2023 HYUNDAI IONIQ 5 light
[x] Cancel search: lightPage 550 of 680

Driver Assistance System
7-148
WARNING
Take the following precautions when
using Reverse Parking Collision-
Avoidance Assist: • Always pay extreme caution while
driving. The driver is responsible for
controlling the brake for safe driving.
• Always pay attention to road and
traffic conditions while driving,
whether or not there is a warning.
• Always look around your vehicle to
make sure there are no pedestrians
or objects before moving the vehicle.
• The performance of Reverse Parking
Collision-Avoidance Assist may
vary under certain conditions. If
vehicle speed is above 2 mph (4
km/h), Reverse Parking Collision-
Avoidance Assist will provide
collision avoidance assist only when
pedestrians are detected. Always
look around and pay attention when
backing up your vehicle.
• Some objects may not be detected
by the rear ultrasonic sensors due
to the objects distance, size or
material, all of which can limit the
effectiveness of the sensor.
• Reverse Parking Collision-Avoidance
Assist may not operate properly
or may operate unnecessarily
depending on the road conditions
and the surroundings.
• Do not solely rely on Reverse Parking
Collision-Avoidance Assist. Doing
so may lead to vehicle damage or injuries. CAUTION
• Noise may be heard when sudden
braking occurs to avoid a collision.
• If any other warning sound such
as the seat belt warning chime is
already generated, Reverse Parking
Collision-Avoidance Assist warning
may not sound.
• Reverse Parking Collision-Avoidance
Assist may not work properly if the
bumper has been damaged, replaced
or repaired.
• Reverse Parking Collision-Avoidance
Assist may not operate properly if
interfered by strong electromagnetic
waves.
• Playing the vehicle audio system at
high volume may prevent passengers
from hearing Reverse Parking
Collision-Avoidance Assist warning sounds.
• Turn off Reverse Parking Collision-
Avoidance Assist when towing a
trailer. If towing and moving in
reverse, Reverse Parking Collision-
Avoidance Assist will activate as it
detects the trailer.
• The brake control may not operate
properly depending on the status of
ESC (Electronic Stability Control).
There will only be a warning when:
- The ESC (Electronic Stability
Control) warning light is on
- ESC (Electronic Stability Control) is
engaged in a different function
Page 558 of 680
Driver Assistance System
7-156
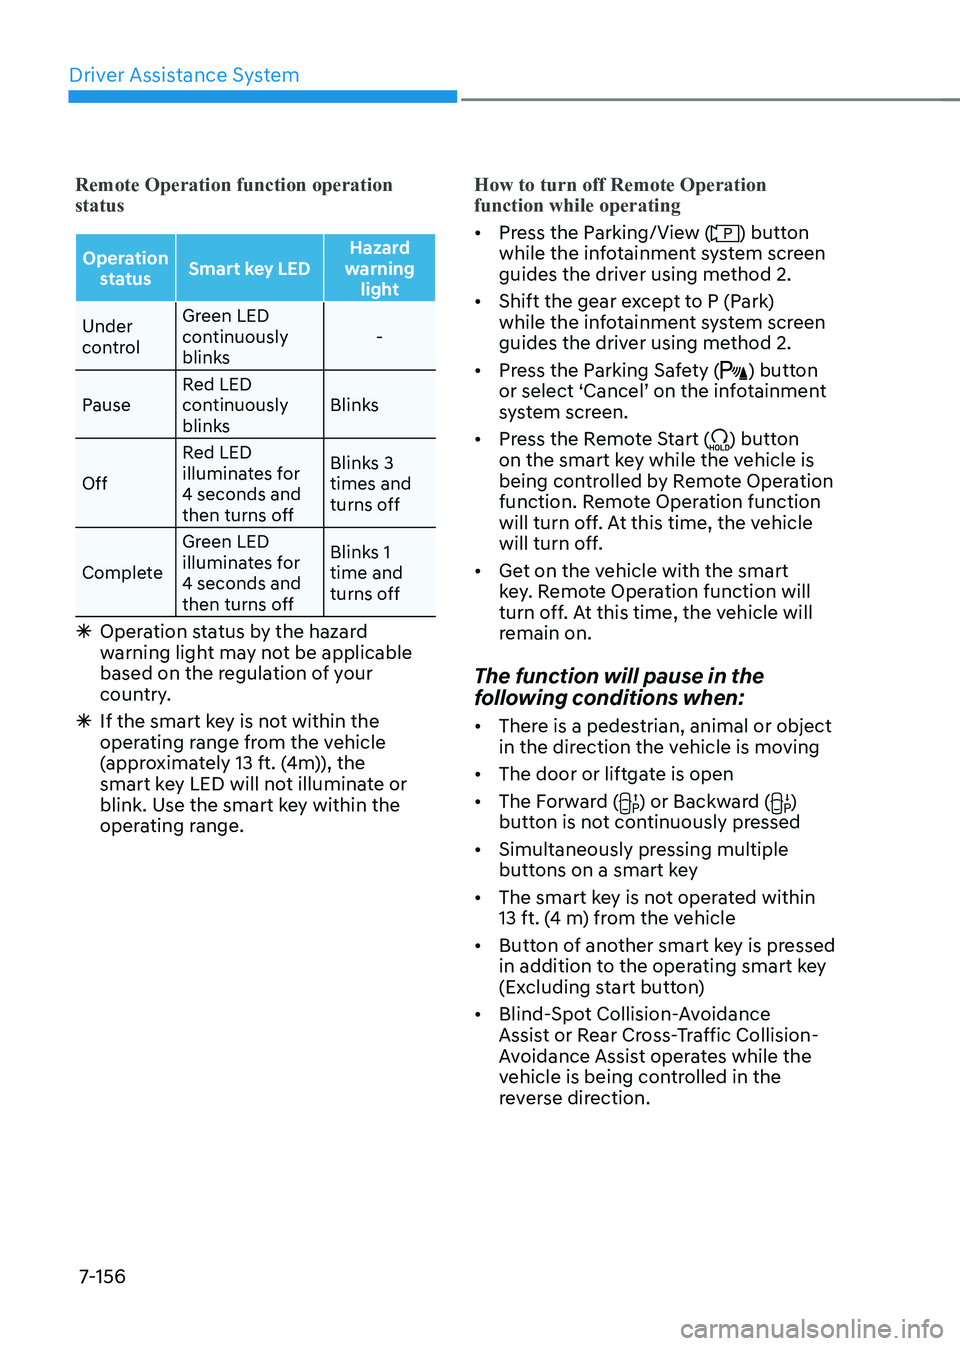
Remote Operation function operation status
Operation status Smart key LED Hazard
warning light
Under
control Green LED
continuously
blinks
-
Pause Red LED
continuously
blinks Blinks
Off Red LED
illuminates for 4 seconds and
then turns off Blinks 3 times and
turns off
Complete Green LED
illuminates for 4 seconds and
then turns off Blinks 1 time and
turns off
à Operation status by the hazard
warning light may not be applicable
based on the regulation of your
country.
à If the smart key is not within the
operating range from the vehicle
(approximately 13 ft. (4m)), the
smart key LED will not illuminate or
blink. Use the smart key within the
operating range.
How to turn off Remote Operation function while operating
• Press the Parking/View () button
while the infotainment system screen
guides the driver using method 2.
• Shift the gear except to P (Park)
while the infotainment system screen
guides the driver using method 2.
• Press the Parking Safety (
) button
or select ‘Cancel’ on the infotainment
system screen.
• Press the Remote Start (
) button
on the smart key while the vehicle is
being controlled by Remote Operation
function. Remote Operation function
will turn off. At this time, the vehicle
will turn off.
• Get on the vehicle with the smart
key. Remote Operation function will
turn off. At this time, the vehicle will
remain on.
The function will pause in the
following conditions when: • There is a pedestrian, animal or object
in the direction the vehicle is moving
• The door or liftgate is open
• The Forward (
) or Backward ()
button is not continuously pressed
• Simultaneously pressing multiple
buttons on a smart key
• The smart key is not operated within
13 ft. (4 m) from the vehicle
• Button of another smart key is pressed
in addition to the operating smart key
(Excluding start button)
• Blind-Spot Collision-Avoidance
Assist or Rear Cross-Traffic Collision-
Avoidance Assist operates while the
vehicle is being controlled in the
reverse direction.
Page 566 of 680
Driver Assistance System
7-164
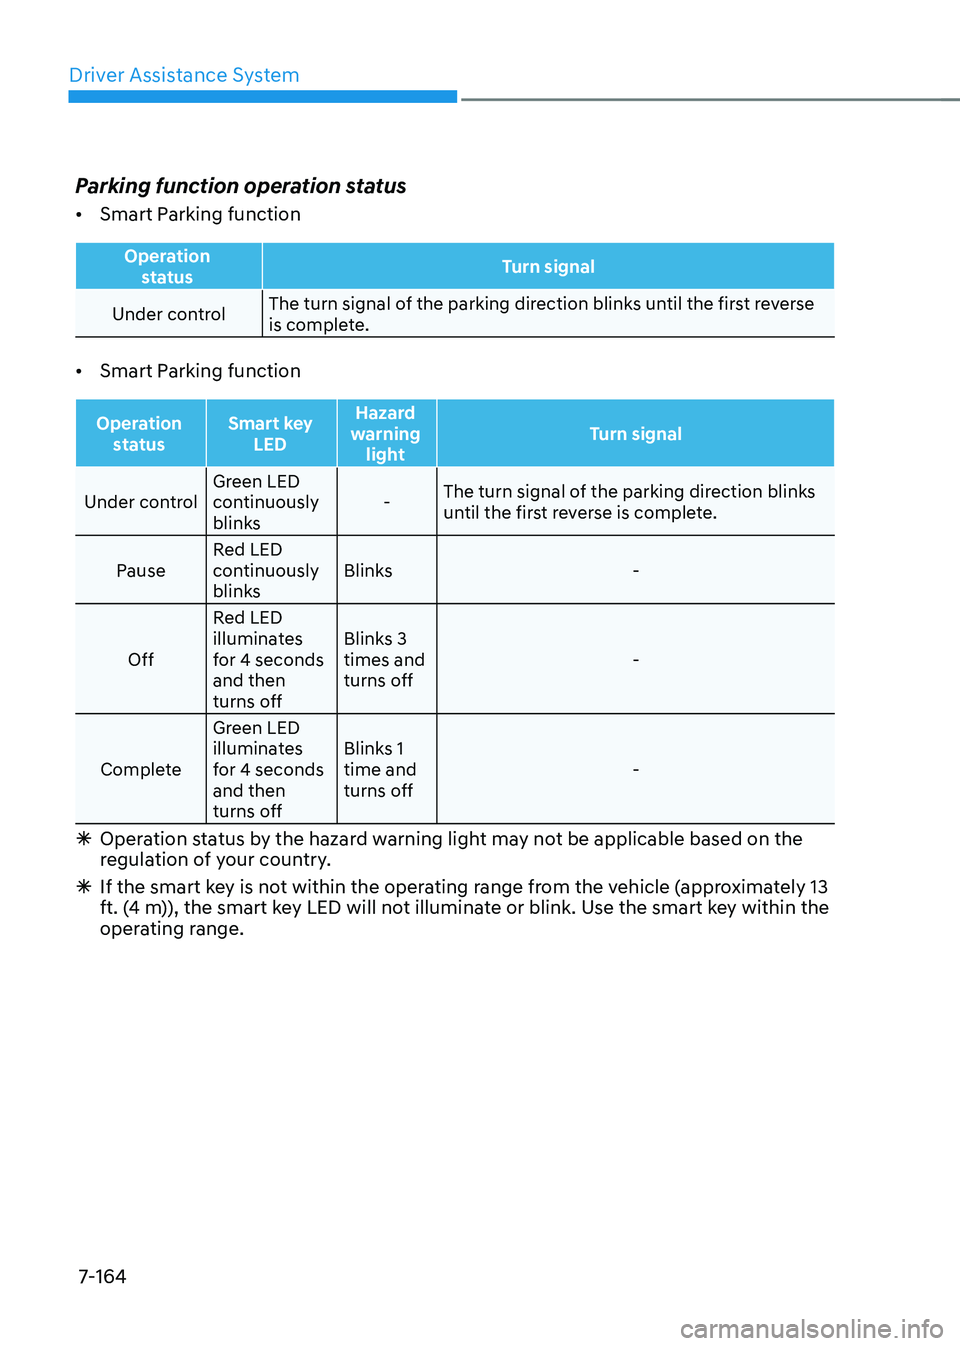
Parking function operation status •
Smart Parking function
Operation
status Turn signal
Under controlThe turn signal of the parking direction blinks until the first reverse
is complete.
• Smart Parking function
Operation
status Smart key
LED Hazard
warning light Turn signal
Under controlGreen LED
continuously
blinks -
The turn signal of the parking direction blinks
until the first reverse is complete.
Pause Red LED
continuously
blinks Blinks -
Off Red LED
illuminates
for 4 seconds and then
turns off Blinks 3 times and
turns off
-
Complete Green LED
illuminates
for 4 seconds and then
turns off Blinks 1 time and
turns off
-
à Operation status by the hazard warning light may not be applicable based on the
regulation of your country.
à If the smart key is not within the operating range from the vehicle (approximately 13
ft. (4 m)), the smart key LED will not illuminate or blink. Use the smart key within the
operating range.
Page 576 of 680

Driver Assistance System
7-174
WARNING
Take the following precautions when
using Remote Smart Parking Assist: • The driver is responsible for safe
parking and exit when using Remote
Smart Parking Assist.
• When using Remote Smart Parking
Assist, stay out of the way in the
direction the vehicle moves for your
safety.
• Always check surroundings when
using Remote Smart Parking Assist.
You may collide with pedestrians,
animals, or objects if they are near
the sensor or are in the sensor’s blind
spot area.
• A collision may occur if a pedestrian,
animal, or object suddenly appears
while Remote Smart Parking Assist is
operating.
• Do not use Remote Smart Parking
Assist when under the influence of
alcohol.
• Do not let children or other people to
use the smart key.
• If Remote Smart Parking Assist is
used continuously for a long period,
it may adversely affect Remote
Smart Parking Assist performance.• Remote Smart Parking Assist may not
operate properly if the vehicle needs
wheel alignment adjustment such
as when the vehicle tilts to one side.
Have the vehicle be inspected by an
authorized HYUNDAI dealer.
• Noise may be heard when braking
occurs by Remote Smart Parking
Assist or when the brake pedal is
depressed by the driver.
• Remote Smart Parking Assist may
suddenly apply the brake to avoid
collision.
• Use Remote Smart Parking Assist
only in a parking space that is large
enough for the vehicle to move
safely.
NOTICE
• If the 3rd stage warning (continuous
beep) of the Forward/Reverse
Parking Distance Warning sounds
while Remote Smart Parking
Assist is operating, it means the
obstacle detected is close to your
vehicle. At this time, Remote Smart
Parking Assist will temporarily stop
operating. Make sure there are no
pedestrians, animals, or objects
around your vehicle.
• Depending on brake operation, the
stop lights may come on while the
vehicle is moving.
• If the vehicle is remotely started that
has been parked in cold weather for
a long time, the operation of Remote
Smart Parking function may be
delayed or canceled depending on
vehicle condition.
Page 579 of 680
8
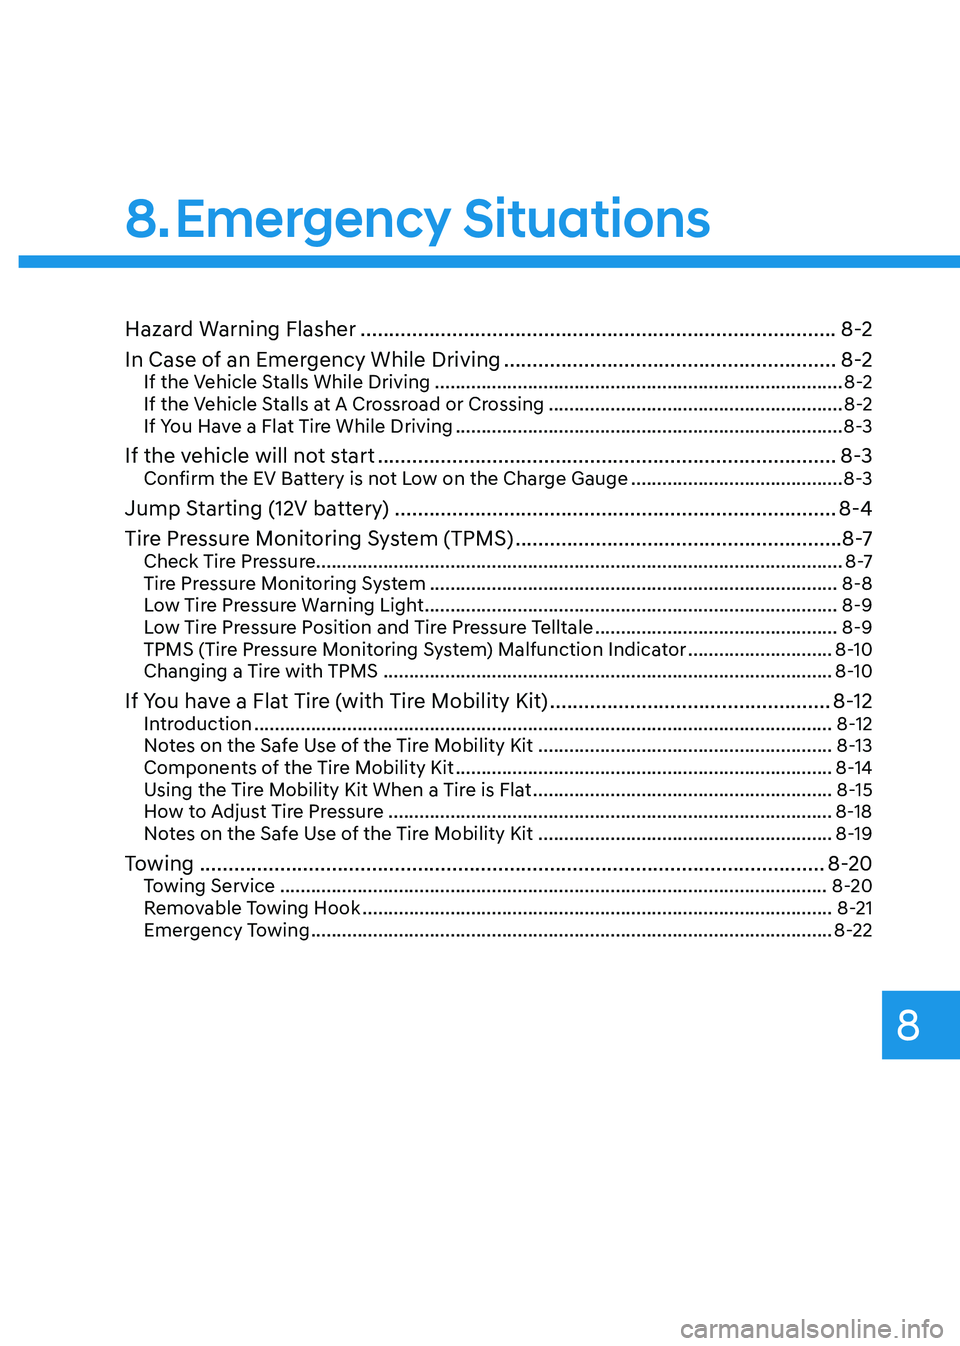
Hazard Warning Flasher ................................................................................... 8-2
In Case of an Emergency While Driving ..........................................................8-2
If the Vehicle Stalls While Driving ............................................................................... 8-2
If the Vehicle Stalls at A Crossroad or Crossing .........................................................8-2
If You Have a Flat Tire While Driving ........................................................................... 8-3
If the vehicle will not start ................................................................................ 8-3
Confirm the EV Battery is not Low on the Charge Gauge .........................................8-3
Jump Starting (12V battery) ............................................................................. 8-4
Tire Pressure Monitoring System (TPMS) .........................................................8 -7
Check Tire Pressure ...................................................................................................... 8 -7
Tire Pressure Monitoring System ............................................................................... 8-8
Low Tire Pressure Warning Light ................................................................................ 8-9
Low Tire Pressure Position and Tire Pressure Telltale ...............................................8-9
TPMS (Tire Pressure Monitoring System) Malfunction Indicator ............................8-10
Changing a Tire with TPMS ....................................................................................... 8-10
If You have a Flat Tire (with Tire Mobility Kit) .................................................8-12
Introduction ................................................................................................................ 8-12
Notes on the Safe Use of the Tire Mobility Kit .........................................................8-13
Components of the Tire Mobility Kit ......................................................................... 8-14
Using the Tire Mobility Kit When a Tire is Flat ..........................................................8-15
How to Adjust Tire Pressure ...................................................................................... 8-18
Notes on the Safe Use of the Tire Mobility Kit .........................................................8-19
Towing ............................................................................................................. 8-20
Towing Service .......................................................................................................... 8-20
Removable Towing Hook ........................................................................................... 8-21
Emergency Towing ..................................................................................................... 8-22
8. Emergency Situations
Page 580 of 680
Emergency Situations
8-2
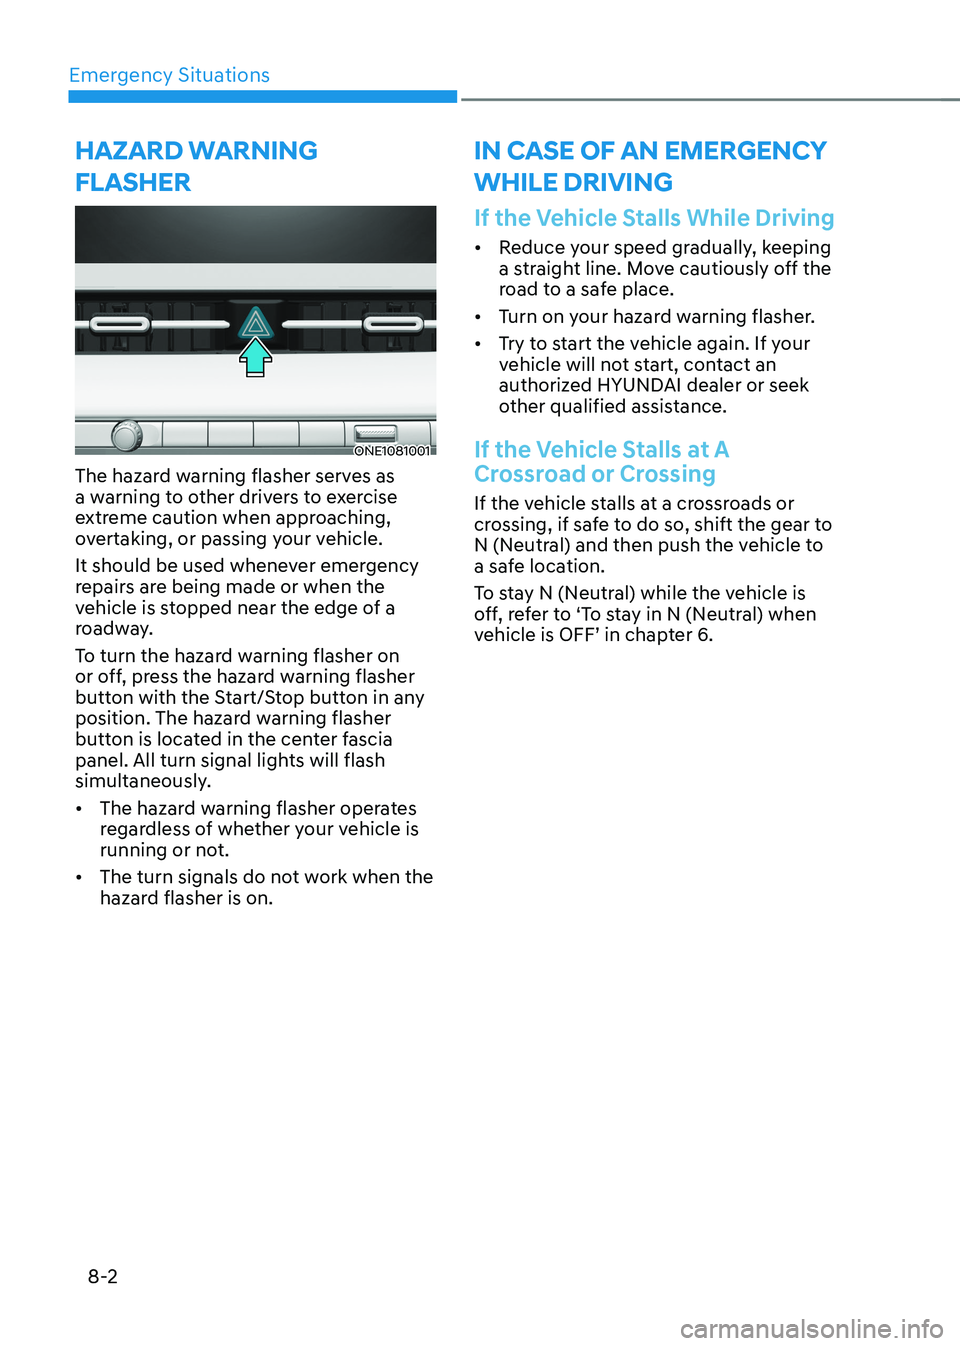
ONE1081001
The hazard warning flasher serves as
a warning to other drivers to exercise
extreme caution when approaching,
overtaking, or passing your vehicle.
It should be used whenever emergency
repairs are being made or when the
vehicle is stopped near the edge of a
roadway.
To turn the hazard warning flasher on
or off, press the hazard warning flasher
button with the Start/Stop button in any
position. The hazard warning flasher
button is located in the center fascia
panel. All turn signal lights will flash
simultaneously. • The hazard warning flasher operates
regardless of whether your vehicle is
running or not.
• The turn signals do not work when the
hazard flasher is on.
If the Vehicle Stalls While Driving
• Reduce your speed gradually, keeping
a straight line. Move cautiously off the
road to a safe place.
• Turn on your hazard warning flasher.
• Try to start the vehicle again. If your
vehicle will not start, contact an
authorized HYUNDAI dealer or seek
other qualified assistance.
If the Vehicle Stalls at A
Crossroad or Crossing
If the vehicle stalls at a crossroads or
crossing, if safe to do so, shift the gear to
N (Neutral) and then push the vehicle to
a safe location.
To stay N (Neutral) while the vehicle is
off, refer to ‘To stay in N (Neutral) when
vehicle is OFF’ in chapter 6.
Hazard warning
flasHer in case of an emergency wHile driving
Page 581 of 680
08
8-3
If You Have a Flat Tire While Driving
If a tire goes flat while you are driving: • Take your foot off the accelerator
pedal and let the vehicle slow down
while driving straight ahead. Do not
apply the brakes immediately or
attempt to pull off the road as this
may cause loss of vehicle control
resulting in an accident. When the
vehicle has slowed to such a speed
that it is safe to do so, brake carefully
and pull off the road. Drive off the
road as far as possible and park on
firm, level ground. If you are on a
divided highway, do not park in the
median area between the two traffic lanes.
• When the vehicle is stopped, press
the hazard warning flasher button,
shift the gear to P (Park), apply the
regenerative brake, and press the
Start/Stop button to the OFF position.
• Have all passengers get out of the
vehicle. Be sure they all get out on the
side of the vehicle that is away from
traffic.
• When changing a flat tire, follow the
instructions provided later in this
chapter.
if tHe veHicle will not
s ta rt
Confirm the EV Battery is not
Low on the Charge Gauge
• Be sure the gear is in P (Park). The
vehicle starts only when the gear is in
P (Park).
• Check the 12-volt battery connections
to be sure they are clean and tight.
• Turn on the interior light. If the light
dims or goes out when you operate
the starter, the 12V battery is drained.
Do not push or pull the vehicle to start it.
This could cause damage to your vehicle.
Page 583 of 680

08
8-5
Jump starting procedure
Information
When you jump start your vehicle,
use the jumper terminal in the motor compartment.
1. Position the vehicles close enough that the jumper cables will reach, but
do not allow the vehicle body parts to
contact.
2. Avoid fans or any moving parts in the motor compartment at all times, even
when the vehicles are turned off.
3. Turn off all electrical devices such as radios, lights, air conditioning, etc.
Put the vehicles in P (Park) and set the
parking brake. Turn both vehicles OFF.
4. Open the hood.
5. Remove the battery cover located inside of the front trunk.
6. Remove the motor compartment fuse box cover.
CAUTION
Before jump starting, make sure to
correctly identify the positive (+) and
negative (-) terminals to avoid reverse
polarity connections.
ONE1081003
7. Connect the jumper cables in
the exact sequence shown in the
illustration. First connect one jumper
cable to the red, positive (+) jumper
terminal of your vehicle (1).
8. Connect the other end of the jumper cable to the red, positive (+) battery/
jumper terminal of the assisting
vehicle (2).
9. Connect the second jumper cable to
the black, negative (-) battery/jumper
terminal of the assisting vehicle (3).
10. Connect the other end of the second
jumper cable to the black, negative (-)
chassis ground of your vehicle (4).
Do not allow the jumper cables to
contact anything except the correct
battery or jumper terminals or the
correct ground. Do not lean over the
battery when making connections.
WARNING
Do not connect the jumper cable to
the negative (-) jumper terminal of the
discharged battery. A spark could cause
the battery to explode and lead to a
personal injury or vehicle damage.