2023 HYUNDAI IONIQ 5 buttons
[x] Cancel search: buttonsPage 200 of 680

Convenience Features
5-8
When you set the Two Press Unlock function
1. Make sure you have the smart key in your possession.
2. Touch the touch sensor on the door handle(engraved part) or press the
Door Unlock button (2) on the smart
key. The driver’s door handle will
pop out and the driver’s door will be
unlocked.
3. Touch the touch sensor on the door handle(engraved part) or press the
Door Unlock button (2) on the smart
key within 4 seconds again. All door
handles will pop out and the doors will
be unlocked and the hazard warning
lights will blink twice and the chime will sound.
4. After unlocking the doors, the doors
will automatically re-lock after 30 seconds unless a door is opened. Two Press Unlock Feature
The priority for unlocking the driver door
only, or unlocking all the doors with
one press may be adjusted in the User
Settings menu in the LCD cluster display.
The Two Press Unlock feature, when
enabled, will require the user to press
the door unlock button once for driver
door only and twice for unlocking all the
doors.
Select or Deselect the Two Press Unlock
Feature in the User Settings menu in the
LCD cluster display. The option can be
found under the following menu:
USER SETTINGS → DOOR →TWO PRESS
UNLOCK
The Two Press Unlock Feature can also
be enabled or disabled by pressing
the door lock and unlock buttons
simultaneously on the Key FOB:
Press and hold both the DOOR LOCK
button and the DOOR UNLOCK button
simultaneously until the hazard warning
lights blink.
This will enable or disable the Two Press
Unlock feature. Repeat this procedure to enable/disable the mode again.
Page 243 of 680

05
5-51
1. Programming HomeLink®
The following steps show how to
program HomeLink. If you have any
questions or are having difficulty
programming your HomeLink buttons,
refer to the HomeLink website or call the
HomeLink customer support toll-free
number. Do this, before going back to
the dealer who sold you the car. •
Visit the HomeLink website at: www.
homelink.com. Then at the top of the
page, choose your vehicle make. Then
watch the You Tube video, and/or
access additional website information.
• If you choose to access the website
via your cell phone, scan the QR code.
• Or, call HomeLink customer support at 1-800-355-3515 (Please have the
vehicle make/model AND the opener
device make/model readily available.) 1) Programming Preparation
ONE1051262N
1. When programming a garage door opener, it is advised to park the
vehicle outside of the garage.
2. It is recommended that a new battery be placed in the handheld transmitter
of the device being programmed to
HomeLink for quicker training and
accurate transmission of the radio-
frequency signal.
3. Place the ignition switch to the ACC (Accessory) position for programming
of HomeLink.
2) Programming a New HomeLink®
ONE1051263N
1. Press and release the HomeLink button (1), (2) or (3), you would like
to program. The HomeLink indicator
light (7) will flash orange slowly (if
not, perform the steps of “Erasing
HomeLink Buttons” section, and start
over).
Page 244 of 680

Convenience Features
5-52
ONE1051264N
2. Position the garage door opener remote 1 – 3 inches (2 – 8cm) away
from the HoleLink buttons.
3. While the HomeLink indicator light (7) is flashing orange, press and hold the
hand-held remote button. Continue
pressing the handheld remote button
until the HomeLink indicator light (7)
light changes from orange to green.
You may now release the handheld
remote button.
4. Wait until your garage door comes
to a complete stop, regardless of
position, before proceeding to the
next steps.
5. Press and release the HomeLink button you are programming and
observe the indicator light.
• If the indicator light remains solid
green, your device should operate
when the HomeLink button is
pressed. At this point, if your device
operates, programming is complete.
• If the indicator light rapidly
flashes green, firmly press, hold
for two seconds and release the
HomeLink button up to three times
in a row slowly to complete the
programming process. Do not press
the HomeLink button rapidly. At
this point if your device operates,
programming is complete. If the
device does not operate, continue
with step 6. 6. At the garage door opener motor,
(security gate motor, etc.) locate the
“Learn”, “Smart”, “Set” or “Program”
button. This can usually be found
where the hanging antenna wire is
attached to the motor-head unit (see
the device’s manual to identify this
button). The name and color of the
button may vary by manufacturer.
ODL3A040504
à A ladder and/or second person may
simplify the following steps.
7. Firmly press and release the “Learn”,
“Smart”, “Set” or “Program” button.
You now have up to 30 seconds in
which to complete the next step.
8. Return to the vehicle and firmly press, hold for two seconds and release,
the HomeLink button up to three
times in a row slowly. Do not press
the HomeLink button rapidly. As soon
as you see the garage door start to
move, stop pressing any buttons
until a few seconds after the garage
door has come to a complete stop,
regardless of position. At this point,
programming is complete and your
device should operate when the
HomeLink button is pressed and
released.
Page 247 of 680

05
5-55
2) Two-Way Communication Display
Behavior
ONE1051265N
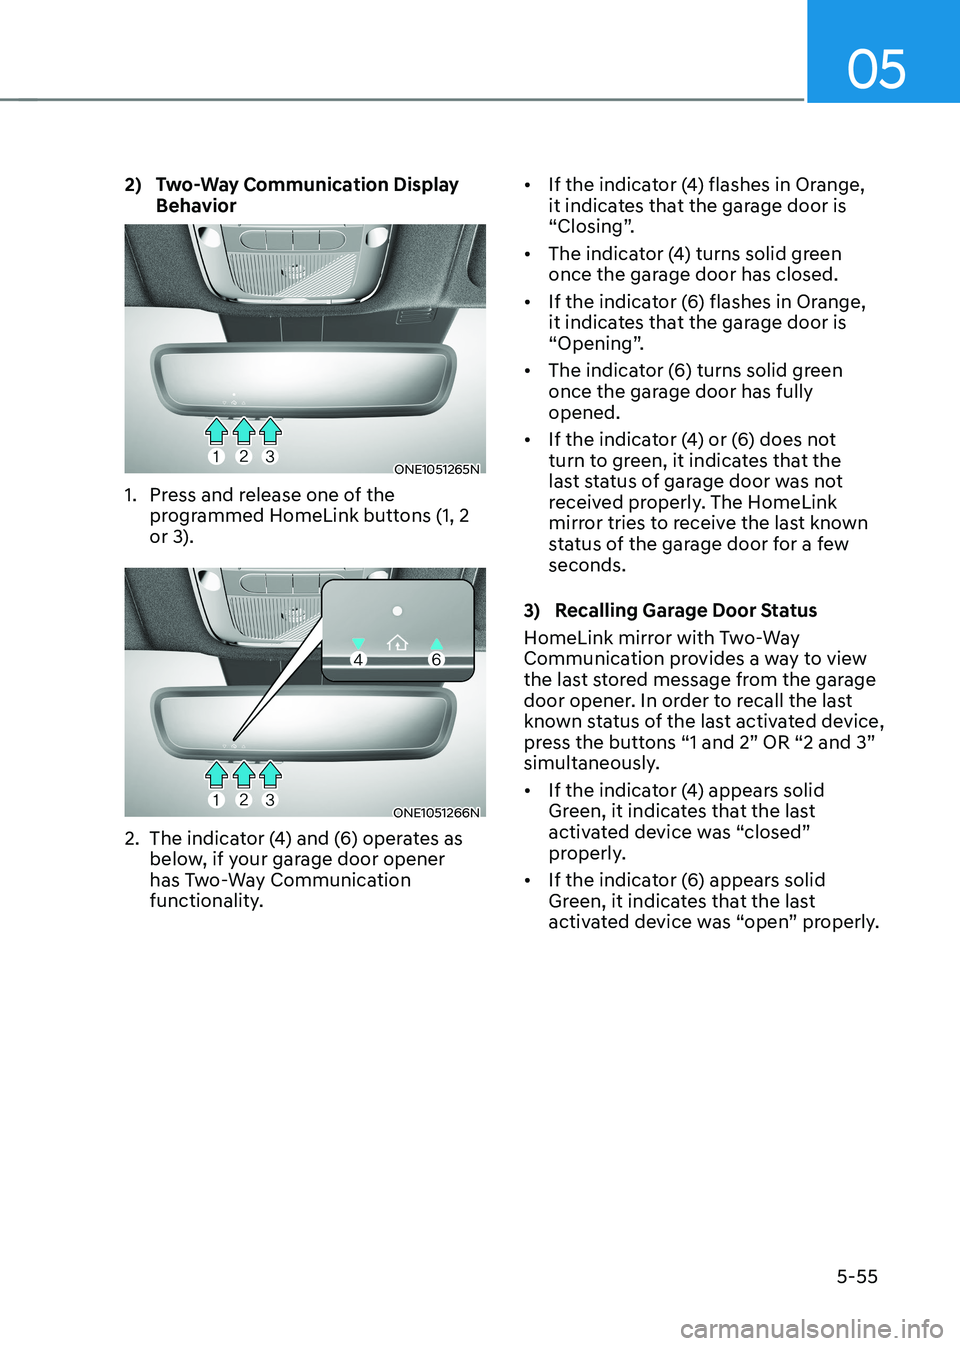
1. Press and release one of the programmed HomeLink buttons (1, 2
or 3).
ONE1051266N
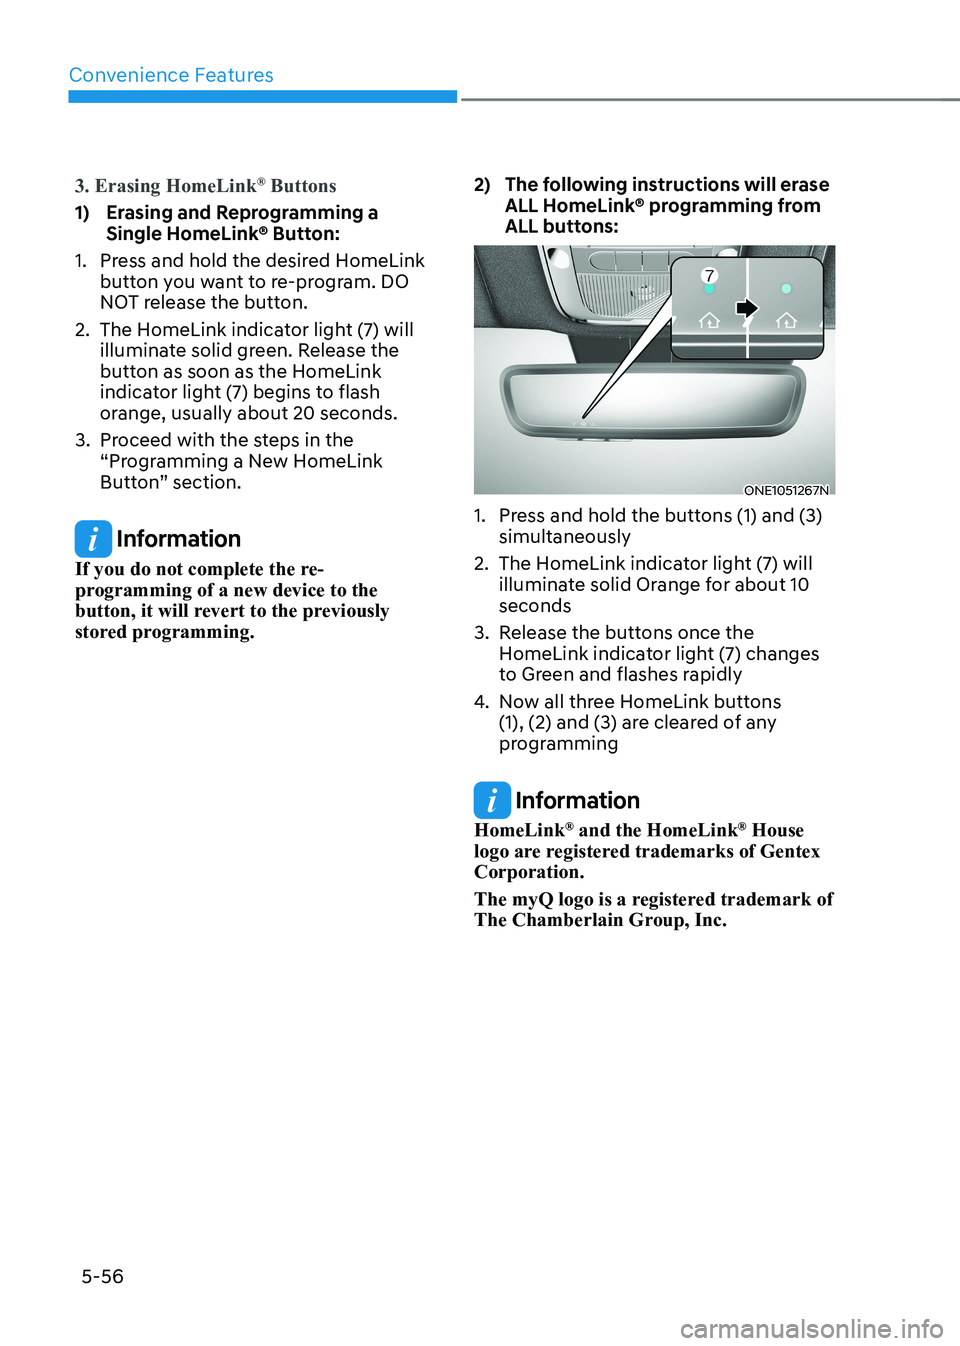
2. The indicator (4) and (6) operates as below, if your garage door opener
has Two-Way Communication
functionality. •
If the indicator (4) flashes in Orange,
it indicates that the garage door is
“Closing”.
• The indicator (4) turns solid green
once the garage door has closed.
• If the indicator (6) flashes in Orange,
it indicates that the garage door is
“Opening”.
• The indicator (6) turns solid green
once the garage door has fully opened.
• If the indicator (4) or (6) does not
turn to green, it indicates that the
last status of garage door was not
received properly. The HomeLink
mirror tries to receive the last known
status of the garage door for a few seconds.
3) Recalling Garage Door Status
HomeLink mirror with Two-Way
Communication provides a way to view
the last stored message from the garage
door opener. In order to recall the last
known status of the last activated device,
press the buttons “1 and 2” OR “2 and 3”
simultaneously. • If the indicator (4) appears solid
Green, it indicates that the last
activated device was “closed”
properly.
• If the indicator (6) appears solid
Green, it indicates that the last
activated device was “open” properly.
Page 248 of 680

Convenience Features
5-56
3. Erasing HomeLink®
Buttons
1) Erasing and Reprogramming a
Single HomeLink® Button:
1. Press and hold the desired HomeLink button you want to re-program. DO
NOT release the button.
2. The HomeLink indicator light (7) will illuminate solid green. Release the
button as soon as the HomeLink
indicator light (7) begins to flash
orange, usually about 20 seconds.
3. Proceed with the steps in the “Programming a New HomeLink
Button” section.
Information
If you do not complete the re-
programming of a new device to the
button, it will revert to the previously
stored programming. 2) The following instructions will erase
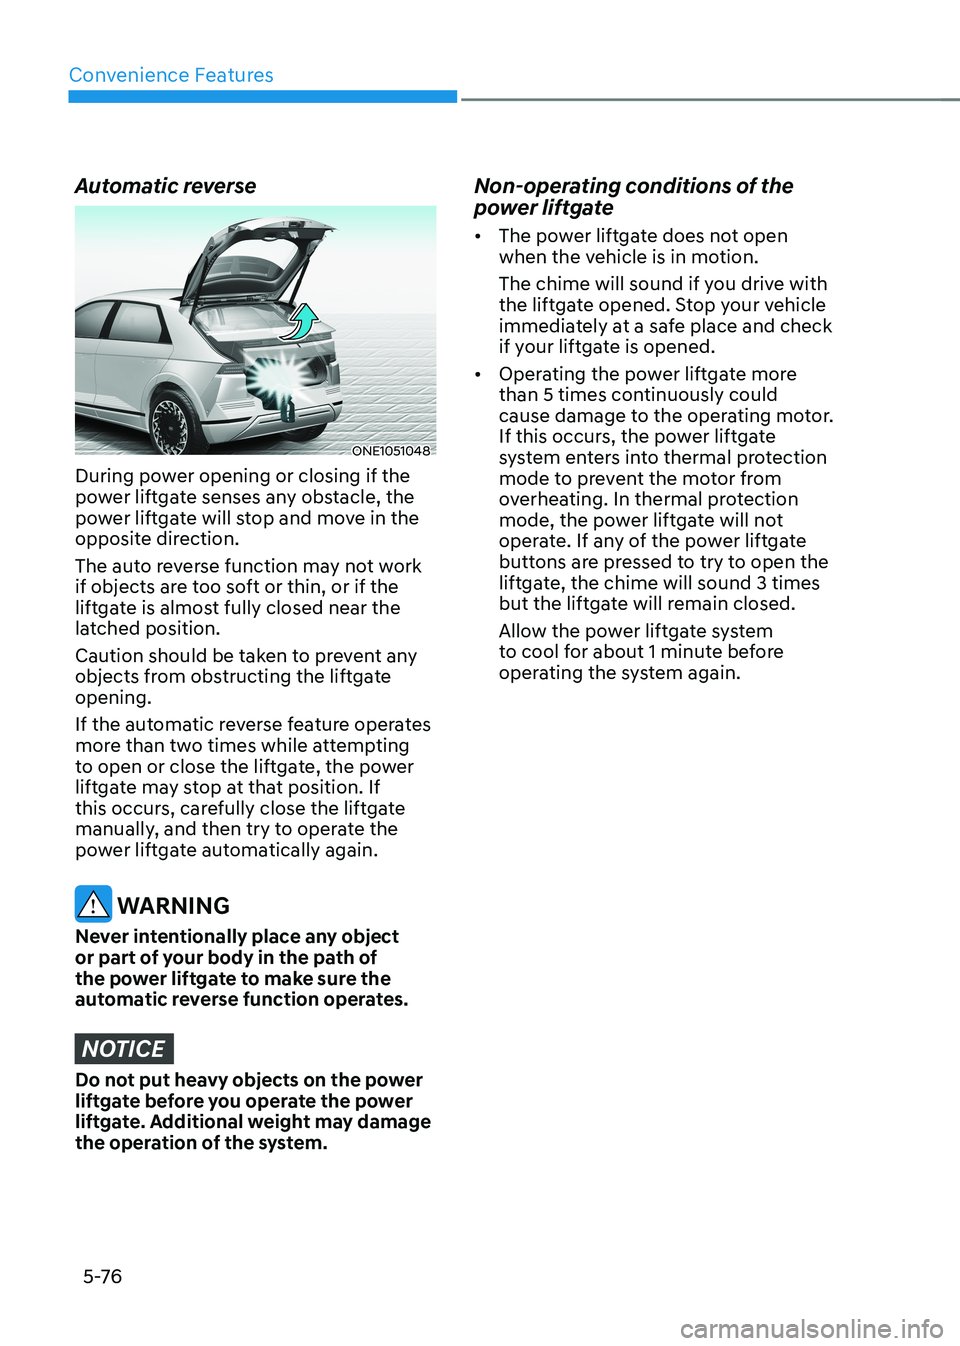
ALL HomeLink® programming from
ALL buttons:
ONE1051267N
1. Press and hold the buttons (1) and (3) simultaneously
2. The HomeLink indicator light (7) will illuminate solid Orange for about 10 seconds
3. Release the buttons once the HomeLink indicator light (7) changes
to Green and flashes rapidly
4. Now all three HomeLink buttons
(1), (2) and (3) are cleared of any
programming
Information
HomeLink ®
and the HomeLink ®
House
logo are registered trademarks of Gentex Corporation.
The myQ logo is a registered trademark of
The Chamberlain Group, Inc.
Page 254 of 680

Convenience Features
5-62
Reverse parking aid user settings mode
You may change the angle of the outside
rearview mirror if it is difficult to see
the rear view with the basic downward
mirror angle provided when reversing.
When the vehicle is first delivered, the
set downward angle of the left and right
outside rearview mirror are different to
ensure driver visibility.
1. Make sure the vehicle is stopped.
2. Depress the brake pedal and shift the
gear to R (Reverse). When L (Left) or R
(Right) button is pressed, both outside
rearview mirror angle will move
downward to the basic set position.
3. Press either L or R button to select the outside rearview mirror you would like
to adjust. Then press “ ▼, ▲ , ◄ , ► ”
switch to adjust the outside rearview
mirror to the desired angle.
4. After adjusting the angle to save the
adjusted outside rearview mirror
angle, shift the gear to another
position other than R (Reverse), or
change the L and R buttons to the
neutral position (L and R buttons are
not pressed).
5. Set the other outside rearview mirror following the above procedure 1 to 4.
Resetting reverse parking aid user settings mode
To change the outside rearview mirror
angle back to the basic angle, shift the
gear to R (Reverse), and adjust the mirror angle higher than when the gear is in P
(Park), N (Neutral) and D (Drive).
NOTICE
When changing the angle of both
outside rearview mirrors, it is
recommended to change the angle one
side at a time following the procedure
1 to 4.
Page 268 of 680

Convenience Features
5 -76
Automatic reverse
ONE1051048
During power opening or closing if the
power liftgate senses any obstacle, the
power liftgate will stop and move in the
opposite direction.
The auto reverse function may not work
if objects are too soft or thin, or if the
liftgate is almost fully closed near the
latched position.
Caution should be taken to prevent any
objects from obstructing the liftgate opening.
If the automatic reverse feature operates
more than two times while attempting
to open or close the liftgate, the power
liftgate may stop at that position. If
this occurs, carefully close the liftgate
manually, and then try to operate the
power liftgate automatically again.
WARNING
Never intentionally place any object
or part of your body in the path of
the power liftgate to make sure the
automatic reverse function operates.
NOTICE
Do not put heavy objects on the power
liftgate before you operate the power
liftgate. Additional weight may damage
the operation of the system. Non-operating conditions of the
power liftgate •
The power liftgate does not open
when the vehicle is in motion.
The chime will sound if you drive with
the liftgate opened. Stop your vehicle
immediately at a safe place and check
if your liftgate is opened.
• Operating the power liftgate more
than 5 times continuously could
cause damage to the operating motor.
If this occurs, the power liftgate
system enters into thermal protection
mode to prevent the motor from
overheating. In thermal protection
mode, the power liftgate will not
operate. If any of the power liftgate
buttons are pressed to try to open the
liftgate, the chime will sound 3 times
but the liftgate will remain closed.
Allow the power liftgate system
to cool for about 1 minute before
operating the system again.
Page 324 of 680

Convenience Features
5-132
NOTICE
• If you install an aftermarket HID
head lamp, your vehicle’s audio and
electronic devices may not function
properly.
• Prevent chemicals such as perfume,
cosmetic oil, sun cream, hand
cleaner, and air freshener from
contacting the interior parts
because they may cause damage or
discoloration.
USB Port
ONE1051092
You can use an USB cable to connect
audio devices to the vehicle USB port.
Information
When using a portable audio device
connected to the power outlet, noise may
occur during playback. If this happens,
use the portable audio device’s power
source.
Antenna
ONE1051089K
The shark fin antenna will receive AM,
FM broadcast signals and transmit data.
Steering Wheel Remote Controls
ONE1051090
NOTICE
Do not operate multiple audio remote
control buttons simultaneously.
InfoTaInmenT sysTem