2023 HYUNDAI IONIQ 5 battery
[x] Cancel search: batteryPage 398 of 680
Driving Your Vehicle
6-72
Safety chains
You should always attach chains between
your vehicle and your trailer.
Instructions about safety chains may
be provided by the hitch manufacturer
or trailer manufacturer. Follow the
manufacturer’s recommendation for
attaching safety chains. Always leave just
enough slack so you can turn with your
trailer. And, never allow safety chains to
drag on the ground.
Trailer brakes
If your trailer is equipped with a braking
system, make sure it conforms to
your country’s regulations and that
it is properly installed and operating
correctly.
If your trailer weighs more than the
maximum trailer weight without trailer
brakes loaded, then it needs its own
brakes and they must be adequate. Be
sure to read and follow the instructions
for the trailer brakes so you’ll be able
to install, adjust and maintain them
properly. Be sure not to modify your
vehicle’s brake system.
WARNING
Do not use a trailer with its own brakes
unless you are absolutely certain that
you have properly set up the brake
system. This is not a task for amateurs.
Use an experienced, competent trailer
shop for this work.
Driving with a Trailer
Towing a trailer requires a certain
amount of experience. Before setting
out for the open road, you must get to
know your trailer. Acquaint yourself with
the feel of handling and braking with the
added weight of the trailer. And always
keep in mind that the vehicle you are
driving is now longer and not nearly as
responsive as your vehicle is by itself.
Before you start, check the trailer hitch
and platform, safety chains, electrical
connector(s), lights, tires and brakes.
During your trip, occasionally check
to be sure that the load is secure, and
that the lights and trailer brakes are still
working.
Information
When the ambient temperature is lower
than 32°F (0°C) and the remaining high
voltage battery is low, the power of the
vehicle with a trailer can be dropped,
causing a trouble in acceleration or drop of the speed when driving hills.
When driving with a trailer, be sure to
charge the high voltage battery more than
50% if the ambient temperature is lower
than 32°F (0°C).
Page 402 of 680
Driving Your Vehicle
6 -76
Two labels on your driver’s door sill show
how much weight your vehicle was
designed to carry: the Tire and Loading
Information Label and the Certification Label.
Before loading your vehicle, familiarize
yourself with the following terms for
determining your vehicle’s weight
ratings, from the vehicle’s specifications
and the Certification Label:
Base Curb Weight
This is the weight of the vehicle
including high voltage battery and
all standard equipment. It does not
include passengers, cargo, or optional
equipment.
Vehicle Curb Weight
This is the weight of your new vehicle
when you picked it up from your dealer
plus any aftermarket equipment.
Cargo Weight
This figure includes all weight added to
the Base Curb Weight, including cargo
and optional equipment.
GAW (Gross Axle Weight)
This is the total weight placed on each
axle (front and rear) - including vehicle
curb weight and all payload.
GAWR (Gross Axle Weight Rating)
This is the maximum allowable weight
that can be carried by a single axle (front
or rear). These numbers are shown on
the Certification Label. The total load on
each axle must never exceed its GAWR.
GVW (Gross Vehicle Weight)
This is the Base Curb Weight plus actual
Cargo Weight plus passengers.
GVWR (Gross Vehicle Weight Rating)
This is the maximum allowable weight
of the fully loaded vehicle (including
all options, equipment, passengers
and cargo). The GVWR is shown on the
Certification Label located on the driver’s door sill.
Overloading
WARNING
The Gross Axle Weight Rating (GAWR)
and the Gross Vehicle Weight Rating
(GVWR) for your vehicle are on the
Certification Label attached to the
driver’s (or front passenger’s) door.
Exceeding these ratings can cause an
accident or vehicle damage. You can
calculate the weight of your load by
weighing the items (and people) before
putting them in the vehicle. Be careful
not to overload your vehicle.
vehicle Weight
Page 557 of 680
07
7-155
•
Check that all smart keys are
outside the vehicle when using
Remote Operation function.
• Remote Operation function will
operate only when the smart key is
within 13 ft. (4 m) from the vehicle. If
there is no vehicle movement even
when the Forward (
) or Backward
() button is pressed on the smart
key, check the distance to the
vehicle and press the button again.
• The detecting range of the smart
key may vary depending on the
surroundings that are affected by
radio waves such as transmission
tower, broadcast station, etc.
• When remotely moving forward
using method (1), it is recognized
as an exit situation, and the
vehicle moves 13 ft. (4 m) to
check for pedestrians, animals or
objects around the vehicle. After
confirmation, the steering wheel
is controlled according to the condition ahead.
• When remotely moving forward
using method (2), it is recognized
as a parking situation, and will
immediately control the steering
wheel according to the condition
ahead to assist with entering the parking space and aligning the
vehicle. However, performance
may reduce depending on the
pedestrians, animals, shape of
objects, location, etc., around the
vehicle.
• For moving remotely backward,
both method (1) and (2) aligns the
steering wheel first, and then will
only move the vehicle straight.
• When remotely moving forward or
backward is completed, the vehicle
will automatically shift to P (Park)
and engage EPB (Electronic Parking
Brake).
CAUTION
• When using Remote Operation
function, make sure that all
passengers have gotten out of the
vehicle.
• If the vehicle’s battery is discharged
or Remote Smart Parking Assist
malfunctions when parked in a
narrow parking space, Remote
Operation function will not operate.
Always park your vehicle in a space
wide enough for you to get in or out
of your vehicle.
• Please note that depending on the
parking space, you may not be able
to exit from the space you have
entered by using Remote Operation function.
• After parking, the surrounding may
change due to the movement of
surrounding vehicles. If this occurs,
Remote Operation function may not
operate.
• Before leaving the vehicle, close
windows and sunroofs, and make
sure the vehicle is off before locking
the doors.
Page 559 of 680
07
7-157
•
The vehicle moves 22 ft. (7 m) while
the smart key is pressed with Remote
Operation function (maximum travel
distance per button press)
When Remote Operation function is
paused, the vehicle will stop. If the
condition that made the function to
pause disappears, the function may
operate again.
The function will cancel in the
following conditions when: • The steering wheel is steered
• The gear is shifted while the vehicle is
moving
• Operating EPB while the vehicle is
moving
• The vehicle hood is open
• The brake pedal or accelerator pedal
is depressed when all the doors are closed
• The smart key is outside the vehicle
when the brake pedal is depressed
while the driver's door is open
• Rapid acceleration occurs
• Vehicle skid occurs
• The wheel is stuck by an obstacle and
cannot move •
Approximately 3 minutes and 50
seconds has passed after Remote
Operation function has started to
operate
• The slope of the road exceeds the
operational range
• The function is paused for more than
1 minute
• The total travel distance of the vehicle
has exceeded 45 ft. (14 m) after
Remote Operation function operation
• The steering wheel, gearshift, braking,
and drive controls are not working
properly
• There is a problem with the smart key
or the smart key battery is low
• ABS, TCS or ESC system operates due
to slippery road conditions
• The alarm of the Theft Alarm System sounds
• The Charging door opens
• The EV mode is utility mode
When Remote Operation function is
canceled, the vehicle will automatically
stop, shift the gear to P (Park) and
engage EPB (Electronic Parking Brake).
Page 568 of 680
Driver Assistance System
7-166
•
Remote Smart Parking
- The steering wheel is steered
- The gear is shifted
- Operating EPB while the vehicle is moving
- The hood is open
- The brake pedal or accelerator pedal is depressed when all the
doors are closed
- The smart key is outside the vehicle when the brake pedal is depressed
while the driver's door is open.
- Rapid acceleration occurs
- Vehicle skid occurs
- The wheel is stuck by an obstacle and cannot move
- There are pedestrians, animals or objects at the front and rear of the
vehicle at the same time
- Approximately 3 minutes and 50 seconds have past after Remote
Smart Parking function has started
to operate
- The slope of the road exceeds the operational range
- The function is paused for more than 1 minute
- The steering wheel, gearshift, braking, and drive controls are not
working properly
- There is a problem with the smart key or the smart key battery is low
- ABS, TCS or ESC system operates due to slippery road conditions
- The alarm of the Theft Alarm System sounds
- The Charging door opens
- The EV mode is utility mode
When Remote Smart Parking function is
canceled, the vehicle will automatically
stop, shift the gear to P (Park) and
engage EPB (Electronic Parking Brake). Smart Exit
Operating order
Smart Exit function operates in the
following order:
1. Getting ready for exit
2. Checking space
3. Select exit direction
4.
Smart Exit
1. Getting ready for exit
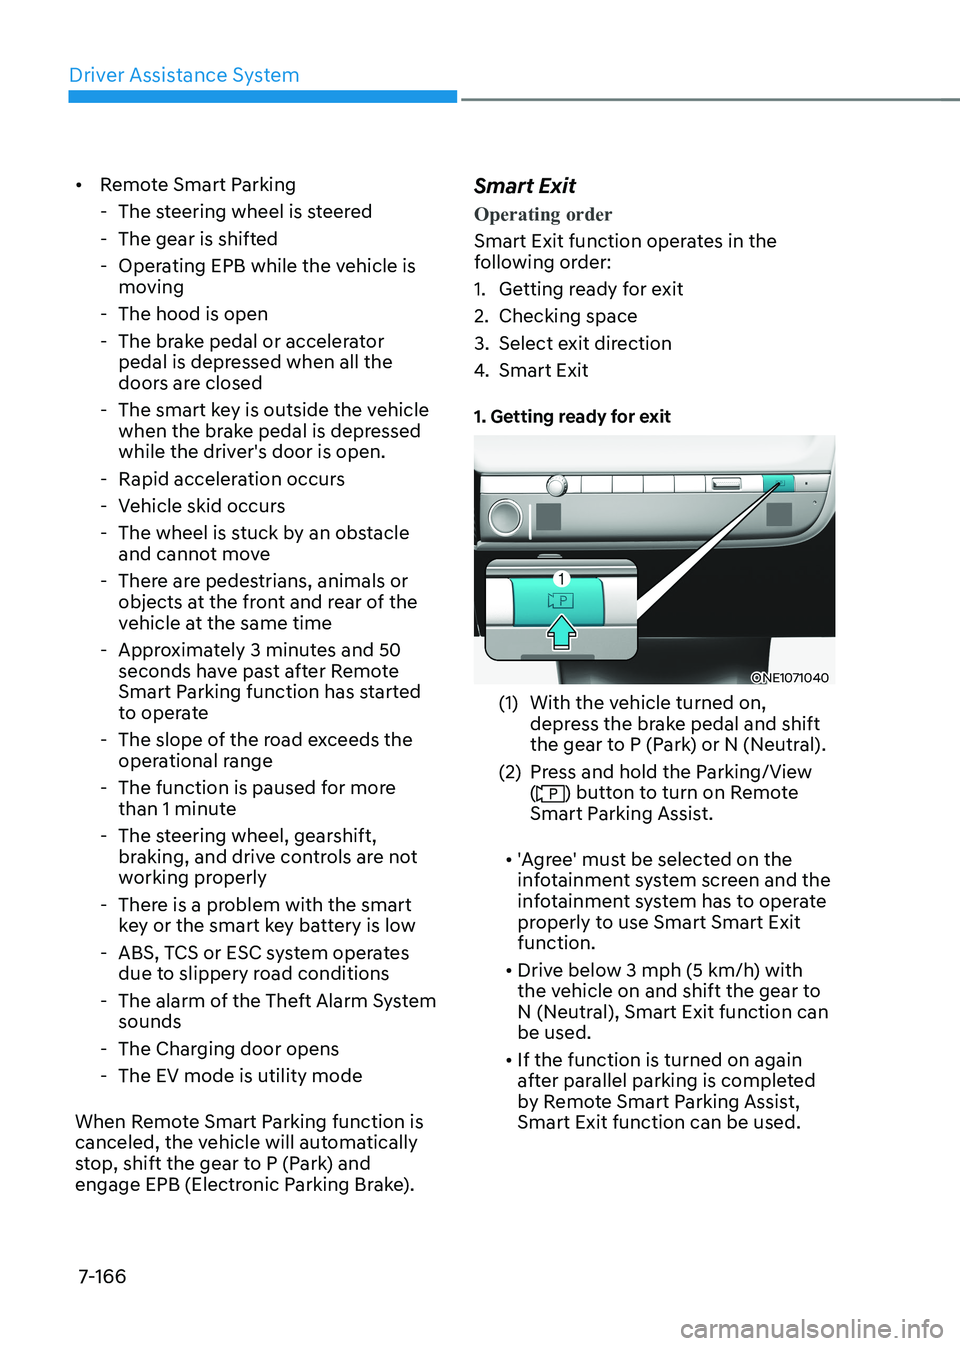
ONE1071040
(1) With the vehicle turned on, depress the brake pedal and shift
the gear to P (Park) or N (Neutral).
(2) Press and hold the Parking/View (
) button to turn on Remote
Smart Parking Assist.
• 'Agree' must be selected on the
infotainment system screen and the
infotainment system has to operate
properly to use Smart Smart Exit function.
• Drive below 3 mph (5 km/h) with
the vehicle on and shift the gear to
N (Neutral), Smart Exit function can be used.
• If the function is turned on again
after parallel parking is completed
by Remote Smart Parking Assist, Smart Exit function can be used.
Page 572 of 680
Driver Assistance System
7-170
Remote Smart Parking Assist
Malfunction and Limitations
Remote Smart Parking Assist
malfunction
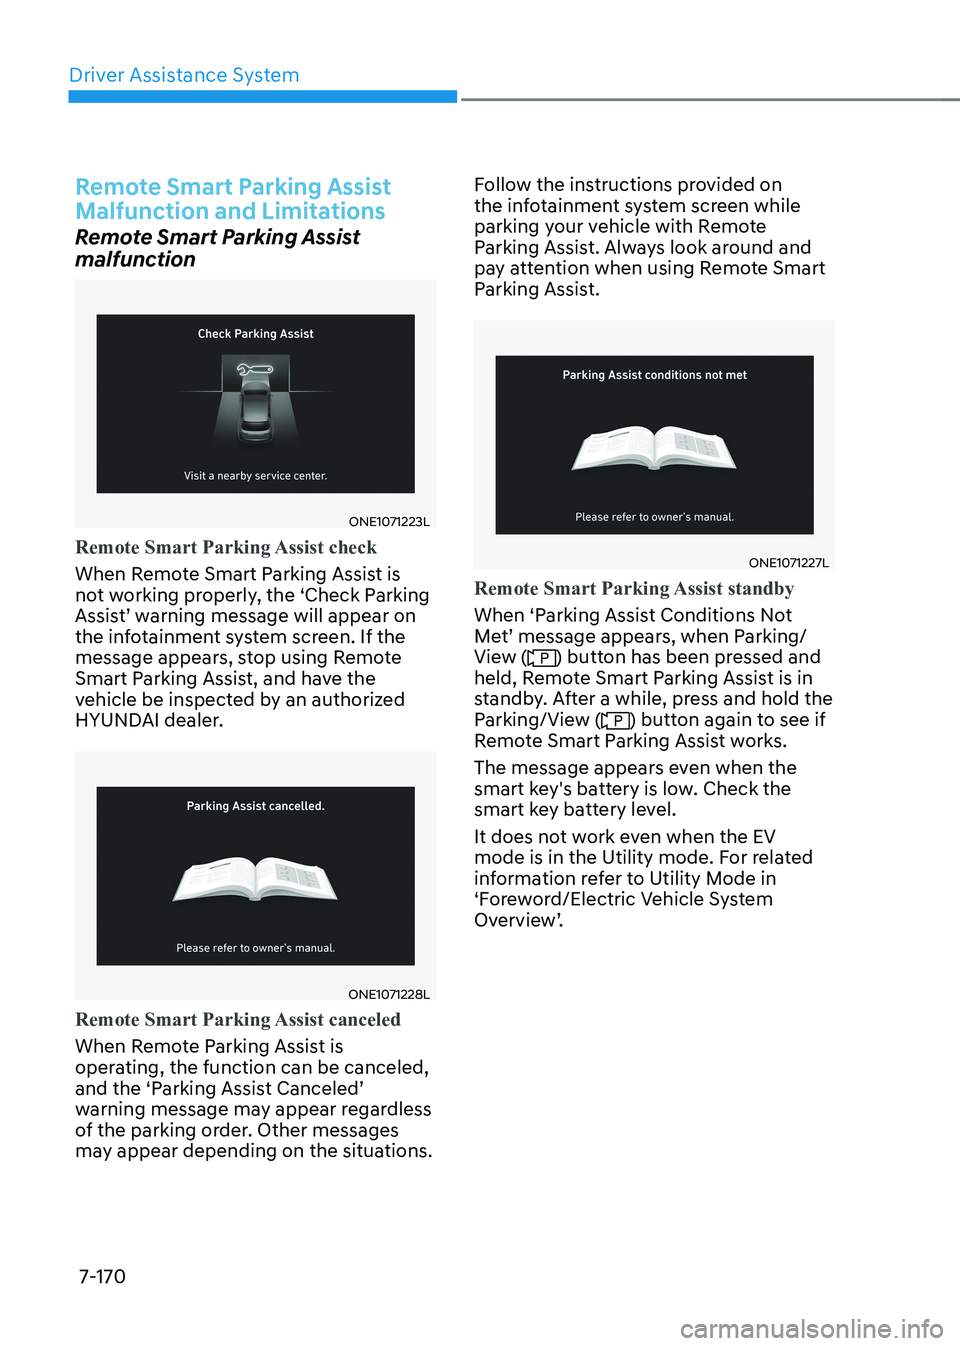
ONE1071223L
Remote Smart Parking Assist check
When Remote Smart Parking Assist is
not working properly, the ‘Check Parking
Assist’ warning message will appear on
the infotainment system screen. If the
message appears, stop using Remote
Smart Parking Assist, and have the
vehicle be inspected by an authorized
HYUNDAI dealer.
ONE1071228L
Remote Smart Parking Assist canceled
When Remote Parking Assist is
operating, the function can be canceled,
and the ‘Parking Assist Canceled’
warning message may appear regardless
of the parking order. Other messages
may appear depending on the situations.Follow the instructions provided on
the infotainment system screen while
parking your vehicle with Remote
Parking Assist. Always look around and
pay attention when using Remote Smart
Parking Assist.
ONE1071227L
Remote Smart Parking Assist standby
When ‘Parking Assist Conditions Not
Met’ message appears, when Parking/
View (
) button has been pressed and
held, Remote Smart Parking Assist is in
standby. After a while, press and hold the
Parking/View (
) button again to see if
Remote Smart Parking Assist works.
The message appears even when the
smart key's battery is low. Check the
smart key battery level.
It does not work even when the EV
mode is in the Utility mode. For related
information refer to Utility Mode in
‘Foreword/Electric Vehicle System
Overview’.
Page 579 of 680
8
Hazard Warning Flasher ................................................................................... 8-2
In Case of an Emergency While Driving ..........................................................8-2
If the Vehicle Stalls While Driving ............................................................................... 8-2
If the Vehicle Stalls at A Crossroad or Crossing .........................................................8-2
If You Have a Flat Tire While Driving ........................................................................... 8-3
If the vehicle will not start ................................................................................ 8-3
Confirm the EV Battery is not Low on the Charge Gauge .........................................8-3
Jump Starting (12V battery) ............................................................................. 8-4
Tire Pressure Monitoring System (TPMS) .........................................................8 -7
Check Tire Pressure ...................................................................................................... 8 -7
Tire Pressure Monitoring System ............................................................................... 8-8
Low Tire Pressure Warning Light ................................................................................ 8-9
Low Tire Pressure Position and Tire Pressure Telltale ...............................................8-9
TPMS (Tire Pressure Monitoring System) Malfunction Indicator ............................8-10
Changing a Tire with TPMS ....................................................................................... 8-10
If You have a Flat Tire (with Tire Mobility Kit) .................................................8-12
Introduction ................................................................................................................ 8-12
Notes on the Safe Use of the Tire Mobility Kit .........................................................8-13
Components of the Tire Mobility Kit ......................................................................... 8-14
Using the Tire Mobility Kit When a Tire is Flat ..........................................................8-15
How to Adjust Tire Pressure ...................................................................................... 8-18
Notes on the Safe Use of the Tire Mobility Kit .........................................................8-19
Towing ............................................................................................................. 8-20
Towing Service .......................................................................................................... 8-20
Removable Towing Hook ........................................................................................... 8-21
Emergency Towing ..................................................................................................... 8-22
8. Emergency Situations
Page 581 of 680
08
8-3
If You Have a Flat Tire While Driving
If a tire goes flat while you are driving: • Take your foot off the accelerator
pedal and let the vehicle slow down
while driving straight ahead. Do not
apply the brakes immediately or
attempt to pull off the road as this
may cause loss of vehicle control
resulting in an accident. When the
vehicle has slowed to such a speed
that it is safe to do so, brake carefully
and pull off the road. Drive off the
road as far as possible and park on
firm, level ground. If you are on a
divided highway, do not park in the
median area between the two traffic lanes.
• When the vehicle is stopped, press
the hazard warning flasher button,
shift the gear to P (Park), apply the
regenerative brake, and press the
Start/Stop button to the OFF position.
• Have all passengers get out of the
vehicle. Be sure they all get out on the
side of the vehicle that is away from
traffic.
• When changing a flat tire, follow the
instructions provided later in this
chapter.
if tHe veHicle will not
s ta rt
Confirm the EV Battery is not
Low on the Charge Gauge
• Be sure the gear is in P (Park). The
vehicle starts only when the gear is in
P (Park).
• Check the 12-volt battery connections
to be sure they are clean and tight.
• Turn on the interior light. If the light
dims or goes out when you operate
the starter, the 12V battery is drained.
Do not push or pull the vehicle to start it.
This could cause damage to your vehicle.