2023 HYUNDAI IONIQ 5 lock
[x] Cancel search: lockPage 272 of 680
Convenience Features
5-80
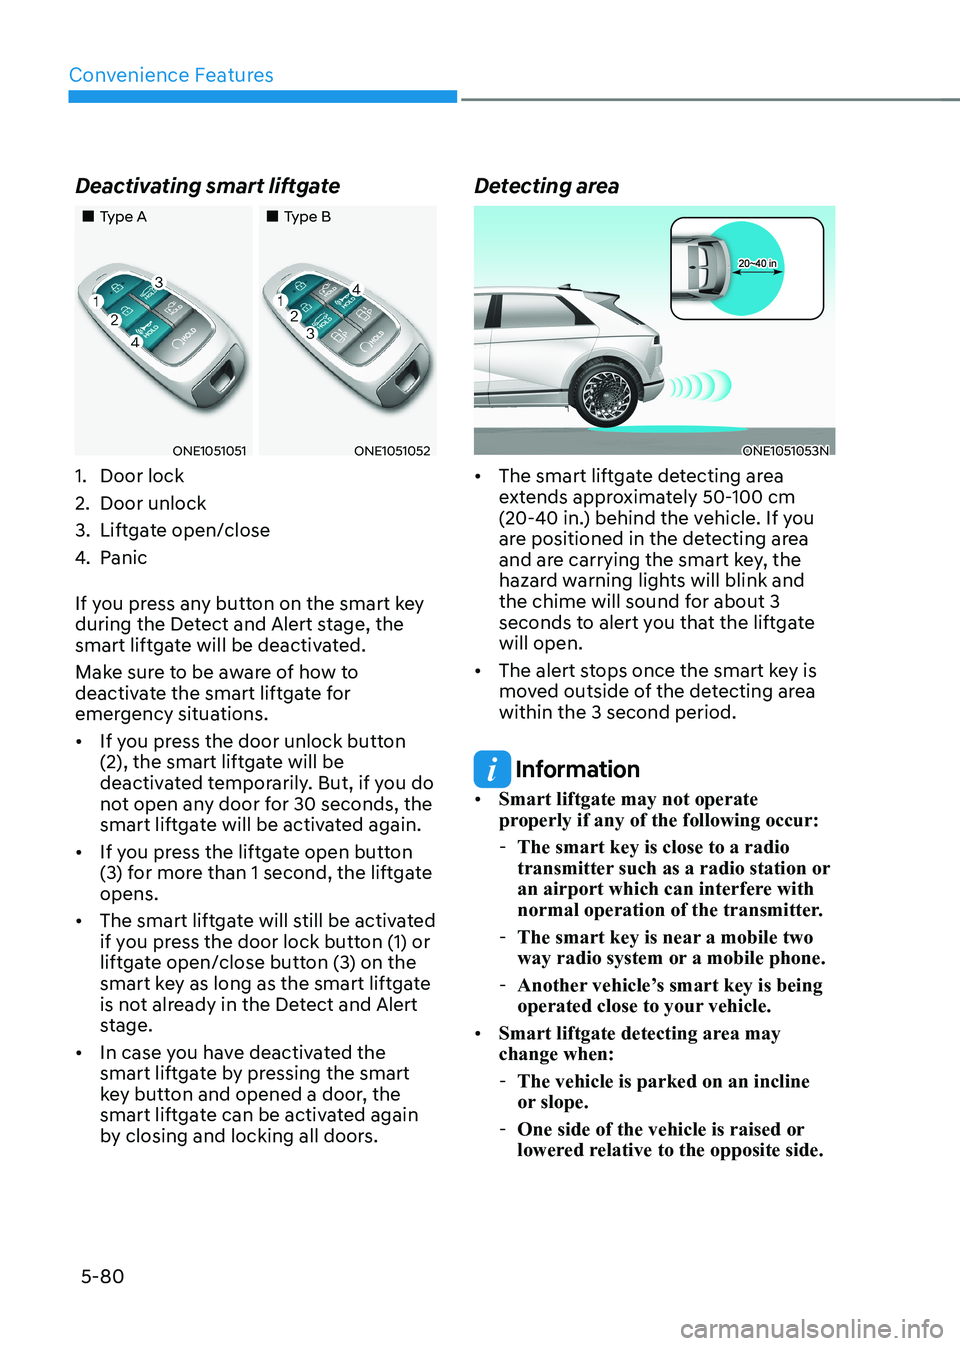
Deactivating smart liftgate
„„Type A
„„Type B
ONE1051051ONE1051052
1. Door lock
2. Door unlock
3. Liftgate open/close
4. Panic
If you press any button on the smart key
during the Detect and Alert stage, the
smart liftgate will be deactivated.
Make sure to be aware of how to
deactivate the smart liftgate for
emergency situations. • If you press the door unlock button
(2), the smart liftgate will be
deactivated temporarily. But, if you do
not open any door for 30 seconds, the
smart liftgate will be activated again.
• If you press the liftgate open button
(3) for more than 1 second, the liftgate opens.
• The smart liftgate will still be activated
if you press the door lock button (1) or
liftgate open/close button (3) on the
smart key as long as the smart liftgate
is not already in the Detect and Alert
stage.
• In case you have deactivated the
smart liftgate by pressing the smart
key button and opened a door, the
smart liftgate can be activated again
by closing and locking all doors. Detecting areaONE1051053N
• The smart liftgate detecting area
extends approximately 50-100 cm
(20-40 in.) behind the vehicle. If you
are positioned in the detecting area
and are carrying the smart key, the
hazard warning lights will blink and
the chime will sound for about 3
seconds to alert you that the liftgate will open.
• The alert stops once the smart key is
moved outside of the detecting area within the 3 second period.
Information
• Smart liftgate may not operate
properly if any of the following occur:
- The smart key is close to a radio
transmitter such as a radio station or
an airport which can interfere with
normal operation of the transmitter.
- The smart key is near a mobile two
way radio system or a mobile phone.
- Another vehicle’s smart key is being
operated close to your vehicle.
• Smart liftgate detecting area may change when:
- The vehicle is parked on an incline
or slope.
- One side of the vehicle is raised or
lowered relative to the opposite side.
Page 280 of 680
Convenience Features
5-88
Battery saver function
The purpose of this feature is to prevent
the battery from being discharged.
The system automatically turns off the
position lamp when the driver turns the
vehicle off and opens the driver-side
door.
With this feature, the position lamps will
turn off automatically if the driver parks
on the side of road at night.
However, the position lamps stay ON
even when the driver-side door is
opened if the light headlamp switch is
turned to the position lamp or AUTO (if
equipped) position after the engine is
turned off.
If necessary, to keep the lamps on turn the position lamps OFF and ON
again using the headlamp switch on
the steering column after the engine is
turned off.
Headlamp delay function
If the Start/Stop button is in the ACC position or the OFF position with the
headlamps ON, the headlamps (and/
or position lamps) remain on for about
5 minutes. However, if the driver’s door is opened and closed, the headlamps
are turned off after 15 seconds. Also,
with the vehicle off if the driver’s door is
opened and closed, the headlamps (and/
or position lamps) are turned off after 15 seconds.
The headlamps (and/or position lamps)
can be turned off by pressing the lock
button on the smart key twice or turning
the headlamp switch to the OFF or AUTO position.
You can enable the headlamp delay
function by selecting ‘Setup → Vehicle
Settings → Lights → Headlight Delay (or
Headlight time-out)’ in the infotainment
system screen.
For detailed information, refer to the
separately supplied infotainment
system manual.
NOTICE
If the driver exits the vehicle through
another door besides the driver
door, the battery saver function
does not operate and the headlamp
delay function does not turn OFF
automatically.
This may cause the battery to
discharge. To avoid battery discharge,
turn OFF the headlamps manually from
the headlamp switch before exiting the
vehicle.
Page 281 of 680
05
5-89
Interior Lights
WARNING
Do not use the interior lights when
driving in the dark. The interior lights
may obscure your view and cause an
accident.
NOTICE
Do not use the interior lights for
extended periods when the vehicle is
turned off or the battery will discharge.
Interior lamp AUTO cut
The interior lamps will automatically go
off approximately 20 minutes after the
vehicle is turned off and the doors are closed. If a door is opened, the lamp
will go off 25 minutes after the vehicle
is turned off. If the doors are locked by
the smart key and the vehicle enters the
armed stage of the theft alarm system,
the lamps will go off five seconds later. Front lamps
ONE1051065
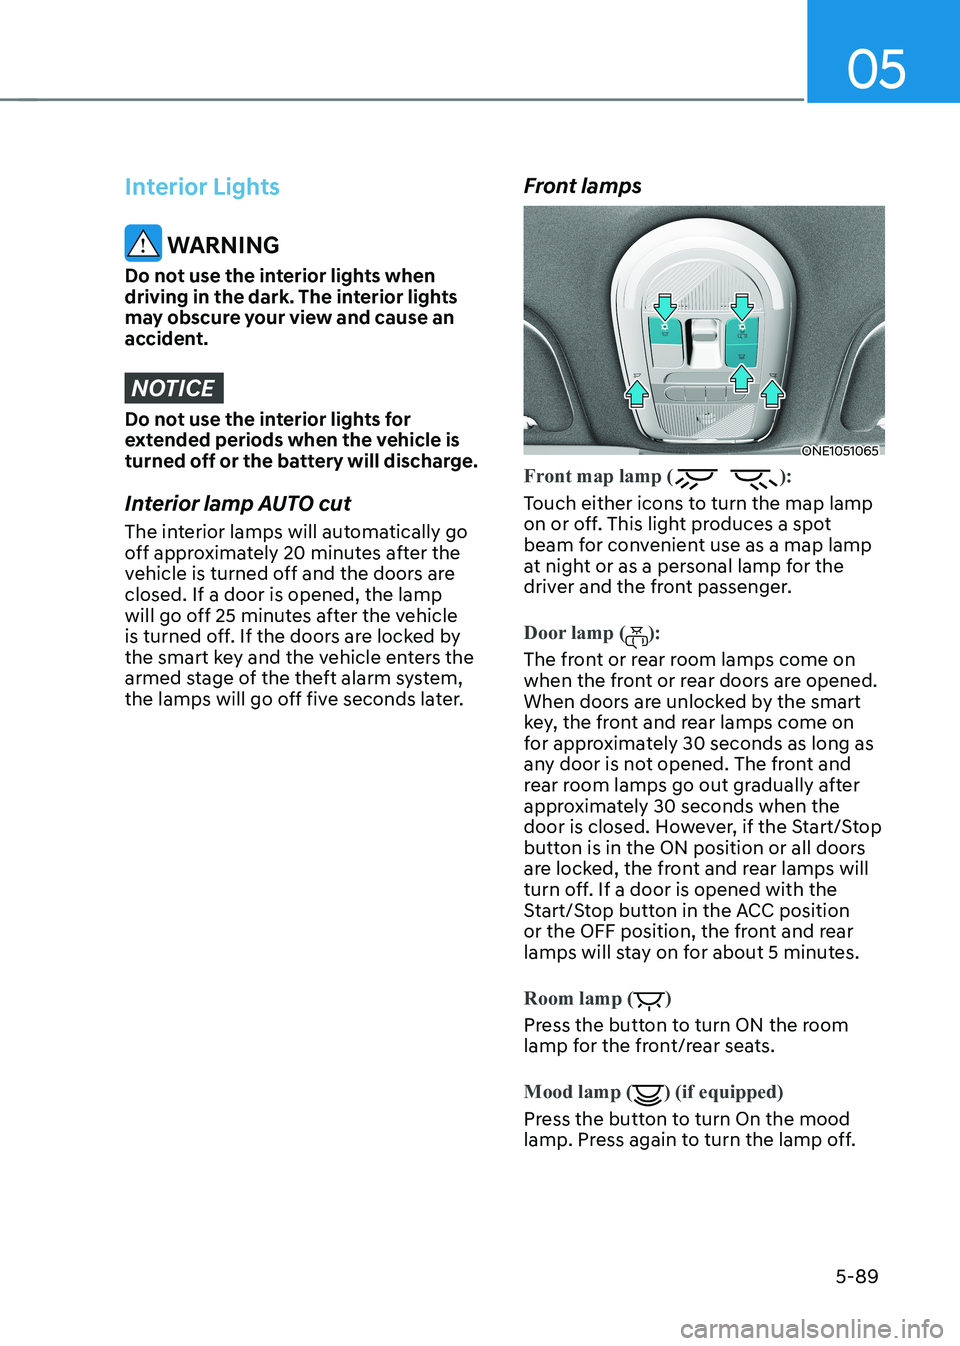
Front map lamp ():
Touch either icons to turn the map lamp
on or off. This light produces a spot
beam for convenient use as a map lamp
at night or as a personal lamp for the
driver and the front passenger.
Door lamp ():
The front or rear room lamps come on
when the front or rear doors are opened.
When doors are unlocked by the smart
key, the front and rear lamps come on
for approximately 30 seconds as long as
any door is not opened. The front and
rear room lamps go out gradually after
approximately 30 seconds when the
door is closed. However, if the Start/Stop
button is in the ON position or all doors
are locked, the front and rear lamps will
turn off. If a door is opened with the
Start/Stop button in the ACC position
or the OFF position, the front and rear
lamps will stay on for about 5 minutes.
Room lamp ()
Press the button to turn ON the room
lamp for the front/rear seats.
Mood lamp
() (if equipped)
Press the button to turn On the mood
lamp. Press again to turn the lamp off.
Page 284 of 680

Convenience Features
5-92
Luggage compartment lamp
ONE1051069
The lamp turns on when the liftgate is opened. Headlamp and position lamp
When the light switch is ON, and all
the doors (and liftgate) are closed and
locked, the headlamp and position lamp
will turn on for approximately 15 seconds
if the door unlock button is pressed on
the smart key.
Select ‘Setup → Lights → Headlight Delay’
from the Settings menu to turn on this function.
For detailed information, refer to the
separately supplied infotainment
system manual.
Interior lamp
When the interior lamp switch is in the
position and all doors (and liftgate)
are closed and locked, the room lamp
will come on for 30 seconds if any of the
below is performed.
- When the door unlock button is pressed on the smart key.
- When you touch the touch sensor on the door handle while carrying the
smart key.
At this time, if you press the door lock
or unlock button on the smart key the
lamps will turn off immediately.
Page 297 of 680
05
5-105
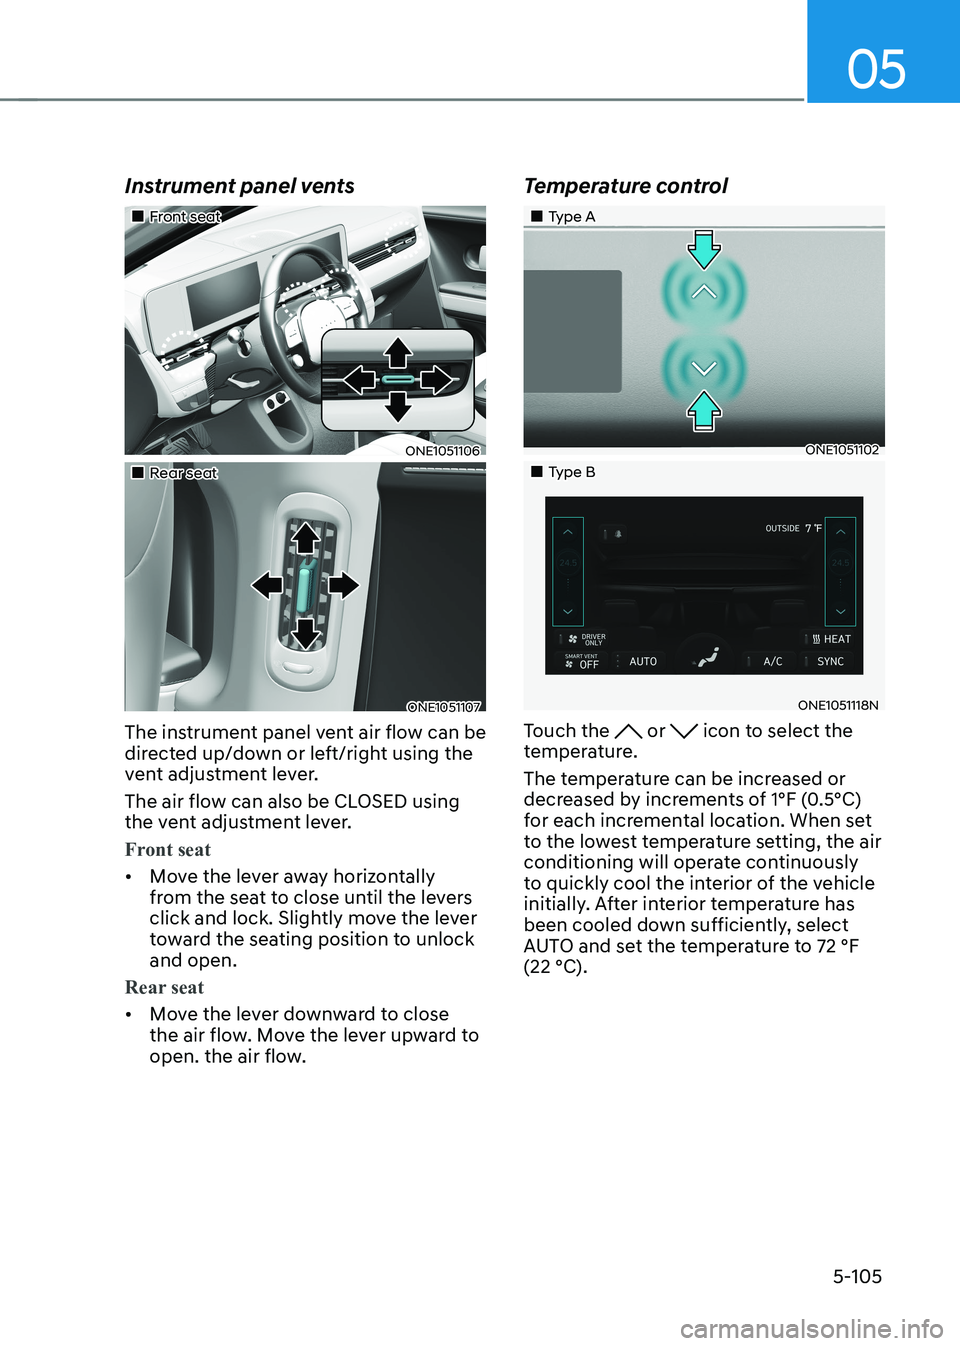
Instrument panel vents
„„Front seat
ONE1051106
„„Rear seat
ONE1051107
The instrument panel vent air flow can be
directed up/down or left/right using the
vent adjustment lever.
The air flow can also be CLOSED using
the vent adjustment lever.
Front seat
• Move the lever away horizontally
from the seat to close until the levers
click and lock. Slightly move the lever
toward the seating position to unlock and open.
Rear seat
• Move the lever downward to close
the air flow. Move the lever upward to
open. the air flow. Temperature control
„„Type A
ONE1051102
„„Type B
ONE1051118N
Touch the
or icon to select the
temperature.
The temperature can be increased or
decreased by increments of 1°F (0.5°C)
for each incremental location. When set
to the lowest temperature setting, the air
conditioning will operate continuously
to quickly cool the interior of the vehicle
initially. After interior temperature has
been cooled down sufficiently, select
AUTO and set the temperature to 72 °F (22 °C).
Page 310 of 680

Convenience Features
5-118
Recirculating Air When Washer
Fluid Is Used
Recirculation mode automatically
activates to reduce any objectionable
scent of the washer fluid from entering
the cabin when the windshield washer is used.
Turning Activate upon Washer Fluid
Use ON or OFF
Activate upon Washer Fluid Use can be
turned on and off by selecting ‘Setup →
Vehicle Settings → Climate → Recirculate
Air → Activate upon Washer Fluid Use
(or Interlocking washer fluid)’ from the
infotainment system screen.
For detailed information, refer to the
separately supplied infotainment
system manual.
Auto. Controls That Use Climate
Control Settings (for driver’s
seat)
The temperature of the driver’s seat
warmer, air ventilated seat and heated
steering wheel is automatically
controlled depending on the inside and
outside temperature of the vehicle when
the vehicle is running.
To use these features, it must be
enabled from the Settings menu in the
infotainment system screen. Select: - Setup → Vehicle Settings → Seat →
Heated/Ventilated Features → Heated/
Ventilated Features → Auto. Controls
That Use Climate Control Settings
For more details on Auto Comfort
Control, refer to “Seat Warmers” and
“Air ventilation seats” section in chapter
3 and “Heated Steering Wheel” section
in this chapter.
Smart ventilation
The smart ventilation system maintains
pleasant/fresh air condition inside
the passenger compartment by
automatically detecting/controlling
the temperature and humidity, when
you drive the vehicle with the climate
control system in the OFF position.
When the smart ventilation system
starts to operate, the message “SMART
VENTILATION ON” appears for 5 seconds. • The smart ventilation system stops
operating, when the BLOWER DOWN
OFF button of the climate control
system is selected.
• The smart ventilation system stops
operating, when any button of the
climate control system is selected for
operation.
• The smart ventilation system may not
operate, when the vehicle is driven at
low speed.
Page 314 of 680
Convenience Features
5-122
Sunvisor
OHI048444
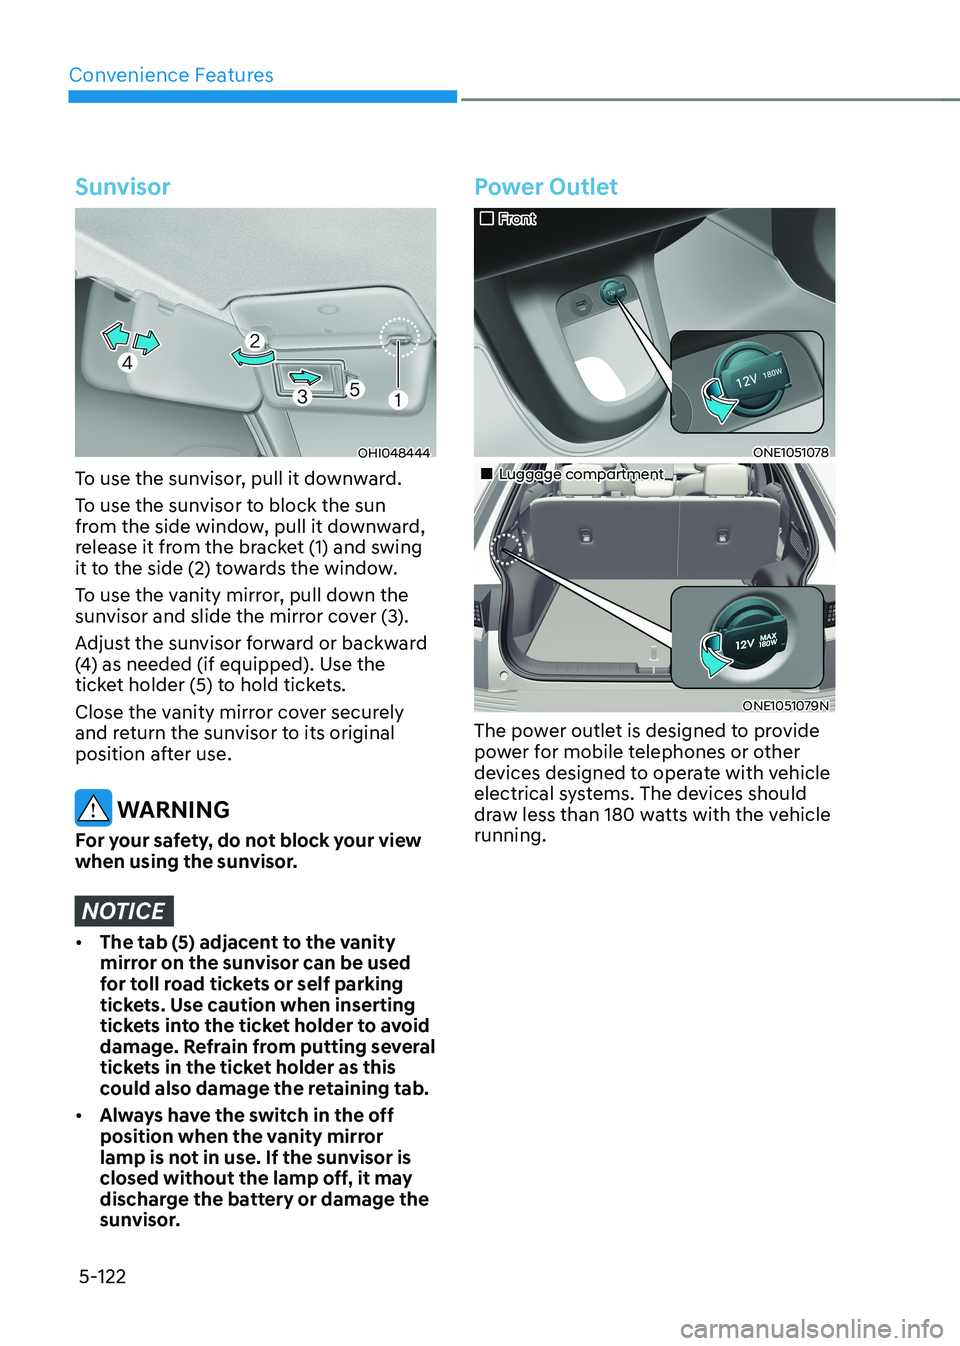
To use the sunvisor, pull it downward.
To use the sunvisor to block the sun
from the side window, pull it downward,
release it from the bracket (1) and swing
it to the side (2) towards the window.
To use the vanity mirror, pull down the
sunvisor and slide the mirror cover (3).
Adjust the sunvisor forward or backward
(4) as needed (if equipped). Use the
ticket holder (5) to hold tickets.
Close the vanity mirror cover securely
and return the sunvisor to its original
position after use.
WARNING
For your safety, do not block your view
when using the sunvisor.
NOTICE
• The tab (5) adjacent to the vanity
mirror on the sunvisor can be used
for toll road tickets or self parking
tickets. Use caution when inserting
tickets into the ticket holder to avoid
damage. Refrain from putting several
tickets in the ticket holder as this
could also damage the retaining tab.
• Always have the switch in the off
position when the vanity mirror
lamp is not in use. If the sunvisor is
closed without the lamp off, it may
discharge the battery or damage the
sunvisor.
Power Outlet
„„Front
ONE1051078
„„Luggage compartment
ONE1051079N
The power outlet is designed to provide
power for mobile telephones or other
devices designed to operate with vehicle
electrical systems. The devices should
draw less than 180 watts with the vehicle running.
Page 317 of 680
05
5-125
Charging smart phone
The wireless smart phone charging
system charges only the Qi-enabled smart phones (
). Read the label on
the smart phone accessory cover or
visit your smart phone manufacturer’s
website to check whether your smart
phone supports the Qi technology.
The wireless charging process starts
when you put a Qi-enabled smart phone
on the wireless charging unit.
1. Remove other items, including the smart key, from the wireless charging
unit. If not, the wireless charging
process may be interrupted. Place
the smart phone on the center of the
charging pad.
2. The indicator light is orange when the smart phone is charging. The indicator
light will turn blue when phone
charging is complete.
3. You can turn ON or OFF the wireless charging function from the Settings
menu in the infotainment system
screen. Select:
- Setup → Vehicle → Convenience →
Wireless Charging
For detailed information, refer to the
separately supplied infotainment
system manual.
If your smart phone is not charging: - Slightly change the position of the smart phone on the charging pad.
- Make sure the indicator light is orange.
The indicator light will blink orange for 10
seconds if there is a malfunction in the
wireless charging system.
In this case, temporarily stop the
charging process, and re-attempt to
charge your smart phone again.
The system warns you with a message on
the LCD display if the smart phone is still
on the wireless charging unit after the
vehicle is turned OFF and the front door is opened.
For some manufacturer’s smart phones,
the system may not warn you even
though the smart phone is left on the
wireless charging unit. This is due to the
particular characteristic of the smart
phone and not a malfunction of the
wireless charging.
NOTICE
• The wireless smart phone charging
system may not support certain
smart phones, which are not verified
for the Qi specification (
).
• When placing your smart phone on
the charging pad, position the phone
in the middle of the mat for optimal
charging performance. If your smart
phone is off to the side, the charging
rate may be less and in some cases
the smart phone may experience
higher heat conduction.
• In some cases, the wireless charging
may stop temporarily when the
smart key is used, either when
starting the vehicle or locking/
unlocking the doors, etc.