2023 HYUNDAI I30 seats
[x] Cancel search: seatsPage 71 of 533
2-50
Safety system of your vehicle
They are designed to help protect the
heads of the front seat occupants
and the rear outboard seat occupants
in certain side impact collisions.
The curtain air bags are designed to
deploy during certain side impact
collisions, depending on the crash
severity, angle, speed and impact.
The curtain air bags are not designed
to deploy in all side impact or rollover
situations.To reduce the risk of serious
injury or death from an inflating
curtain air bag, take the follow-
ing precautions:
All seat occupants must wear
seat belts at all times to help
keep occupants positioned
properly.
Properly secure Child Restraint
Systems as far away from the
door as possible.
Do not place any objects over
the air bag. Also, do not attach
any objects around the area the
air bag inflates such as the
door, side door glass, front and
rear pillar, roof side rail.
Do not hang other objects
except clothes, especially hard
or breakable objects. In an acci-
dent, it may cause vehicle dam-
age or personal injury.
(Continued)
WARNING (Continued)
Do not allow passengers to
lean their heads or bodies
onto doors, put their arms on
the doors, stretch their arms
out of the window, or place
objects between the doors
and seats.
Do not open or repair the side
curtain air bags.
Page 82 of 533
2-61
Safety system of your vehicle
2
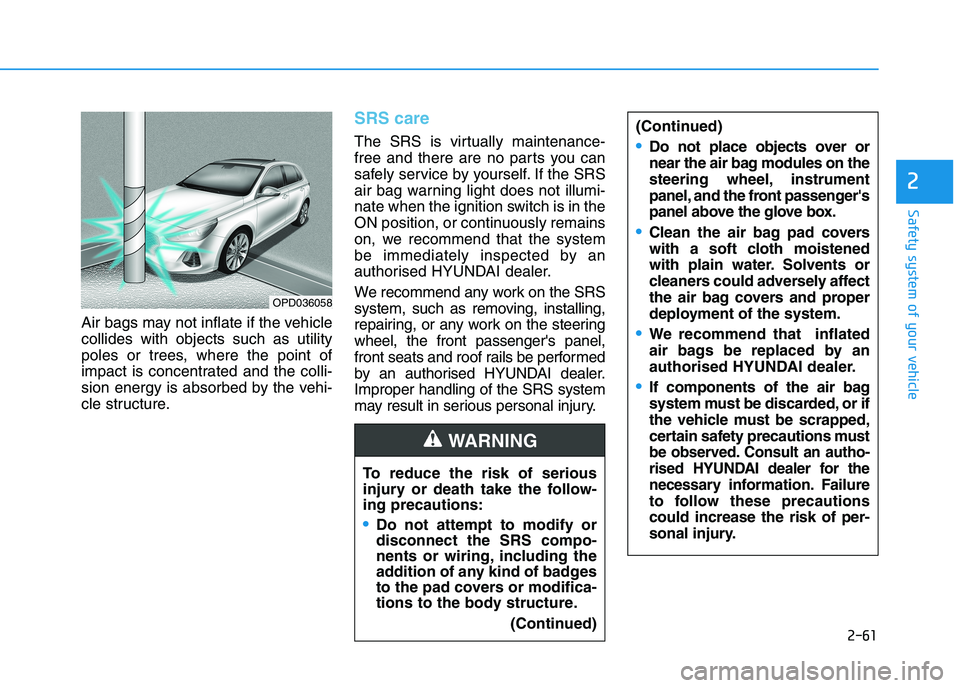
Air bags may not inflate if the vehicle
collides with objects such as utility
poles or trees, where the point of
impact is concentrated and the colli-
sion energy is absorbed by the vehi-
cle structure.
SRS care
The SRS is virtually maintenance-
free and there are no parts you can
safely service by yourself. If the SRS
air bag warning light does not illumi-
nate when the ignition switch is in the
ON position, or continuously remains
on, we recommend that the system
be immediately inspected by an
authorised HYUNDAI dealer.
We recommend any work on the SRS
system, such as removing, installing,
repairing, or any work on the steering
wheel, the front passenger's panel,
front seats and roof rails be performed
by an authorised HYUNDAI dealer.
Improper handling of the SRS system
may result in serious personal injury.
OPD036058
To reduce the risk of serious
injury or death take the follow-
ing precautions:
Do not attempt to modify or
disconnect the SRS compo-
nents or wiring, including the
addition of any kind of badges
to the pad covers or modifica-
tions to the body structure.
(Continued)
WARNING
(Continued)
Do not place objects over or
near the air bag modules on the
steering wheel, instrument
panel, and the front passenger's
panel above the glove box.
Clean the air bag pad covers
with a soft cloth moistened
with plain water. Solvents or
cleaners could adversely affect
the air bag covers and proper
deployment of the system.
We recommend that inflated
air bags be replaced by an
authorised HYUNDAI dealer.
If components of the air bag
system must be discarded, or if
the vehicle must be scrapped,
certain safety precautions must
be observed. Consult an autho-
rised HYUNDAI dealer for the
necess
ary information. Failure
to follow these precautions
could increase the risk of per-
sonal injury.
Page 83 of 533
2-62
Safety system of your vehicle
Additional safety precautions
Passengers should not move out of
or change seats whilst the vehicle
is moving.A passenger who is not
wearing a seat belt during a crash or
emergency stop can be thrown
against the inside of the vehicle,
against other occupants, or be ejected
from the vehicle.
Do not use any accessories on seat
belts.Devices claiming to improve
occupant comfort or reposition the
seat belt can reduce the protection
provided by the seat belt and increase
the chance of serious injury in a crash.
Do not modify the front seats.
Modification of the front seats could
interfere with the operation of the sup-
plemental restraint system sensing
components or side air bags.
Do not place items under the front
seats.Placing items under the front
seats could interfere with the opera-
tion of the supplemental restraint sys-
tem sensing components and wiring
harnesses.
Do not cause impact to the doors.
Impact to the doors when the ignition
switch is in the ON position may cause
the air bags to inflate.
Adding equipment to or modify-
ing your air bag equipped vehicle
If you modify your vehicle by changing
your vehicle's frame, bumper system,
front end or side sheet metal or ride
height, this may affect the operation of
your vehicle's air bag system.
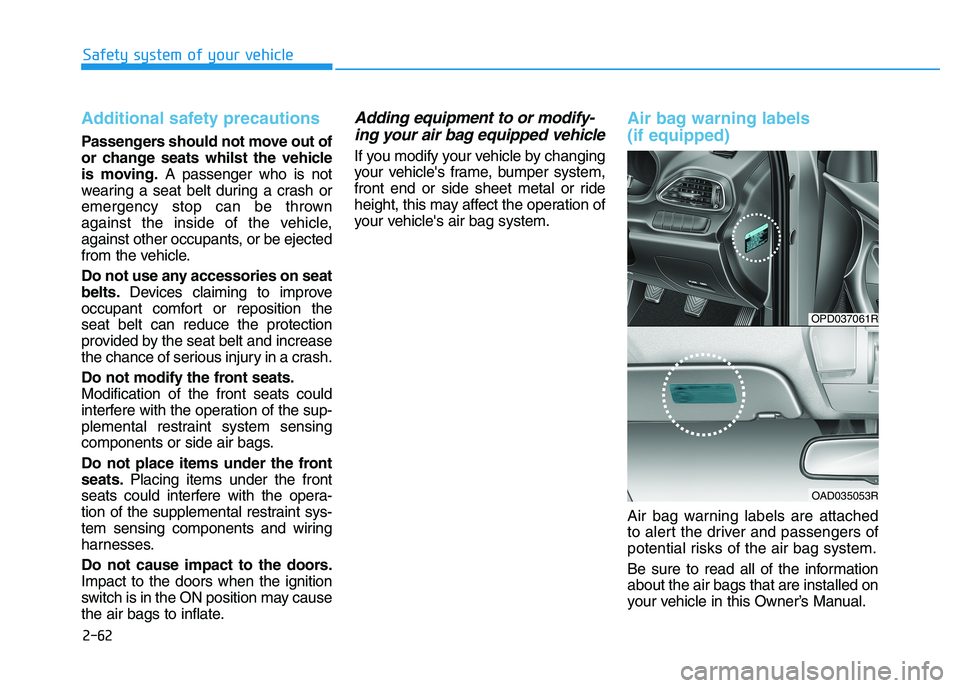
Air bag warning labels
(if equipped)
Air bag warning labels are attached
to alert the driver and passengers of
potential risks of the air bag system.
Be sure to read all of the information
about the air bags that are installed on
your vehicle in this Owner’s Manual.
OPD037061R
OAD035053R
Page 98 of 533

3-15
Convenient features of your vehicle
3
Auto door lock/unlock features
Impact sensing door unlock
system (if equipped)
All doors will be automatically
unlocked when an impact causes the
air bags to deploy.
Speed sensing door lock system
(if equipped)
All doors will be automatically locked
when vehicle speed exceeds 15
km/h.
You can activate or deactivate the
Auto Door Lock/Unlock features from
the User Settings mode on the LCD
display.For more details, refer to
"LCD Display" in this chapter.
Child-protector rear door locks
The child safety lock is provided to
help prevent children seated in the
rear seats from accidentally opening
the rear doors. The rear door safety
locks should be used whenever chil-
dren are in the vehicle.
The child safety lock is located on
the edge of each rear door. When the
child safety lock is in the lock posi-
tion, the rear door will not open if the
inner door handle is pulled.To lock the child safety lock, insert a
key (or screwdriver) (1) into the hole
and turn it to the lock position.
To allow a rear door to be opened
from inside the vehicle, unlock the
child safety lock.
OPDE046009
If children accidently open the
rear doors whilst the vehicle is
in motion, they could fall out of
the vehicle. The rear door safety
locks should always be used
whenever children are in the
vehicle.
WARNING
Page 172 of 533
3-89
Convenient features of your vehicle
3
Front map lamp
Press either lens to turn the map
lamp on or off. This light produces a
spot beam for convenient use as a
map lamp at night or as a personal
lamp for the driver and the front pas-
senger.
Front passenger compartment lamp
Press the button to turn ON the
passenger compartment lamp for
the front/rear seats.
Press the button to turn OFF the
passenger compartment lamp for
the front/rear seats.
Front door lamp ( )
The front or rear passenger compart-
ment lamps come on when the front
or rear doors are opened, if the
engine is running or not.
When doors are unlocked by the
remote key or smart key, the front
and rear lamps come on for approxi-
mately 30 seconds as long as any
door is not opened. The front and
rear passenger compartment lamps
go out gradually after approximately
30 seconds if the door is closed.
However, if the ignition switch is in
the ON position or all doors are
locked, the front and rear lamps will
turn off. If a door is opened with the
ignition switch in the ACC position or
the OFF position, the front and rear
lamps stay on for about 20 minutes.
Page 514 of 533
7-83
7
Maintenance
Keep paint and trim in good condition
Scratches or chips in the finish
should be covered with "touch-up"
paint as soon as possible to reduce
the possibility of corrosion. If bare
metal is showing through, the atten-
tion of a qualified body and paint
shop is recommended.
Bird droppings : Bird droppings are
highly corrosive and may damage
painted surfaces in just a few hours.
Always remove bird droppings as
soon as possible.
Don't neglect the interior
Moisture can collect under the floor
mats and carpeting to cause corro-
sion. Check under the mats periodi-
cally to be sure the carpeting is dry.
Use particular care if you carry fer-
tilisers, cleaning materials or chemi-
cals in the vehicle.
These should be carried only in
proper containers and any spills or
leaks should be cleaned up, flushed
with clean water and thoroughly
dried.
Interior care
Interior general precautions
Prevent chemicals such as perfume,
cosmetic oil, sun cream, hand clean-
er and air freshener from contacting
the interior parts because they may
cause damage or discolouration. If
they do contact the interior parts,
wipe them off immediately.
See the instructions that follow for
the proper way to clean vinyl.
Never allow water or other liquids to
come in contact with electrical/elec-
tronic components inside the vehi-
cle as this may damage them.
When cleaning leather products
(steering wheel, seats etc.), use
neutral detergents or low alcohol
content solutions. If you use high
alcohol content solutions or acid/
alkaline detergents, the colour of
the leather may fade or the sur-
face may get stripped off.
Cleaning the upholstery and
interior trim
Vinyl (if equipped)
Remove dust and loose dirt from
vinyl with a whisk broom or vacuum
cleaner. Clean vinyl surfaces with a
vinyl cleaner.
Fabric (if equipped)
Remove dust and loose dirt from fabric
with a whisk broom or vacuum cleaner.
Clean with a mild soap solution recom-
mended for upholstery or carpets.
Remove fresh spots immediately with
a fabric spot cleaner. If fresh spots do
not receive immediate attention, the
fabric can be stained and its colour can
be affected. Also, its fire-resistant prop-
erties can be reduced if the material is
not properly maintained.
Using anything but recommended
cleaners and procedures may affect
the fabric’s appearance and fire-
resistant properties.
NOTICE
NOTICE
NOTICE
Page 515 of 533
7-84
Maintenance
Leather (if equipped)
Features of seat leather
- Leather is made from the outer
skin of an animal, which goes
through a special process to be
available for use. Since it is a nat-
ural product, each part differs in
thickness or density.
Wrinkles may appear as a natural
result of stretching and shrinking
depending on the temperature
and humidity.
- The seat is made of stretchable
fabric to improve comfort.
- The parts contacting the body are
curved and the side supporting
area is high which provides driv-
ing comfort and stability.
- Wrinkles may appear naturally
from usage. It is not a fault of the
product. Caring for the leather seats
- Vacuum the seat periodically to
remove dust and sand on the seat.
It will prevent abrasion or damage
of the leather and maintain its qual-
ity.
- Wipe the natural leather seat cover
often with dry or soft cloth.
- Use of proper leather protector
may prevent abrasion of the cover
and helps maintain the colour. Be
sure to read the instructions and
consult a specialist when using
leather coating or protective agent.
- Light coloured (beige, cream
beige) leather is easily contaminat-
ed and the stain is noticeable.
Clean the seats frequently.
- Avoid wiping with wet cloth. It may
cause the surface to crack.
Wrinkles or abrasions which
appear naturally from usage
are not covered by warranty.
Belts with metallic acces-
sories, zippers or keys inside
the back pocket may damage
the seat fabric.
Make sure not to wet the seat.
It may change the nature of
natural leather.
Jeans or clothes which could
bleach may contaminate the
surface of the seat covering
fabric.
CAUTION
Page 516 of 533
7-85
7
Maintenance
Cleaning the leather seats
- Remove all contaminations instant-
ly. Refer to instructions below for
removal of each contaminant.
- Cosmetic products (sunscreen,
foundation, etc.)
Apply cleansing cream on a cloth
and wipe the contaminated spot.
Wipe off the cream with a wet cloth
and remove water with a dry cloth.
- Beverages (coffee, soft drink, etc.)
Apply a small amount of neutral
detergent and wipe until contami-
nations do not smear.
- Oil
Remove oil instantly with
absorbable cloth and wipe with
stain remover used only for natu-
ral leather.
- Chewing gum
Harden the gum with ice and
remove gradually.Cleaning the lap/shoulder belt
webbing
Clean the belt webbing with any mild
soap solution recommended for clean-
ing upholstery or carpet. Follow the
instructions provided with the soap. Do
not bleach or re-dye the webbing
because this may weaken it.
Cleaning the interior window
glass
If the interior glass surfaces of the
vehicle become fogged (that is, cov-
ered with an oily, greasy or waxy film),
they should be cleaned with glass
cleaner. Follow the directions on the
glass cleaner container.
Do not scrape or scratch the inside
of the rear window. This may result
in damage to the rear window
defroster grid.
NOTICE