2023 HONDA HRV clock
[x] Cancel search: clockPage 8 of 664

Contents
This owner’s manual should be considered a permanent part of the
vehicle and should remain with the vehicle when it is sold.
The Navigation Manual is available online at honda.ca. If you are
the first registered owner of your vehicle, you may request a
complimentary printed copy of the Navigation Manual within
the first six months of vehicle purchase. Please request a copy
from your Honda dealer.
This owner’s manual covers all models of your vehicle. You may find
descriptions of equipment and features that are not on your
particular model.
Images throughout this owner’s ma nual (including the front cover)
represent features and equipment that are available on some, but
not all, models. Your particular mo del may not have some of these
features.
This owner’s manual is for vehicles sold in the United States and
Canada.
The information and specifications in cluded in this publication were
in effect at the time of approval for printing. Honda Motor Co., Ltd.
reserves the right, however, to discontinue or change specifications
or design at any time without notice and without incurring any
obligation.2 Safe Driving P. 33
For Safe Driving P. 34 Seat Belts P. 39 Airbags P. 50
2Instrument Panel P. 85
Indicators P. 86 Gauges and Driver Information Interface P. 104
2Controls P. 133
Clock P. 134 Locking and Unlocking the Doors P. 136
Moonroof* P. 162
Seats P. 180 Interior Convenience Items P. 189
2 Features P. 211
Audio System P. 212 Audio System Basic Operation P. 219, 244
Customized Features P. 337, 345 Bluetooth® HandsFreeLink ® P. 369, 389
2 Driving P. 409
Before Driving P. 410 Towing a Trailer P. 415
Braking P. 528 Parking Your Vehicle P. 537
2Maintenance P. 551
Before Performing Maintenance P. 552 Maintenance MinderTM P. 555
Checking and Maintaining Wiper Blades P. 577
Climate Control System Maintenance P. 595
2Handling the Unexpected P. 603
Tools P. 604If a Tire Goes Flat P. 605
Overheating P. 620 Indicator, Coming On/Blinking P. 622 Fuses P. 628
If You Cannot Open the Ta ilgate P. 636 Refueling P. 637
2Information P. 639
Specifications P. 640 Identification Numbers P. 642
Emissions Testing P. 645 Warranty Coverages P. 647
23 HR-V-313V06000_01.book 6 ページ 2022年4月4日 月曜日 午前10時49分
Page 18 of 664

16
Quick Reference Guide
Controls (P133)
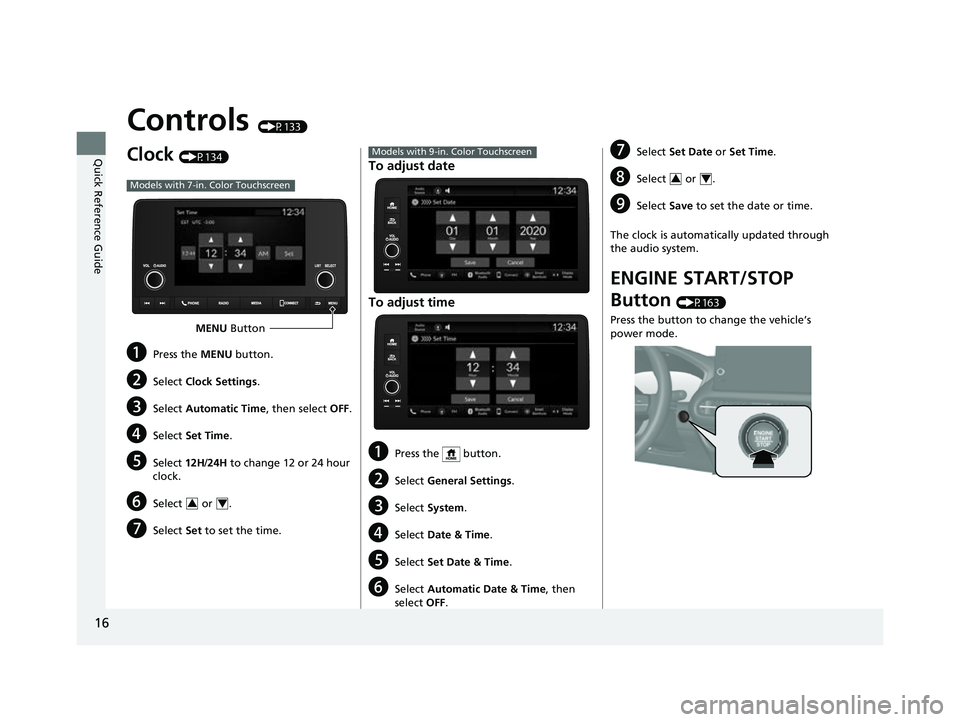
Clock (P134)
aPress the MENU button.
bSelect Clock Settings .
cSelect Automatic Time , then select OFF.
dSelect Set Time .
eSelect 12H/24H to change 12 or 24 hour
clock.
fSelect or .
gSelect Set to set the time.
Models with 7-in. Color Touchscreen
MENU Button
34
To adjust date
To adjust time
aPress the button.
bSelect General Settings.
cSelect System .
dSelect Date & Time .
eSelect Set Date & Time .
fSelect Automatic Date & Time , then
select OFF.
Models with 9-in. Color TouchscreengSelect Set Date or Set Time .
hSelect or .
iSelect Save to set the date or time.
The clock is automatically updated through
the audio system.
ENGINE START/STOP
Button
(P163)
Press the button to change the vehicle’s
power mode.
34
23 HR-V-313V06000_01.book 16 ページ 2022年4月4日 月曜日 午前10時49分
Page 108 of 664

106
uuGauges and Driver Information Interface uGauges
Instrument Panel
Shows the current mode for ACC with Low Speed Follow, LKAS, and Traffic Jam
Assist*.
2 Adaptive Cruise Control (ACC) with Low Speed Follow P. 471
2 Lane Keeping Assist System (LKAS) P. 491
2 Traffic Jam Assist
* P. 502
Shows the clock.
You can adjust the time manually and change the clock display to show the 12 hour
clock or 24 hour clock.
2Clock P. 134
■Current Mode for ACC with Low Speed Follow, the LKAS, and
Traffic Jam Assist*
■Clock
* Not available on all models
23 HR-V-313V06000_01.book 106 ページ 2022年4月4日 月曜日 午前10時49分
Page 135 of 664

133
Controls
This chapter explains how to operate the various controls necessary for driving.
Clock.................................................. 134
Locking and Unlocking the Doors Key .................................................. 136
Low Keyless Remote Signal Strength ... 138
Locking/Unlocking the Doors from the Outside .......................................... 139
Locking/Unlocking the Doors from the Inside ............................................. 149
Childproof Door Locks ..................... 151
Auto Door Locking/Unlocking .......... 152
Tailgate .............................................. 153
Security System
Immobilizer System .......................... 156
Security System Alarm ...................... 156
Windows ........................................... 159 Moonroof*........................................ 162
Operating the Switches Around the Steering Wheel
ENGINE START/STOP Button............. 163
Lights............................................... 166
Auto High-Beam .............................. 171
Wipers and Washers ........................ 174
Rear Defogger/Heat ed Door Mirror
*
Button ........................................... 176
Heated Windshield Button ............... 176
Adjusting the Steering Wheel........... 177
Canadian models
Mirrors Interior Rearview Mirror ................... 178
Power Door Mirrors ......................... 179
Seats Front Seats ...................................... 180
Rear Seats........................................ 183
Maintain a Proper Sitting Position .... 185
Head Restraints................................ 186
Armrest ........................................... 188
Interior Convenience Items .............. 189
Climate Control System Using Automatic Climate Control .... 203
Automatic Climate Control Sensors ... 209
* Not available on all models
23 HR-V-313V06000_01.book 133 ページ 2022年4月4日 月曜日 午前10時49分
Page 136 of 664

134
Controls
Clock
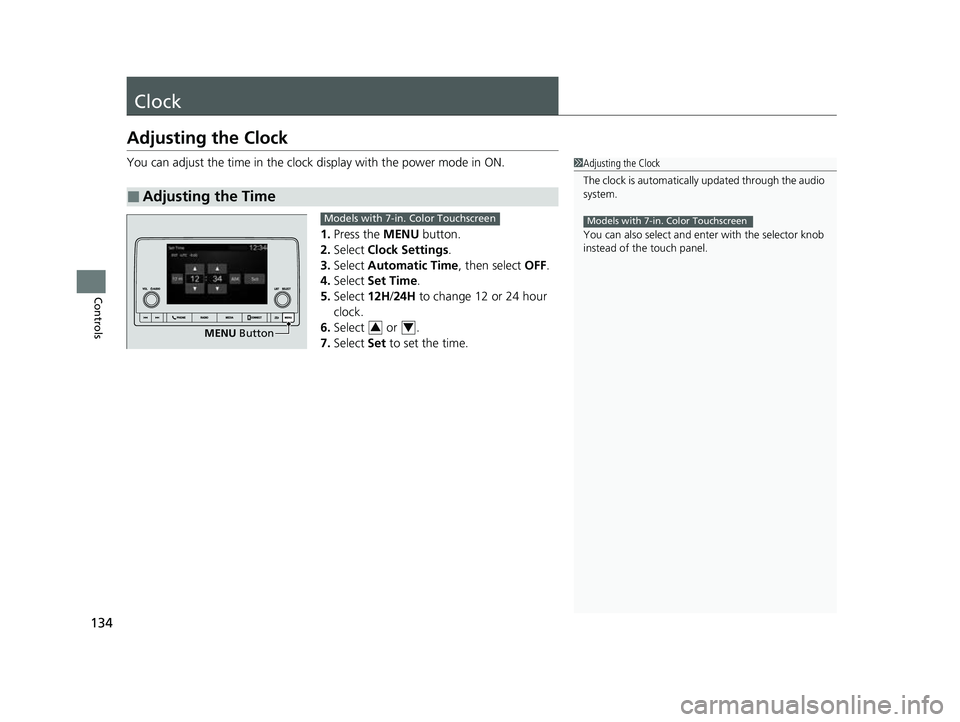
Adjusting the Clock
You can adjust the time in the clock display with the power mode in ON.
1. Press the MENU button.
2. Select Clock Settings .
3. Select Automatic Time , then select OFF.
4. Select Set Time.
5. Select 12H/24H to change 12 or 24 hour
clock.
6. Select or .
7. Select Set to set the time.
■Adjusting the Time
1Adjusting the Clock
The clock is automatically updated through the audio
system.
You can also select and en ter with the selector knob
instead of the touch panel.
Models with 7-in. Color Touchscreen
MENU Button
Models with 7-in. Color Touchscreen
34
23 HR-V-313V06000_01.book 134 ページ 2022年4月4日 月曜日 午前10時49分
Page 137 of 664

135
uuClock uAdjusting the Clock
Controls
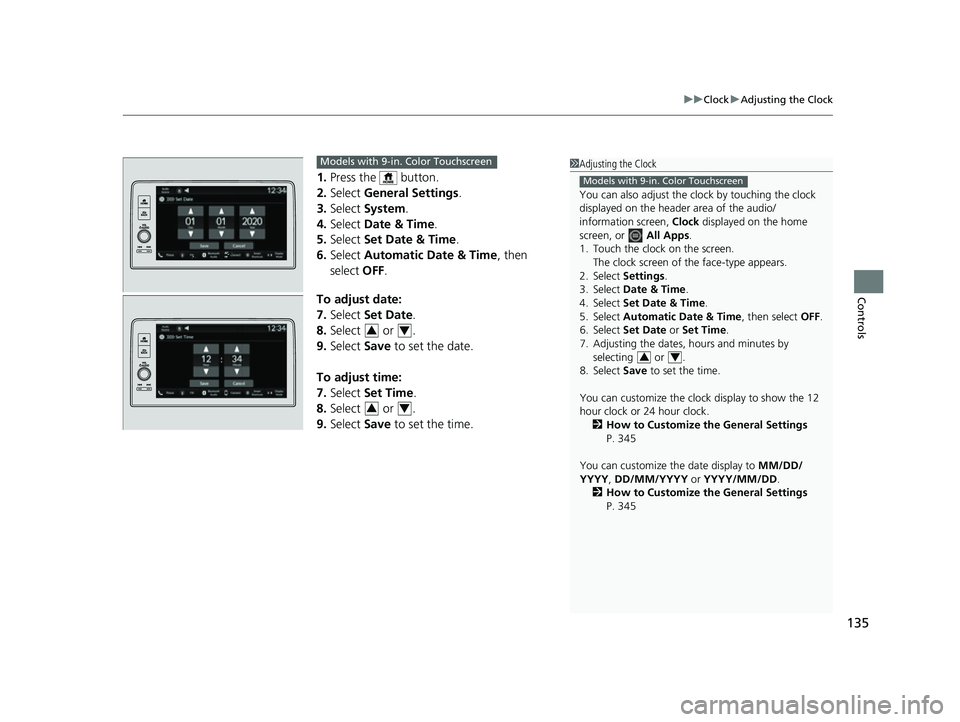
1. Press the button.
2. Select General Settings .
3. Select System.
4. Select Date & Time .
5. Select Set Date & Time .
6. Select Automatic Date & Time , then
select OFF.
To adjust date:
7. Select Set Date.
8. Select or .
9. Select Save to set the date.
To adjust time:
7. Select Set Time.
8. Select or .
9. Select Save to set the time.
1Adjusting the Clock
You can also adjust the clock by touching the clock
displayed on the header area of the audio/
information screen, Clock displayed on the home
screen, or All Apps.
1. Touch the clock on the screen. The clock screen of the face-type appears.
2. Select Settings .
3. Select Date & Time .
4. Select Set Date & Time .
5. Select Automatic Date & Time , then select OFF.
6. Select Set Date or Set Time.
7. Adjusting the dates, hours and minutes by selecting or .
8. Select Save to set the time.
You can customize the clock display to show the 12
hour clock or 24 hour clock. 2 How to Customize the General Settings
P. 345
You can customize the date display to MM/DD/
YYYY , DD/MM/YYYY or YYYY/MM/DD .
2 How to Customize the General Settings
P. 345
Models with 9-in. Color Touchscreen
34
Models with 9-in. Color Touchscreen
34
34
23 HR-V-313V06000_01.book 135 ページ 2022年4月4日 月曜日 午前10時49分
Page 221 of 664

219
Features
Audio System Basic Operation
To use the audio system, the power mode must be in ACCESSORY or ON.Use the selector knob or MENU button to
access some au dio functions.
Press to switch between the normal and
extended display fo r some functions.
Selector knob: Rotate left or right to scroll
through the available choices. Press to set
your selection.
MENU button: Press to display the menu
screen. (Back) button: Press to go back to the
previous display.
Models with 7-in. Color Touchscreen1 Audio System Basic Operation
These indications are used to show how to operate
the selector knob.
Rotate to select.
Press to enter.
Menu Items 2 Adjusting the Clock P. 134
2 Adjusting the Sound P. 220
2 Display Setup P. 221
2 Customized Features P. 337
Press the buttons on the steering wheel to change
any audio setting. 2 Audio Remote Controls P. 215
Touchscreen operation
•Use simple gestures - in cluding touching, swiping
and scrolling - to operate certain audio functions.
•Some items may be grayed out during driving to
reduce the potential for distraction.
•You can select them when the vehicle is stopped.•Wearing gloves may limit or prevent touchscreen
response.
You can change the touchs creen sensitivity setting.
2 Customized Features P. 337
(Back)
Button
Selector Knob
MENU Button
Menu Display
23 HR-V-313V06000_01.book 219 ページ 2022年4月4日 月曜日 午前10時49分
Page 250 of 664

248
uuAudio System Basic Operation uAudio/Information Screen
Features
■Trip Computer
Displays the trip computer information.
• Current Drive tab: Displays the current trip information.
• Trip A /Trip B tab: Displays information for the current and three previous drives.
The information is stored ever y time you reset Trip A/B.
To reset the Trip A/B, select Settings, then select Delete Trip History .
To change the setting of how to reset Trip A/B, select Settings, then select “Trip A”
Reset Timing or “Trip B” Reset Timing .
■System Updates
Updates the software versi on of the audio system.
2System Updates P. 257
■Clock
Displays the clock.
■Smart Shortcuts
Displays the Smart Shortcuts screen.
2Smart Shortcuts P. 297
■Display Mode
Displays the brightness bar.
■Compass*
Displays the compass screen.
* Not available on all models
23 HR-V-313V06000_01.book 248 ページ 2022年4月4日 月曜日 午前10時49分