Page 195 of 719

uuOperating the Switches Around the Steering Wheel uAuto High-Beam
194
Controls
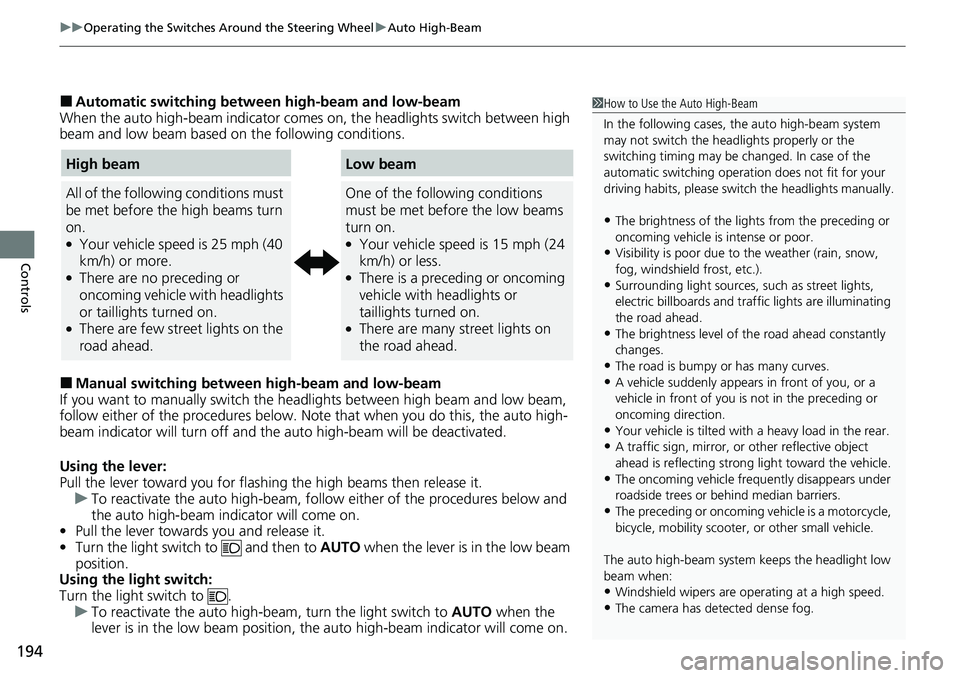
■Automatic switching between high-beam and low-beam
When the auto high-beam indicator comes on, the headlights switch between high
beam and low beam based on the following conditions.
■Manual switching between high-beam and low-beam
If you want to manually switch the headlights between high beam and low beam,
follow either of the proced ures below. Note that when you do this, the auto high-
beam indicator will turn off and the auto high-beam will be deactivated.
Using the lever:
Pull the lever toward you for flashi ng the high beams then release it.
u To reactivate the auto high-beam, follo w either of the procedures below and
the auto high-beam indicator will come on.
• Pull the lever towards you and release it.
• Turn the light switch to and then to AUTO when the lever is in the low beam
position.
Using the light switch:
Turn the light switch to .
u To reactivate the auto high-be am, turn the light switch to AUTO when the
lever is in the low beam position, the auto high-beam indicator will come on.
1 How to Use the Auto High-Beam
In the following cases, th e auto high-beam system
may not switch the head lights properly or the
switching timing may be ch anged. In case of the
automatic switching operati on does not fit for your
driving habits, please swit ch the headlights manually.
•The brightness of the lights from the preceding or
oncoming vehicle is intense or poor.
•Visibility is poor due to the weather (rain, snow,
fog, windshield frost, etc.).
•Surrounding light sources, such as street lights,
electric billboards and traf fic lights are illuminating
the road ahead.
•The brightness level of th e road ahead constantly
changes.
•The road is bumpy or has many curves.•A vehicle suddenly appears in front of you, or a
vehicle in front of you is not in the preceding or
oncoming direction.
•Your vehicle is tilted with a heavy load in the rear.•A traffic sign, mirror, or other reflective object
ahead is reflecting strong light toward the vehicle.
•The oncoming vehicle freq uently disappears under
roadside trees or be hind median barriers.
•The preceding or oncoming vehicle is a motorcycle,
bicycle, mobility scooter, or other small vehicle.
The auto high-beam system keeps the headlight low
beam when:
•Windshield wipers are op erating at a high speed.
•The camera has detected dense fog.
High beam
All of the following conditions must
be met before the high beams turn
on.
●Your vehicle speed is 25 mph (40
km/h) or more.
●There are no preceding or
oncoming vehicle with headlights
or taillights turned on.
●There are few street lights on the
road ahead.
Low beam
One of the following conditions
must be met before the low beams
turn on.
●Your vehicle speed is 15 mph (24
km/h) or less.
●There is a preceding or oncoming
vehicle with headlights or
taillights turned on.
●There are many street lights on
the road ahead.
Page 202 of 719

201
uuOperating the Switches Around the Steering Wheel uDriving Position Memory System*
Controls
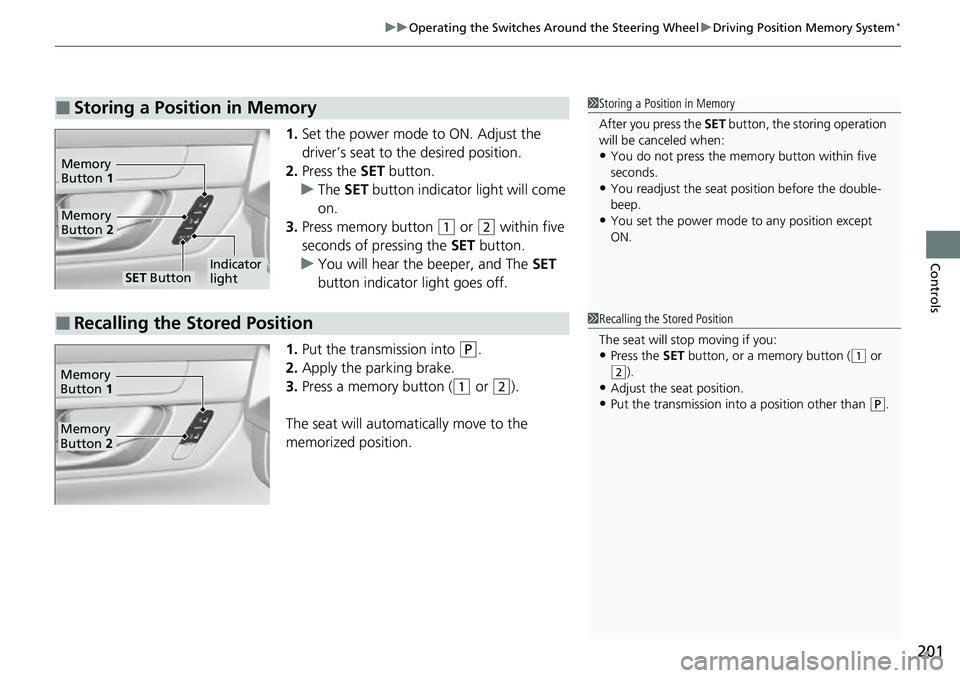
1. Set the power mode to ON. Adjust the
driver’s seat to the desired position.
2. Press the SET button.
u The SET button indicator light will come
on.
3. Press memory button
(1 or (2 within five
seconds of pressing the SET button.
u You will hear the beeper, and The SET
button indicator light goes off.
1. Put the transmission into
(P.
2. Apply the parking brake.
3. Press a memory button (
(1 or (2).
The seat will automatically move to the
memorized position.
■Storing a Position in Memory1 Storing a Position in Memory
After you press the SET button, the storing operation
will be canceled when:
•You do not press the memory button within five
seconds.
•You readjust the seat position before the double-
beep.
•You set the power mode to any position except
ON.
SET ButtonIndicator
light
Memory
Button 2
Memory
Button 1
■Recalling the Stored Position1Recalling the Stored Position
The seat will st op moving if you:
•Press the SET button, or a memory button ((1 or (2).
•Adjust the seat position.
•Put the transmission into a position other than (P.
Memory
Button 1
Memory
Button 2
Page 204 of 719
203
Controls
Mirrors
Interior Rearview Mirror
Adjust the angle of the rearview mirror when you are sitting in the correct driving
position.
Flip the tab to switch the position.
The night position will help to reduce the glare
from headlights behind you when driving
after dark.
When you are driving after dark, the
automatic dimming rearview mirror reduces
the glare from headlights behind you. Press
the AUTO button to turn this function on and
off. When activated, the AUTO indicator
comes on.
■Rearview Mirror with Day and Night Positions*
1 Mirrors
Keep the inside and out side mirrors clean and
adjusted for best visibility.
Adjust the mirrors before you start driving. 2 Front Seats P. 205
Tab
Daytime
Position Night
Position
■Automatic Dimming Rearview Mirror*
Auto Button
Sensor
1
Automatic Dimming Rearview Mirror*
The auto dimming function cancels when the
transmission is in
(R.
* Not available on all models
Page 217 of 719

216
Controls
Interior Convenience Items
Interior Lights
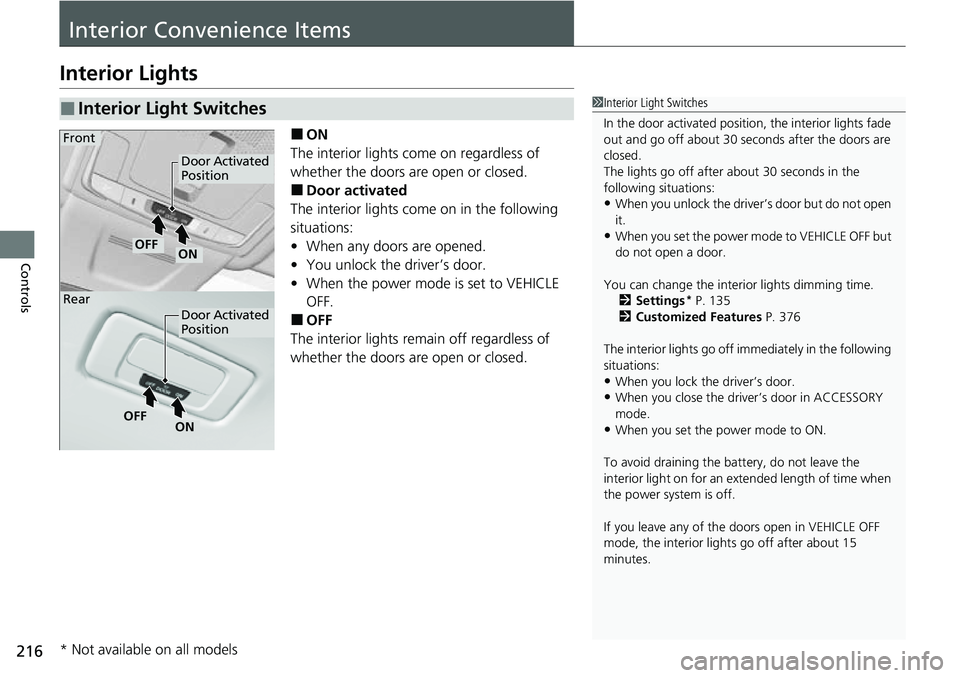
■ON
The interior lights come on regardless of
whether the doors are open or closed.
■Door activated
The interior lights come on in the following
situations:
• When any doors are opened.
• You unlock the driver’s door.
• When the power mode is set to VEHICLE
OFF.
■OFF
The interior lights remain off regardless of
whether the doors are open or closed.
■Interior Light Switches1 Interior Light Switches
In the door activated position, the interior lights fade
out and go off about 30 seconds after the doors are
closed.
The lights go off after about 30 seconds in the
following situations:
•When you unlock the driver’s door but do not open
it.
•When you set the power mode to VEHICLE OFF but
do not open a door.
You can change the interi or lights dimming time.
2 Settings
* P. 135
2 Customized Features P. 376
The interior lights go off im mediately in the following
situations:
•When you lock the driver’s door.•When you close the driver’s door in ACCESSORY
mode.
•When you set the power mode to ON.
To avoid draining the ba ttery, do not leave the
interior light on for an extended length of time when
the power system is off.
If you leave any of the doors open in VEHICLE OFF
mode, the interior light s go off after about 15
minutes.
Door Activated
Position
Door Activated
Position
ONOFF
ONOFF
Front
Rear
* Not available on all models
Page 218 of 719
217
uuInterior Convenience Items uInterior Lights
Controls
The map lights can be turned on and off by
pressing the switches.
The cargo area lights come on when you open
the tailgate.
■Map Light Switches1Map Light Switches
When the front interior li ght switch is in the door
activated position and any door is open, the map
light will not go off when you press the switches.
■Cargo Area Lights
Page 224 of 719
223
uuInterior Convenience Items uStorage Items
Controls
The cargo hooks on the both of the cargo area
can be used to hang a light items.
To open the sunglasses holder, push and
release the indent. To close, push it again until
it latches.
You can store eyeglasses and other small
items in this holder.
■Cargo Hooks1Cargo Hooks
Do not hang a large object or an object that weighs
more than 6 lbs (3 kg) on the side cargo hooks.
Hanging heavy or large objects may damage the
hooks.
Hook
■Sunglasses Holder1Sunglasses Holder
Keep the holder closed wh ile driving except when
accessing stored items.
Push
Page 225 of 719
224
uuInterior Convenience Items uOther Interior Convenience Items
Controls
Other Interior Convenience Items
The accessory power sockets can be used when the power mode is in ACCESSORY
or ON.
■Console panel
Open the cover to use it.
■Cargo area
Open the cover to use it.
■Accessory Power Socket1 Accessory Power Socket
NOTICE
Do not insert an automotive type cigarette lighter
element. This can overheat the accessory power
socket.
The accessory power socket is designed to supply
power for 12-volt DC accessories that are rated 180
watts (15 amps) or less.
To prevent battery drain, use the accessory power
socket only when the power system on.
When the accessory power soc ket is not in use, close
the cover to prevent any small foreign objects from
getting into the accessory power socket.
Page 226 of 719

Continued225
uuInterior Convenience Items uOther Interior Convenience Items
Controls
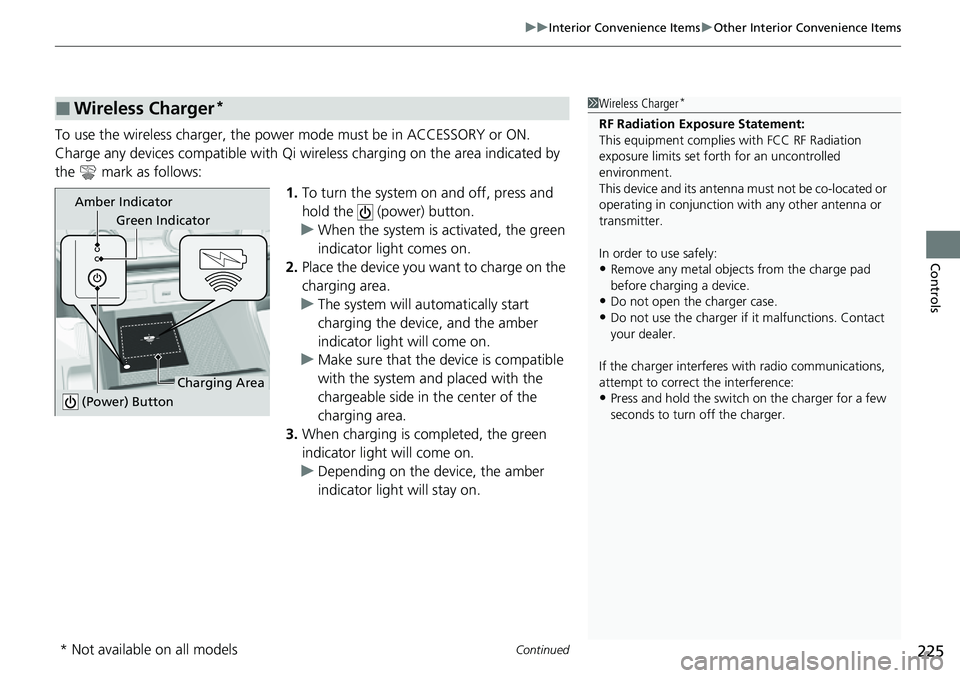
To use the wireless charger, the power mode must be in ACCESSORY or ON.
Charge any devices compatible with Qi wi reless charging on the area indicated by
the mark as follows:
1.To turn the system on and off, press and
hold the (power) button.
u When the system is activated, the green
indicator light comes on.
2. Place the device you want to charge on the
charging area.
u The system will au tomatically start
charging the device, and the amber
indicator light will come on.
u Make sure that the device is compatible
with the system and placed with the
chargeable side in the center of the
charging area.
3. When charging is completed, the green
indicator light will come on.
u Depending on the device, the amber
indicator light will stay on.
■Wireless Charger*1Wireless Charger*
RF Radiation Exposure Statement:
This equipment complies with FCC RF Radiation
exposure limits set forth for an uncontrolled
environment.
This device and its antenna must not be co-located or
operating in conjunction with any other antenna or
transmitter.
In order to use safely:
•Remove any metal objects from the charge pad
before charging a device.
•Do not open the charger case.
•Do not use the charger if it malfunctions. Contact
your dealer.
If the charger interferes with radio communications,
attempt to correct the interference:
•Press and hold the switch on the charger for a few
seconds to turn off the charger.
Green Indicator
Charging Area
(Power) Button
Amber Indicator
* Not available on all models