2023 HONDA CRV ECO mode
[x] Cancel search: ECO modePage 190 of 719

Continued189
uuOperating the Switches Around the Steering Wheel uLight Switches
Controls
Automatic lighting control can be used when
the power mode is in ON.
When the light switch is in AUTO, the
headlights and other exterior lights will switch
on and off automatically depending on the
ambient brightness.
The headlights come on when you unlock a
door in dark areas with the headlight switch in
AUTO .
u Once you lock the door, the headlights
will go off.
■Automatic Operation (automatic lighting control)1Automatic Operation (aut omatic lighting control)
We recommend that you tu rn on the lights manually
when driving at night, in a de nse fog, or in dark areas
such as long tunnels or parking facilities.
The light sensor is in the location shown below.
Do not cover this light sensor with anything;
otherwise, the automatic lighting system may not
work properly.
Light Sensor
Models without automatic
intermittent wipers
Models with automatic
intermittent wipers
Light Sensor
Page 192 of 719

191
uuOperating the Switches Around the Steering Wheel uLight Switches
Controls
The headlights, all other exterior lights, and the instrument panel lights turn off 15
seconds after you set the power mode to VEHICLE OFF, take the keyless remote with
you, and close the driver’s door.
If you set the power mode to VEHICLE OFF with the headlight switch on, but do not
open the door, the lights turn off after 10 minu tes (3 minutes, if the switch is in the
AUTO position).
The lights turn on again when you unlock or open the driver’s door. If you unlock
the door, but do not open it within 15 seconds, the lights go off. If you open the
driver’s door, you will hear a reminder chime alerting you that the lights are on.
■Automatic Lighting Off Feature1 Automatic Lighting Off Feature
You can change the headlight auto off timer setting.
2 Settings
* P. 135
2 Customized Features P. 376
* Not available on all models
Page 194 of 719

193
uuOperating the Switches Around the Steering Wheel uAuto High-Beam
Continued
Controls
Auto High-Beam
The front sensor camera detects the light sources ahead of the vehicle such as the
lights of a preceding or oncoming vehicle, or street lights. When you are driving at
night, the system automatically switches the headlights between low beam and high
beam depending on the situation.
■Activating the system
When all of the following conditions have been met, the auto high-beam indicator
comes on and between the high beam and low beam switches automatically
depending on the situation. •The power mode is in ON.
• The light switch is in AUTO.
• The lever is in the low beam position.
• The headlights have been automatically
activated.
• It is dark outside the vehicle.
If the auto high-beam indica tor does not come on even when all the conditions have
been met, carry out either of the procedures below and the indicator will come on.
• Pull the lever towards you and release it.
• Turn the light switch to th en turn the light switch to AUTO.
■How to Use the Auto High-Beam
1Auto High-Beam
The auto high-beam system does not always operate
in every situation. This syst em is just for assisting the
driver. Always observe your surroundings and switch
the headlights between high beam and low beam
manually if necessary.
If you find the timing of beam changes inconvenient
for driving, change the headlight beams manually.
The range and the distance at which the camera can
recognize varies de pending on conditions
surrounding your vehicle.
Regarding the handling of the camera mounted to
the inside of the windshiel d, refer to the following.
2 Front Sensor Camera P. 568
For the auto high-beam to work properly:
•Do not place an object that reflects light on the
dashboard.
•Keep the windshield around the camera clean.
•When cleaning the windshield, be careful not to
apply the windshield cleans er to the camera lens.
•Do not attach an object, sticker or film to the area
around the camera.
•Do not touch the camera lens.
If the camera receives a st rong impact, or repairing of
the area near the camera is required, consult a dealer.
Light Switch
Auto High-Beam
Indicator
Page 197 of 719

196
uuOperating the Switches Around the Steering Wheel uWipers and Washers
Controls
Wipers and Washers
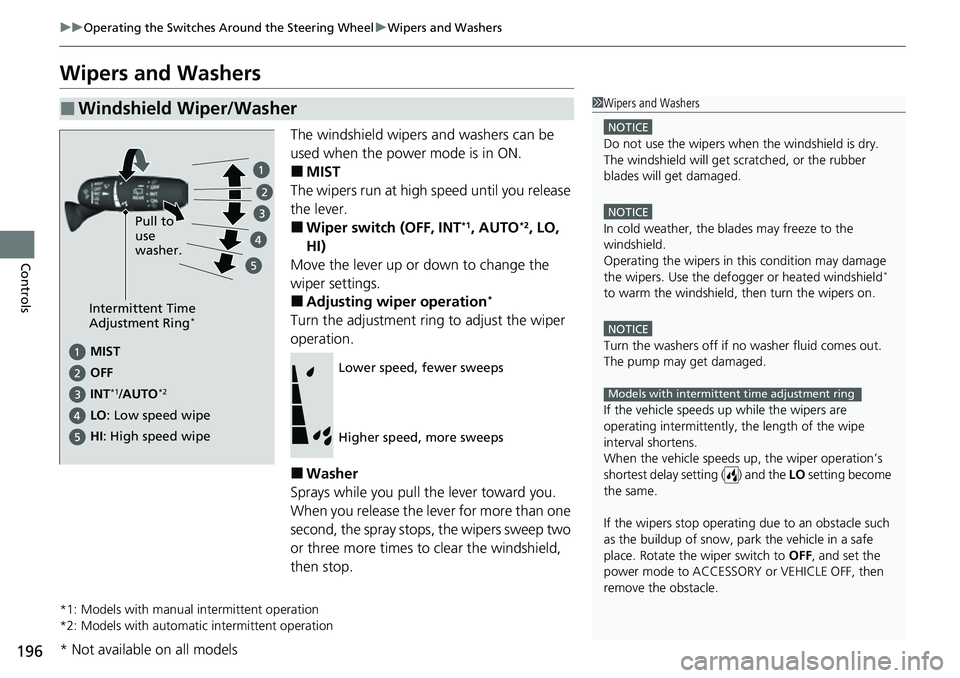
The windshield wipers and washers can be
used when the power mode is in ON.
■MIST
The wipers run at high speed until you release
the lever.
■Wiper switch (OFF, INT*1, AUTO*2, LO,
HI)
Move the lever up or down to change the
wiper settings.
■Adjusting wiper operation*
Turn the adjustment ring to adjust the wiper
operation.
■Washer
Sprays while you pull the lever toward you.
When you release the lever for more than one
second, the spray stops, the wipers sweep two
or three more times to clear the windshield,
then stop.
*1: Models with manual intermittent operation
*2: Models with automati c intermittent operation
■Windshield Wiper/Washer1Wipers and Washers
NOTICE
Do not use the wipers when the windshield is dry.
The windshield will get sc ratched, or the rubber
blades will get damaged.
NOTICE
In cold weather, the blades may freeze to the
windshield.
Operating the wipers in th is condition may damage
the wipers. Use the defogge r or heated windshield
*
to warm the windshield, then turn the wipers on.
NOTICE
Turn the washers off if no washer fluid comes out.
The pump may get damaged.
If the vehicle speeds up while the wipers are
operating intermittently, the length of the wipe
interval shortens.
When the vehicle speeds up, the wiper operation’s
shortest delay setting ( ) and the LO setting become
the same.
If the wipers st op operating due to an obstacle such
as the buildup of snow, park the vehicle in a safe
place. Rotate the wiper switch to OFF, and set the
power mode to ACCESSORY or VEHICLE OFF, then
remove the obstacle.
Models with intermittent time adjustment ring
Intermittent Time
Adjustment Ring*
MIST
INT
*1/AUTO*2
OFF
LO : Low speed wipe Pull to
use
washer.
HI: High speed wipe
Lower speed, fewer sweeps
Higher speed, more sweeps
* Not available on all models
Page 201 of 719

200
uuOperating the Switches Around the Steering Wheel uDriving Position Memory System*
Controls
Driving Position Memory System*
You can store two driver’s seat positions (except for power lumbar) with the driving
position memory system.
When you unlock and open the driver’s door with a keyless remote, the seat adjusts
automatically to one of the two preset positions.
• DRIVER 1 transmitter is linked to memory button 1.
• DRIVER 2 transmitter is linked to memory button 2.
The driver’s seat moves rearward depending
on the set seating position once you.
• Stop the vehicle.
• Put the transmission in
(P.
• Set the power mode to VEHICLE OFF.
• Open the driver’s door.
Once the power mode is in the ACCESSORY
position, the driver’s seat moves forward to
the DRIVER 1 or 2 preset position.
1 Driving Position Memory System*
Using the audio/informati on screen, you can disable
the automatic seat adjustment function.
2 Customized Features P. 376
The driver's seat easy exit feature can be turned ON/
OFF. 2 Customized Features P. 376
System Operation
The system will not operate if:
•The transmission is out of the ( P position.
•Either memory button is pressed while the seat is in
motion.
•The seat position is adju sted while in operation.
•Either of the memorized pos itions set fully to the
rear.
The system may not recognize a key if:
•The key is in close proximity to a mobile phone or
other wireless device.
•Both keys are in the vehicle at the same time.
•The Driving Position Memory System is disabled in
customized features.
•Opening driver’s door wi thout fully grabbing door
handle.
DRIVER 1 DRIVER 2
* Not available on all models
Page 202 of 719

201
uuOperating the Switches Around the Steering Wheel uDriving Position Memory System*
Controls
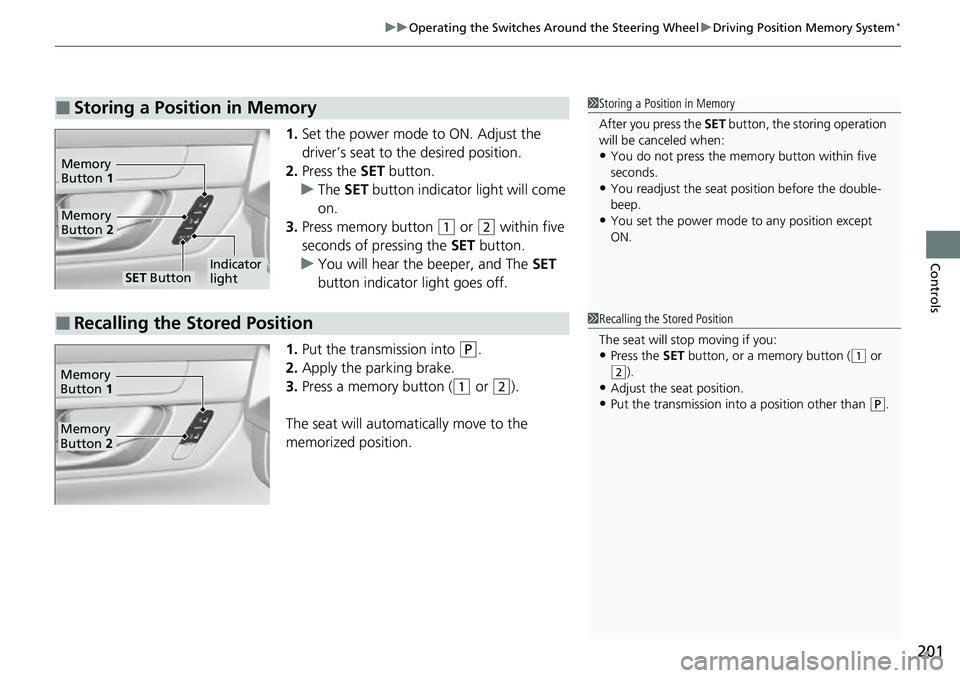
1. Set the power mode to ON. Adjust the
driver’s seat to the desired position.
2. Press the SET button.
u The SET button indicator light will come
on.
3. Press memory button
(1 or (2 within five
seconds of pressing the SET button.
u You will hear the beeper, and The SET
button indicator light goes off.
1. Put the transmission into
(P.
2. Apply the parking brake.
3. Press a memory button (
(1 or (2).
The seat will automatically move to the
memorized position.
■Storing a Position in Memory1 Storing a Position in Memory
After you press the SET button, the storing operation
will be canceled when:
•You do not press the memory button within five
seconds.
•You readjust the seat position before the double-
beep.
•You set the power mode to any position except
ON.
SET ButtonIndicator
light
Memory
Button 2
Memory
Button 1
■Recalling the Stored Position1Recalling the Stored Position
The seat will st op moving if you:
•Press the SET button, or a memory button ((1 or (2).
•Adjust the seat position.
•Put the transmission into a position other than (P.
Memory
Button 1
Memory
Button 2
Page 217 of 719

216
Controls
Interior Convenience Items
Interior Lights
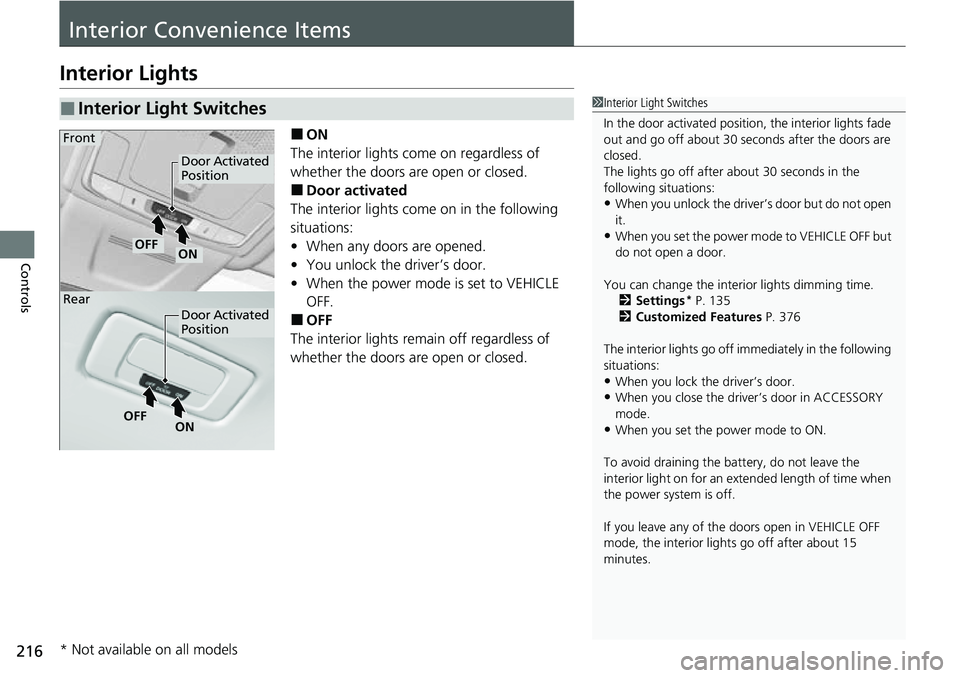
■ON
The interior lights come on regardless of
whether the doors are open or closed.
■Door activated
The interior lights come on in the following
situations:
• When any doors are opened.
• You unlock the driver’s door.
• When the power mode is set to VEHICLE
OFF.
■OFF
The interior lights remain off regardless of
whether the doors are open or closed.
■Interior Light Switches1 Interior Light Switches
In the door activated position, the interior lights fade
out and go off about 30 seconds after the doors are
closed.
The lights go off after about 30 seconds in the
following situations:
•When you unlock the driver’s door but do not open
it.
•When you set the power mode to VEHICLE OFF but
do not open a door.
You can change the interi or lights dimming time.
2 Settings
* P. 135
2 Customized Features P. 376
The interior lights go off im mediately in the following
situations:
•When you lock the driver’s door.•When you close the driver’s door in ACCESSORY
mode.
•When you set the power mode to ON.
To avoid draining the ba ttery, do not leave the
interior light on for an extended length of time when
the power system is off.
If you leave any of the doors open in VEHICLE OFF
mode, the interior light s go off after about 15
minutes.
Door Activated
Position
Door Activated
Position
ONOFF
ONOFF
Front
Rear
* Not available on all models
Page 226 of 719

Continued225
uuInterior Convenience Items uOther Interior Convenience Items
Controls
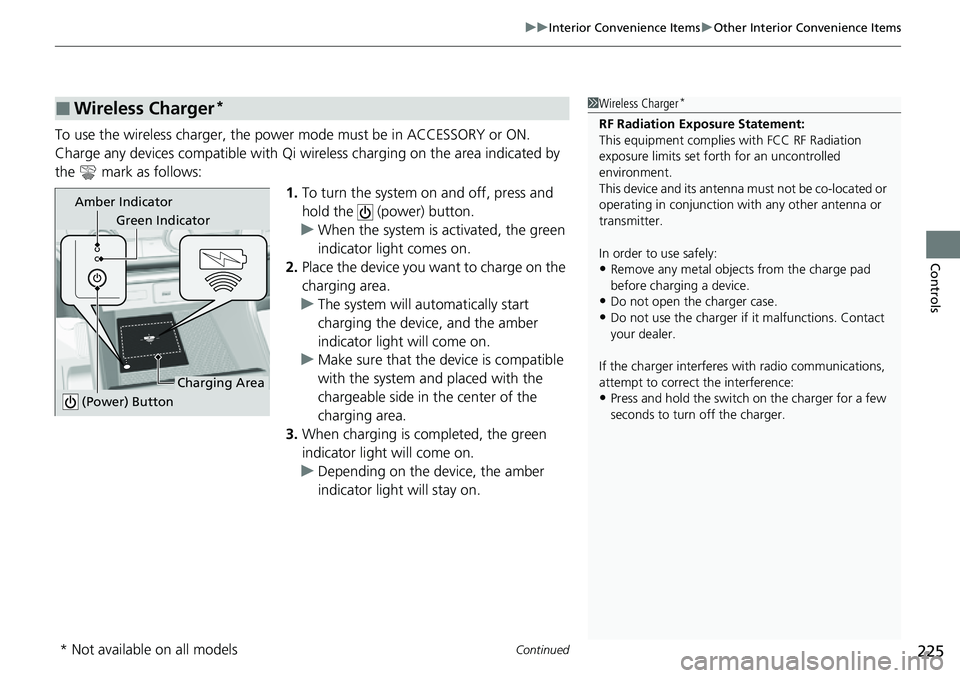
To use the wireless charger, the power mode must be in ACCESSORY or ON.
Charge any devices compatible with Qi wi reless charging on the area indicated by
the mark as follows:
1.To turn the system on and off, press and
hold the (power) button.
u When the system is activated, the green
indicator light comes on.
2. Place the device you want to charge on the
charging area.
u The system will au tomatically start
charging the device, and the amber
indicator light will come on.
u Make sure that the device is compatible
with the system and placed with the
chargeable side in the center of the
charging area.
3. When charging is completed, the green
indicator light will come on.
u Depending on the device, the amber
indicator light will stay on.
■Wireless Charger*1Wireless Charger*
RF Radiation Exposure Statement:
This equipment complies with FCC RF Radiation
exposure limits set forth for an uncontrolled
environment.
This device and its antenna must not be co-located or
operating in conjunction with any other antenna or
transmitter.
In order to use safely:
•Remove any metal objects from the charge pad
before charging a device.
•Do not open the charger case.
•Do not use the charger if it malfunctions. Contact
your dealer.
If the charger interferes with radio communications,
attempt to correct the interference:
•Press and hold the switch on the charger for a few
seconds to turn off the charger.
Green Indicator
Charging Area
(Power) Button
Amber Indicator
* Not available on all models