Page 178 of 719

Continued177
uuSecurity System uSecurity System Alarm
Controls
■When the security system alarm activates
The horn sounds intermittently, and some exterior lights flash.
■To deactivate the security system alarm
Unlock the vehicle using the key, remote tra nsmitter, or keyless access system, or
turn the power mode is set to ON. The system, along with the horn and flashing
lights, is deactivated.
■Setting the security system alarm
The security system alarm automatically sets when the following conditions have
been met:
• The power mode is set to VEHICLE OFF.
• The hood is closed.
• All doors and tailgate are locked from ou tside with the remote transmitter or
keyless access system.
■When the security system alarm sets
The security system alarm in dicator in the instrument panel blinks and the blinking
interval changes after about 15 seconds.
■To cancel the security system alarm
The security system alarm is canceled when the vehicle is unlocked using the remote
transmitter or keyless access system, or when the power mode is set to ON. The
security system alarm indicato r goes off at the same time.
1Security System Alarm
Do not set the security system alarm when someone
is in the vehicle or a window is open. The system can
accidentally activate when:
•Unlocking the door with the lock tab.•Opening the hood with the hood release handle.
•Taking the transmission out of ( P.
If the 12-volt battery goes dead after you have set the
security system alarm, the security alarm may go off
once the 12-volt battery is recharged or replaced.
If this occurs, deactivate the security system alarm by
unlocking a door using the ke y, remote transmitter,
or keyless access system.
Page 185 of 719

184
Controls
Operating the Switches Around the Steering Wheel
POWER Button
■Changing the Power Mode1POWER Button
POWER Button Operating Range
You can start the power system when the keyless
remote is inside the vehicle.
The power system may also start if the keyless remote
i s c l o s e t o t h e d o o r o r w i n d o w , e v e n i f i t i s o u t s i d e t h e
vehicle.
ON mode:
The POWER button is on (in red), if the power system
is on.
If the battery of the keyless remote is getting low, the
power system may not start when you push the
POWER button. If the power system does not start,
refer to the following link. 2 If the Keyless Remote Battery is Weak
P. 668
Do not leave the power mode in ACCESSORY or ON
when you get out.
Operating Range
VEHICLE OFF
The button is off.
The power to all electrical components is turned off.
ACCESSORY
The button blinks (in red).
Operate the audio system and other accessories
in this position.
ON
The button blinks (in red).
All electrical components can be used.
Without pressing the
brake pedal Press the butto n without the
transmission in
( P. Press the button.
Press the button with the
transmission in
( P. Put the transmission into (
P.
Page 186 of 719
185
uuOperating the Switches Around the Steering Wheel uPOWER Button
Continued
Controls
If you leave the vehicle for 30 to 60 minutes with the transmission in (P and the
power mode in ACCESSORY, the vehicle automa tically goes into the mode similar to
VEHICLE OFF to avoid draining the 12-volt battery.
If you open the driver’s door when the pow er mode is set to ACCESSORY, a warning
buzzer sounds.
■Automatic Power Off
■Power Mode Reminder
Page 189 of 719

188
uuOperating the Switches Around the Steering Wheel uLight Switches
Controls
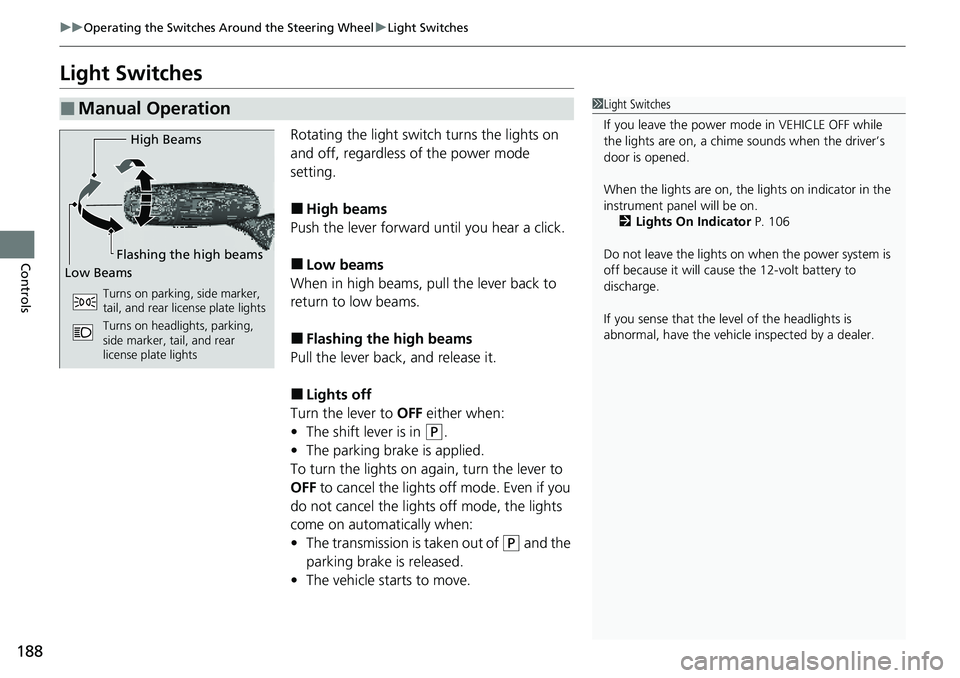
Light Switches
Rotating the light switch turns the lights on
and off, regardless of the power mode
setting.
■High beams
Push the lever forward until you hear a click.
■Low beams
When in high beams, pull the lever back to
return to low beams.
■Flashing the high beams
Pull the lever back, and release it.
■Lights off
Turn the lever to OFF either when:
• The shift lever is in
(P.
• The parking brake is applied.
To turn the lights on again, turn the lever to
OFF to cancel the lights off mode. Even if you
do not cancel the lights off mode, the lights
come on automatically when:
• The transmission is taken out of
(P and the
parking brake is released.
• The vehicle starts to move.
■Manual Operation1Light Switches
If you leave the power mode in VEHICLE OFF while
the lights are on, a chime sounds when the driver’s
door is opened.
When the lights are on, the lights on indicator in the
instrument pane l will be on.
2 Lights On Indicator P. 106
Do not leave the lights on when the power system is
off because it will caus e the 12-volt battery to
discharge.
If you sense that the le vel of the headlights is
abnormal, have the vehicl e inspected by a dealer.
High Beams
Flashing the high beams
Low Beams
Turns on parking, side marker,
tail, and rear license plate lights
Turns on headlights, parking,
side marker, tail, and rear
license plate lights
Page 200 of 719

199
uuOperating the Switches Around the Steering Wheel uRear Defogger/Heated Door Mirror Button
Controls
Rear Defogger/Heated Door Mirror Button
Press the rear defogger and heated door mirror button to defog the rear window
and mirrors when the power mode is in ON.
The rear defogger and heated door mirror
automatically switch off after 10-30 minutes
depending on the outside temperature.
However, if the outsid e temperature is 32°F
(0°C) or below, it does not automatically
switch off.
Heated Windshield Button
Press the heated windshield button to deice
the windshield at the wiper park area and
along the driver side edge of the windshield
when the power mode is in ON.
The heated windshield will automatically
switch off after 15 minutes.
1 Rear Defogger/Heated Door Mirror Button
This system consumes a lot of power, so turn it off
when the window has been defogged. Also, do not
use the system for a long time while the power
system is stopped. This may weaken the 12-volt
battery, making it difficult to turn the power system
on.
When the power mode is se t to ON and the outside
temperature is below 41°F (5°C), the heated door
mirror may automatically activate for 10 minutes.
Canadian models
1 Heated Windshield Button
This system consumes a lot of power, so turn it off
when the window has been deiced. Also, do not use
the system for a long period when the power system
is stopped. This may weaken the 12 volt battery,
making it difficult to turn the power system on.
Page 225 of 719
224
uuInterior Convenience Items uOther Interior Convenience Items
Controls
Other Interior Convenience Items
The accessory power sockets can be used when the power mode is in ACCESSORY
or ON.
■Console panel
Open the cover to use it.
■Cargo area
Open the cover to use it.
■Accessory Power Socket1 Accessory Power Socket
NOTICE
Do not insert an automotive type cigarette lighter
element. This can overheat the accessory power
socket.
The accessory power socket is designed to supply
power for 12-volt DC accessories that are rated 180
watts (15 amps) or less.
To prevent battery drain, use the accessory power
socket only when the power system on.
When the accessory power soc ket is not in use, close
the cover to prevent any small foreign objects from
getting into the accessory power socket.
Page 227 of 719

uuInterior Convenience Items uOther Interior Convenience Items
226
Controls
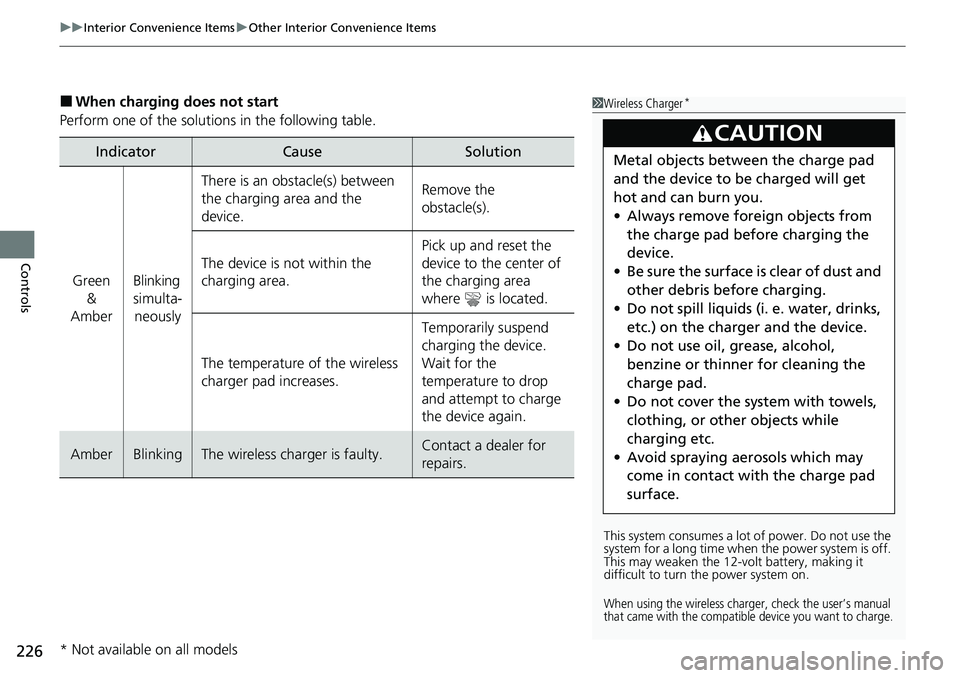
■When charging does not start
Perform one of the solution s in the following table.
IndicatorCauseSolution
Green
&
AmberBlinking
simulta- neously
There is an obstacle(s) between
the charging area and the
device.Remove the
obstacle(s).
The device is not within the
charging area. Pick up and reset the
device to the center of
the charging area
where is located.
The temperature of the wireless
charger pad increases. Temporarily suspend
charging the device.
Wait for the
temperature to drop
and attempt to charge
the device again.
AmberBlinkingThe wireless charger is faulty.Contact a dealer for
repairs.
1
Wireless Charger*
This system consumes a lot of power. Do not use the
system for a long time when the power system is off.
This may weaken the 12-v olt battery, making it
difficult to turn the power system on.
When using the wireless charge r, check the user’s manual
that came with the compatible device you want to charge.
3CAUTION
Metal objects between the charge pad
and the device to be charged will get
hot and can burn you.
• Always remove foreign objects from
the charge pad before charging the
device.
• Be sure the surface is clear of dust and
other debris before charging.
• Do not spill liquids (i. e. water, drinks,
etc.) on the charger and the device.
• Do not use oil, grease, alcohol,
benzine or thinner for cleaning the
charge pad.
• Do not cover the system with towels,
clothing, or other objects while
charging etc.
• Avoid spraying aerosols which may
come in contact with the charge pad
surface.
* Not available on all models
Page 229 of 719
uuInterior Convenience Items uOther Interior Convenience Items
228
Controls
1Wireless Charger*
During the charging phase, it is normal for the
charging area and de vice to heat up.
Charging may be briefl y interrupted when:
•All the doors and the tailgate are closed
- to avoid interference with the proper functioning
of the keyless access system.
•The position of the device is altered.
Do not charge more than one device at a time on a
charging area.
If the device becomes too hot and its battery
protection function activa tes, it may charge
extremely slowly or no longer charge.
The temperature at which the battery protection
function activates de pends on the device.
* Not available on all models