2023 HONDA CRV Trip B
[x] Cancel search: Trip BPage 143 of 719

142
uuGauges and Driver Information Interface uDriver Information Interface
Instrument Panel
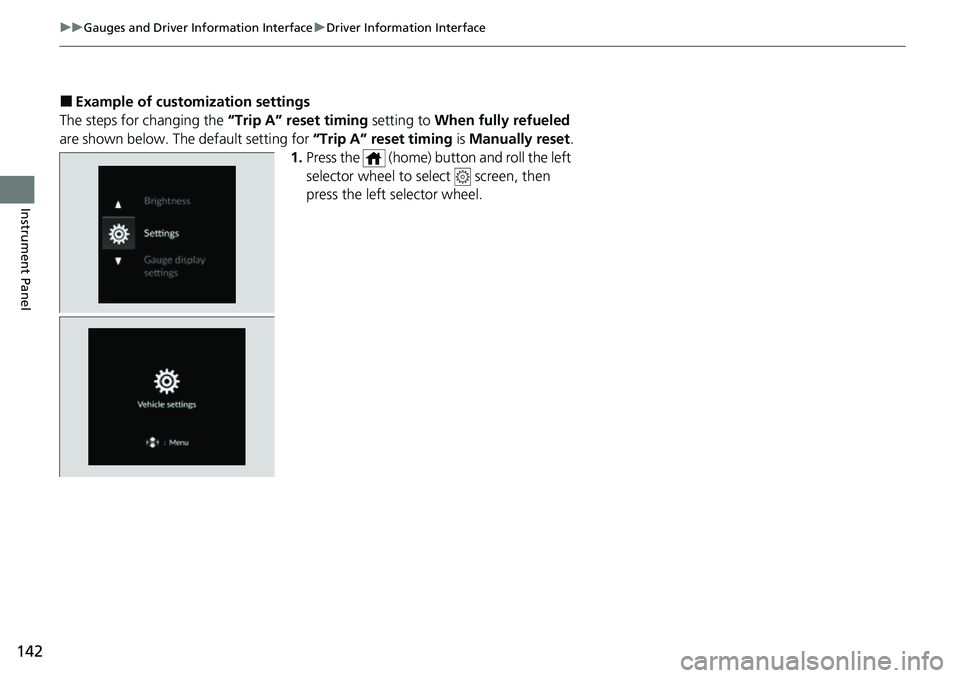
■Example of customization settings
The steps for changing the “Trip A” reset timing setting to When fully refueled
are shown below. The default setting for “Trip A” reset timing is Manually reset.
1. Press the (home) button and roll the left
selector wheel to select screen, then
press the left selector wheel.
Page 144 of 719

143
uuGauges and Driver Information Interface uDriver Information Interface
Continued
Instrument Panel
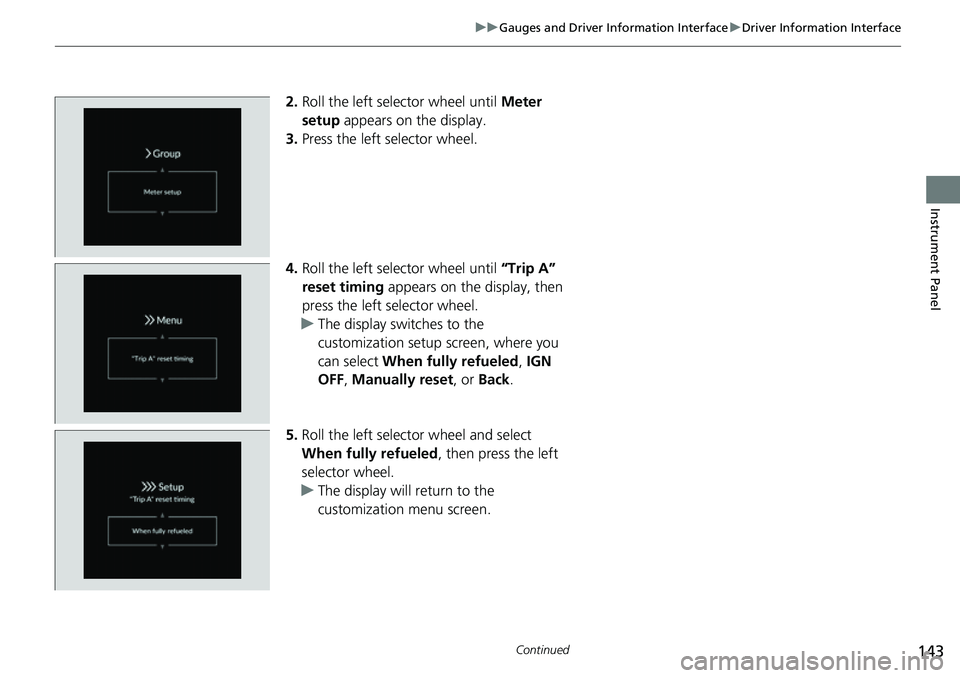
2. Roll the left selector wheel until Meter
setup appears on the display.
3. Press the left selector wheel.
4. Roll the left selector wheel until “Trip A”
reset timing appears on the display, then
press the left selector wheel.
u The display swit ches to the
customization setup screen, where you
can select When fully refueled , IGN
OFF , Manually reset , or Back .
5. Roll the left selector wheel and select
When fully refueled , then press the left
selector wheel.
u The display will return to the
customization menu screen.
Page 276 of 719

275
uuAudio System Basic Operation uAudio/Information Screen
Continued
Features
■Trip Computer
Displays the trip computer information.
• Current Drive tab: Displays the current trip information.
• Trip A /Trip B tab: Displays information for the current and three previous drives.
The information is stored ever y time you reset Trip A/B.
To reset the Trip A/B, select Settings, then select Delete Trip History .
To change the setting of how to reset Trip A/B, select Settings, then select “Trip A”
Reset Timing or “Trip B” Reset Timing .
■System Updates
Updates the software version of the audio system.
2 System Updates P. 284
■Wi-Fi Hotspot*
Displays the AT&T Hotspot screen.
2AT&T Hotspot* P. 328
■Clock
Displays the clock.
■Smart Shortcuts
Displays the Smart Shortcuts screen.
2Smart Shortcuts P. 324
■Display Mode
Displays the brightness bar.
■Compass*
Displays the compass screen.
* Not available on all models
Page 391 of 719

390
uuCustomized Features u
Features
Turn By Turn Auto Display
Speed/Distance Units
Keyless Access Light Flash
Rear Seat Reminder
Door Unlock Mode
Keyless Access Beep
Remote Start System ON/OFF
Lockout Protection
Keyless Access Setup
Meter SetupAdjust Outside Temp. Display
"Trip A" Reset Timing
"Trip B" Reset Timing
Adjust Alarm Volume
Fuel Efficiency Backlight
Memory Position Link
Seat Position Movement At Entry/Exit
Driving Position Setup
Page 395 of 719

394
uuCustomized Features u
Features
■Meter Setup
*1:Default Setting
Customizable Features Description Selectable Settings
Adjust Outside Temp.
DisplaySelects to adjust outside temperature reading by a few degrees.2Outside Temperature P. 115
-5°F ~ ±0°F*1 ~ +5°F (U.S.)
-3°C ~ ±0°C*1 ~ +3°C (Canada)
"Trip A" Reset Timing Selects the timing to reset Trip A.
2
Range / Fuel / Trip Meter P. 121
2 Speed / Time / Trip Meter P. 123When Fully Refueled /IGN OFF /
Manually Reset*1
"Trip B" Reset TimingSelects the timing to reset Trip B.
2 Range / Fuel / Trip Meter P. 121
2 Speed / Time / Trip Meter P. 123When Fully Refueled /IGN OFF /
Manually Reset*1
Adjust Alarm Volume Changes volume level of all system warnings, door opening
warning and indicator. High/
Mid*1/Low
Fuel Efficiency BacklightTurns the ambient meter feature on and off.ON*1/OFF
Turn By Turn Auto Display Turns the pop-up warning ON/OFF in the turn-by-turn
navigation in the driver
information interface.
2Turn-by-Turn Directions P. 125ON*1/OFF
Speed/Distance UnitsSelects the trip computer units.
2 No Content P. 132
km/h · km/mph · miles*1 (U.S.)
km/h · km*1/ mph · miles (Canada)
Rear Seat Reminder Turns the Rear Seat Reminder feature on and off. ON
*1/OFF
Page 632 of 719

631
Maintenance
Checking and Maintaining Tires
Checking Tires
To safely operate your vehicle, your tires must be of the proper type and size, in
good condition with adequate tread, and properly inflated.
■Inflation guidelines
Properly inflated tires provid e the best combination of hand ling, tread life, and comfort.
Refer to the driver’s doorjamb label or spec ifications page for the specified pressure.
Underinflated tires wear unev enly, adversely affect handling and fuel economy, and
are more likely to fail from overheating.
Overinflated tires make your vehicle ride ha rshly, are more prone to road hazards,
and wear unevenly.
Every day before you drive, look at each of the tires. If one looks lower than the
others, check the pressure with a tire gauge.
At least once a month or before long trips , use a gauge to measure the pressure in
all tires. Even tires in good condition can lose 1–2 psi (10–20 kPa, 0.1–0.2 kgf/cm
2)
per month.
■Inspection guidelines
Every time you check inflation, also examine the tires and valve stems.
Look for:
• Bumps or bulges on the side or in the tread. Replace the tire if you find any cuts,
splits, or cracks in the side of the tire . Replace it if you see fabric or cord.
• Remove any foreign objects and inspect for air leaks.
• Uneven tread wear. Have a deal er check the wheel alignment.
• Excessive tread wear.
2 Wear Indicators P. 636
•Cracks or other damage around valve stem.
1Checking Tires
Measure the air pressure when tires are cold. This
means the vehicle has been parked for at least three
hours, or driven less than 1 mile (1.6 km). If
necessary, add or releas e air until the specified
pressure is reached.
If checked when hot, tire pressure can be as much as
4–6 psi (30–40 kPa, 0.3–0.4 kgf/cm
2) higher than if
checked when cold.
Whenever tire pressure is adjusted, you must
calibrate the TPMS. 2 Tire Pressure Monitoring System (TPMS)
P. 480
Have a dealer check the tires if you feel a consistent
vibration while driving. Ne w tires and any that have
been removed and reinst alled should be properly
balanced.
3WARNING
Using tires that are excessively worn or
improperly inflated can cause a crash in
which you can be seriously hurt or killed.
Follow all instruction s in this owner’s
manual regarding ti re inflation and
maintenance.
U.S. models
Page 706 of 719

705
Information
Customer Service Information
Honda dealership personnel are trained professionals able to deal with any problems
you may encounter with your vehicle. If, however, you are faced with a problem that
they cannot resolve to your satisfaction, contact Honda Customer Services.
U.S. Owners
American Honda Motor Co., Inc.
Honda Automobile Customer Service
Mail Stop CHI-5
1919 Torrance Blvd.
Torrance, CA 90501-2746
Tel: 1 (800) 999-1009 Canadian Owners
Honda Canada Inc.
Customer Relations
180 Honda Boulevard
Markham, ON
L6C 0H9
Tel: 1-888-9-HONDA-9
Fax: 1-877-939-0909
E-mail: [email protected]
In Puerto Rico a nd the U.S. Virgin
Islands
Bella International
P.O. Box 190816
San Juan, PR 00919-0816
Tel: 1 (787) 620-7546 In Guam
Triple J Autogroup
157 S. Marine Corps Drive
Tamuning, GU 96913
Tel: (671) 648-2277
In Saipan, Commonwealth of the
Northern Mariana Island
Joeten Motor Company, Inc.
P.O Box 500680
Saipan, MP 96950
Tel: (670) 234-55621
Customer Service Information
When you call or write, please give us the following
information:
•Vehicle Identification Number
2Vehicle Identification Number (VIN),
Engine Number, Motor Number, and
Transmission Number P. 696
•Date of purchase•Odometer reading of your vehicle
•Your name, address, and telephone number
•A detailed description of the problem•Name of the dealer who sold the vehicle to you
Page 715 of 719

714
Index
O
Odometer.................................................. 114
Off-Highway Driving Guidelines .............. 453
Oil (Engine) ............................................... 613
Adding .................................................... 615
Checking ................................................. 614
Displaying Oil Life .................................... 604
Low Oil Pressure Indicator ........................ 676
Recommended Engine Oil ........................ 613
Viscosity .......................................... 613, 695
Open Source Licenses ....................... 363, 706
Opening/Closing Hood ....................................................... 612
Moonroof ................................................ 183
Power Windows ...................................... 179
Tailgate ................................................... 165
Outside Temperature Display .................. 115
Overheating .............................................. 674
P
Paddle Selectors ........................................ 466
Panic Mode ............................................... 178
Parking ...................................................... 582
Parking Brake ............................................ 572
Parking Brake and Brake System Indicator (Amber) ........................................... 100, 680
Parking Brake and Brake System Indicator (Red) .................................... 98, 99, 679, 680
Parking Sensor System .............................. 584
Passenger Airbag Off Indicator ................. 76Passing Indicators
..................................... 188
Petrol
Gauge ..................................................... 114
Phone ........................................................ 124
Playing Bluetooth ® Audio ................ 257, 317
POWER Button ......................................... 184
Power Flow ............................................... 342
Power Flow/Engine Status Display/High
Voltage Battery Charge Level Gauge .... 119
POWER Gauge .......................................... 114
Power System
Won’t Start ............................................. 667
POWER SYSTEM Indicator ........................ 100
Power System Won’t Start ....................... 667
Power Tailgate ......................................... 168
Power Windows ....................................... 179
Precautions While Driving
Rain ........................................................ 462
Pregnant Women ....................................... 57
Puncture (Tire) .......................................... 653R
Radiator.................................................... 619
Radio (FM/AM) ................................. 249, 296
Radio (SiriusXM ®) ..................................... 300
Radio Data System (RDS) ................. 250, 298
Range ........................................................ 122
RDS (Radio Data System) ................. 250, 298
Readiness Codes (Emissions Testing) ....... 699
READY Indicator ....................................... 100 Real Time AWD with Intelligent Control
System
TM.................................................. 479
Rear Defogger/Heated Door Mirror Button ..................................................... 199
Rear Seat Heaters ..................................... 231
Rear Seats (Folding Down) ...................... 210
Rearview Mirror ....................................... 203
Refueling .......................................... 439, 595
Fuel Gauge ............................................. 114
Gasoline ......................................... 595, 694
Low Fuel Indicator (Amber) ..................... 103
Regulations .............................. 485, 634, 697
Remote Transmitter ................................. 157
Replacement
Battery .................................................... 642
Bulbs ...................................................... 623
Fuses .............................................. 683, 685
Rear Wiper Blade Rubber ........................ 629
Tires........................................................ 637
Wiper Blade Rubber ................................ 627
Reporting Safety Defects ......................... 698
Resetting a Trip Meter ............................. 122
Road Departure Mitigation ..................... 554
On and Off ............................................. 557