Page 618 of 719

617
uuMaintenance Under the Hood uChanging the Engine Oil and Oil Filter
Maintenance
5. Remove the oil filter and dispose of the
remaining oil.
6. Check that the filter gasket is not stuck to
the engine contact surface.
u If it is stuck, you must detach it.
7. Wipe away dirt and dust adhering to the
contact surface of the engine block, and
install a new oil filter.
u Apply a light coat of new engine oil to
the filter gasket.
8. Put a new washer on the drain bolt, then
reinstall the drain bolt.
u Tightening torque:
30 lbf∙ft (40 N∙m, 4.0 kgf∙m)
9. Pour the recommended engine oil into the
engine.
u Engine oil change capacity (including filter):
4.2 US qt (4.0 L)
10. Reinstall the engine oil fill cap securely and
start the engine.
11. Run the engine for a few minutes, and
then check that there is no leak from the
drain bolt or oil filter.
12. Stop the engine, wait for three minutes,
and then check the oil level on the
dipstick.
u If necessary, add more engine oil.
13. Reinstall the under cover in the same order
it was removed.1Changing the Engine Oil and Oil Filter
You will need a special wrench to replace the oil
filter. You can buy this wrench from a dealer.
When installing the new oil filter, follow the
instructions supplied with the oil filter.
Reinstall the engine oil fill cap. Start the engine. If the
Engine oil pressure low warning appears, turn off
the engine, and check your work.
Oil Filter
Page 624 of 719
623
Maintenance
Replacing Light Bulbs
Headlights
Headlights are LED type. Have an authorized Honda dealer inspect and replace the
light assembly.
Front Turn Signal, Parkin g/Daytime Running Lights
Front turn signal, parking/daytime running lights are LED type. Have an authorized
Honda dealer inspect and replace the light assembly.
Front Side Marker Lights
Front side marker lights are LED type. Have an authorized Hond a dealer inspect and
replace the light assembly.
Side Turn Signal/Emer gency Indicator Lights
Door mirror side turn lights are LED type. Have an authorized Honda dealer inspect
and replace the light assembly.
1 Headlights
The headlight aim is set by the factory, and does not
need to be adjusted. Howeve r, if you regularly carry
heavy items in the cargo area or tow a trailer, have
the aiming readjusted at a dealer or by a qualified
technician.
Page 625 of 719
624
uuReplacing Light Bulbs uBrake Light, Taillight, Rear Side Marker Light, and Rear Turn Signal Light Bulbs
Maintenance
Brake Light, Taillight, Rear Side Marker Light, and
Rear Turn Signal Light Bulbs
When replacing, use the following bulbs.
1.Unscrew the bolts.
2. Pull the taillight carefully until the snap pins
are removed from the body grommets.
Brake Light: LED
Taillight: LED
Rear Side Marker Light: LED
Rear Turn Signal Li ght: 21 W (Amber)
1Brake Light, Taillight, Rear Side Marker Light, and Rear Turn
Signal Light Bulbs
Brake lights, taillight s, and rear side marker lights are
LED type. Have an authorized Honda dealer inspect
and replace the light assembly.
Bolt
Snap Pin
Page 626 of 719
625
uuReplacing Light Bulbs uBrake Light, Taillight, Rear Side Marker Light, and Rear Turn Signal Light Bulbs
Maintenance
3.Pull the light assembly out of the rear pillar.
4. Turn the socket counter-clockwise and
remove it.
5. Remove the old bulb and insert a new bulb.
6. Align the pins with the body grommets,
then push in until they fully seat.
SocketBulb
Page 627 of 719
626
uuReplacing Light Bulbs uTaillight and Back-Up Lights
Maintenance
Taillight and Back-Up Lights
Taillights and back-up lights are LED type. Ha ve an authorized Honda dealer inspect
and replace the light assembly.
Rear License Plate Light
Rear license plate light is LED type. Have an authorized Honda dealer inspect and
replace the light assembly.
High-Mount Brake Light
High-mount brake light is LED type. Have an authorized Honda dealer inspect and
replace the light assembly.
Page 649 of 719

uuCleaning uExterior Care
648
Maintenance
The inside lenses of exterior lights (headli ghts, brake lights, etc.) may fog temporarily
if you have driven in the rain, or after the vehicle has been run through a car wash.
Dew condensation also may build up inside the lenses when there is a significant
enough difference between the ambient and inside lens temperatures (similar to
vehicle windows fogging up in rainy conditions). These conditions are natural
processes, not structural design problems in the exterior lights.
Lens design characteristics may result in mo isture developing on the light lens frame
surfaces. This also is not a malfunction.
However, if you see large amounts of wa ter accumulation, or large water drops
building up inside the lenses, have your vehicle inspected by a dealer.
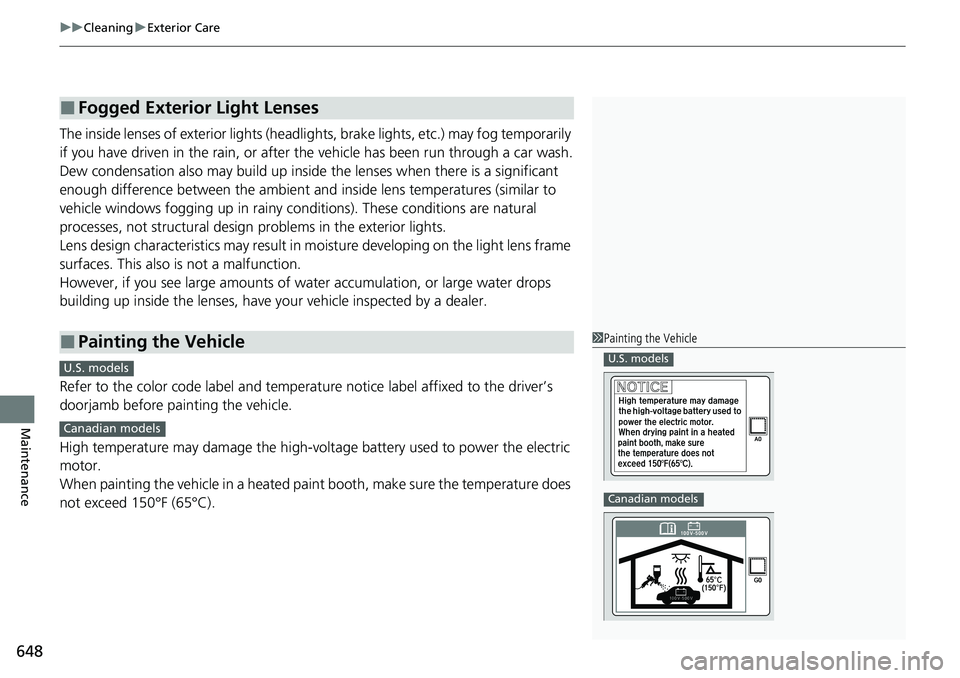
Refer to the color code label and temperat ure notice label affixed to the driver’s
doorjamb before painting the vehicle.
High temperature may damage the high-volt age battery used to power the electric
motor.
When painting the vehicle in a heated paint booth, make sure the temperature does
not exceed 150°F (65°C).
■Fogged Exterior Light Lenses
■Painting the Vehicle1 Painting the Vehicle
U.S. models
Canadian models
C
U.S. models
Canadian models
Page 654 of 719

653Continued
Handling the Unexpected
If a Tire Goes Flat
Temporarily Repairing a Flat Tire
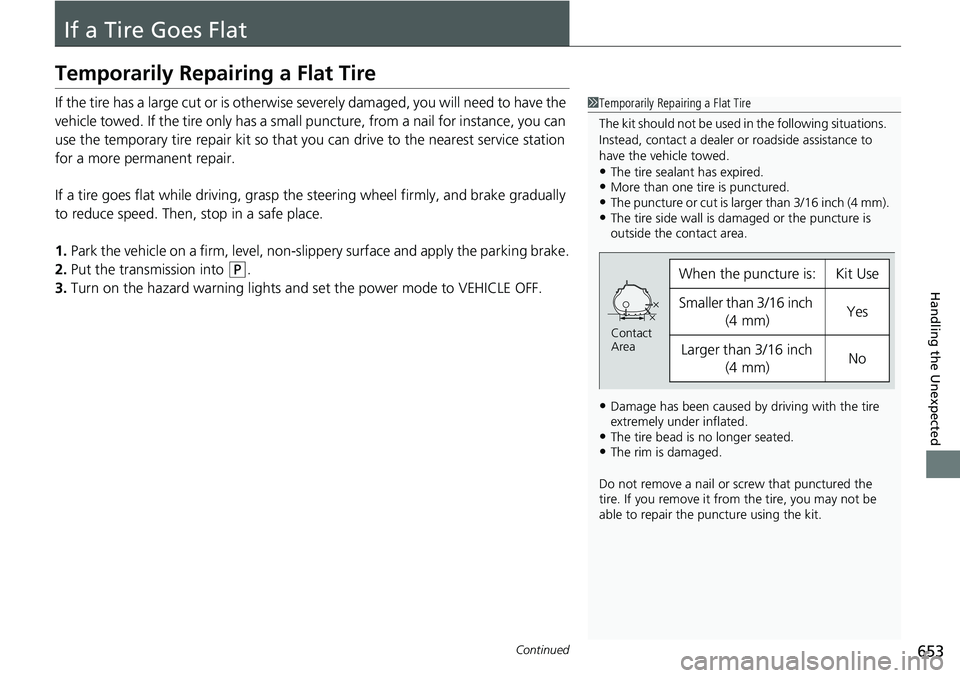
If the tire has a large cut or is otherwise severely damaged, you will need to have the
vehicle towed. If the tire only has a small puncture, from a nail for instance, you can
use the temporary tire repair kit so that you can drive to the nearest service station
for a more permanent repair.
If a tire goes flat while driving, grasp the steering wheel firmly, and brake gradually
to reduce speed. Then, stop in a safe place.
1. Park the vehicle on a firm, level, non-slippery surface and apply the parking brake.
2. Put the transmission into
(P.
3. Turn on the hazard warning lights an d set the power mode to VEHICLE OFF.
1Temporarily Repairing a Flat Tire
The kit should not be used in the following situations.
Instead, contact a dealer or roadside assistance to
have the vehicle towed.
•The tire sealant has expired.•More than one tire is punctured.•The puncture or cut is larger than 3/16 inch (4 mm).•The tire side wall is da maged or the puncture is
outside the contact area.
•Damage has been caused by driving with the tire
extremely under inflated.
•The tire bead is no longer seated.•The rim is damaged.
Do not remove a nail or screw that punctured the
tire. If you remove it from the tire, you may not be
able to repair the puncture using the kit.
When the puncture is:Kit Use
Smaller than 3/16 inch
(4 mm)Yes
Larger than 3/16 inch (4 mm)No
Contact
Area
Page 672 of 719

671Continued
Handling the Unexpected
If the 12-Volt Battery Is Dead
Jump Starting Procedure
Turn off the power to electric devices, such as audio and lights. Turn off the power
system, then open the hood. 1.Open the terminal cover on your vehicle’s
12-volt battery positive + terminal.
2. Connect the first jumper cable to your
vehicle's 12-volt battery + terminal.
3. Connect the other end of the first jumper
cable to the booster battery + terminal.
u Use a 12-volt booster battery only.
u
When using an automotive battery charger
to boost your 12-volt battery, select a
lower charging voltage than 15-volt. Check
the charger manual for the proper setting.
4. Connect the second jumper cable to the
booster battery - terminal.
5. Connect the other end of the second
jumper cable to the engine mounting bolt
as shown. Do not connect this jumper cable
to any other part.
6. If your vehicle is connected to another
vehicle, start the assisting vehicle's engine
and increase its rpm slightly.
7. Attempt to start your ve hicle's engine. If it
turns over slowly, check that the jumper
cables have good metal-to-metal contact.
1 Jump Starting Procedure
Securely attach the jumper cables clips so that they
do not come off when the e ngine vibrates. Be careful
not to tangle the jumper cables or allow the cable
ends to touch each other while attaching or
detaching the jumper cables.
12-volt battery performa nce degrades in cold
conditions and may prevent the engine from starting.
The Vehicle Stability Assist
TM (VSA ®) system, brake
system (Amber), Adaptive Cruise Control (ACC) with
Low Speed Follow, low tire pressure/TPMS
* and
Safety Support indicators may come on along with a
message in the gauge when you set the power mode
to ON after reconnecting the 12-volt battery.
Drive a short distance at more than 12 mph (20 km/h).
Each indicator should go off. If any do not, have your
vehicle checked by a dealer.
3WARNING
A 12-volt battery can explode if you do not
follow the correct procedure, seriously
injuring anyone nearby.
Keep all sparks, open flames, and smoking
materials away from the 12-volt battery.
Booster Battery
* Not available on all models