2023 GMC YUKON DENALI instrument cluster
[x] Cancel search: instrument clusterPage 209 of 432
GMC Yukon/Yukon XL/Denali Owner Manual (GMNA-Localizing-U.S./
Canada/Mexico-16417394) - 2023 - CRC - 5/16/22
208 Driving and Operating
Drive Systems
Four-Wheel Drive
If equipped, four-wheel drive engages the
front axle for extra traction.
Read the appropriate section for transfer
case operation before using.
Caution
Do not drive on clean, dry pavement in
4
mand 4n(if equipped) for an extended
period of time. These conditions may
cause premature wear on the vehicle’s
powertrain.
Driving on clean, dry pavement in 4
mor
4
nmay:
.Cause a vibration to be felt in the
steering system.
.Cause tires to wear faster.
{Warning
If equipped with four-wheel drive, the
vehicle will be free to roll if the transfer
case is in N (Neutral), even when the
transmission is in P (Park). You or (Continued)
Warning (Continued)
someone else could be seriously injured.
Be sure the transfer case is in a drive
gear—2
m, 4m, or 4n—or set the
parking brake before placing the transfer
case in N (Neutral). See Shifting Into Park
0 201.
Caution
Extended high-speed operation in 4n
may damage or shorten the life of the
drivetrain.
An engagement noise and bump is normal
when shifting between 4
nand 4mor
N (Neutral), with the engine running.
Shifting into 4
nwill turn Traction Control
and StabiliTrak/Electronic Stability Control
(ESC) off. See Traction Control/Electronic
Stability Control 0214.
Automatic Transfer Case
Two-Speed Transfer Case
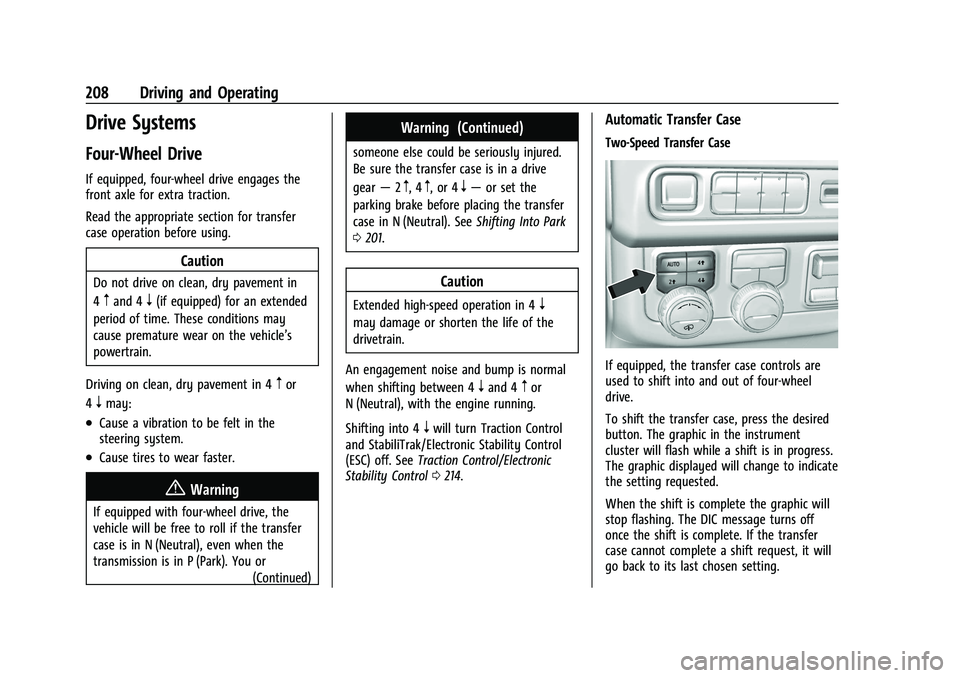
If equipped, the transfer case controls are
used to shift into and out of four-wheel
drive.
To shift the transfer case, press the desired
button. The graphic in the instrument
cluster will flash while a shift is in progress.
The graphic displayed will change to indicate
the setting requested.
When the shift is complete the graphic will
stop flashing. The DIC message turns off
once the shift is complete. If the transfer
case cannot complete a shift request, it will
go back to its last chosen setting.
Page 211 of 432
GMC Yukon/Yukon XL/Denali Owner Manual (GMNA-Localizing-U.S./
Canada/Mexico-16417394) - 2023 - CRC - 5/16/22
210 Driving and Operating
for the shift to occur. After this time, a
graphic in the instrument cluster will
indicate that the transfer case is in 4
n.
Caution
Shifting the transmission into gear before
the requested mode indicator light has
stopped flashing could damage the
transfer case.
If the transmission is not shifted into
N (Neutral) or the vehicle has not slowed to
5 km/h (3 mph) within 20 seconds, the
transfer case will remain in its original state.
This will be indicated in the instrument
cluster.
With the vehicle moving less than
5 km/h (3 mph) and the transmission in
N (Neutral), attempt the shift again.
Shifting Out of 4
n
1. The vehicle must be stopped or moving less than 5 km/h (3 mph) with the
transmission in N (Neutral) and the
ignition on. It is best for the vehicle to
be moving 1.6 to 3.2 km/h (1 to 2 mph).
2. Press 4
m, AUTO, or 2m. The actual 4x4
shift request is only made after the
button is released. The 4x4 graphic will remain flashing until the shift request
has completed. A DIC message displays
to indicate the state of the request.
Once the 4x4 shift has completed, the
DIC message disappears, the 4x4 graphic
stops flashing, and the current setting is
indicated.
If vehicle speed is higher when shift
request occurs, a DIC message displays.
Reduce vehicle speed.
If the transmission is not in N (Neutral)
when shift request occurs, DIC messages will
display. The vehicle will allow 20 seconds for
this shift to occur. After this time, a graphic
in the instrument cluster will indicate that
the transfer case is in 4
n.
Caution
Shifting the transmission into gear before
the requested mode indicator light has
stopped flashing could damage the
transfer case.
If the transmission is not shifted into
N (Neutral) or the vehicle has not slowed to
5 km/h (3 mph) within 20 seconds, the
transfer case will remain in its original state.
This will be indicated in the instrument
cluster. With the vehicle moving less than 5 km/h
(3 mph), and the transmission in N (Neutral),
attempt the shift again.
Shifting Into N (Neutral)
To shift into N (Neutral):
1. Start the vehicle.
2. Shift the transmission to N (Neutral).
3. Shift the transfer case to 2
m.
4. Apply the parking brake and/or brake pedal.
5. Press 2
mfive times in 10 seconds until
the N (Neutral) graphic starts flashing in
the instrument cluster. When the shift is
complete, the graphic stops flashing.
If the parking brake and/or brake pedal
is not applied within 20 seconds, the
transfer case will remain in the original
state.
6. If the transmission is not shifted into N (Neutral) or the vehicle has not slowed
to 5 km/h (3 mph) within 20 seconds,
the transfer case will remain in its
original state. This will be indicated in
the instrument cluster.
Page 212 of 432
GMC Yukon/Yukon XL/Denali Owner Manual (GMNA-Localizing-U.S./
Canada/Mexico-16417394) - 2023 - CRC - 5/16/22
Driving and Operating 211
Shifting Out of N (Neutral)
To shift out of N (Neutral):1. Turn the ignition on with the engine off. See Ignition Positions 0198.
2. Set the parking brake. See Electric
Parking Brake 0212.
3. Shift the transmission to N (Neutral).
4. Shift the transfer case to 2
m. Transfer
case shifts out of N (Neutral) can only be
made into 2
m. When the shift to 2mis
complete, the graphic in the instrument
cluster will stop flashing. If the transfer
case cannot complete a shift, the graphic
will return to the previously selected
setting. Single Speed Transfer Case
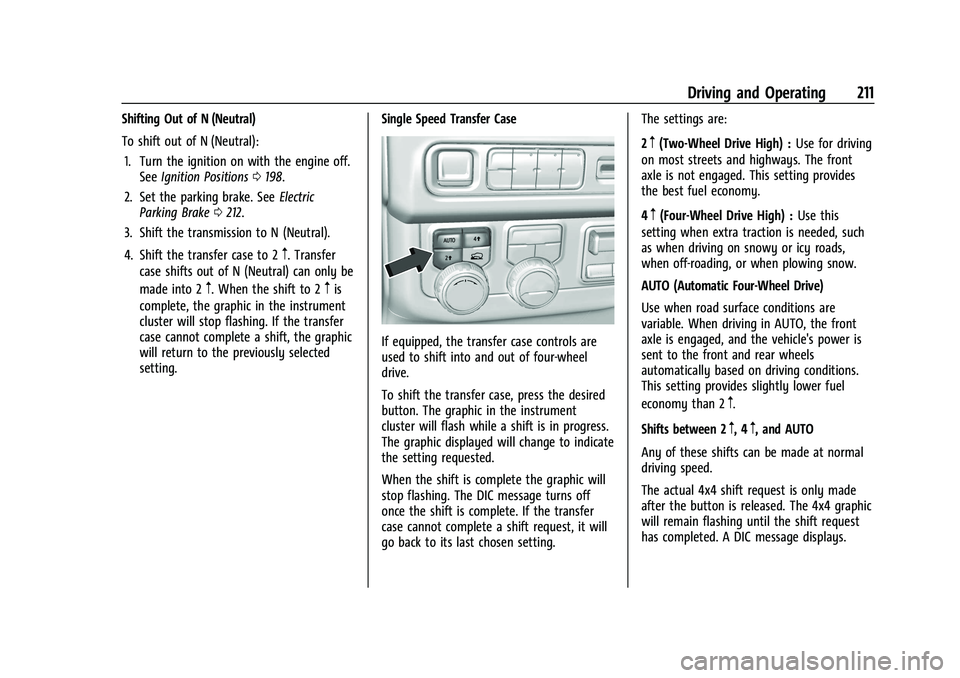
If equipped, the transfer case controls are
used to shift into and out of four-wheel
drive.
To shift the transfer case, press the desired
button. The graphic in the instrument
cluster will flash while a shift is in progress.
The graphic displayed will change to indicate
the setting requested.
When the shift is complete the graphic will
stop flashing. The DIC message turns off
once the shift is complete. If the transfer
case cannot complete a shift request, it will
go back to its last chosen setting. The settings are:
2
m(Two-Wheel Drive High) :
Use for driving
on most streets and highways. The front
axle is not engaged. This setting provides
the best fuel economy.
4
m(Four-Wheel Drive High) : Use this
setting when extra traction is needed, such
as when driving on snowy or icy roads,
when off-roading, or when plowing snow.
AUTO (Automatic Four-Wheel Drive)
Use when road surface conditions are
variable. When driving in AUTO, the front
axle is engaged, and the vehicle's power is
sent to the front and rear wheels
automatically based on driving conditions.
This setting provides slightly lower fuel
economy than 2
m.
Shifts between 2
m, 4m, and AUTO
Any of these shifts can be made at normal
driving speed.
The actual 4x4 shift request is only made
after the button is released. The 4x4 graphic
will remain flashing until the shift request
has completed. A DIC message displays.
Page 216 of 432

GMC Yukon/Yukon XL/Denali Owner Manual (GMNA-Localizing-U.S./
Canada/Mexico-16417394) - 2023 - CRC - 5/16/22
Driving and Operating 215
stuck in sand, mud, ice, or snow. SeeIf the
Vehicle Is Stuck 0193 and “Turning the
Systems Off and On” later in this section.
When the transfer case (if equipped) is in
Four-Wheel Drive Low, the TCS and
StabiliTrak/ESC are automatically disabled,
g
comes on, and the appropriate message will
appear on the Driver Information
Center (DIC).
The indicator light for both systems is in the
instrument cluster. This light will:
.Flash when TCS is limiting wheel spin.
.Flash when StabiliTrak/ESC is activated.
.Turn on and stay on when either system
is not working.
See Traction Control System (TCS)/StabiliTrak
Light 0118.
If either system fails to turn on or to
activate, a message displays in the DIC, and
dcomes on and stays on to indicate that
the system is inactive and is not assisting the driver in maintaining control. Without
the assistance of properly functioning
StabiliTrak/ESC the possibility of rollover is
increased. Adjust driving accordingly.
If
dcomes on and stays on:
1. Stop the vehicle.
2. Turn the engine off and wait 15 seconds.
3. Start the engine.
Drive the vehicle. If
dcomes on and stays
on, see your dealer.
Turning the Systems Off and On
The button for TCS and StabiliTrak/ESC is on
the instrument panel to the left of the
steering wheel.
Caution
Do not repeatedly brake or accelerate
heavily when TCS is off. The vehicle
driveline could be damaged.
To turn off only TCS, press and release
g.
The traction off light
idisplays in the
instrument cluster. The appropriate message
will display in the DIC. To turn TCS on again,
press and release
g. The traction off light
idisplayed in the instrument cluster will
turn off.
If TCS is limiting wheel spin when
gis
pressed, the system will not turn off until
the wheels stop spinning.
To turn off both TCS and StabiliTrak/ESC,
press and hold
guntil the traction off light
iand the StabiliTrak OFF lightgcome on
and stay on in the instrument cluster, then
release. The appropriate message will
display in the DIC.
To turn TCS and StabiliTrak/ESC on again,
press and release
g. The traction off light
iand the StabiliTrak OFF lightgin the
instrument cluster turn off.
Page 217 of 432
GMC Yukon/Yukon XL/Denali Owner Manual (GMNA-Localizing-U.S./
Canada/Mexico-16417394) - 2023 - CRC - 5/16/22
216 Driving and Operating
For vehicles without four corner air
suspension StabiliTrak/ESC will automatically
turn on if the vehicle exceeds 56 km/h
(35 mph). Traction control will remain off.
For vehicles with four corner air suspension
StabiliTrak/ESC will automatically turn on if
the vehicle exceeds 32 km/h (20 mph).
The vehicle has a Trailer Sway Control (TSC)
feature and a Hill Start Assist (HSA) feature.
SeeTrailer Sway Control (TSC) 0294 or
Hill Start Assist (HSA) 0214.
Adding accessories can affect the vehicle
performance. See Accessories and
Modifications 0308.
Hill Descent Control (HDC)
If equipped, Hill Descent Control (HDC) sets
and maintains vehicle speed while driving
down steep grades in a forward or reverse
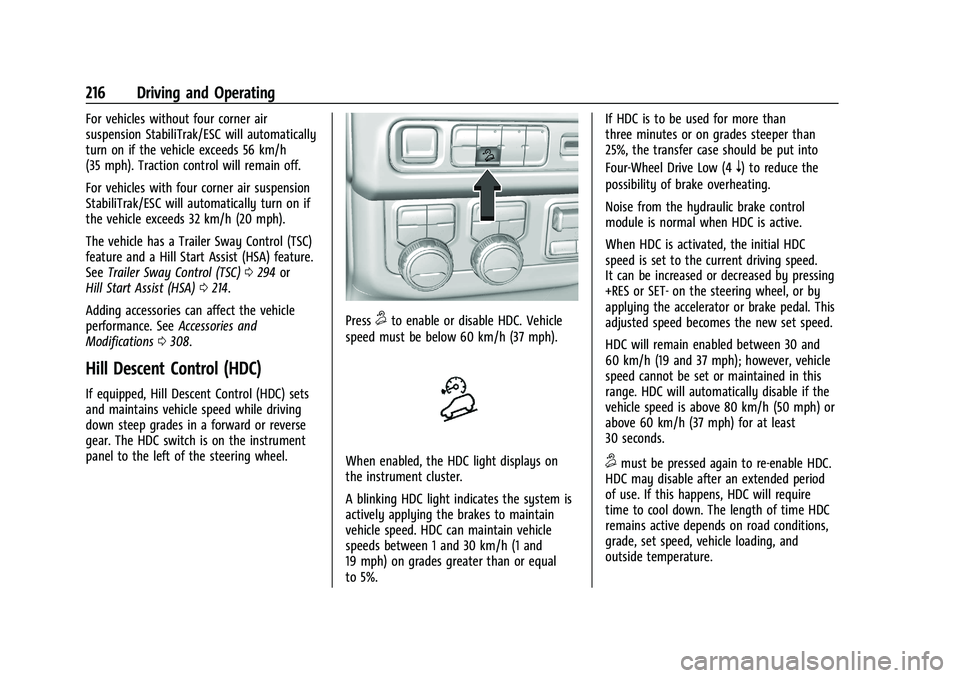
gear. The HDC switch is on the instrument
panel to the left of the steering wheel.
Press5to enable or disable HDC. Vehicle
speed must be below 60 km/h (37 mph).
When enabled, the HDC light displays on
the instrument cluster.
A blinking HDC light indicates the system is
actively applying the brakes to maintain
vehicle speed. HDC can maintain vehicle
speeds between 1 and 30 km/h (1 and
19 mph) on grades greater than or equal
to 5%. If HDC is to be used for more than
three minutes or on grades steeper than
25%, the transfer case should be put into
Four-Wheel Drive Low (4
n) to reduce the
possibility of brake overheating.
Noise from the hydraulic brake control
module is normal when HDC is active.
When HDC is activated, the initial HDC
speed is set to the current driving speed.
It can be increased or decreased by pressing
+RES or SET- on the steering wheel, or by
applying the accelerator or brake pedal. This
adjusted speed becomes the new set speed.
HDC will remain enabled between 30 and
60 km/h (19 and 37 mph); however, vehicle
speed cannot be set or maintained in this
range. HDC will automatically disable if the
vehicle speed is above 80 km/h (50 mph) or
above 60 km/h (37 mph) for at least
30 seconds.
5must be pressed again to re-enable HDC.
HDC may disable after an extended period
of use. If this happens, HDC will require
time to cool down. The length of time HDC
remains active depends on road conditions,
grade, set speed, vehicle loading, and
outside temperature.
Page 218 of 432
GMC Yukon/Yukon XL/Denali Owner Manual (GMNA-Localizing-U.S./
Canada/Mexico-16417394) - 2023 - CRC - 5/16/22
Driving and Operating 217
When enabled, if the vehicle speed is above
30 km/h (19 mph) and below 60 km/h
(37 mph), a DIC message will display.
Driver Mode Control
Driver Mode Control (DMC) allows the driver
to adjust the overall driving experience to
better suit preference by adjusting multiple
subsystems simultaneously. Drive Mode
availability and affected vehicle subsystems
are dependent upon vehicle trim level,
region, and optional features.
Normal Mode is the default mode every
time the vehicle is started. A unique and
persistent indicator is displayed in the
instrument cluster for each mode.
Depending on trim level, Normal, Sport,
Snow/Ice, Off-Road, Tow/Haul, and Terrain
modes may be available.
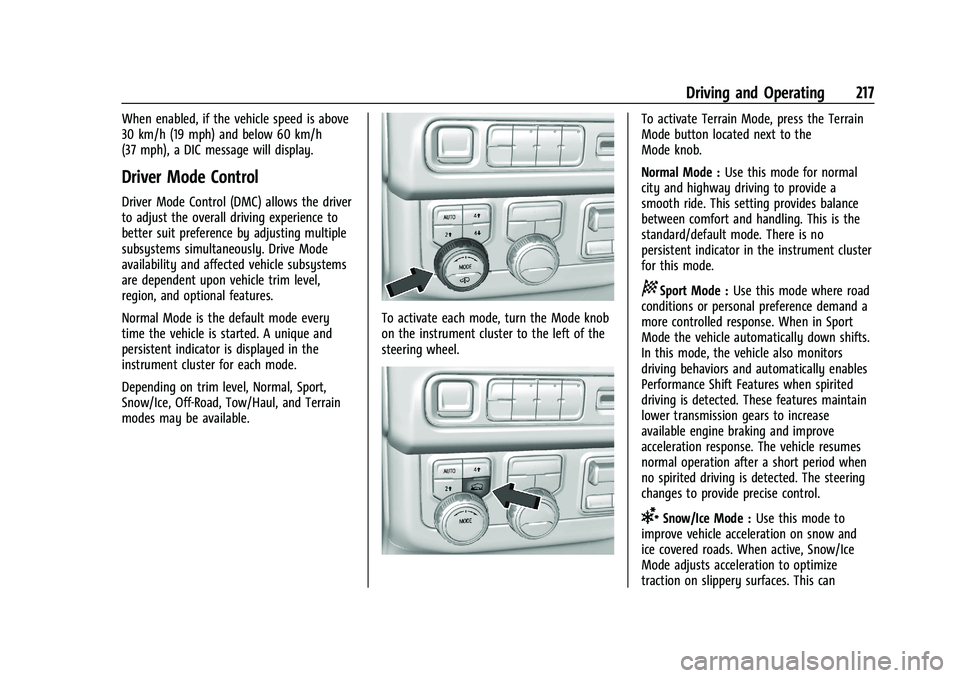
To activate each mode, turn the Mode knob
on the instrument cluster to the left of the
steering wheel.
To activate Terrain Mode, press the Terrain
Mode button located next to the
Mode knob.
Normal Mode :Use this mode for normal
city and highway driving to provide a
smooth ride. This setting provides balance
between comfort and handling. This is the
standard/default mode. There is no
persistent indicator in the instrument cluster
for this mode.
8Sport Mode : Use this mode where road
conditions or personal preference demand a
more controlled response. When in Sport
Mode the vehicle automatically down shifts.
In this mode, the vehicle also monitors
driving behaviors and automatically enables
Performance Shift Features when spirited
driving is detected. These features maintain
lower transmission gears to increase
available engine braking and improve
acceleration response. The vehicle resumes
normal operation after a short period when
no spirited driving is detected. The steering
changes to provide precise control.
6Snow/Ice Mode : Use this mode to
improve vehicle acceleration on snow and
ice covered roads. When active, Snow/Ice
Mode adjusts acceleration to optimize
traction on slippery surfaces. This can
Page 221 of 432

GMC Yukon/Yukon XL/Denali Owner Manual (GMNA-Localizing-U.S./
Canada/Mexico-16417394) - 2023 - CRC - 5/16/22
220 Driving and Operating
Terrain Mode is only available on vehicles
equipped with the single speed
transfer case.
Terrain Mode can only be active when:
.Vehicle speed is less than 80 km/h
(50 mph).
.The transfer case is in 4m.
Frequent use of this mode may cause brake
wear due to the light braking.
The vehicle automatically exits the mode if
the brakes get too hot. Terrain Mode can be
turned back on after the brakes have cooled.
When Terrain Mode is selected:
.Auto Engine Start/Stop is disabled.
.The Terrain Mode indicator displays on
the instrument cluster.
Magnetic Ride Control
This vehicle may have a semi-active damping
system called Magnetic Ride Control. With
this feature, improved vehicle ride and
handling is provided under a variety of
passenger and loading conditions.
Locking Rear Axle
Vehicles with a locking rear axle can give
more traction on snow, mud, ice, sand,
or gravel. It works like a standard axle most
of the time, but when traction is low, this
feature will allow the rear wheel with the
most traction to move the vehicle.
Four Corner Air Suspension
System
The Four Corner Air Suspension feature
provides full time load leveling capability
along with the benefit of adjusting ride
height for increased convenience and
capability.
{Warning
To help avoid personal injury or death,
make sure the area underneath the
vehicle and inside the wheel wells is clear
when lowering the vehicle.
{Warning
To help avoid personal injury or death,
always select the lowest ride height for
the current driving conditions. Higher ride
heights raise the vehicle's center of
gravity, increasing the chance of a
rollover during extreme maneuvers.
{Warning
Heavy loads on the roof rack will make
the vehicle's center of gravity higher,
increasing the possibility of a rollover. To
avoid losing control of the vehicle, always
select the normal height setting and
avoid high speeds, sudden starts, sharp
turns, sudden braking, or abrupt
maneuvers when carrying cargo on the
roof rack.
Page 223 of 432
GMC Yukon/Yukon XL/Denali Owner Manual (GMNA-Localizing-U.S./
Canada/Mexico-16417394) - 2023 - CRC - 5/16/22
222 Driving and Operating
Off-Road Driver Mode and Terrain Driver
Mode will automatically set Increased
Height when vehicle speed is less than
80 km/h (50 mph). If vehicle speed exceeds
80 km/h (50 mph), the vehicle will lower to
Normal Height. Normal Height will be
maintained until vehicle speed is slowed to
less than 16 km/h (10 mph) and then the
vehicle will automatically raise back to
Increased Height.
The vehicle will automatically lower from
Increased Height to Normal Height to
provide improved stability if aggressive
maneuvers are detected.
Maximum Height
Maximum Height is 50 mm (2 in) higher
than Normal Height. This ride height raises
the vehicle for off-road use and is only
available with specific optional content.
To raise the vehicle to Maximum Height,
first shift the transfer case to 4
n. Once the
transfer case is in 4
nand vehicle speed is
less than 48 km/hr (30 mph), select
Maximum Height in the Ride Height Menu.
If vehicle speed exceeds 48 km/h, the
vehicle will automatically lower to Increased
Height. The vehicle will automatically lower from
Maximum Height to Normal Height to
provide improved stability if aggressive
maneuvers are detected.
Aerodynamic Height
Aerodynamic Height is 20 mm (0.75 in)
lower than Normal Height. This ride height
lowers the vehicle at higher vehicle speeds
to improve aerodynamics.
The vehicle will lower to Aerodynamic
Height when vehicle speed exceeds
105 km/h (65 mph) for a period of time. The
vehicle will raise to Normal Height when the
vehicle slows to less than 48 km/h
(30 mph).
Aerodynamic Height is automatically
disabled when a trailer is connected to the
vehicle or Tow/Haul Driver Mode is active.
Suspension Modes
The air suspension has two special modes
located in the infotainment screen under
Settings/Vehicle/Suspension. When either is
active, the following amber icon will be
illuminated in the instrument cluster.
See
Four Corner Air Suspension Light 0119.
Service Mode
Service Mode will disable all air suspension
operation including raising and lowering the
vehicle and operation of the air compressor.
This mode is useful when the vehicle is
being towed on a flat bed or when any
work under the vehicle is being performed.
Service Mode is automatically enabled when
the vehicle is put on a hoist or a floor jack
is used to raise a corner. Service Mode may
temporarily enable during intense off-road
situations to prevent damaging air
suspension activity. Service Mode
automatically disables when vehicle speed
exceeds 16 km/h (10 mph).
Alignment Mode
Alignment Mode will optimize the vehicle
height to provide the most accurate wheel
alignment. This mode should be enabled
once the vehicle is driven onto the
alignment station.