2023 GMC SIERRA flat tire
[x] Cancel search: flat tirePage 358 of 430
GMC Sierra/Sierra Denali 2500 HD/3500 HD Owner Manual (GMNA-
Localizing-U.S./Canada-16504257) - 2023 - CRC - 5/18/22
Vehicle Care 357
Warning (Continued)
4. Turn off the engine and do notrestart while the vehicle is raised.
5. Do not allow passengers to remain in the vehicle.
6. Place wheel blocks, if equipped, on both sides of the tire at the opposite
corner of the tire being changed.
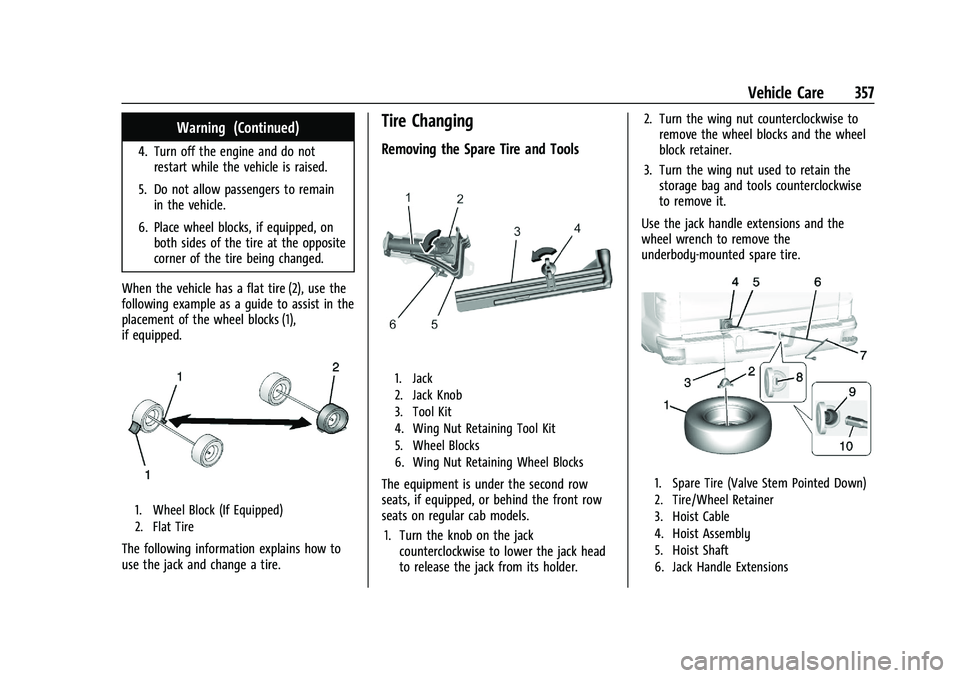
When the vehicle has a flat tire (2), use the
following example as a guide to assist in the
placement of the wheel blocks (1),
if equipped.
1. Wheel Block (If Equipped)
2. Flat Tire
The following information explains how to
use the jack and change a tire.
Tire Changing
Removing the Spare Tire and Tools
1. Jack
2. Jack Knob
3. Tool Kit
4. Wing Nut Retaining Tool Kit
5. Wheel Blocks
6. Wing Nut Retaining Wheel Blocks
The equipment is under the second row
seats, if equipped, or behind the front row
seats on regular cab models. 1. Turn the knob on the jack counterclockwise to lower the jack head
to release the jack from its holder. 2. Turn the wing nut counterclockwise to
remove the wheel blocks and the wheel
block retainer.
3. Turn the wing nut used to retain the storage bag and tools counterclockwise
to remove it.
Use the jack handle extensions and the
wheel wrench to remove the
underbody-mounted spare tire.1. Spare Tire (Valve Stem Pointed Down)
2. Tire/Wheel Retainer
3. Hoist Cable
4. Hoist Assembly
5. Hoist Shaft
6. Jack Handle Extensions
Page 360 of 430
GMC Sierra/Sierra Denali 2500 HD/3500 HD Owner Manual (GMNA-
Localizing-U.S./Canada-16504257) - 2023 - CRC - 5/18/22
Vehicle Care 359
Tilt the retainer and pull it through the
center of the wheel along with the cable
and spring.
8. Put the spare tire near the flat tire.
9. If equipped with a spare tire cable remove the cable from the spare tire by
passing the clip through the looped end
of the cable.
Removing the Flat Tire and Installing the
Spare Tire
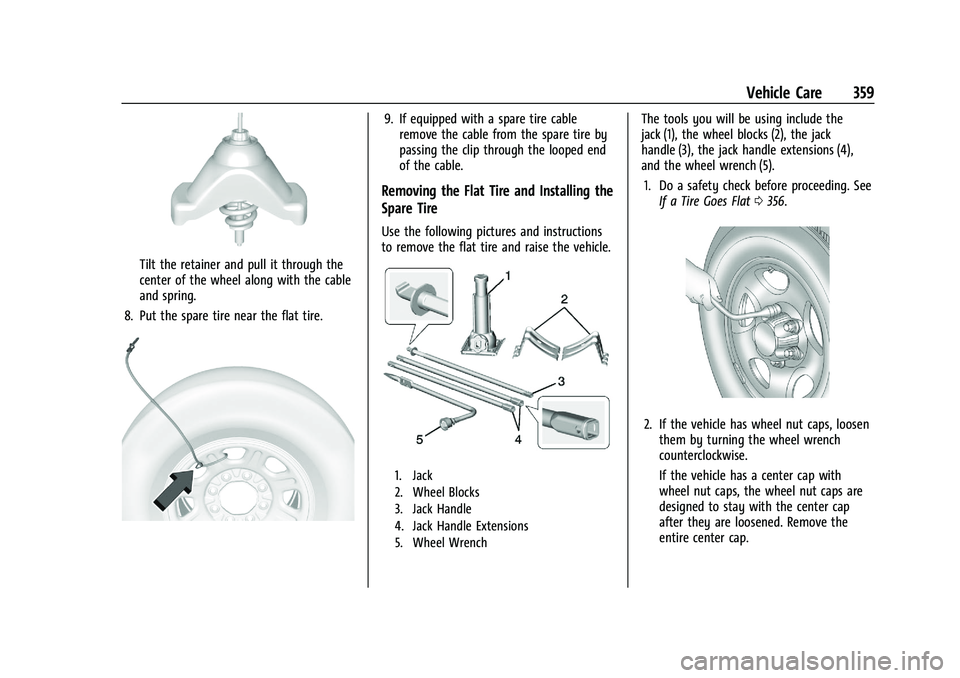
Use the following pictures and instructions
to remove the flat tire and raise the vehicle.
1. Jack
2. Wheel Blocks
3. Jack Handle
4. Jack Handle Extensions
5. Wheel Wrench
The tools you will be using include the
jack (1), the wheel blocks (2), the jack
handle (3), the jack handle extensions (4),
and the wheel wrench (5).
1. Do a safety check before proceeding. See If a Tire Goes Flat 0356.
2. If the vehicle has wheel nut caps, loosen
them by turning the wheel wrench
counterclockwise.
If the vehicle has a center cap with
wheel nut caps, the wheel nut caps are
designed to stay with the center cap
after they are loosened. Remove the
entire center cap.
Page 361 of 430
GMC Sierra/Sierra Denali 2500 HD/3500 HD Owner Manual (GMNA-
Localizing-U.S./Canada-16504257) - 2023 - CRC - 5/18/22
360 Vehicle Care
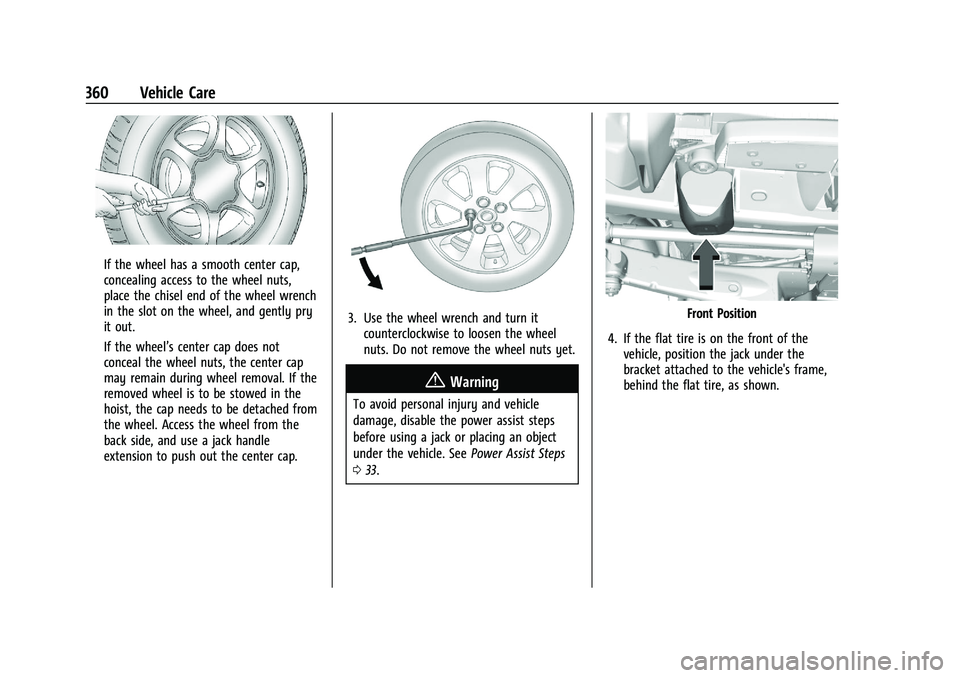
If the wheel has a smooth center cap,
concealing access to the wheel nuts,
place the chisel end of the wheel wrench
in the slot on the wheel, and gently pry
it out.
If the wheel’s center cap does not
conceal the wheel nuts, the center cap
may remain during wheel removal. If the
removed wheel is to be stowed in the
hoist, the cap needs to be detached from
the wheel. Access the wheel from the
back side, and use a jack handle
extension to push out the center cap.
3. Use the wheel wrench and turn itcounterclockwise to loosen the wheel
nuts. Do not remove the wheel nuts yet.
{Warning
To avoid personal injury and vehicle
damage, disable the power assist steps
before using a jack or placing an object
under the vehicle. See Power Assist Steps
0 33.
Front Position
4. If the flat tire is on the front of the vehicle, position the jack under the
bracket attached to the vehicle's frame,
behind the flat tire, as shown.
Page 362 of 430
GMC Sierra/Sierra Denali 2500 HD/3500 HD Owner Manual (GMNA-
Localizing-U.S./Canada-16504257) - 2023 - CRC - 5/18/22
Vehicle Care 361
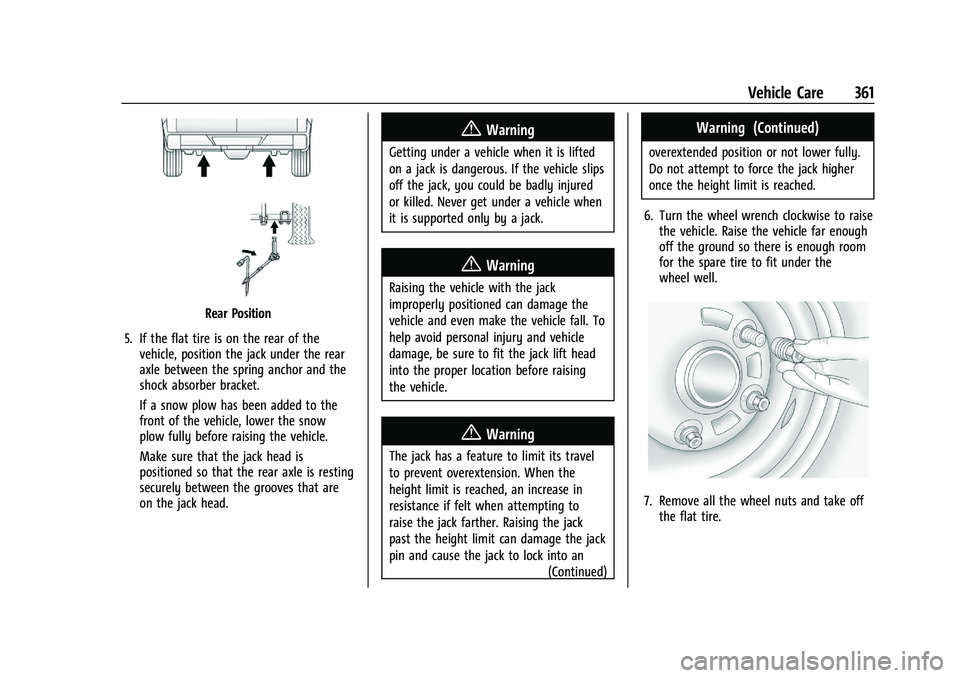
Rear Position
5. If the flat tire is on the rear of the vehicle, position the jack under the rear
axle between the spring anchor and the
shock absorber bracket.
If a snow plow has been added to the
front of the vehicle, lower the snow
plow fully before raising the vehicle.
Make sure that the jack head is
positioned so that the rear axle is resting
securely between the grooves that are
on the jack head.
{Warning
Getting under a vehicle when it is lifted
on a jack is dangerous. If the vehicle slips
off the jack, you could be badly injured
or killed. Never get under a vehicle when
it is supported only by a jack.
{Warning
Raising the vehicle with the jack
improperly positioned can damage the
vehicle and even make the vehicle fall. To
help avoid personal injury and vehicle
damage, be sure to fit the jack lift head
into the proper location before raising
the vehicle.
{Warning
The jack has a feature to limit its travel
to prevent overextension. When the
height limit is reached, an increase in
resistance if felt when attempting to
raise the jack farther. Raising the jack
past the height limit can damage the jack
pin and cause the jack to lock into an
(Continued)
Warning (Continued)
overextended position or not lower fully.
Do not attempt to force the jack higher
once the height limit is reached.
6. Turn the wheel wrench clockwise to raise the vehicle. Raise the vehicle far enough
off the ground so there is enough room
for the spare tire to fit under the
wheel well.
7. Remove all the wheel nuts and take offthe flat tire.
Page 364 of 430
GMC Sierra/Sierra Denali 2500 HD/3500 HD Owner Manual (GMNA-
Localizing-U.S./Canada-16504257) - 2023 - CRC - 5/18/22
Vehicle Care 363
Warning (Continued)
accessory locking wheel nuts. See
Capacities and Specifications0393 for
original equipment wheel nut torque
specifications.
Caution
Improperly tightened wheel nuts can lead
to brake pulsation and rotor damage. To
avoid expensive brake repairs, evenly
tighten the wheel nuts in the proper
sequence and to the proper torque
specification. See Capacities and
Specifications 0393 for the wheel nut
torque specification.
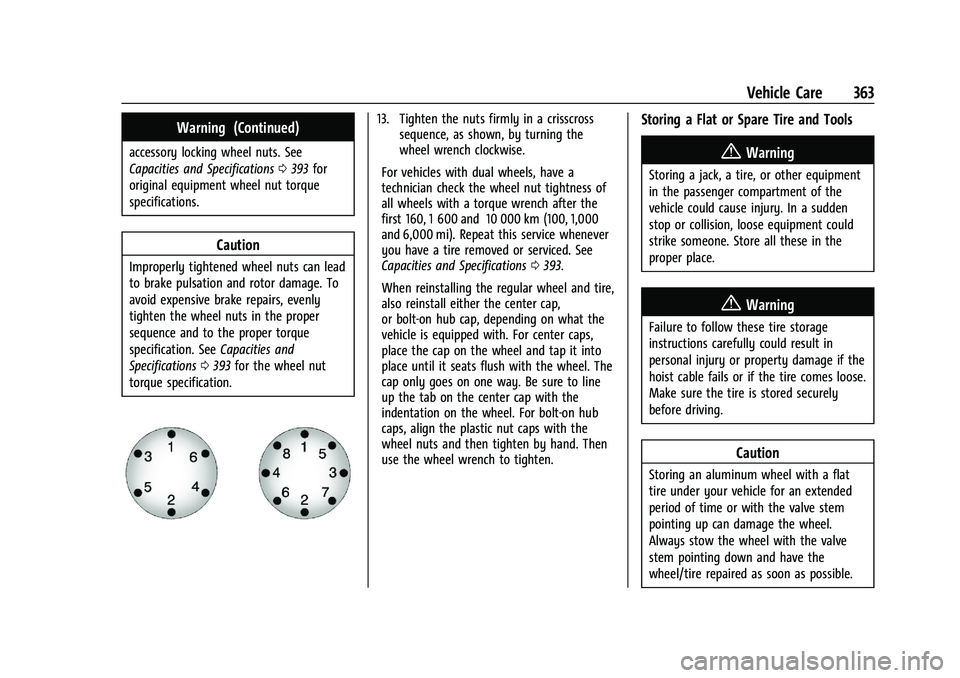
13. Tighten the nuts firmly in a crisscross sequence, as shown, by turning the
wheel wrench clockwise.
For vehicles with dual wheels, have a
technician check the wheel nut tightness of
all wheels with a torque wrench after the
first 160, 1 600 and 10 000 km (100, 1,000
and 6,000 mi). Repeat this service whenever
you have a tire removed or serviced. See
Capacities and Specifications 0393.
When reinstalling the regular wheel and tire,
also reinstall either the center cap,
or bolt-on hub cap, depending on what the
vehicle is equipped with. For center caps,
place the cap on the wheel and tap it into
place until it seats flush with the wheel. The
cap only goes on one way. Be sure to line
up the tab on the center cap with the
indentation on the wheel. For bolt-on hub
caps, align the plastic nut caps with the
wheel nuts and then tighten by hand. Then
use the wheel wrench to tighten.Storing a Flat or Spare Tire and Tools
{Warning
Storing a jack, a tire, or other equipment
in the passenger compartment of the
vehicle could cause injury. In a sudden
stop or collision, loose equipment could
strike someone. Store all these in the
proper place.
{Warning
Failure to follow these tire storage
instructions carefully could result in
personal injury or property damage if the
hoist cable fails or if the tire comes loose.
Make sure the tire is stored securely
before driving.
Caution
Storing an aluminum wheel with a flat
tire under your vehicle for an extended
period of time or with the valve stem
pointing up can damage the wheel.
Always stow the wheel with the valve
stem pointing down and have the
wheel/tire repaired as soon as possible.
Page 368 of 430
GMC Sierra/Sierra Denali 2500 HD/3500 HD Owner Manual (GMNA-
Localizing-U.S./Canada-16504257) - 2023 - CRC - 5/18/22
Vehicle Care 367
Full-Size Spare Tire
If this vehicle came with a full-size spare
tire, it was fully inflated when new,
however, it can lose air over time. Check the
inflation pressure regularly. SeeTire Pressure
0 342 and
Vehicle Load Limits 0215 for information
regarding proper tire inflation and loading
the vehicle. For instructions on how to
remove, install, or store a spare tire, see Tire
Changing 0357.
After installing the spare tire on the vehicle,
stop as soon as possible and check that the
spare is correctly inflated. The spare tire is
made to perform well at speeds up to
112 km/h (70 MPH) at the recommended
inflation pressure, so you can finish
your trip.
Have the damaged or flat road tire repaired
or replaced and installed back onto the
vehicle as soon as possible so the spare tire
will be available in case it is needed again.
Do not mix tires and wheels of different
sizes, because they will not fit. Keep the
spare tire and its wheel together.
Caution
If the vehicle has four-wheel drive and a
different size spare tire is installed, do
not drive in four-wheel drive until the flat
tire is repaired and/or replaced. The
vehicle could be damaged and the repairs
would not be covered by the warranty.
Never use four-wheel drive when a
different size spare tire is installed on the
vehicle.
The vehicle may have a different size spare
tire than the road tires originally installed
on the vehicle. This spare tire was developed
for use on this vehicle, so it is all right to
drive on it. If the vehicle has four-wheel
drive and a different size spare tire is
installed, drive only in two-wheel drive.
If the vehicle has a spare tire that does not
match the vehicle’s original road tires and
wheels, in size and type, do not include the
spare in the tire rotation.
Jump Starting
Jump Starting - North America
For more information about the vehicle
battery, see Battery - North America 0319. If the vehicle's battery (or batteries) has run
down, you may want to use another vehicle
and some jumper cables to start your
vehicle. Be sure to use the following steps
to do it safely.
{Warning
WARNING:
Battery posts, terminals and
related accessories can expose you to
chemicals including lead and lead
compounds, which are known to the
State of California to cause cancer and
birth defects or other reproductive harm.
Wash hands after handling. For more
information go to
www.P65Warnings.ca.gov.
See California Proposition 65 Warning 01.
{Warning
Batteries can hurt you. They can be
dangerous because:
.They contain acid that can burn you.
.They contain gas that can explode or
ignite.
.They contain enough electricity to
burn you.
(Continued)
Page 371 of 430
GMC Sierra/Sierra Denali 2500 HD/3500 HD Owner Manual (GMNA-
Localizing-U.S./Canada-16504257) - 2023 - CRC - 5/18/22
370 Vehicle Care
8. Do not let the other end touch metal.Connect it to the good battery
positive (+) terminal. Use a remote
positive (+) terminal if the vehicle
has one.
9. Connect one end of the black negative (–) cable to the good battery negative
(–) terminal. Use a remote negative (–)
terminal if the vehicle has one.
Do not let the other end touch anything
until the next step.
10. Connect the other end of the negative (–) cable to the discharged battery
negative (–) grounding point.
11. Start the vehicle with the good battery and run the engine for a while.
12. Try to start the vehicle that had the dead battery. If it will not start after a
few tries, it probably needs service.
Jumper Cable Removal
Reverse the sequence exactly when
removing the jumper cables.
After starting the disabled vehicle and
removing the jumper cables, allow it to idle
for several minutes.Towing the Vehicle
Transporting a Disabled Vehicle
Caution
Incorrectly transporting a disabled vehicle
may cause damage to the vehicle. Use
proper tire straps to secure the vehicle to
the flatbed tow truck. Do not strap or
hook to any frame, underbody,
or suspension component not specified
below. Do not move vehicles with drive
axle tires on the ground. Damage is not
covered by the vehicle warranty.
Caution
The vehicle may be equipped with an
electric parking brake and/or a
mechanical transmission range select
shifter. In the event of a loss of 12-volt
battery power, the electric parking brake
cannot be released, and the vehicle
cannot be shifted to N (Neutral). Tire
skates or dollies must be used under the
non-rolling tires to prevent damage while
(Continued)
Caution (Continued)
loading/unloading the vehicle. Dragging
the vehicle will cause damage not
covered by the vehicle warranty.
Caution
The vehicle may be equipped with a tow
eye. Improper use of the tow eye may
cause damage to the vehicle and is not
covered by the vehicle warranty.
If equipped, use the tow eye to load the
vehicle onto a flatbed tow truck from a
flat road surface, or to move the vehicle
a very short distance at a walking pace.
The tow eye is not designed for off-road
recovery. The vehicle must be in
N (Neutral) with the electric parking
brake released when using the tow eye.
Contact a professional towing service if the
disabled vehicle must be transported. GM
recommends a flatbed tow truck to
transport a disabled vehicle. Use ramps to
help reduce approach angles, if necessary.
Page 372 of 430

GMC Sierra/Sierra Denali 2500 HD/3500 HD Owner Manual (GMNA-
Localizing-U.S./Canada-16504257) - 2023 - CRC - 5/18/22
Vehicle Care 371
If equipped, a tow eye may be located near
the spare tire or emergency jack. Do not use
the tow eye to pull the vehicle from the
snow, mud, sand, or ditch. Tow eye threads
may have right or left-hand threads. Use
caution when installing or removing the
tow eye.
The vehicle must be in N (Neutral) and the
electric parking brake must be released
when loading the vehicle onto a flatbed tow
truck.
.If the 12-volt battery is dead and/or
electric parking brake is not released, the
vehicle will not move. Try to jump start
the vehicle with a known good 12-volt
battery, shift the car into N (Neutral), and
release the electric parking brake. Refer to
Jump Starting - North America0367.
.If unsuccessful, the vehicle will not move.
Tire skates or dollies must be used under
the non-rolling tires to prevent vehicle
damage.
Front Attachment Points
The vehicle is equipped with specific
attachment points to be used to pull the
vehicle onto a flatbed car carrier from a flat
road surface. Do not use these attachment
points to pull the vehicle from snow, mud
or sand.
Recreational Vehicle Towing
Recreational vehicle towing means towing
the vehicle behind another vehicle, such as a
motor home. The two most common types
of recreational vehicle towing are dinghy
and dolly towing. Dinghy towing is towing
the vehicle with all four wheels on the ground. Dolly towing is towing the vehicle
with two wheels on the ground and two
wheels on a dolly.
Here are some important things to consider
before recreational vehicle towing:
.Before towing the vehicle, become
familiar with the local laws that apply to
recreational vehicle towing. These laws
may vary by region.
.The towing capacity of the towing
vehicle. Read the tow vehicle
manufacturer's recommendations.
.How far the vehicle can be towed. Some
vehicles have restrictions on how far and
how long the vehicle can be towed.
.Whether the vehicle has the proper
towing equipment. See your dealer or
trailering professional for additional
advice and equipment recommendations.
.Whether the vehicle is ready to be towed.
Just as preparing the vehicle for a long
trip, make sure the vehicle is prepared to
be towed.
Follow the tow vehicle manufacturer’s
instructions. See your dealer or trailering
professional for additional advice and
equipment recommendations.