2023 GMC SIERRA height
[x] Cancel search: heightPage 186 of 430

GMC Sierra/Sierra Denali 2500 HD/3500 HD Owner Manual (GMNA-
Localizing-U.S./Canada-16504257) - 2023 - CRC - 5/18/22
Infotainment System 185
Comfort and Convenience
Adjusts different comfort and convenience
settings.
Lighting
Adjusts different lighting settings.
Power Door Locks
Adjusts different door lock settings.
Remote Lock, Unlock, and Start
Adjusts different remote lock settings.
Ride Height
Adjusts different ride height settings.
Running Boards
Adjusts different running board settings.
Seating Position
Adjusts different seat settings.
Suspension
Adjusts different suspension settings.
Trailering
Adjusts different trailering camera settings.
Teen Driver
SeeTeen Driver 0186. Valet Mode
This will lock the infotainment system and
steering wheel controls. It may also limit
access to vehicle storage locations,
if equipped.
To enable valet mode:
1. Enter a four-digit code on the keypad.
2. Select Enter to go to the confirmation screen.
3. Re-enter the four-digit code.
Touch Lock or Unlock to lock or unlock the
system. Touch Back to go back to the
previous menu.
Personal
If equipped, this menu allows adjustment of
different user profile settings. See “Users”in
Using the System 0152 for information on
setting up user profiles.
The menu may contain the following:
Name
Touch to edit your user name that will be
displayed in the vehicle. Vehicle Account Information
Touch to view the vehicle account
information and to change the account
password.
An
“unverified user account” pop-up will
display until the account information
verification process has been completed on
the Internet. Check your registered e-mail
account for an activation e-mail to complete
the verification process.
Profile Picture
Touch to choose or change your profile
picture.
Profile Identifiers
Touch to have the vehicle recognize the
identifier you choose.
Touch Vehicle Key 1 and/or Vehicle Key 2.
If the remote key is lost or stolen, see your
dealer.
Security
Touch to have your profile secured with
a PIN.
Touch No or Yes.
Vehicle Name
Touch to edit your vehicle name.
Page 219 of 430

GMC Sierra/Sierra Denali 2500 HD/3500 HD Owner Manual (GMNA-
Localizing-U.S./Canada-16504257) - 2023 - CRC - 5/9/22
218 Driving and Operating
Using heavier suspension components
to get added durability might not
change the weight ratings. Ask your
dealer to help load the vehicle the
right way.
{Warning
Things you put inside the vehicle can
strike and injure people in a sudden
stop or turn, or in a crash.
.Put things in the cargo area of the
vehicle. Try to spread the weight
evenly.
.Never stack heavier things, like
suitcases, inside the vehicle so
that some of them are above the
tops of the seats.
.Do not leave an unsecured child
restraint in the vehicle.
.When you carry something inside
the vehicle, secure it whenever
you can.
.Do not leave a seat folded down
unless you need to. There is also important loading
information for off-road driving in this
manual. See
“Loading the Vehicle for
Off-Road Driving“ underOff-Road
Driving 0208.
Two-Tiered Loading
Depending on the model of the pickup,
an upper load platform can be created
by positioning three or four 5 cm (2 in)
by 15 cm (6 in) wooden planks across
the width of the pickup box. The planks
must be inserted in the pickup box
depressions.
When using this upper load platform,
be sure the load is securely tied down
to prevent it from shifting. The load's
center of gravity should be positioned
in a zone over the rear axle. The zone is
located in the area between the front
of each wheel well and the rear of each
wheel well. The center of gravity height
must not extend above the top of the
pickup box flareboard. Any load that extends beyond the
vehicle's taillamp area must be properly
marked according to local laws and
regulations.
Remember not to exceed the Gross Axle
Weight Rating (GAWR) of the front or
rear axle.
Add-On Equipment
When carrying removable items, a limit
on how many people carried inside the
vehicle may be necessary. Be sure to
weigh the vehicle before buying and
installing the new equipment.
Caution
Overloading the vehicle may cause
damage. Repairs would not be covered by
the vehicle warranty. Do not overload the
vehicle.
Remember not to exceed the Gross Axle
Weight Rating (GAWR) of the front or
rear axle.
Page 262 of 430

GMC Sierra/Sierra Denali 2500 HD/3500 HD Owner Manual (GMNA-
Localizing-U.S./Canada-16504257) - 2023 - CRC - 5/9/22
Driving and Operating 261
part of the Lane Change Alert (LCA) system,
read the entire LCA section before using this
feature.
Lane Change Alert (LCA)
If equipped, the LCA system is a
lane-changing aid that assists drivers with
avoiding lane change crashes that occur with
moving vehicles in the side blind zone (or
spot) areas or with vehicles rapidly
approaching these areas from behind. The
LCA warning display will light up in the
corresponding outside side mirror and will
flash if the turn signal is on.
{Warning
LCA does not alert the driver to vehicles
outside of the system detection zones,
pedestrians, bicyclists, or animals. It may
not provide alerts when changing lanes
under all driving conditions. Failure to use
proper care when changing lanes may
result in injury, death, or vehicle damage.
Before making a lane change, always
check mirrors, glance over your shoulder,
and use the turn signals.LCA Detection Zones
1. SBZA Detection Zone
2. LCA Detection Zone
The LCA sensor covers a zone of
approximately one lane over from both
sides of the vehicle, or 3.5 m (11 ft). The
height of the zone is approximately between
0.5 m (1.5 ft) and 2 m (6 ft) off the ground.
The Side Blind Zone Alert (SBZA) warning
area starts at approximately the middle of
the vehicle and goes back 5 m (16 ft). Drivers
are also warned of vehicles rapidly
approaching from up to 70 m (230 ft) behind
the vehicle.
How the System Works
The LCA symbol lights up in the side mirrors
when the system detects a moving vehicle
in the next lane over that is in the side blind zone or rapidly approaching that zone
from behind. A lit LCA symbol indicates it
may be unsafe to change lanes. Before
making a lane change, check the LCA
display, check mirrors, glance over your
shoulder, and use the turn signals.
Left Side Mirror
DisplayRight Side Mirror Display
When the vehicle is started, both outside
mirror LCA displays will briefly come on to
indicate the system is operating. When the
vehicle is in a forward gear, the left or right
side mirror display will light up if a moving
vehicle is detected in the next lane over in
that blind zone or rapidly approaching that
zone. If the turn signal is activated in the
same direction as a detected vehicle, this
display will flash as an extra warning not to
change lanes.
LCA can be disabled through vehicle settings.
When you disable LCA, SBZA is also disabled.
To view available settings from the
Page 278 of 430

GMC Sierra/Sierra Denali 2500 HD/3500 HD Owner Manual (GMNA-
Localizing-U.S./Canada-16504257) - 2023 - CRC - 5/9/22
Driving and Operating 277
VehicleMaximum Trailer Weight Weight Distributing Hitch Hitch Distribution
2500/3500 Up to 9 080 kg (20,000 lb) Not Required* 25%
*Weight distributing hitch required on vehicles equipped with On/Off Road (OOR) and Mud Terrain (MT) tires with trailers over 10,000 lbs.
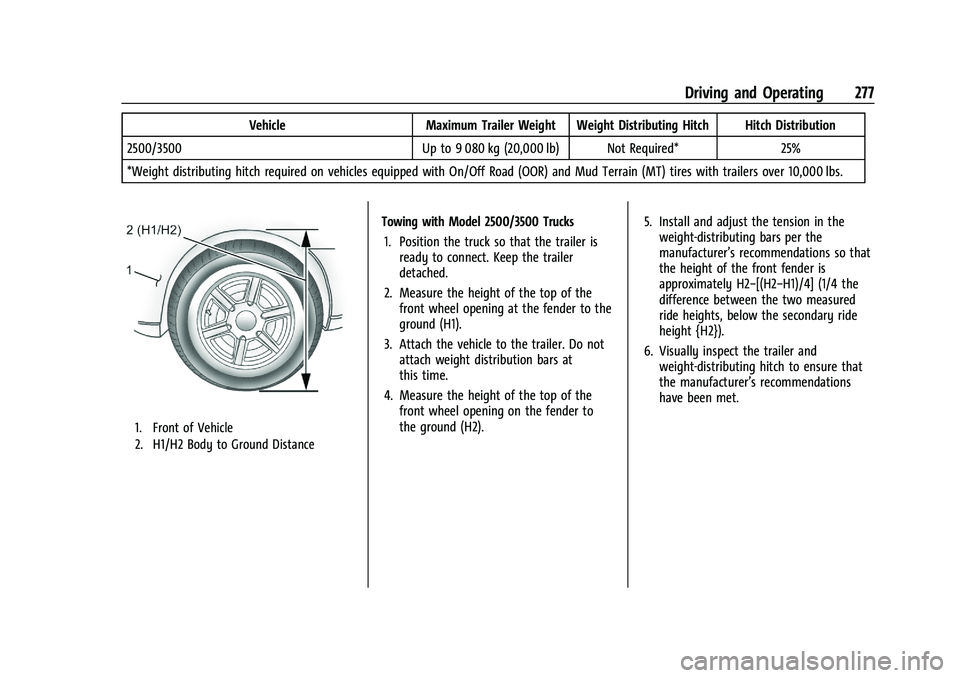
1. Front of Vehicle
2. H1/H2 Body to Ground Distance
Towing with Model 2500/3500 Trucks 1. Position the truck so that the trailer is ready to connect. Keep the trailer
detached.
2. Measure the height of the top of the front wheel opening at the fender to the
ground (H1).
3. Attach the vehicle to the trailer. Do not attach weight distribution bars at
this time.
4. Measure the height of the top of the front wheel opening on the fender to
the ground (H2). 5. Install and adjust the tension in the
weight-distributing bars per the
manufacturer’s recommendations so that
the height of the front fender is
approximately H2−[(H2−H1)/4] (1/4 the
difference between the two measured
ride heights, below the secondary ride
height {H2}).
6. Visually inspect the trailer and weight-distributing hitch to ensure that
the manufacturer’s recommendations
have been met.
Page 279 of 430

GMC Sierra/Sierra Denali 2500 HD/3500 HD Owner Manual (GMNA-
Localizing-U.S./Canada-16504257) - 2023 - CRC - 5/9/22
278 Driving and Operating
MeasurementHeight Example 2500/3500 (mm)
H1 1 040
H2 1 080
H2−H1 40
(H2−H1)/4 10
H2−[(H2−H1)/4] 1 070
Tires
.Do not tow a trailer while using a
compact spare tire on the vehicle.
.Tires must be properly inflated to support
loads while towing a trailer. SeeTires
0 337 for instructions on proper tire
inflation.
Fifth-Wheel and Gooseneck Trailering
Fifth-wheel and gooseneck trailers can be
used with many pickup models. These
trailers place a larger percentage of the
weight (kingpin weight) on the tow vehicle
than conventional trailers. Make sure this
weight does not cause the vehicle to exceed
Gross Axle Weight Rating (GAWR) or Gross
Vehicle Weight Rating (GVWR). Fifth-wheel
or gooseneck kingpin weight should be
15 –25% of the trailer weight up to the maximum amount specified on the Trailering
Information Label. See
“Trailer Weight"
under Trailer Towing 0272.
The hitch should be in the pickup bed so
that its centerline is over or near the rear
axle. Take care that it is not so far forward
that it will contact the back of the cab in
sharp turns. This is especially important for
short box pickups. Trailer pin box extensions
and sliding fifth-wheel hitch assemblies may
be used. There should be at least 15 cm
(6 in) of clearance between the top of the
pickup box and the bottom of the trailer
shelf that extends over the box.
Attach the hitch to the tow vehicle frame
rails. Do not use the pickup box for support.
Two Inch Adapter Sleeve and
Retainer Pin
The 2500/3500 series vehicles are equipped
with a 2-1/2” square receiver. An adapter is
provided to allow the use of a 2” draw bar,
along with a hitch retainer pin, and
retainer clip.
Safety Chains
Always attach safety chains between the
vehicle and the trailer. Instructions about
safety chains may be provided by the hitch
manufacturer or by the trailer manufacturer.
If the trailer being towed weighs up to
2 271 kg (5,000 lb) with a factory-installed
step bumper, safety chains may be attached
Page 290 of 430

GMC Sierra/Sierra Denali 2500 HD/3500 HD Owner Manual (GMNA-
Localizing-U.S./Canada-16504257) - 2023 - CRC - 5/9/22
Driving and Operating 289
trailer tires are rotated or replaced. See
“Editing a Trailer Profile”later in this section
for tire pressure sensor relearn information.
Tool Method: A TTPMS activation tool can
be purchased separately to learn the sensor
locations.
Manual Method: Without the tool, the air
pressure can be increased or decreased in
each tire for 10 seconds. Do not exceed the
maximum inflation pressure found on the
tire sidewalls. Make sure to re-adjust tire
pressure to the recommended level when
the process is complete.
Sensor Learning Steps
To complete the sensor-to-vehicle learn
process:
1. Touch Start on the Learn Sensors screen. The horn chirps twice and the Learning
Active screen appears on the
infotainment display.
2. Start with the driver side front trailer tire.
3. Activate the tool near the valve stem or adjust the air pressure of this tire until
the horn chirps and all working vehicle
and trailer lights flash. The process stops without saving the
sensor locations if this step takes more
than two minutes.
4. Move to the next tire and repeat Step 3 for each sensor. The horn chirps twice
when all sensors are completed.
5. Return to the vehicle to complete the setup.
Maintenance Reminders
To set up maintenance reminders, touch the
Trailer Maintenance icon. Select Yes to set
up the maintenance reminders for the
Trailer Profile. Follow the on-screen prompts.
The maximum number of reminders is 50.
Select No to return to the previous screen.
Towing Assistance
To set up towing assistance features,
if equipped, touch the Towing
Assistance icon.
Touch Yes to begin set up or touch No to
return to the previous screen.
1. Select the number of axles on the trailer.
2. Enter trailer dimensions as prompted.
3. Follow the on-screen instructions to complete setup for available features. Certain trailer features require a compatible
trailer profile configured and selected.
A compatible trailer is a box type trailer
(cargo, camper, etc.) with a conventional
hitch.
Transparent Trailer Setup
If equipped, a rear trailer camera must be
mounted on the trailer and electrically
connected to the vehicle before transparent
trailer feature can be used. See
Assistance
Systems for Parking or Backing 0248.
Trailer dimensions must be in range and the
transparent trailer must be calibrated prior
to use:
.Trailer Length: 300 cm (118.1 in) –970 cm
(381.8 in). Measure from center of coupler
to furthest rear point on the trailer.
.Trailer Width: 120 cm (47.2 in) –260 cm
(102.3 in). Measure from left edge to
right edge.
.Trailer Height: 1 cm (0.39 in) –450 cm
(177.1 in). Measure from ground to tallest
point.
.Hitching Point Length: 180 cm (70.8 in) –
970 cm (381.8 in). Measure from center of
coupler to middle of tires.
Page 291 of 430

GMC Sierra/Sierra Denali 2500 HD/3500 HD Owner Manual (GMNA-
Localizing-U.S./Canada-16504257) - 2023 - CRC - 5/9/22
290 Driving and Operating
.Trailer Tongue Length: 50 cm (19.6 in)–
220 cm (86.6 in). Measure from center of
coupler to trailer front wall.
.Vehicle Hitch Height: 10 cm (3.9 in) –
100 cm (39.3 in). Measure from ground to
top of coupler.
.Vehicle Hitch Length: 10 cm (3.9 in) –
100 cm (39.3 in). Measure from hitch
receiver to center of ball.
1. If trailer dimensions are out of range, this feature will be unavailable.
2. Ensure rear trailer camera is connected.
3. Follow instructions to drive forward to complete calibration.
Rear Trailer Guidance Setup
If equipped, a rear trailer camera must be
mounted on the trailer and electrically
connected to the vehicle before rear trailer
guidance feature can be used. See Assistance
Systems for Parking or Backing 0248.
Trailer dimensions must be in range to
enable this feature.
.Trailer Length: 300 cm (118.1 in) –970 cm
(381.8 in). Measure from center of coupler
to furthest rear point on the trailer.
1. If trailer dimensions are out of range, this feature will be unavailable. 2. Ensure rear trailer camera is connected.
3. Follow instructions to drive forward to
complete calibration.
Jack-Knife Alert Setup
If equipped, follow instructions to drive
forward to complete calibration.
Trailer Length Indicator Setup
If equipped, follow instructions to drive
forward to complete calibration.
Trailer Side Blind Zone Alert Setup
If equipped, trailer dimensions must be in
range to enable this feature.
.Trailer Length: 300 cm (118.1 in) –
1200 cm (472.4 in). Measure from center
of coupler to furthest rear point on the
trailer.
If trailer dimensions are out of range, this
feature will be unavailable.
Status View
The Status view shows:
.Vehicle
.Connections
.Tires
.Maintenance
.Cameras
Upon entry, the most recent items will be
shown. Select MORE to view all options.
Vehicle
1. Transmission Fluid Temperature
2. Average Fuel Economy with Trailer Profile
Transmission Temperature
View the temperature of the transmission
fluid by looking at the graphic. The graphic
will indicate a dangerous level if the
temperature is at 130 °C–150 °C
(270 °F–300 °F).
Page 304 of 430

GMC Sierra/Sierra Denali 2500 HD/3500 HD Owner Manual (GMNA-
Localizing-U.S./Canada-16504257) - 2023 - CRC - 5/18/22
Vehicle Care 303
Damage to suspension components caused
by modifying vehicle height outside of
factory settings will not be covered by the
vehicle warranty.
Damage to vehicle components resulting
from modifications or the installation or use
of non-GM certified parts, including control
module or software modifications, is not
covered under the terms of the vehicle
warranty and may affect remaining
warranty coverage for affected parts.
GM Accessories are designed to complement
and function with other systems on the
vehicle. See your dealer to accessorize the
vehicle using genuine GM Accessories
installed by a dealer technician.
Also, seeAdding Equipment to the
Airbag-Equipped Vehicle 074.Vehicle Checks
Doing Your Own Service Work
{Warning
It can be dangerous to work on your
vehicle if you do not have the proper
knowledge, service manual, tools,
or parts. Always follow owner’s manual
procedures and consult the service
manual for your vehicle before doing any
service work.
If doing some of your own service work, use
the proper service manual. It tells you much
more about how to service the vehicle than
this manual can. To order the proper service
manual, see Publication Ordering
Information 0404.
This vehicle has an airbag system. Before
attempting to do your own service work,
see Servicing the Airbag-Equipped Vehicle
0 73. If equipped with remote vehicle start, open
the hood before performing any service
work to prevent remote starting the vehicle
accidentally. See
Remote Vehicle Start 022.
Keep a record with all parts receipts and list
the mileage and the date of any service
work performed. See Maintenance Records
0 391.
Caution
Even small amounts of contamination can
cause damage to vehicle systems. Do not
allow contaminants to contact the fluids,
reservoir caps, or dipsticks.
Hood
{Warning
Turn the vehicle off before opening the
hood. If the engine is running with the
hood open, you or others could be
injured.