2023 FORD SUPER DUTY center console
[x] Cancel search: center consolePage 10 of 738
How Does the Rear Occupant AlertSystem Work.............................................174
Rear Occupant Alert System Precautions.........................................................................174
Rear Occupant Alert System Limitations.........................................................................174
Rear Occupant Alert System Settings.........................................................................175
Rear Occupant Alert System Indicators.........................................................................175
Rear Occupant Alert System AudibleWarnings.....................................................176
Memory Function
What Is the Memory Function.................177
Memory Function Precautions................177
Locating the Memory Function Buttons..........................................................................177
Saving a Preset Position............................177
Recalling a Preset Position.......................177
Memory Function Videos..........................178
Garage Door Opener
Garage Door Opener Introduction.........179
Garage Door Opener Precautions andFrequencies...............................................179
Programming the Garage Door Opener........................................................................180
Garage Door Opener AdditionalAssistance..................................................182
USB Ports
Locating the USB Ports.............................183
Playing Media Using the USB Port........183
Charging a Device........................................183
USB Ports Videos........................................184
Power Outlet
What Is the Power Outlet.........................185
Power Outlet Precautions........................185
Power Outlet Limitations.........................185
Locating the Power Outlets.....................185
Power Outlet Indicators............................186
Power Outlet Videos..................................186
Onboard Generator
What Is the Onboard Generator............187
Onboard Generator Precautions...........187
Locating the Outlets..................................188
Onboard Generator Indicators...............188
Switching the Outlets On and Off........189
What Is Utility Idle Mode..........................190
Switching Utility Idle Mode On and Off........................................................................190
What Is Generator Mode..........................190
Switching Generator Mode On and Off........................................................................190
Resetting Ground Fault Detection........190
Onboard Generator – Troubleshooting..........................................................................191
Center Console Work Surface
Using the Center Console Work Surface.........................................................................193
Center Console Work Surface –Troubleshooting......................................194
Wireless Accessory Charger
What Is the Wireless Accessory Charger.........................................................................195
Wireless Accessory Charger Precautions.........................................................................195
Locating the Wireless Accessory Charger.........................................................................195
Charging a Wireless Device.....................195
Wireless Accessory Charger Videos......196
Storage
Cup Holders...................................................197
Glove Compartment...................................197
Center Console.............................................198
Under Seat Storage....................................198
6
2023 Super Duty (TFH) Canada/United States of America, enUSA, Edition date: 202211, DOMTable of Contents
Page 37 of 738
See Selecting a Four-Wheel Drive Mode (page 241).L
See Using the Integrated Trailer Brake Controller (page 372).M
See Exterior Lighting Control (page 117).N
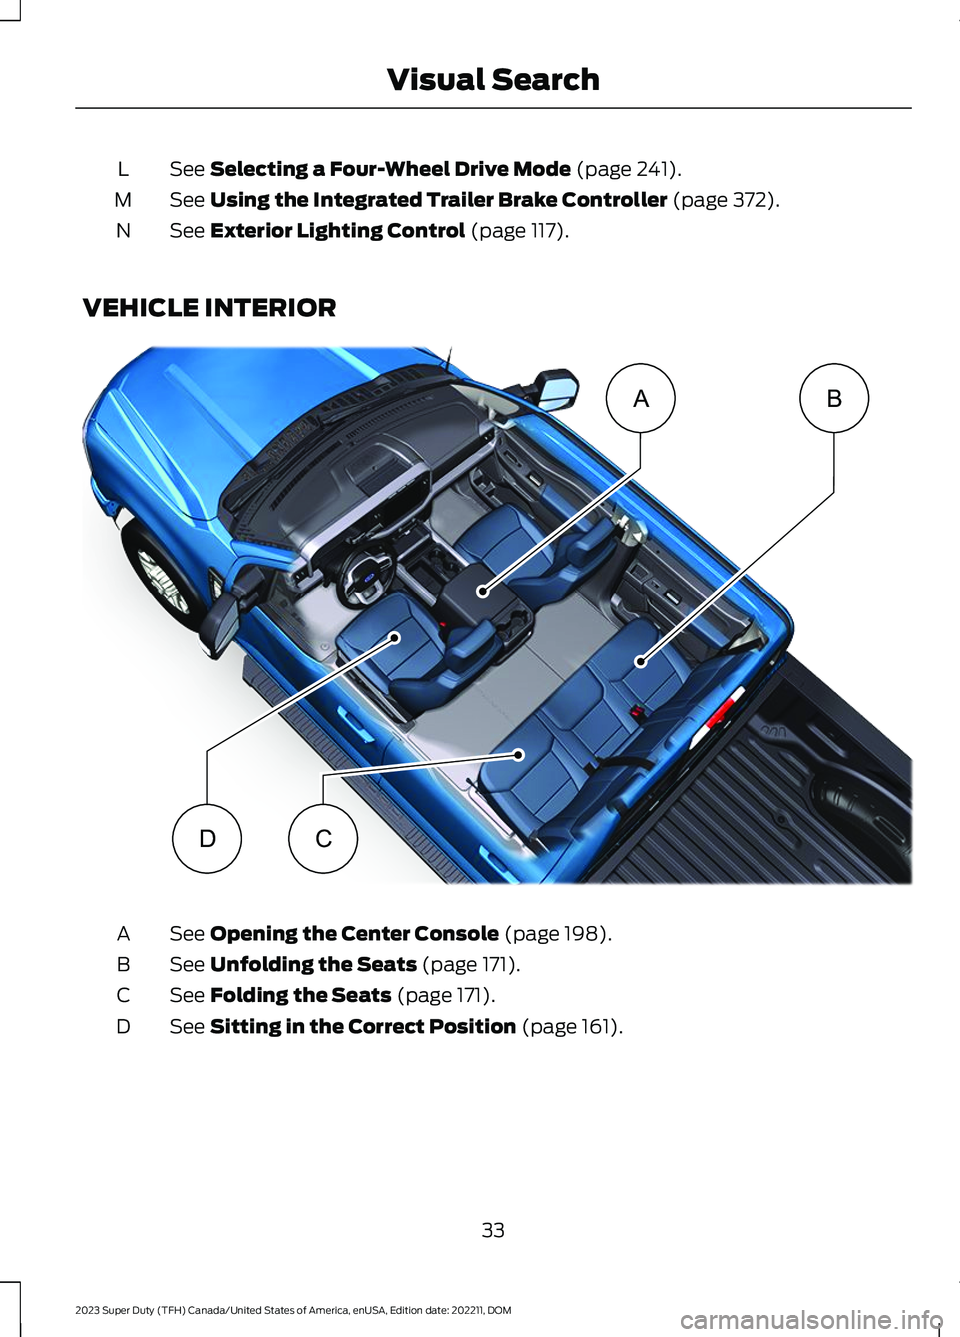
VEHICLE INTERIOR
See Opening the Center Console (page 198).A
See Unfolding the Seats (page 171).B
See Folding the Seats (page 171).C
See Sitting in the Correct Position (page 161).D
33
2023 Super Duty (TFH) Canada/United States of America, enUSA, Edition date: 202211, DOMVisual SearchBADC E374896
Page 82 of 738
2.Switch the ignition from off to on. Keepthe ignition on for at least threeseconds, but no more than 10 seconds.
3.Switch the ignition off and remove thefirst coded key from the ignition.
4.After three seconds but within 10seconds of switching the ignition off,insert the second previously coded keyinto the ignition.
5.Switch the ignition from off to on. Keepthe ignition on for at least threeseconds, but no more than 10 seconds.
6.Switch the ignition off and remove thesecond previously programmed codedkey from the ignition.
7.After three seconds but within 10seconds of switching the ignition offand removing the previouslyprogrammed coded key, insert the newun–programmed key into the ignition.
8.Switch the ignition from off to on. Keepthe ignition on for at least six secondsuntil you hear the door locks cycle.
9.Remove the newly programmed codedkey from the ignition.
The key starts the engine if programmingis successful. You can operate the keylessremote entry system with the new remotecontrol with integrated key.
If programming was not successful, wait20 seconds and repeat Steps 1 through 8.If you are still unsuccessful, take yourvehicle to an authorized dealer.
Note:You can program a maximum of sixcoded remote controls to your vehicle.
PROGRAMMING THE REMOTE
CONTROL - VEHICLES WITH:
PUSH BUTTON START
General Information
You must have two previouslyprogrammed remote controls inside yourvehicle and the new unprogrammedremote controls readily accessible. Contactan authorized dealer to have the spareremote control programmed if twopreviously programmed remotes are notavailable. Make sure that your vehicle isoff before beginning this procedure. Makesure that you close all the doors beforebeginning and that they remain closedthroughout the procedure. Perform allsteps within 30 seconds of starting thesequence. Stop and wait for at least oneminute before starting again if you performany steps out of sequence.
Read and understand the entire procedurebefore you begin.
Note:You can program a maximum of fourremote controls to your vehicle.
Note:If your programmed remote controlsare lost or stolen and you do not have anextra coded remote, you need to have yourvehicle towed to an authorized dealer. Storean extra programmed remote away fromyour vehicle in a safe place to help preventany inconvenience. Contact an authorizeddealer to purchase additional spare orreplacement remotes.
Steps for Programming Your SpareRemote Control
Note:Your vehicle is equipped with one ofthe following center consoles.
78
2023 Super Duty (TFH) Canada/United States of America, enUSA, Edition date: 202211, DOMKeys and Remote Controls
Page 83 of 738
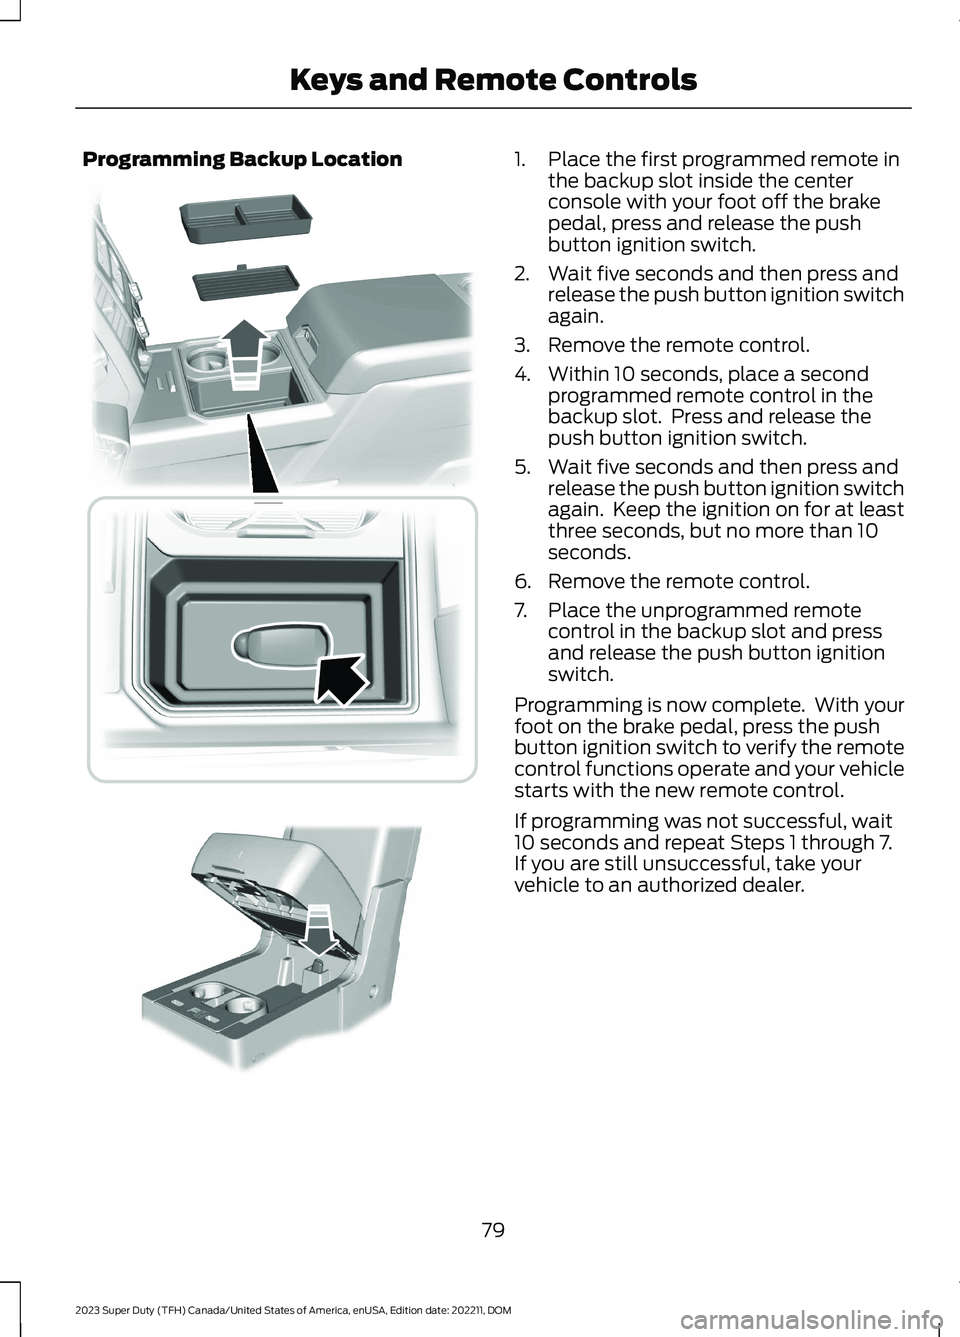
Programming Backup Location1.Place the first programmed remote inthe backup slot inside the centerconsole with your foot off the brakepedal, press and release the pushbutton ignition switch.
2.Wait five seconds and then press andrelease the push button ignition switchagain.
3.Remove the remote control.
4.Within 10 seconds, place a secondprogrammed remote control in thebackup slot. Press and release thepush button ignition switch.
5.Wait five seconds and then press andrelease the push button ignition switchagain. Keep the ignition on for at leastthree seconds, but no more than 10seconds.
6.Remove the remote control.
7.Place the unprogrammed remotecontrol in the backup slot and pressand release the push button ignitionswitch.
Programming is now complete. With yourfoot on the brake pedal, press the pushbutton ignition switch to verify the remotecontrol functions operate and your vehiclestarts with the new remote control.
If programming was not successful, wait10 seconds and repeat Steps 1 through 7.If you are still unsuccessful, take yourvehicle to an authorized dealer.
79
2023 Super Duty (TFH) Canada/United States of America, enUSA, Edition date: 202211, DOMKeys and Remote Controls E226701 E269950
Page 91 of 738
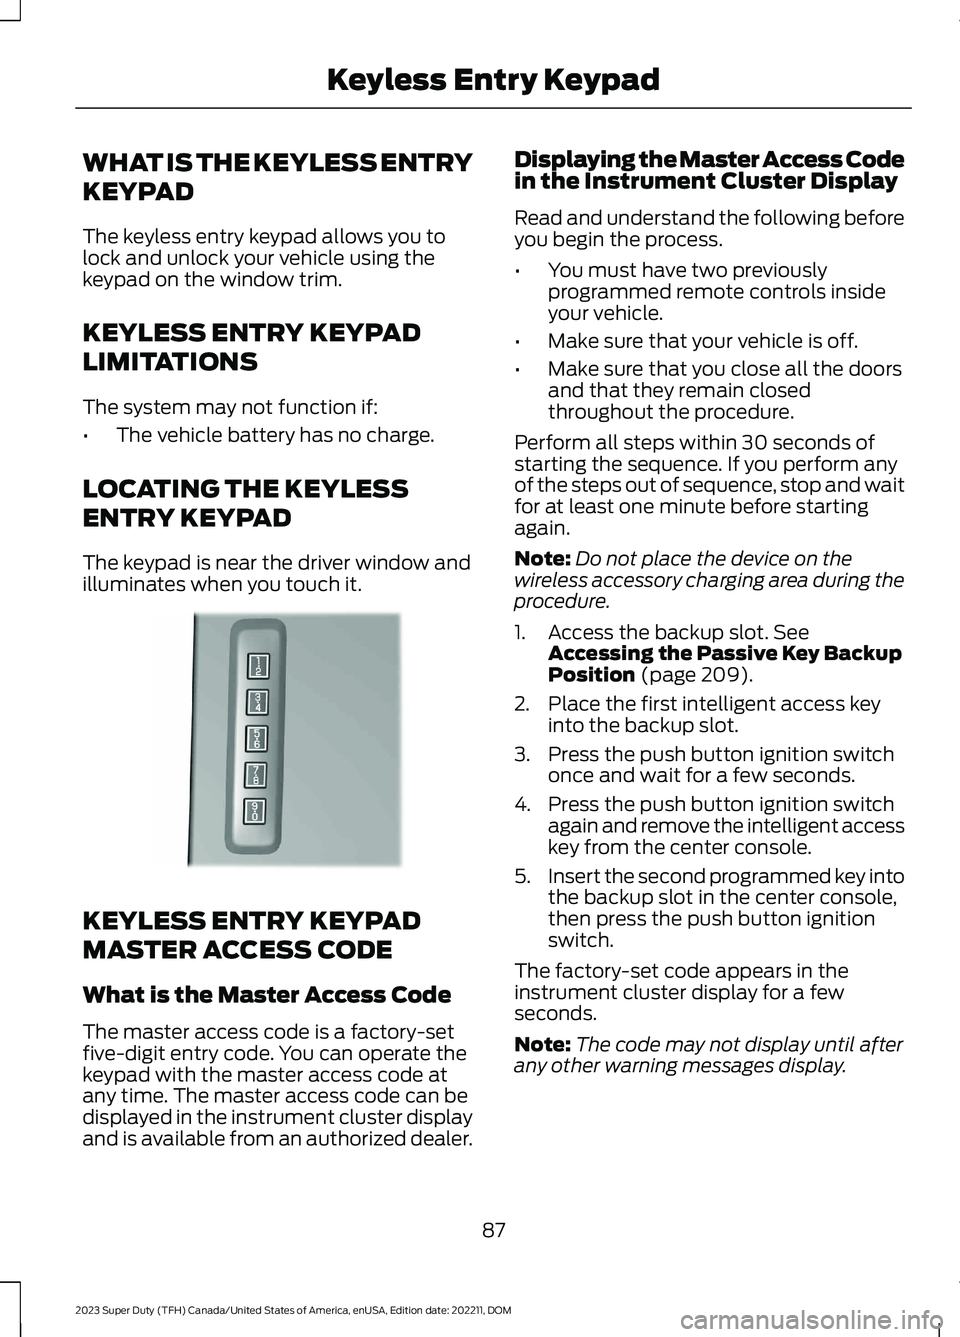
WHAT IS THE KEYLESS ENTRY
KEYPAD
The keyless entry keypad allows you tolock and unlock your vehicle using thekeypad on the window trim.
KEYLESS ENTRY KEYPAD
LIMITATIONS
The system may not function if:
•The vehicle battery has no charge.
LOCATING THE KEYLESS
ENTRY KEYPAD
The keypad is near the driver window andilluminates when you touch it.
KEYLESS ENTRY KEYPAD
MASTER ACCESS CODE
What is the Master Access Code
The master access code is a factory-setfive-digit entry code. You can operate thekeypad with the master access code atany time. The master access code can bedisplayed in the instrument cluster displayand is available from an authorized dealer.
Displaying the Master Access Codein the Instrument Cluster Display
Read and understand the following beforeyou begin the process.
•You must have two previouslyprogrammed remote controls insideyour vehicle.
•Make sure that your vehicle is off.
•Make sure that you close all the doorsand that they remain closedthroughout the procedure.
Perform all steps within 30 seconds ofstarting the sequence. If you perform anyof the steps out of sequence, stop and waitfor at least one minute before startingagain.
Note:Do not place the device on thewireless accessory charging area during theprocedure.
1.Access the backup slot. SeeAccessing the Passive Key BackupPosition (page 209).
2.Place the first intelligent access keyinto the backup slot.
3.Press the push button ignition switchonce and wait for a few seconds.
4.Press the push button ignition switchagain and remove the intelligent accesskey from the center console.
5.Insert the second programmed key intothe backup slot in the center console,then press the push button ignitionswitch.
The factory-set code appears in theinstrument cluster display for a fewseconds.
Note:The code may not display until afterany other warning messages display.
87
2023 Super Duty (TFH) Canada/United States of America, enUSA, Edition date: 202211, DOMKeyless Entry KeypadE190936
Page 152 of 738
HEAD UP DISPLAY – TROUBLESHOOTING
HEAD UP DISPLAY – INFORMATION MESSAGES
ActionMessage
The system is malfunctioning or somethingis obstructing the display. Make sure thatthe head up display is free from obstruction.If the message continues to appear, haveyour vehicle checked as soon as possible.
Head Up Display System Fault See Manual
Press the button on the steering wheel orcenter console. The head up display menuappears in the instrument cluster display.Make sure the blue frame is fully visible. Donot manually move the screen. This cancause damage not covered by your vehicle'swarranty.
Head Up Display To Position Use theInformation Display
148
2023 Super Duty (TFH) Canada/United States of America, enUSA, Edition date: 202211, DOMHead Up Display (If Equipped)
Page 177 of 738
SWITCHING THE HEATED SEATSON AND OFF
The vehicle must be running to use thisfeature.
The rear seat heat controls are on the rearof the center console.
Press the heated seat symbol to cyclethrough the various heat settings and off.More indicator lights indicate warmersettings.
The heated seats turn off when you switchoff the vehicle.
173
2023 Super Duty (TFH) Canada/United States of America, enUSA, Edition date: 202211, DOMRear SeatsE146322
Page 187 of 738
LOCATING THE USB PORTS
Data Transfer USB Ports
The USB ports could be in the followinglocations:
•On the lower instrument panel.
•Inside the center console.
Note: These USB ports can also chargedevices.
Note: Not all USB ports in your vehicle havedata transfer capabilities.
Note: We recommend using only USB-IFcertified cables and adapters. Non-certifiedcables and adapters may not work.
Charge Only USB Ports
The USB ports could be in the followinglocations:
•On the lower instrument panel.
•On the upper instrument panel.
•Inside the media bin.
•Inside the center console.
•On the rear of the center console.
•Behind the first row seats.
•In the cargo area.
PLAYING MEDIA USING THE
USB PORT
WARNING: Driving while distractedcan result in loss of vehicle control, crashand injury. We strongly recommend thatyou use extreme caution when using anydevice that may take your focus off theroad. Your primary responsibility is thesafe operation of your vehicle. Werecommend against the use of anyhand-held device while driving andencourage the use of voice-operatedsystems when possible. Make sure youare aware of all applicable local lawsthat may affect the use of electronicdevices while driving.
Connect your device to a data transfer USBport.
Press the audio button on thefeature bar.
Select Sources.
Select the USB option.
Press to play a track. Press againto pause the track.
Press to skip to the next track.
Press and hold to fast forwardthrough the track.
Press once to return to thebeginning of a track. Repeatedlypress to return to previoustracks.
Press and hold to fast rewind.
CHARGING A DEVICE
Connect your device to the USB port.
183
2023 Super Duty (TFH) Canada/United States of America, enUSA, Edition date: 202211, DOMUSB PortsE250655 E263583 E100027