2023 FORD F650/750 emergency
[x] Cancel search: emergencyPage 20 of 378

Note:To stop the connectivity device from
sharing this information, for example,
location and vehicle data, see your
Connectivity Settings through the FordPass
app. You may also remove the vehicle from
your FordPass account.
Note:The service can be unavailable or
interrupted for a number of reasons, for
example, environmental or topographical
conditions and data plan coverage.
Note:To find out if your vehicle has
connectivity technology, visit
www
.FordConnected.com.
Note:If you plan to no longer use your
vehicle, for example, by selling or donating
it, remember to remove the vehicle from
your FordPass account. If you recently
purchased the vehicle and want to disable
or establish new connectivity, please
contact the Ford Customer Relationship
Center through the FordPass app or by using
the e-mail address on the local Ford
website.
Vehicles With SYNC
Mobile Device Data
If you connect a mobile device to your
vehicle, you can display data from your
device on the touchscreen for example,
music and album art. You can share your
vehicle data with mobile apps on your
device through the system.
The mobile apps function operates by your
connected device sending data to us in the
United States. The data is encrypted and
includes the vehicle identification number
of your vehicle, the SYNC module serial
number, odometer, enabled apps, usage
statistics and debugging information. We
retain it only as long as necessary to
provide the service, to troubleshoot, for
continuous improvement and to offer you
products and services that may be of
interest to you according to your
preferences and where allowed by law.If you connect a cell phone to the system,
the system creates a profile that links to
that cell phone. The cell phone profile
enables more mobile features and efficient
operation. The profile contains, for
example, data from your phonebook, read
and unread text messages and call history,
including history of calls when your cell
phone was not connected to the system.
If you connect a media device, the system
creates and retains a media device index
of supported media content. The system
also records a short diagnostic log of
approximately 10 minutes of all recent
system activity.
The cell phone profile, media device index
and diagnostic log remain in your vehicle
unless you delete them and are generally
accessible only in your vehicle when you
connect your cell phone or media device.
If you no longer plan to use the system or
your vehicle, we recommend you use the
master reset function to erase the stored
information.
System data cannot be accessed without
special equipment and access to your
vehicle's module.
For additional information about our
privacy policy, refer to your local Ford
website.
Note:To find out if your vehicle has
connectivity technology, visit
www
.FordConnected.com.
Vehicles With an Emergency Call
System
When the emergency call system is active,
it may disclose to emergency services that
your vehicle has been in a crash involving
the deployment of an airbag or activation
of the fuel pump shut-off. Certain versions
or updates to the emergency call system
may also be capable of electronically or
verbally disclosing to emergency services
operators your vehicle location or other
16
Introduction
Page 21 of 378

details about your vehicle or crash to assist
emergency services operators to provide
the most appropriate emergency services.
If you do not want to disclose this
information, do not activate the emergency
call system.
Note:You cannot deactivate emergency
call systems that are required by law.
PERCHLORATE
Certain components in your vehicle such
as airbag modules, seatbelt pretensioners
and remote control batteries may contain
perchlorate material. Special handling
may apply for service or vehicle end of life
disposal.
For more information visit:
Web Address
www.dtsc.ca.gov/hazard-
ouswaste/perchlorate
FORD CREDIT
US Only
Ford Credit offers a full range of financing
and lease plans to help you acquire your
vehicle. If you have financed or leased your
vehicle through Ford Credit, thank you for
your business.
For assistance call 1-800-727-7000, or for
more information about Ford Credit and
access to the online Account Manager tool,
visit www.ford.com/finance.
REPLACEMENT PARTS
RECOMMENDATION
We have built your vehicle to the highest
standards using quality parts. We
recommend that you demand the use of
genuine Ford and Motorcraft parts
whenever your vehicle requires scheduled
maintenance or repair. You can clearly
identify genuine Ford and Motorcraft parts
by looking for the Ford, FoMoCo or
Motorcraft branding on the parts or their
packaging.
Scheduled Maintenance and
Mechanical Repairs
One of the best ways for you to make sure
that your vehicle provides years of service
is to have it maintained in line with our
recommendations using parts that
conform to the specifications detailed in
this Owner’s Manual.
Genuine Ford and Motorcraft parts meet
or exceed these specifications.
Collision Repairs
We hope that you never experience a
collision, but accidents happen sometimes.
Genuine Ford replacement collision parts
meet our stringent requirements for fit,
finish, structural integrity, corrosion
protection and dent resistance. During
vehicle development we validate that
these parts deliver the intended level of
protection as a whole system. A great way
to know for sure you are getting this level
of protection is to use genuine Ford
replacement collision parts.
Warranty on Replacement Parts
Genuine Ford and Motorcraft replacement
parts are the only replacement parts that
benefit from a Ford Warranty.
17
Introduction
Page 24 of 378
enhance personal safety and security when
appropriately used, particularly in
emergency situations. Safety must be
paramount when using mobile
communications equipment to avoid
negating these benefits. Mobile
communication equipment includes, but
is not limited to, cellular phones, pagers,
portable email devices, text messaging
devices and portable two-way radios.
EXPORT UNIQUE OPTIONS
For your particular global region, your
vehicle may be equipped with features and
options that are different from the features
and options that are described in this
Owner’s Manual. A market unique
supplement may be supplied that
complements this book. By referring to the
market unique supplement, if provided,
you can properly identify those features,
recommendations and specifications that
are unique to your vehicle. This Owner’s
Manual is written primarily for the U.S. and
Canadian Markets. Features or equipment
listed as standard may be different on units
built for export.Refer to this Owner’s
Manual for all other required
information and warnings.
FEDERAL HIGHWAY
ADMINISTRATION
REGULATION
Regulations such as those issued by the
Federal Highway Administration or issued
pursuant to the Occupational Safety and
Health Act (OSHA), and state and local
laws and regulations may require
additional equipment for the way you
intend to use your vehicle. It is the
responsibility of the registered owner to
determine the applicability of such lawsand regulations to your intended use for
the vehicle, and to arrange for the
installation of required equipment. The
dealer has information about the
availability of equipment which can be
ordered for your vehicle.
ENTERING, EXITING OR
CLIMBING ON THIS VEHICLE
WARNING: Do not carry items
while entering, exiting or climbing. Make
sure you keep a firm grip. Always face
the vehicle step and handle system while
climbing up and down. Do not climb
behind the cab unless you have three
point contact with a step and handle
system at all times.
You must be careful and deliberate to
minimize the possibility of personal injury
from a slip and fall when entering, exiting
or climbing on your vehicle. Always use
the steps and assist handles before
climbing. Do not skip any steps or assist
handles. Use three point contact at all
times with at least two feet and one hand
or two hands and one foot firmly placed
during all phases of entering, exiting or
climbing. Always keep your shoe soles and
hands clean. Keep the steps and assist
handles free of snow, ice, oil, grease,
substances or debris. Be sure to take extra
care in bad weather. Avoid wearing thick
gloves. Always perform trailer hook-up
while standing on the ground.
20
Introduction
Page 45 of 378
When to Use the Automatic Locking
Mode
Use this mode any time a child safety seat,
except a booster, is installed in passenger
front or rear seating positions. Properly
restrain children 12 years old and under in
a rear seating position whenever possible.
See Child Safety (page 24).
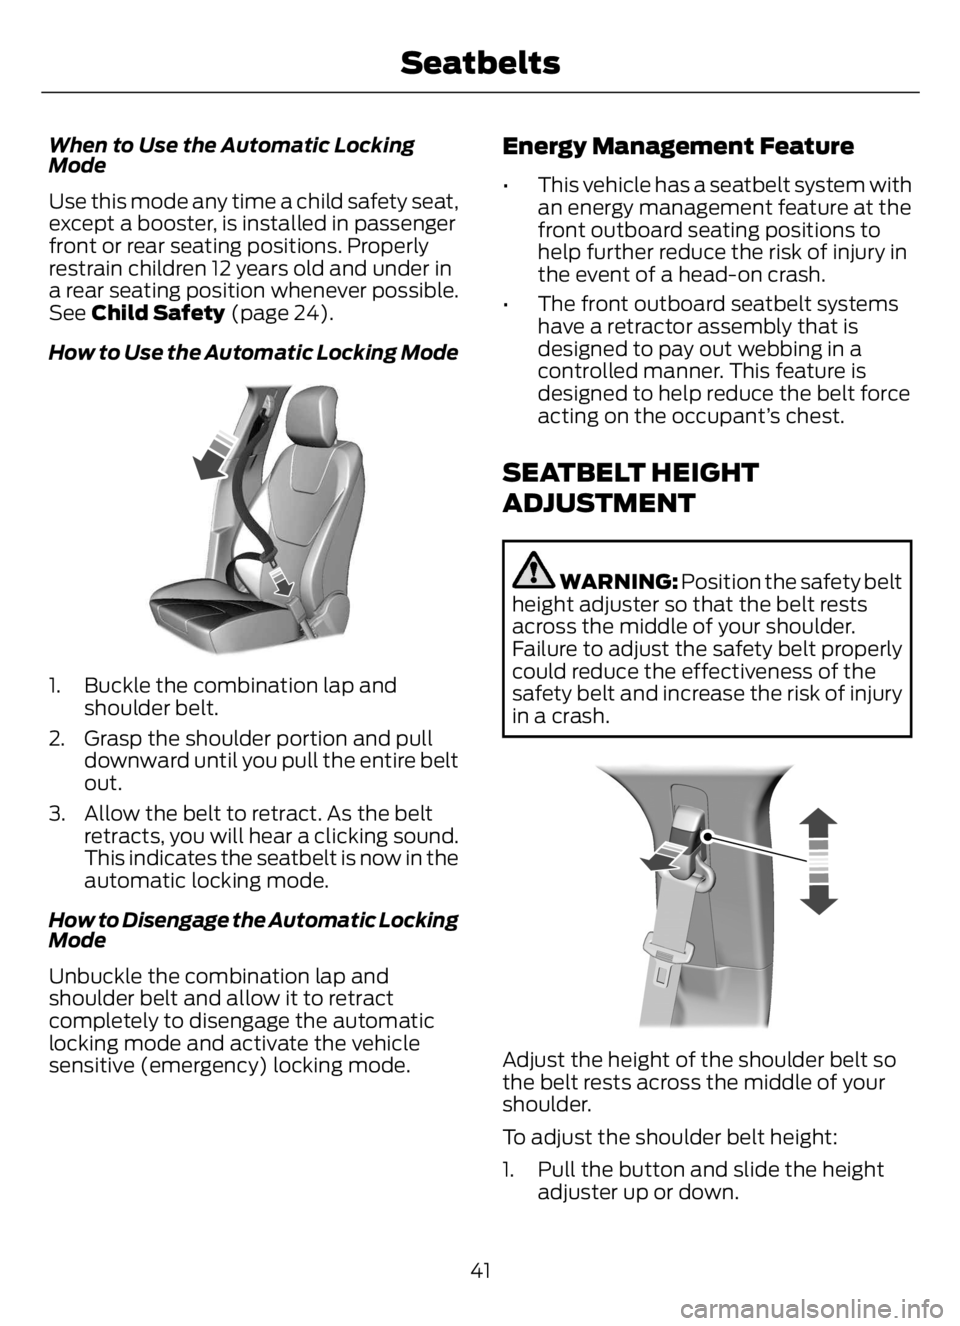
How to Use the Automatic Locking Mode
E142591E142591
1. Buckle the combination lap and
shoulder belt.
2. Grasp the shoulder portion and pull
downward until you pull the entire belt
out.
3. Allow the belt to retract. As the belt
retracts, you will hear a clicking sound.
This indicates the seatbelt is now in the
automatic locking mode.
How to Disengage the Automatic Locking
Mode
Unbuckle the combination lap and
shoulder belt and allow it to retract
completely to disengage the automatic
locking mode and activate the vehicle
sensitive (emergency) locking mode.
Energy Management Feature
• This vehicle has a seatbelt system with
an energy management feature at the
front outboard seating positions to
help further reduce the risk of injury in
the event of a head-on crash.
• The front outboard seatbelt systems
have a retractor assembly that is
designed to pay out webbing in a
controlled manner. This feature is
designed to help reduce the belt force
acting on the occupant’s chest.
SEATBELT HEIGHT
ADJUSTMENT
WARNING: Position the safety belt
height adjuster so that the belt rests
across the middle of your shoulder.
Failure to adjust the safety belt properly
could reduce the effectiveness of the
safety belt and increase the risk of injury
in a crash.
E145664E145664
Adjust the height of the shoulder belt so
the belt rests across the middle of your
shoulder.
To adjust the shoulder belt height:
1. Pull the button and slide the height
adjuster up or down.
41
Seatbelts
Page 141 of 378

GENERAL INFORMATION
Note: Occasional brake noise is normal. If
a metal-to-metal, continuous grinding or
continuous squeal sound is present, the
brake linings may be worn-out. Have the
system checked as soon as possible. If the
vehicle has continuous vibration or shudder
in the steering wheel while braking, have the
system checked as soon as possible.
All standard equipment brakes are
self-adjusting. Automatic adjustment,
when required, occurs whenever you apply
and release the brakes during forward or
reverse operation.
Know the required stopping distances for
all driving conditions you may encounter.
For longer brake lining life, take full
advantage of engine braking power when
coming to a stop.
Wet brakes result in reduced braking
efficiency. Gently press the brake pedal a
few times when driving from a car wash or
standing water to dry the brakes.
If the brakes do not grip well:
• Check brake adjustment.
• Check the brake linings for excessive
wear.
• Check the system air pressure on
vehicles with air brakes.
• Let the brakes cool if you have been
using them excessively, as in mountain
driving or after several fast, high-speed
stops.
• If you have been driving through deep
water, gently apply the brakes several
times while your vehicle is moving
slowly.
Brake Over Accelerator
In the event the accelerator pedal
becomes stuck or entrapped, apply steady
and firm pressure to the brake pedal to
slow the vehicle and reduce engine power.
If you experience this condition, apply the
brakes and bring your vehicle to a safe
stop. Move the transmission to park (P),
switch the engine off and apply the parking
brake. Inspect the accelerator pedal for
any interference. If none are found and the
condition persists, have your vehicle towed
to the nearest authorized dealer
Anti-lock Brake System
This system helps you maintain steering
control during emergency stops by keeping
the brakes from locking.
If the light does not illuminate
during start up, remains on or
flashes, the system may be
disabled. It also momentarily illuminates
when you switch the ignition on to confirm
the lamp is functional. If it does not
illuminate when you switch the ignition on,
or begins to flash at any time, have the
system checked.
E210335
If you connect a PLC trailer with
the ignition on, the trailer ABS
light also illuminates. If the light
fails to illuminate, if it remains on after you
start the vehicle or continues to flash, have
the system serviced immediately.
See Warning Lamps and Indicators
(page 66).
137
Brakes
Page 143 of 378
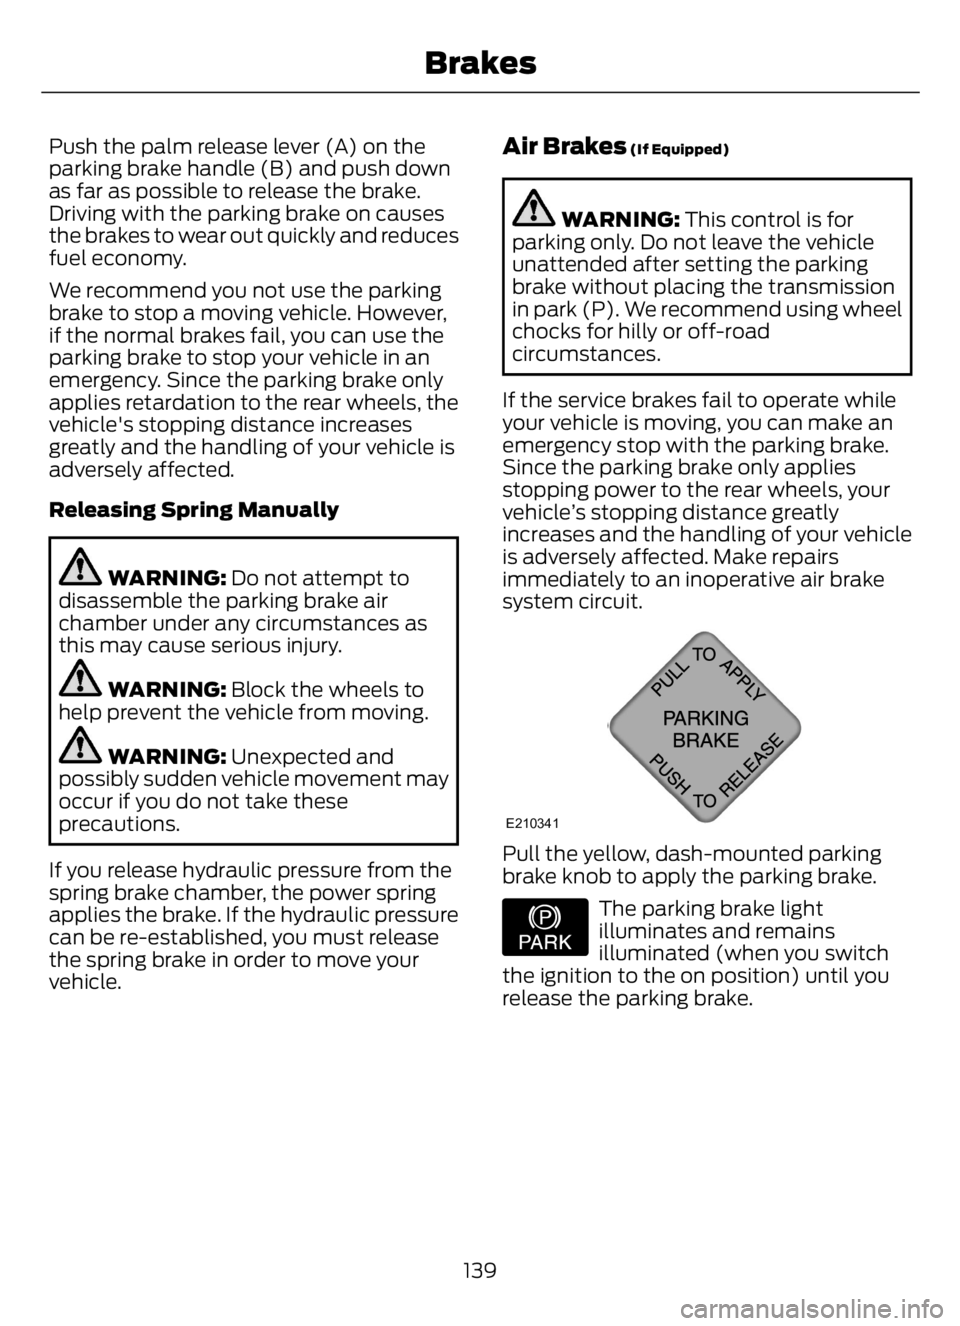
Push the palm release lever (A) on the
parking brake handle (B) and push down
as far as possible to release the brake.
Driving with the parking brake on causes
the brakes to wear out quickly and reduces
fuel economy.
We recommend you not use the parking
brake to stop a moving vehicle. However,
if the normal brakes fail, you can use the
parking brake to stop your vehicle in an
emergency. Since the parking brake only
applies retardation to the rear wheels, the
vehicle's stopping distance increases
greatly and the handling of your vehicle is
adversely affected.
Releasing Spring Manually
WARNING: Do not attempt to
disassemble the parking brake air
chamber under any circumstances as
this may cause serious injury.
WARNING: Block the wheels to
help prevent the vehicle from moving.
WARNING: Unexpected and
possibly sudden vehicle movement may
occur if you do not take these
precautions.
If you release hydraulic pressure from the
spring brake chamber, the power spring
applies the brake. If the hydraulic pressure
can be re-established, you must release
the spring brake in order to move your
vehicle.
Air Brakes (If Equipped)
WARNING: This control is for
parking only. Do not leave the vehicle
unattended after setting the parking
brake without placing the transmission
in park (P). We recommend using wheel
chocks for hilly or off-road
circumstances.
If the service brakes fail to operate while
your vehicle is moving, you can make an
emergency stop with the parking brake.
Since the parking brake only applies
stopping power to the rear wheels, your
vehicle’s stopping distance greatly
increases and the handling of your vehicle
is adversely affected. Make repairs
immediately to an inoperative air brake
system circuit.
E210341
Pull the yellow, dash-mounted parking
brake knob to apply the parking brake.
E208810
The parking brake light
illuminates and remains
illuminated (when you switch
the ignition to the on position) until you
release the parking brake.
139
Brakes
Page 144 of 378
Releasing the Parking Brake
WARNING: When your vehicle is
stationary, keep the brake pedal fully
pressed when shifting gears. Failure to
follow this instruction could result in
personal injury, death or property
damage.
Note:Read and understand the following
steps and perform them whenever you
prepare to drive the vehicle.
Note:The parking brake does not disengage
unless sufficient system air pressure is
available.
1. Press and hold the service brake pedal
while the engine is running.
2. Select the appropriate drive gear.
3. Push and hold the yellow
dash-mounted parking brake knob until
the parking brake light turns off, then
release.
Parking Brake Light Illumination Due
to Low Air Pressure
If the air pressure becomes too low at any
time during vehicle operation, the parking
brake may apply and the parking brake
light turns on.
If the parking brake applies due to low air
pressure, immediate service is required to
the parking brake system.
Releasing Spring Brake with Air
Pressure
The air system in all vehicles with
spring-actuated rear wheel parking brakes
has a valve on the governor for connection
to an outside air supply. The valve lets you
recharge the system with air from an
outside source, releasing the
spring-actuated parking brakes. Your
vehicle is now ready to tow in an
emergency.You can only use an outside air source if
the protected system is in operating
condition. If you cannot restore air pressure
in the protected air system, you must
release the spring-actuated brakes
manually.
Releasing Spring Manually
Do not use impact wrenches as they may
damage the piston and prevent proper
caging of the spring. Do not apply more
than 50 lb.ft (68 Nm) to the release bolt
nut.
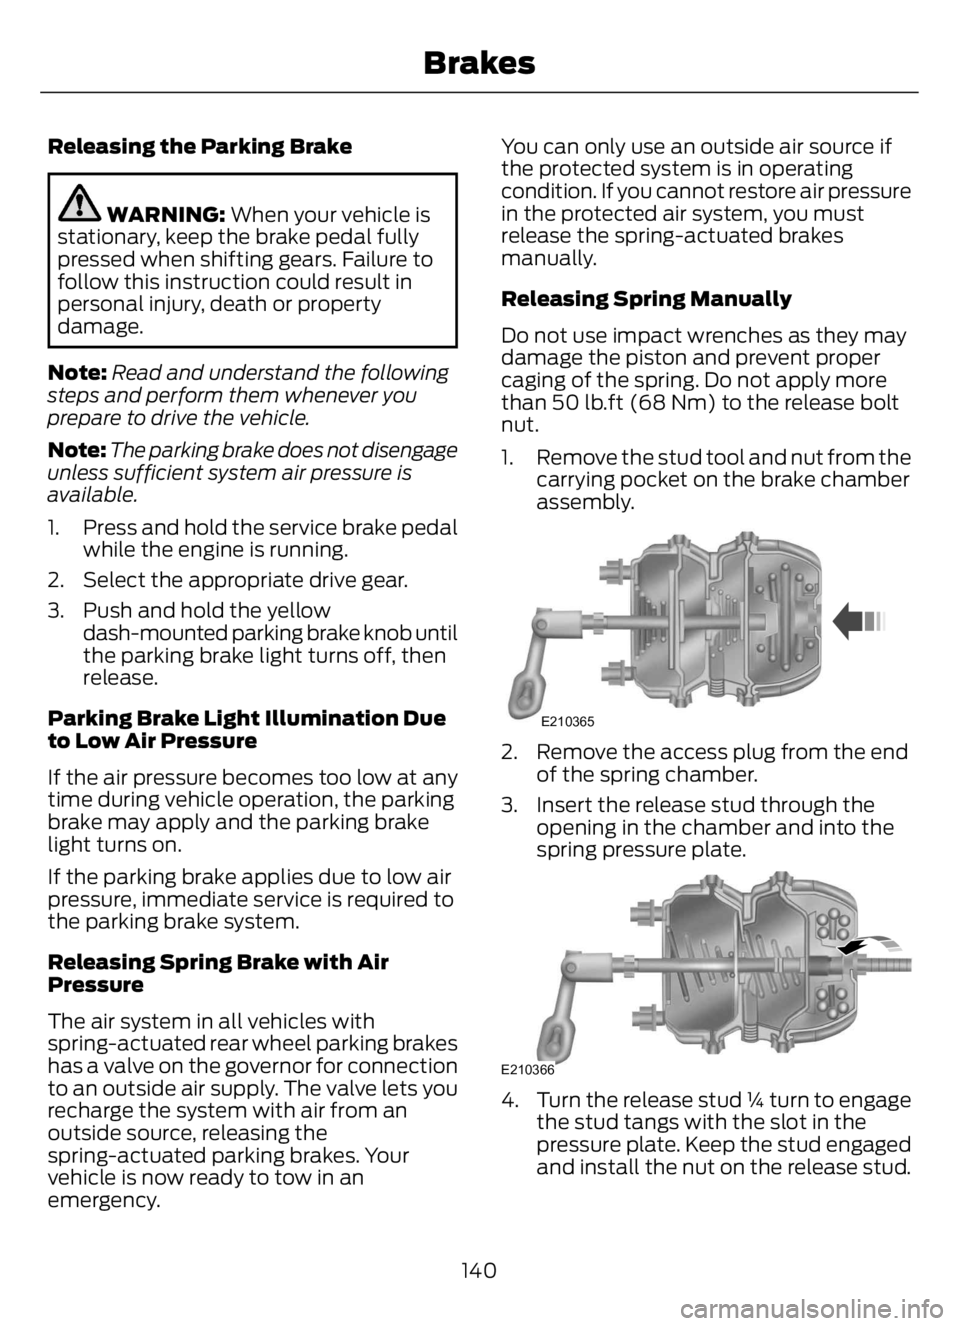
1. Remove the stud tool and nut from the
carrying pocket on the brake chamber
assembly.
E210365
2. Remove the access plug from the end
of the spring chamber.
3. Insert the release stud through the
opening in the chamber and into the
spring pressure plate.
E210366
4. Turn the release stud ¼ turn to engage
the stud tangs with the slot in the
pressure plate. Keep the stud engaged
and install the nut on the release stud.
140
Brakes
Page 147 of 378

Cam Brakes - Automatic Slack
Adjusters
WARNING: Do not manually adjust
the automatic slack adjusters to correct
excessive push rod stroke as it may result
in reduced brake effectiveness and a
vehicle crash. Excessive push rod stroke
indicates that a problem exists with the
automatic adjuster, with the installation
of the adjuster, or with foundation brake
components that manual adjustment
does not remedy. Seek service from a
qualified facility for excessive push rod
stroke.
E210337
Standard air brakes (cam) are equipped
with automatic brake adjusters. Automatic
adjustment occurs during brake
applications. Inspect brakes for proper
adjustment at the specified intervals. See
Scheduled Maintenance (page 319).
Emergency Air Brake
WARNING: Do not continue to
operate the vehicle with a failure of one
of the brake systems. Take the vehicle
to your dealer for service immediately.All vehicles are equipped with a dual brake
system. In the unlikely event of a failure of
one system, the second system functions
for emergency stopping. The brake pedal
controls all these systems in the same
manner as for normal stops.
EXHAUST BRAKE (IF EQUIPPED)
WARNING: Do not use tow/haul
when the road surface is slippery. Failure
to follow this instruction could result in
the loss of control of your vehicle.
WARNING: Do not use diesel
engine exhaust braking when the road
surface is slippery. Failure to follow this
instruction could result in the loss of
control of your vehicle.
Note:Installing an exhaust or auxiliary
brake does not necessarily protect the
engine from exceeding the maximum
governed speed. Use the primary brakes to
make sure the engine never exceeds the
maximum governed speed under any
circumstance.
Note:Engine speed has a major influence
on limiting performance. When engine
speed stays at the maximum allowable
level, the exhaust brake operates at peak
performance.
Note:Exhaust brakes operate effectively
with automatic transmissions. However,
performance varies with engine speed and
the gear selected by the transmission.
An exhaust brake is an auxiliary braking
system that assists, but does not replace,
the primary brake system. It helps control
vehicle speed. It is not a vehicle-stopping
device.
143
Brakes