2023 FORD F650/750 engine oil
[x] Cancel search: engine oilPage 226 of 378

UNDER HOOD OVERVIEW - 6.7L DIESEL
E313700E313700
Engine compartment fuse box. See Fuses (page 200). A
Windshield washer fluid reservoir. See Washer Fluid Check (page 249). B
Automatic transmission fluid dipstick. See Automatic Transmission Fluid
Check (page 242). C
Secondary Cooling System Reservoir. See Engine Coolant Check (page 233). D
Engine coolant reservoir. See Engine Coolant Check (page 233). E
Secondary fuel filter. See Draining the Fuel Filter Water Trap (page 232). F
Engine oil separator. See Changing the Engine Oil and Oil Filter (page 226). G
Engine oil filler cap. See Engine Oil Check (page 224). H
Brake fluid reservoir. See Brake Fluid Check (page 244). I
Power steering fluid reservoir. See Power Steering Fluid Check (page 245). J
Air brake compressor. See Brake System Inspection (page 255). K
Engine oil dipstick. See Engine Oil Dipstick (page 224). L
Air cleaner assembly. See Changing the Engine Oil and Oil Filter (page 226). M
222
Maintenance
Page 227 of 378
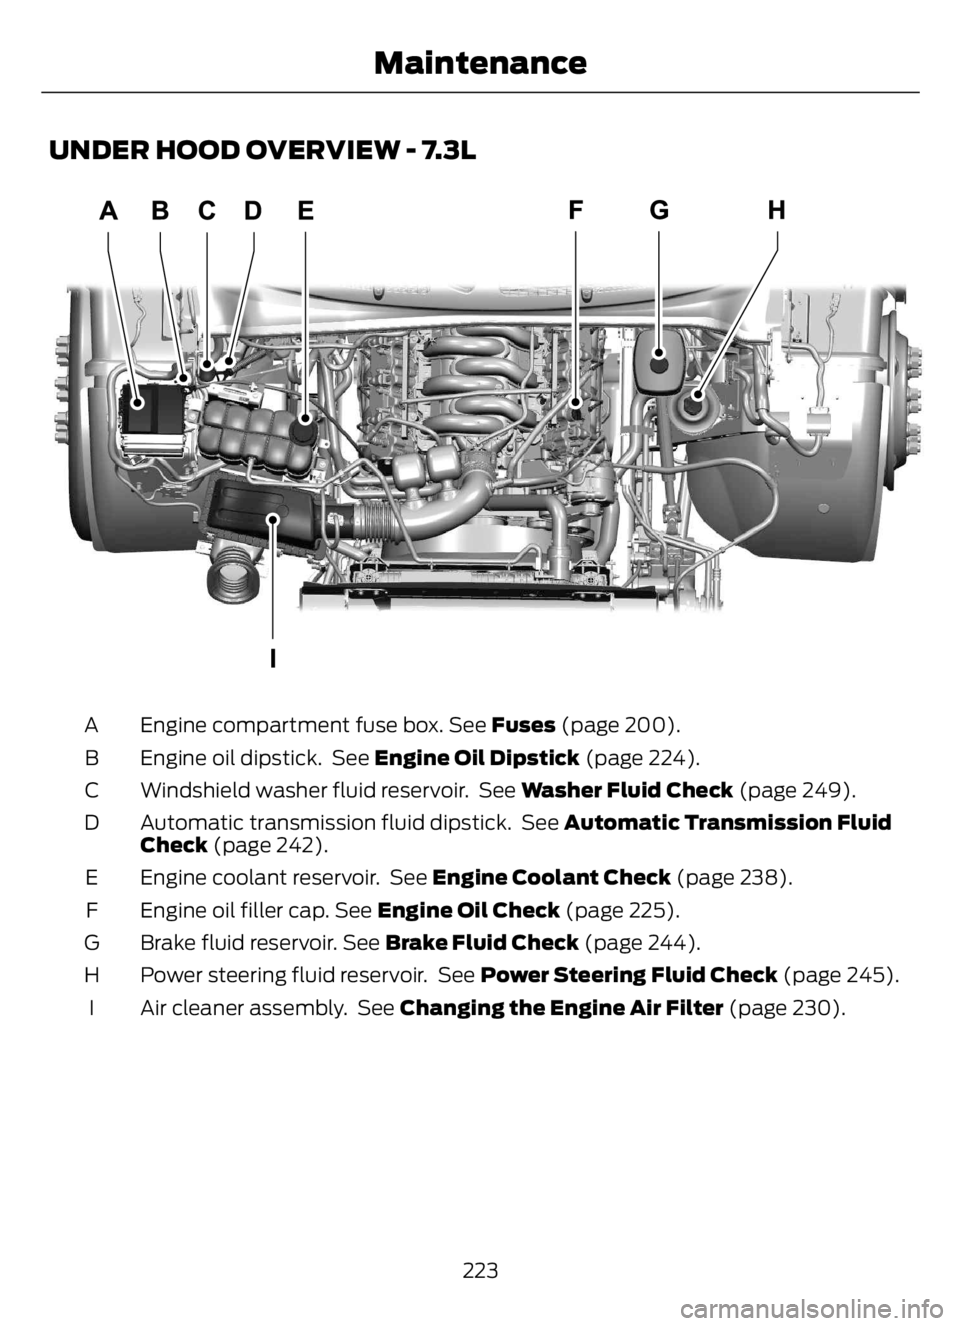
UNDER HOOD OVERVIEW - 7.3L
E330964E330964
Engine compartment fuse box. See Fuses (page 200). A
Engine oil dipstick. See Engine Oil Dipstick (page 224). B
Windshield washer fluid reservoir. See Washer Fluid Check (page 249). C
Automatic transmission fluid dipstick. See Automatic Transmission Fluid
Check (page 242). D
Engine coolant reservoir. See Engine Coolant Check (page 238). E
Engine oil filler cap. See Engine Oil Check (page 225). F
Brake fluid reservoir. See Brake Fluid Check (page 244). G
Power steering fluid reservoir. See Power Steering Fluid Check (page 245). H
Air cleaner assembly. See Changing the Engine Air Filter (page 230). I
223
Maintenance
Page 228 of 378

ENGINE OIL DIPSTICK - 6.7L
DIESEL
E249448
Minimum. A
Nominal. B
Maximum. C
ENGINE OIL DIPSTICK - 7.3L
E250320E250320
Minimum. A
Nominal. B
Maximum. C
ENGINE OIL CHECK - 6.7L
DIESEL
To check the engine oil level consistently
and accurately, do the following:1. Make sure the parking brake is on. Make
sure the transmission is in park (P) or
neutral (N).
2. Run engine until it reaches normal
operating temperature.
3. Make sure that your vehicle is on level
ground.
4. Switch the engine off and wait 15
minutes for the oil to drain into the oil
pan. Checking the engine oil level too
soon after you switch the engine off
may result in an inaccurate reading.
5. Open the hood. See Opening and
Closing the Hood (page 220).
6. Remove the dipstick and wipe it with
a clean, lint-free cloth. See Under
Hood Overview (page 222).
7. Replace the dipstick and remove it
again to check the oil level. See
Engine Oil Dipstick (page 224).
8. Make sure that the oil level is between
the maximum and minimum marks. If
the oil level is at the minimum mark,
add oil immediately. See Engine Oil
Capacity and Specification (page
292).
9. If the oil level is correct, replace the
dipstick and make sure it is fully seated.
Note:Do not remove the dipstick when the
engine is running.
Note: If the oil level is between the
maximum and minimum marks, the oil level
is acceptable. Do not add oil.
Note:The oil consumption of new engines
reaches its normal level after approximately
3,000 mi (5,000 km).
Adding Engine Oil
WARNING: Do not remove the filler
cap when the engine is running.
224
Maintenance
Page 229 of 378

Do not use supplemental engine oil
additives because they are unnecessary
and could lead to engine damage that may
not be covered by the vehicle Warranty.
To top up the engine oil level do the
following:
1. Clean the area surrounding the engine
oil filler cap before you remove it.
2. Remove the engine oil filler cap. See
Under Hood Overview (page 222).
Turn it counterclockwise and remove
it.
3. Add engine oil of the proper viscosity
and grade that meets Ford
specifications. See Engine Oil
Capacity and Specification (page
292). You may have to use a funnel to
pour the engine oil into the opening.
4. Recheck the oil level.
5. If the oil level is correct, replace the
dipstick and make sure it is fully seated.
6. Replace the engine oil filler cap. Turn
it clockwise until you feel a strong
resistance.
Note: Do not add oil further than the
maximum mark. Oil levels above the
maximum mark may cause engine damage.
Note:Make sure you install the oil filler cap
correctly.
Note:Soak up any spillage with an
absorbent cloth immediately.
Engine lubrication for severe
service operation
The following conditions define severe
operation for which engine operation with
SAE 5W-40 oil which meets Ford
specification, WSS-M2C171-F1, is
recommended. Oil and oil filter change
intervals will be determined by the
Intelligent Oil Life Monitor™ as noted
previously.
ENGINE OIL CHECK - 7.3L
1. Make sure that your vehicle is on level
ground.
2. Check the oil level before starting the
engine, or switch the engine off after
warm up and wait 10 minutes for the
oil to drain into the oil pan.
3. Remove the dipstick and wipe it with
a clean, lint-free cloth.
4. Reinstall the dipstick and make sure it
is fully seated.
5. Remove the dipstick again to check the
oil level.
Note: If the oil level is between the
maximum and minimum marks, the oil level
is acceptable. Do not add oil.
6. If the oil level is at the minimum mark,
immediately add oil.
7. Reinstall the dipstick. Make sure it is
fully seated.
Note:The oil consumption of new engines
reaches its normal level after approximately
3,000 mi (5,000 km).
Adding Engine Oil
WARNING: Do not add engine oil
when the engine is hot. Failure to follow
this instruction could result in personal
injury.
WARNING: Do not remove the filler
cap when the engine is running.
Do not use supplemental engine oil
additives because they are unnecessary
and could lead to engine damage that the
vehicle warranty may not cover.
1. Clean the area surrounding the engine
oil filler cap before you remove it.
2. Remove the engine oil filler cap.
225
Maintenance
Page 230 of 378

3. Add engine oil that meets our
specifications. See Capacities and
Specifications (page 288).
4. Reinstall the engine oil filler cap. Turn
it clockwise until you feel a strong
resistance.
Note: Do not add oil further than the
maximum mark. Oil levels above the
maximum mark may cause engine damage.
Note:Immediately soak up any oil spillage
with an absorbent cloth.
Engine Oil Pressure Warning Lamp
WARNING: If it illuminates when
you are driving do not continue your
journey, even if the oil level is correct.
Have your vehicle checked.
It illuminates when you switch
the ignition on.
If it illuminates when the engine
is running this indicates a malfunction.
Stop your vehicle as soon as it is safe to
do so and switch the engine off. Check the
engine oil level. If the oil level is sufficient,
this indicates a system malfunction. Have
your vehicle checked as soon as possible.
CHANGING THE ENGINE OIL
AND OIL FILTER
WARNING: Do not add engine oil
when the engine is hot. Failure to follow
this instruction could result in personal
injury.If your vehicle has a diesel engine, an
Intelligent Oil Life Monitor™ calculates the
proper oil change service interval. When
the information display indicates: OIL
CHANGE REQUIRED, change the engine
oil and oil filter. See Information
Displays (page 70).
The engine oil filter protects your engine
by filtering harmful, abrasive or sludge
particles and particles significantly smaller
than most available will-fit filters. See
Motorcraft Parts (page 290).
1. Unscrew the oil filter and oil pan drain
plug and wait for the oil to drain.
2. Replace the filter.
3. Reinstall the oil pan drain plug.
4. Refill the engine with new oil. See
Engine Oil Capacity and
Specification (page 295).
5. For diesel engines, you need to reset
the Intelligent Oil Life Monitor™. See
Information Displays (page 70).
Engine Lubrication for Severe
Service Operation
The following conditions define severe
operation:
• Frequent or extended idling such as
over 10 minutes per hour of normal
driving.
• Low-speed operation or stationary use.
• If the vehicle is operated in sustained,
ambient temperatures below -9°F
(-23°C) or above 100°F (38°C).
• Frequent low-speed operation, or
consistent heavy traffic less than
25 mph (40 km/h).
• Operating in severe dust conditions.
• Operating the vehicle off road.
• Towing a trailer over 1,000 mi
(1,600 km).
226
Maintenance
Page 231 of 378

• Sustained, high-speed driving at the
gross vehicle weight rating.
• Use of fuels with sulfur content other
than ultra-low sulfur diesel (ULSD).
• Use of high-sulfur diesel fuel.
Only use engine oil that meets our
specifications. See Capacities and
Specifications (page 288).
OIL CHANGE INDICATOR
RESET
Base Cluster
Use the information display controls on
the steering wheel to reset the oil change
indicator.
From the main menu scroll to:
Action and Description Message
Press the right arrow button,
then from this menu scroll
to the following message. Settings
Press the down arrow
button, then from this menu
scroll to the following
message. Vehicle
Press the right arrow button,
then from this menu scroll
to the following message. Oil Life
Reset
Press and hold the OK
button until the instrument
cluster displays the
following message. Oil Life
Hold to
Reset
Press and hold the OK
button until the instrument
cluster displays the
following message. Oil Life
Hold OK
to Reset
Action and Description Message
Reset Complete
If the instrument cluster
displays the following
message, repeat the
process.
Reset Cancelled
High Series Cluster
Use the information display controls on
the steering wheel to reset the oil change
indicator.
From the main menu scroll to:
Action and Description Message
Press the down arrow
button, then from this menu
scroll to the following
message. Truck Info
Press the OK button. Mainten-
ance
Monitor
Press the down arrow
button, then from this menu
scroll to the following
message. Oil Life:
xxx%
Press the OK button. Oil Life
Press and hold the OK
button until the instrument
cluster displays the
following message. Oil Life
Hold OK to
Reset
Oil Life: 100%
When the oil change indic-
ator resets, the instrument
cluster displays 100%.
Repeat the process if the oil
change indicator does not
reset.
227
Maintenance
Page 259 of 378
Before engine operation, remove any debris
blocking the core.
• Turbocharger-to-charge air cooler.
• Charge air cooler-to-intake manifold
pipe.
• Mounting bracket.
• Chassis-mounted charge air cooler
core.
Inspect air intake piping:
• Check for accumulation of salt
deposits (where applicable). If present,
disassemble and clean the complete
air intake piping system. If pitting is
evident on the intake piping, use
Motorcraft Silicone Gasket and Sealant
TA-30 to seal joints against leakage.
• Check for loose hoses and clamps.
• Check for ruptured or collapsed hoses.
• Check air cleaner housing for cracks.
EXHAUST SYSTEM
INSPECTION
Note:If your vehicle is equipped with a
catalytic converter or muffler, do not blend
waste oil with diesel fuel. Operate only on
ultra-low sulfur (less than 15 parts per
million sulfur) diesel fuel with a cetane
value of 45 or higher.
If your diesel engine is equipped with a
catalytic converter, it is important to review
the maintenance schedule to make sure
proper functioning of the catalytic
converter. Also, take precautions not to
damage the catalytic converter when
servicing your engine or storing your
vehicle.
BRAKE SYSTEM INSPECTION
WARNING: Always wear a
respirator approved by the National
Institute of Occupational Studies of
Health (NIOSH) or Mine Safety and
Appliance (MSA) during all brake service
procedures. Wear the respirator from
removal of the wheels through assembly.
Never use compressed air or dry brushing
to clean brake parts or assemblies.
Clean brake parts and assemblies in
open air. During assembly, carefully
place all parts on the floor to avoid
getting dust in the air. Use an industrial
vacuum cleaner with a HEPA filter
system to clean dust from the brake
drums, backing plates and other brake
parts. After using the vacuum, remove
any remaining dust with a rag soaked in
water and wrung until nearly dry.
Never use compressed air or dry
sweeping to clean the work area. Use an
industrial vacuum cleaner with a HEPA
filter system and rags soaked in water
and wrung until nearly dry. Dispose of
used rags with care to avoid getting dust
in the air. Use an approved respirator
when emptying vacuum cleaners and
handling used rags.
Worker clean-up: Wash your hands
before eating, drinking or smoking.
Vacuum your work clothes after use and
then launder them separately, without
shaking them, to prevent fiber dust
getting into the air.
Your vehicle is equipped with
non-asbestos brake linings. However,
exposure to excessive amounts of brake
material (whether asbestos or
non-asbestos, fiberglass, mineral wool,
aramid or carbon) may be a serious health
hazard.
255
Maintenance
Page 263 of 378

Follow the tire manufacturer's
recommended cold inflation pressure for
the tire size, load range (ply rating) and
steer axle loading typical for their operation
(each steer axle tire equals ½ steer axle
loading).
Special applications may warrant a setting
based on experience with the type of tire
operating loads and conditions. Radial tires
are more sensitive to toe-in setting than
bias ply tires. Fine tuning school bus
alignment to line-haul truck standards
does not drastically improve tire tread life.
STEERING SYSTEM
INSPECTION
WARNING: Failure to maintain the
steering system in proper condition can
cause reduced steering ability resulting
in property damage, personal injury or
death.
Note:Have any steering problems
immediately corrected by a qualified service
technician.
Ask your service technician to examine the
steering mechanism. Only minor
adjustments may be necessary.
Regular inspections should include:
• Checking the tie rod, drag link end
clamp bolts and ball joints for proper
tightness.
• Checking for installation and spread of
cotter pins and tightness of nuts at
both ends of the tie rod and drag link.
• Checking that the pitman arm (steering
arm at steering gear) mounting is tight
and locked. Check system for leaks or
hose chafing. Repair immediately, if
necessary.• Maintaining proper steering gear and
power steering pump lubricant levels.
• Checking steering column joint bolts
and steering linkage, particularly for
body-to-chassis clearance.
Steering Column Joint Bolts
As a good maintenance practice, check
steering column joint bolt tightness every
60,000 mi (96,000 km) or annually,
whichever occurs first. Do not overtighten
the bolts.
Hydraulic System
Whenever draining and refilling the power
steering's hydraulic system for any reason,
bleed air from the system before returning
the vehicle to service. Failure to bleed the
hydraulic system properly can result in
degradation of power system performance.
Consult an authorized dealer who is aware
of the proper procedures for filling and
bleeding the system.
SUSPENSION SYSTEM
INSPECTION
Note:Do not adjust air suspension height
to any setting other than the specified
setting. Altering the height setting changes
the driveline angle and may result in
unwarrantable component damage, such
as transmission component damage.
Verify drive axle air suspension height and
height control valve performance at engine
oil change intervals.
Periodically check:
• Condition of spring leaves for evidence
of fatigue, bending or breakage.
• Condition of suspension mounting
brackets and bushings.
• Torque rod mounting fasteners for
tightness.
259
Maintenance