2023 FORD F650/750 oil level
[x] Cancel search: oil levelPage 218 of 378

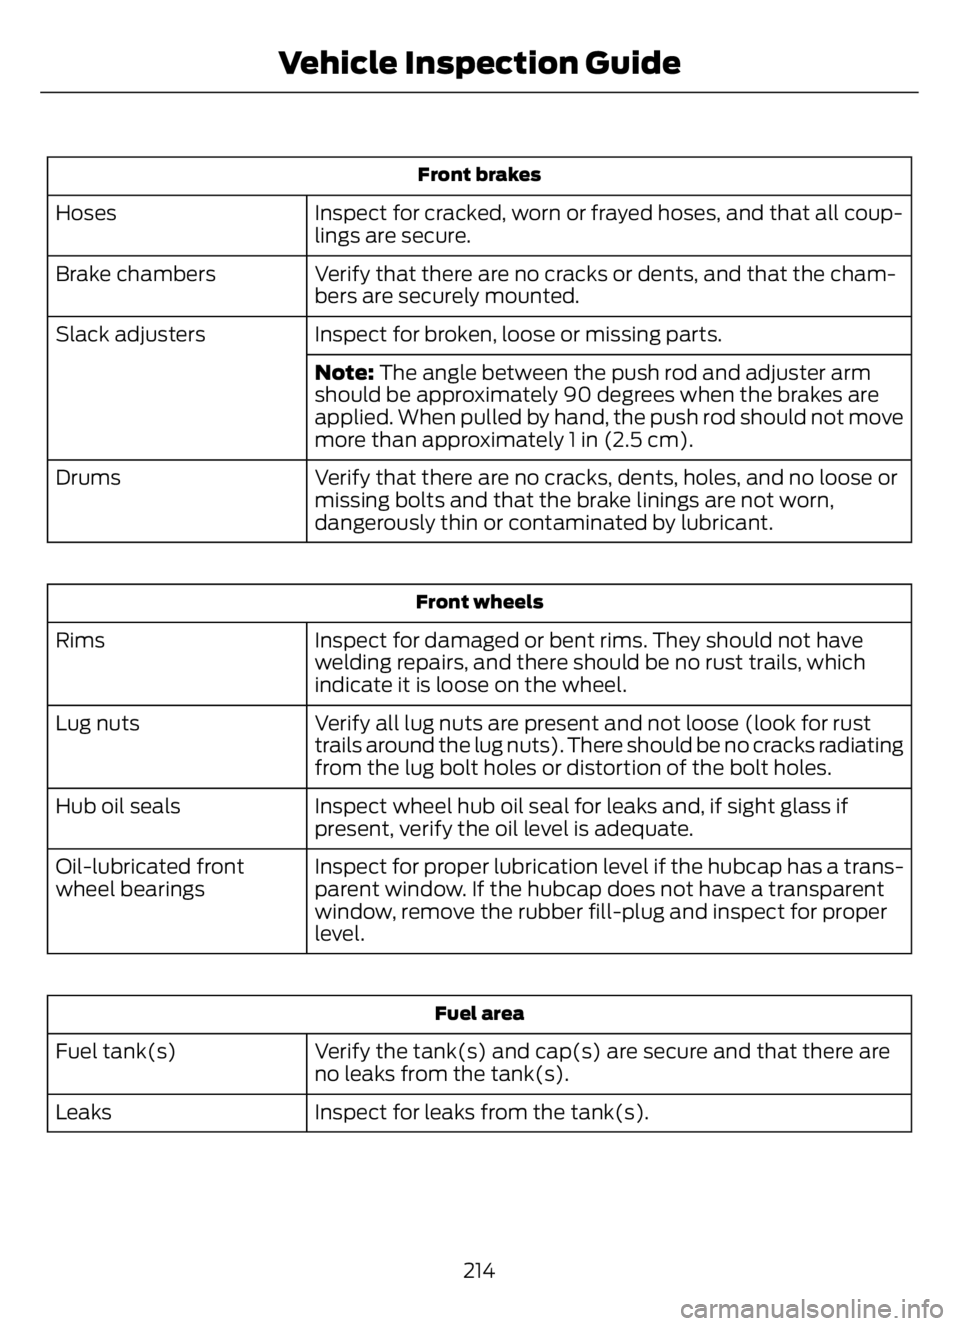
Front brakes
Inspect for cracked, worn or frayed hoses, and that all coup-
lings are secure. Hoses
Verify that there are no cracks or dents, and that the cham-
bers are securely mounted. Brake chambers
Inspect for broken, loose or missing parts. Slack adjusters
Note: The angle between the push rod and adjuster arm
should be approximately 90 degrees when the brakes are
applied. When pulled by hand, the push rod should not move
more than approximately 1 in (2.5 cm).
Verify that there are no cracks, dents, holes, and no loose or
missing bolts and that the brake linings are not worn,
dangerously thin or contaminated by lubricant. Drums
Front wheels
Inspect for damaged or bent rims. They should not have
welding repairs, and there should be no rust trails, which
indicate it is loose on the wheel. Rims
Verify all lug nuts are present and not loose (look for rust
trails around the lug nuts). There should be no cracks radiating
from the lug bolt holes or distortion of the bolt holes. Lug nuts
Inspect wheel hub oil seal for leaks and, if sight glass if
present, verify the oil level is adequate. Hub oil seals
Inspect for proper lubrication level if the hubcap has a trans-
parent window. If the hubcap does not have a transparent
window, remove the rubber fill-plug and inspect for proper
level. Oil-lubricated front
wheel bearings
Fuel area
Verify the tank(s) and cap(s) are secure and that there are
no leaks from the tank(s). Fuel tank(s)
Inspect for leaks from the tank(s). Leaks
214
Vehicle Inspection Guide
Page 228 of 378

ENGINE OIL DIPSTICK - 6.7L
DIESEL
E249448
Minimum. A
Nominal. B
Maximum. C
ENGINE OIL DIPSTICK - 7.3L
E250320E250320
Minimum. A
Nominal. B
Maximum. C
ENGINE OIL CHECK - 6.7L
DIESEL
To check the engine oil level consistently
and accurately, do the following:1. Make sure the parking brake is on. Make
sure the transmission is in park (P) or
neutral (N).
2. Run engine until it reaches normal
operating temperature.
3. Make sure that your vehicle is on level
ground.
4. Switch the engine off and wait 15
minutes for the oil to drain into the oil
pan. Checking the engine oil level too
soon after you switch the engine off
may result in an inaccurate reading.
5. Open the hood. See Opening and
Closing the Hood (page 220).
6. Remove the dipstick and wipe it with
a clean, lint-free cloth. See Under
Hood Overview (page 222).
7. Replace the dipstick and remove it
again to check the oil level. See
Engine Oil Dipstick (page 224).
8. Make sure that the oil level is between
the maximum and minimum marks. If
the oil level is at the minimum mark,
add oil immediately. See Engine Oil
Capacity and Specification (page
292).
9. If the oil level is correct, replace the
dipstick and make sure it is fully seated.
Note:Do not remove the dipstick when the
engine is running.
Note: If the oil level is between the
maximum and minimum marks, the oil level
is acceptable. Do not add oil.
Note:The oil consumption of new engines
reaches its normal level after approximately
3,000 mi (5,000 km).
Adding Engine Oil
WARNING: Do not remove the filler
cap when the engine is running.
224
Maintenance
Page 229 of 378

Do not use supplemental engine oil
additives because they are unnecessary
and could lead to engine damage that may
not be covered by the vehicle Warranty.
To top up the engine oil level do the
following:
1. Clean the area surrounding the engine
oil filler cap before you remove it.
2. Remove the engine oil filler cap. See
Under Hood Overview (page 222).
Turn it counterclockwise and remove
it.
3. Add engine oil of the proper viscosity
and grade that meets Ford
specifications. See Engine Oil
Capacity and Specification (page
292). You may have to use a funnel to
pour the engine oil into the opening.
4. Recheck the oil level.
5. If the oil level is correct, replace the
dipstick and make sure it is fully seated.
6. Replace the engine oil filler cap. Turn
it clockwise until you feel a strong
resistance.
Note: Do not add oil further than the
maximum mark. Oil levels above the
maximum mark may cause engine damage.
Note:Make sure you install the oil filler cap
correctly.
Note:Soak up any spillage with an
absorbent cloth immediately.
Engine lubrication for severe
service operation
The following conditions define severe
operation for which engine operation with
SAE 5W-40 oil which meets Ford
specification, WSS-M2C171-F1, is
recommended. Oil and oil filter change
intervals will be determined by the
Intelligent Oil Life Monitor™ as noted
previously.
ENGINE OIL CHECK - 7.3L
1. Make sure that your vehicle is on level
ground.
2. Check the oil level before starting the
engine, or switch the engine off after
warm up and wait 10 minutes for the
oil to drain into the oil pan.
3. Remove the dipstick and wipe it with
a clean, lint-free cloth.
4. Reinstall the dipstick and make sure it
is fully seated.
5. Remove the dipstick again to check the
oil level.
Note: If the oil level is between the
maximum and minimum marks, the oil level
is acceptable. Do not add oil.
6. If the oil level is at the minimum mark,
immediately add oil.
7. Reinstall the dipstick. Make sure it is
fully seated.
Note:The oil consumption of new engines
reaches its normal level after approximately
3,000 mi (5,000 km).
Adding Engine Oil
WARNING: Do not add engine oil
when the engine is hot. Failure to follow
this instruction could result in personal
injury.
WARNING: Do not remove the filler
cap when the engine is running.
Do not use supplemental engine oil
additives because they are unnecessary
and could lead to engine damage that the
vehicle warranty may not cover.
1. Clean the area surrounding the engine
oil filler cap before you remove it.
2. Remove the engine oil filler cap.
225
Maintenance
Page 230 of 378

3. Add engine oil that meets our
specifications. See Capacities and
Specifications (page 288).
4. Reinstall the engine oil filler cap. Turn
it clockwise until you feel a strong
resistance.
Note: Do not add oil further than the
maximum mark. Oil levels above the
maximum mark may cause engine damage.
Note:Immediately soak up any oil spillage
with an absorbent cloth.
Engine Oil Pressure Warning Lamp
WARNING: If it illuminates when
you are driving do not continue your
journey, even if the oil level is correct.
Have your vehicle checked.
It illuminates when you switch
the ignition on.
If it illuminates when the engine
is running this indicates a malfunction.
Stop your vehicle as soon as it is safe to
do so and switch the engine off. Check the
engine oil level. If the oil level is sufficient,
this indicates a system malfunction. Have
your vehicle checked as soon as possible.
CHANGING THE ENGINE OIL
AND OIL FILTER
WARNING: Do not add engine oil
when the engine is hot. Failure to follow
this instruction could result in personal
injury.If your vehicle has a diesel engine, an
Intelligent Oil Life Monitor™ calculates the
proper oil change service interval. When
the information display indicates: OIL
CHANGE REQUIRED, change the engine
oil and oil filter. See Information
Displays (page 70).
The engine oil filter protects your engine
by filtering harmful, abrasive or sludge
particles and particles significantly smaller
than most available will-fit filters. See
Motorcraft Parts (page 290).
1. Unscrew the oil filter and oil pan drain
plug and wait for the oil to drain.
2. Replace the filter.
3. Reinstall the oil pan drain plug.
4. Refill the engine with new oil. See
Engine Oil Capacity and
Specification (page 295).
5. For diesel engines, you need to reset
the Intelligent Oil Life Monitor™. See
Information Displays (page 70).
Engine Lubrication for Severe
Service Operation
The following conditions define severe
operation:
• Frequent or extended idling such as
over 10 minutes per hour of normal
driving.
• Low-speed operation or stationary use.
• If the vehicle is operated in sustained,
ambient temperatures below -9°F
(-23°C) or above 100°F (38°C).
• Frequent low-speed operation, or
consistent heavy traffic less than
25 mph (40 km/h).
• Operating in severe dust conditions.
• Operating the vehicle off road.
• Towing a trailer over 1,000 mi
(1,600 km).
226
Maintenance
Page 263 of 378

Follow the tire manufacturer's
recommended cold inflation pressure for
the tire size, load range (ply rating) and
steer axle loading typical for their operation
(each steer axle tire equals ½ steer axle
loading).
Special applications may warrant a setting
based on experience with the type of tire
operating loads and conditions. Radial tires
are more sensitive to toe-in setting than
bias ply tires. Fine tuning school bus
alignment to line-haul truck standards
does not drastically improve tire tread life.
STEERING SYSTEM
INSPECTION
WARNING: Failure to maintain the
steering system in proper condition can
cause reduced steering ability resulting
in property damage, personal injury or
death.
Note:Have any steering problems
immediately corrected by a qualified service
technician.
Ask your service technician to examine the
steering mechanism. Only minor
adjustments may be necessary.
Regular inspections should include:
• Checking the tie rod, drag link end
clamp bolts and ball joints for proper
tightness.
• Checking for installation and spread of
cotter pins and tightness of nuts at
both ends of the tie rod and drag link.
• Checking that the pitman arm (steering
arm at steering gear) mounting is tight
and locked. Check system for leaks or
hose chafing. Repair immediately, if
necessary.• Maintaining proper steering gear and
power steering pump lubricant levels.
• Checking steering column joint bolts
and steering linkage, particularly for
body-to-chassis clearance.
Steering Column Joint Bolts
As a good maintenance practice, check
steering column joint bolt tightness every
60,000 mi (96,000 km) or annually,
whichever occurs first. Do not overtighten
the bolts.
Hydraulic System
Whenever draining and refilling the power
steering's hydraulic system for any reason,
bleed air from the system before returning
the vehicle to service. Failure to bleed the
hydraulic system properly can result in
degradation of power system performance.
Consult an authorized dealer who is aware
of the proper procedures for filling and
bleeding the system.
SUSPENSION SYSTEM
INSPECTION
Note:Do not adjust air suspension height
to any setting other than the specified
setting. Altering the height setting changes
the driveline angle and may result in
unwarrantable component damage, such
as transmission component damage.
Verify drive axle air suspension height and
height control valve performance at engine
oil change intervals.
Periodically check:
• Condition of spring leaves for evidence
of fatigue, bending or breakage.
• Condition of suspension mounting
brackets and bushings.
• Torque rod mounting fasteners for
tightness.
259
Maintenance
Page 272 of 378

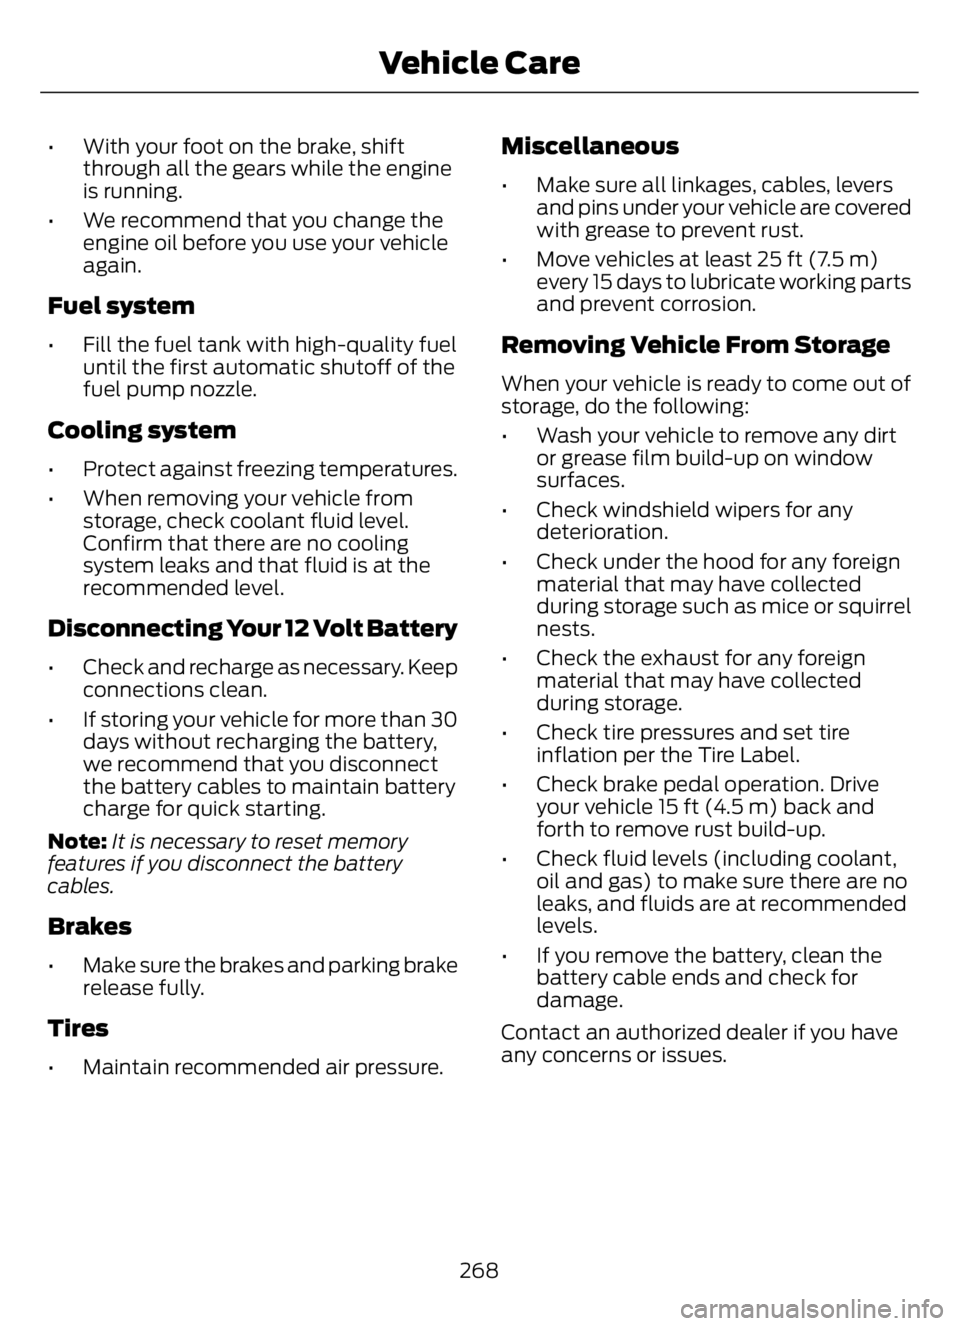
• With your foot on the brake, shift
through all the gears while the engine
is running.
• We recommend that you change the
engine oil before you use your vehicle
again.
Fuel system
• Fill the fuel tank with high-quality fuel
until the first automatic shutoff of the
fuel pump nozzle.
Cooling system
• Protect against freezing temperatures.
• When removing your vehicle from
storage, check coolant fluid level.
Confirm that there are no cooling
system leaks and that fluid is at the
recommended level.
Disconnecting Your 12 Volt Battery
• Check and recharge as necessary. Keep
connections clean.
• If storing your vehicle for more than 30
days without recharging the battery,
we recommend that you disconnect
the battery cables to maintain battery
charge for quick starting.
Note:It is necessary to reset memory
features if you disconnect the battery
cables.
Brakes
• Make sure the brakes and parking brake
release fully.
Tires
• Maintain recommended air pressure.
Miscellaneous
• Make sure all linkages, cables, levers
and pins under your vehicle are covered
with grease to prevent rust.
• Move vehicles at least 25 ft (7.5 m)
every 15 days to lubricate working parts
and prevent corrosion.
Removing Vehicle From Storage
When your vehicle is ready to come out of
storage, do the following:
• Wash your vehicle to remove any dirt
or grease film build-up on window
surfaces.
• Check windshield wipers for any
deterioration.
• Check under the hood for any foreign
material that may have collected
during storage such as mice or squirrel
nests.
• Check the exhaust for any foreign
material that may have collected
during storage.
• Check tire pressures and set tire
inflation per the Tire Label.
• Check brake pedal operation. Drive
your vehicle 15 ft (4.5 m) back and
forth to remove rust build-up.
• Check fluid levels (including coolant,
oil and gas) to make sure there are no
leaks, and fluids are at recommended
levels.
• If you remove the battery, clean the
battery cable ends and check for
damage.
Contact an authorized dealer if you have
any concerns or issues.
268
Vehicle Care
Page 296 of 378

BULB SPECIFICATION CHART
Replacement bulbs are specified in the
chart below. Headlamp bulbs must be
marked with an authorized “D.O.T.” forNorth America and an “E” for Europe to
ensure lamp performance, light brightness
and pattern and safe visibility. The correct
bulbs will not damage the lamp assembly
or void the lamp assembly warranty and
will provide quality bulb illumination time.
Trade name Number of Bulbs Function
H13/9008 2 Headlamps
W5W 2 Side marker lamp - front
3157NA 2 Park/Turn lamp- front
3157 2 Tail/stop/turn/side marker
3157 2 Reverse
3157 1 License plate lamp
912 1 High-mount brake lamp
12V6W 2 Map lamp
578 3 Dome/reading lamps
2825 2 Interior visor lamp
2825 2 Mirror turn signal
2825 2 Mirror clearance lamp
194 5 Front clearance lamps and
front identification lamps
Note:To replace instrument panel lights,
see an authorized dealer.
ENGINE OIL CAPACITY AND
SPECIFICATION - 6.7L DIESEL
Use oil that meets the defined
specification and viscosity grade.If you do not use oil that meets the defined
specification and viscosity grade, it could
result in:
• Component damage that your vehicle
warranty does not cover.
• Longer engine cranking periods.
• Increased emission levels.
• Reduced vehicle performance.
• Reduced fuel economy.
292
Capacities and Specifications
Page 299 of 378

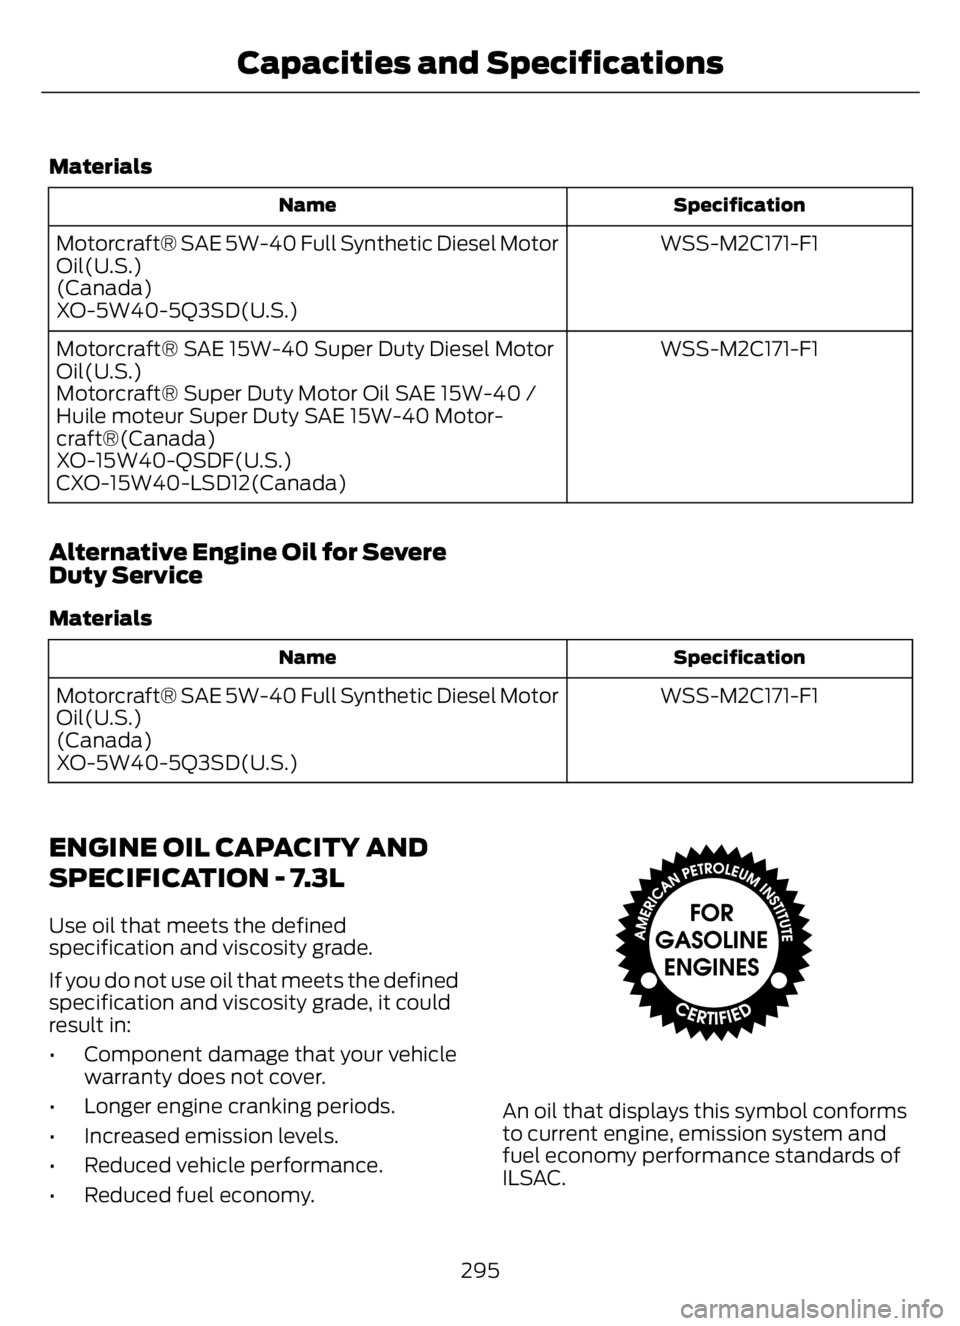
Materials
Specification Name
WSS-M2C171-F1 Motorcraft® SAE 5W-40 Full Synthetic Diesel Motor
Oil(U.S.)
(Canada)
XO-5W40-5Q3SD(U.S.)
WSS-M2C171-F1 Motorcraft® SAE 15W-40 Super Duty Diesel Motor
Oil(U.S.)
Motorcraft® Super Duty Motor Oil SAE 15W-40 /
Huile moteur Super Duty SAE 15W-40 Motor-
craft®(Canada)
XO-15W40-QSDF(U.S.)
CXO-15W40-LSD12(Canada)
Alternative Engine Oil for Severe
Duty Service
Materials
Specification Name
WSS-M2C171-F1 Motorcraft® SAE 5W-40 Full Synthetic Diesel Motor
Oil(U.S.)
(Canada)
XO-5W40-5Q3SD(U.S.)
ENGINE OIL CAPACITY AND
SPECIFICATION - 7.3L
Use oil that meets the defined
specification and viscosity grade.
If you do not use oil that meets the defined
specification and viscosity grade, it could
result in:
• Component damage that your vehicle
warranty does not cover.
• Longer engine cranking periods.
• Increased emission levels.
• Reduced vehicle performance.
• Reduced fuel economy.
E142732
An oil that displays this symbol conforms
to current engine, emission system and
fuel economy performance standards of
ILSAC.
295
Capacities and Specifications