2023 FORD EXPLORER manual transmission
[x] Cancel search: manual transmissionPage 24 of 573

AT A GLANCE - ST
Exterior
•Front and rear fascias feature uniqueST grille and unique finish.
•ST badging in front grille and on rearliftgate.
•Trim features unique ST gloss blackfinish.
•E-X-P-L-O-R-E-R lettering acrosshood.
•Blackout treatment on headlight andtaillight lenses.
Interior
•Unique ST interior trim.
•Ford Performance sill plates.
•ST flat-bottom steering wheel withintegrated transmission shift paddlecontrols.
•Selectable Drive Mode controller with7 settings (Normal, Eco, Sport, Trail,Slippery, Deep Snow/Sand andTow/Haul).
•Unique electronic sound enhancementin Sport Selectable Drive Mode.
Chassis
•Unique ST-tuned suspension featuring32 N/mm front coil springs and a 34mm hollow front stabilizer bar and 106N/mm rear coil springs and a 21.7 mmhollow rear stabilizer bar.
•Standard ST brake system consists of345 mm diameter vented front rotorswith two piston calipers and low-dustlinings; 326 mm solid rear rotors withsingle-piston brake calipers andelectric integrated park brake with lowdust linings.
•Optional ST braking system includes363 mm diameter vented front rotorswith heavy duty two-piston calipersand low-dust linings; 350 mm diametervented rear rotors with heavy-dutysingle-piston brake calipers andelectric integrated park brake withlow-dust linings; system requires 21 x9-inch wheels and P275/45R21all-season tires.
•Optional low-metallic brake linings areincluded with optional P275/45R21summer tire (late availability).
•ST-tuned electric power assist steeringrack and pinion.
•AdvanceTrac with stabilityenhancement system with four modes:Default, Traction Control Off, Sport andDisabled.
•Aluminum ST 20 in (50.8 cm) x 8.5 in(21.6 cm) wheels standard; 21 in(53.3 cm) x 9 in (22.9 cm) wheelsoptional.
•P255/55R20 all-season tires oroptional P275/45R21 all-season tires.
Powertrain
•3.0L V6 DOHC GTDI engine, 400horsepower, 415 lb-ft.
•10R60 10-speed automatictransmission with SelectShift manualshift mode.
•3.58 axle ratios.
•Unique transmission calibration inSport Selectable Drive Mode.
•Dual exhaust with quad-tip outlets.
20
2023 Explorer (CTW) Canada/United States of America, enUSA, Edition date: 202209, First-PrintingAt a Glance
Page 66 of 573

Car Finder
Press the button twice withinthree seconds. The horn soundsand the direction indicatorsflash. We recommend you use this methodto locate your vehicle, rather than usingthe panic alarm.
Sounding the Panic Alarm
Press the button to sound thepanic alarm. Press the buttonagain or switch the ignition on toturn it off.
Note:The panic alarm only operates whenthe ignition is off.
Remote Start (If Equipped)
WARNING: Do not start the enginein a closed garage or in other enclosedareas. Exhaust fumes are toxic. Alwaysopen the garage door before you startthe engine. Failure to follow thisinstruction could result in personal injuryor death.
The remote start button is on theremote control.
This feature allows you to start yourvehicle from the outside. Your remotecontrol has an extended operating range.
If your vehicle has automatic climatecontrol, you can configure it to operatewhen you remote start your vehicle. SeeClimate Control (page 137).A manualclimate control system runs at the settingit was set to when you switched yourvehicle off.
Many states and provinces haverestrictions for the use of remote start.
Check your local and state or provinciallaws for specific requirements regardingremote start systems.
The system does not work if:
•The ignition is on.
•The anti-theft alarm triggers.
•You disable the feature.
•The hood is open.
•The transmission is not in park (P).
•The battery voltage is below theminimum operating voltage.
•The service engine soon light is on.
Note: Do not use remote start if your fuellevel is low.
Remote Control Feedback (IfEquipped)
An LED on the remote control providesstatus feedback of remote start or stopcommands.
StatusLED
Remote startsuccessfulSolid green
Remote stopsuccessfulSolid red
Request failed orstatus not receivedBlinking red
Status incompleteBlinking green
Remote Starting Your Vehicle
Note: You must press each button withinthree seconds of each other. If you do notfollow this sequence, your vehicle does notstart remotely, the direction indicators donot flash twice and the horn does not sound.
62
2023 Explorer (CTW) Canada/United States of America, enUSA, Edition date: 202209, First-PrintingKeys and Remote ControlsE138623 E138624 E138625
Page 78 of 573
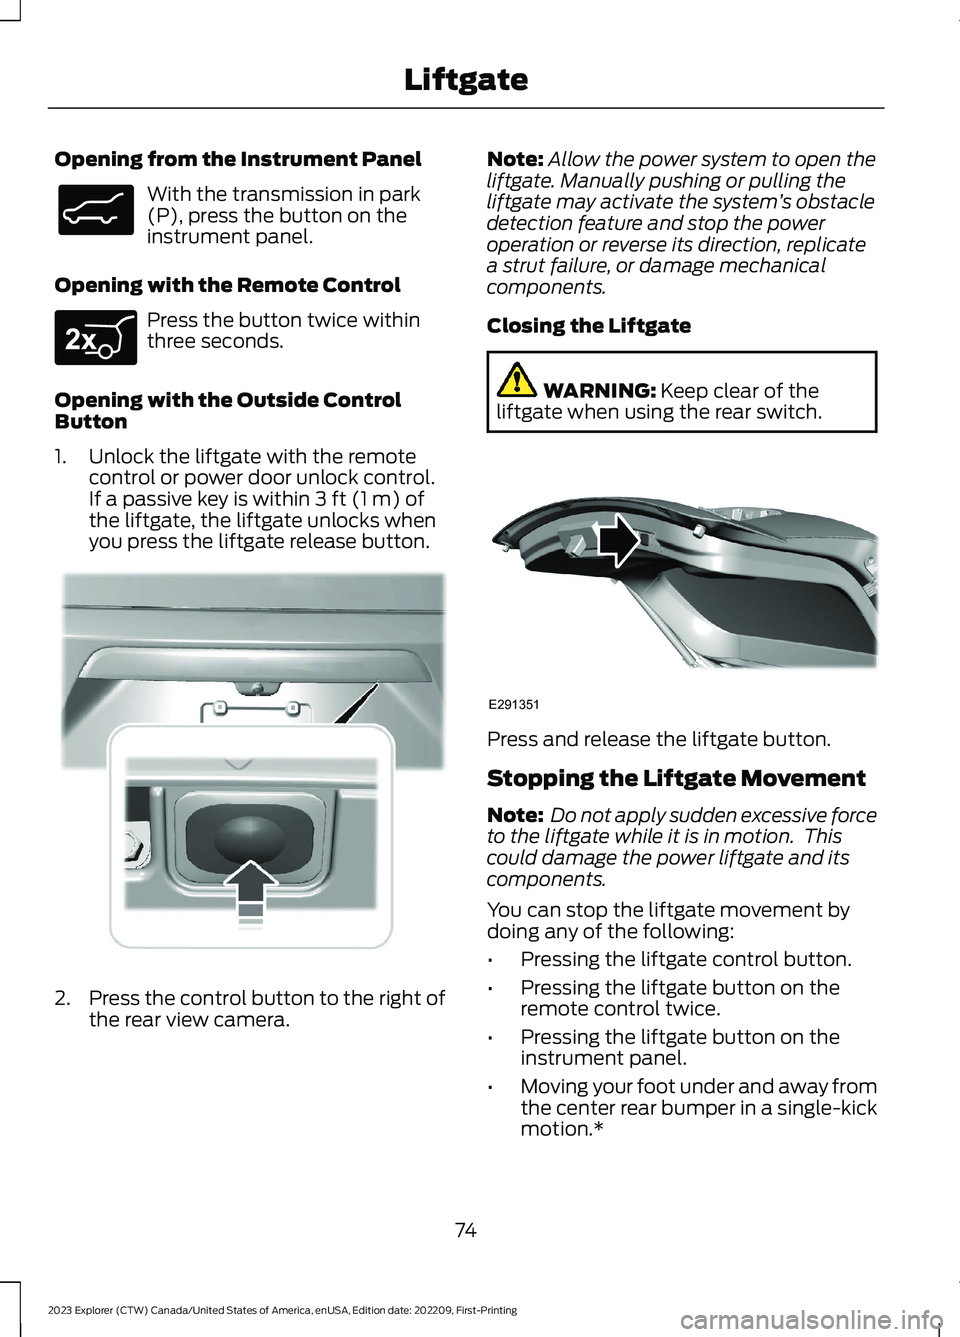
Opening from the Instrument Panel
With the transmission in park(P), press the button on theinstrument panel.
Opening with the Remote Control
Press the button twice withinthree seconds.
Opening with the Outside ControlButton
1.Unlock the liftgate with the remotecontrol or power door unlock control.If a passive key is within 3 ft (1 m) ofthe liftgate, the liftgate unlocks whenyou press the liftgate release button.
2.Press the control button to the right ofthe rear view camera.
Note:Allow the power system to open theliftgate. Manually pushing or pulling theliftgate may activate the system’s obstacledetection feature and stop the poweroperation or reverse its direction, replicatea strut failure, or damage mechanicalcomponents.
Closing the Liftgate
WARNING: Keep clear of theliftgate when using the rear switch.
Press and release the liftgate button.
Stopping the Liftgate Movement
Note: Do not apply sudden excessive forceto the liftgate while it is in motion. Thiscould damage the power liftgate and itscomponents.
You can stop the liftgate movement bydoing any of the following:
•Pressing the liftgate control button.
•Pressing the liftgate button on theremote control twice.
•Pressing the liftgate button on theinstrument panel.
•Moving your foot under and away fromthe center rear bumper in a single-kickmotion.*
74
2023 Explorer (CTW) Canada/United States of America, enUSA, Edition date: 202209, First-PrintingLiftgateE138633 E267940 E291352 E291351
Page 92 of 573
DAYTIME RUNNING LAMPS -
VEHICLES WITH:
CONFIGURABLE DAYTIME
RUNNING LAMPS
WARNING: The daytime runninglamps system does not activate the rearlamps and may not provide adequatelighting during low visibility drivingconditions. Make sure you switch theheadlamps on, as appropriate, during alllow visibility conditions. Failure to do somay result in a crash.
Switch the daytime running lamps on oroff using the touchscreen:
1.Select Settings. See Settings (page458).
2.Select Vehicle.
3.Select Lighting.
The daytime running lamps turn on when:
1.The lamps are on in the informationdisplay.
2.You switch the ignition on.
3.The transmission is not in park (P) forvehicles with automatic transmissionsor you release the parking brake forvehicles with manual transmissions.
4.The lighting control is in the autolampsposition.
5.The headlamps are off.
The other lighting control switch positionsdo not turn on the daytime running lamps.
If the daytime running lamps are off in theinformation display, the lamps stay off inall switch positions.
DAYTIME RUNNING LAMPS -
VEHICLES WITH: DAYTIME
RUNNING LAMPS (DRL)
WARNING: The daytime runninglamps system does not activate the rearlamps and may not provide adequatelighting during low visibility drivingconditions. Make sure you switch theheadlamps on, as appropriate, during alllow visibility conditions. Failure to do somay result in a crash.
The system turns the lamps on in daylightconditions.
Daytime running lamps are always onunless the headlamps are on or yourvehicle is in park (P).
FRONT FOG LAMPS (IF EQUIPPED)
Using the Front Fog Lamps
To switch the lamps on or off:
1.Set the lighting control to the parkinglamps, headlamps or autolampsposition.
Note:When the lighting control is in theautolamps position, you cannot switch thefog lamps on unless the low beamheadlamps are on.
2.
Press the button on thelighting control to switch the front foglamps on or off.
Note:Only switch the front fog lamps onduring reduced visibility.
Note:The brightness of the daytime runninglamps may decrease when the front foglamps are on.
88
2023 Explorer (CTW) Canada/United States of America, enUSA, Edition date: 202209, First-PrintingLighting
Page 101 of 573
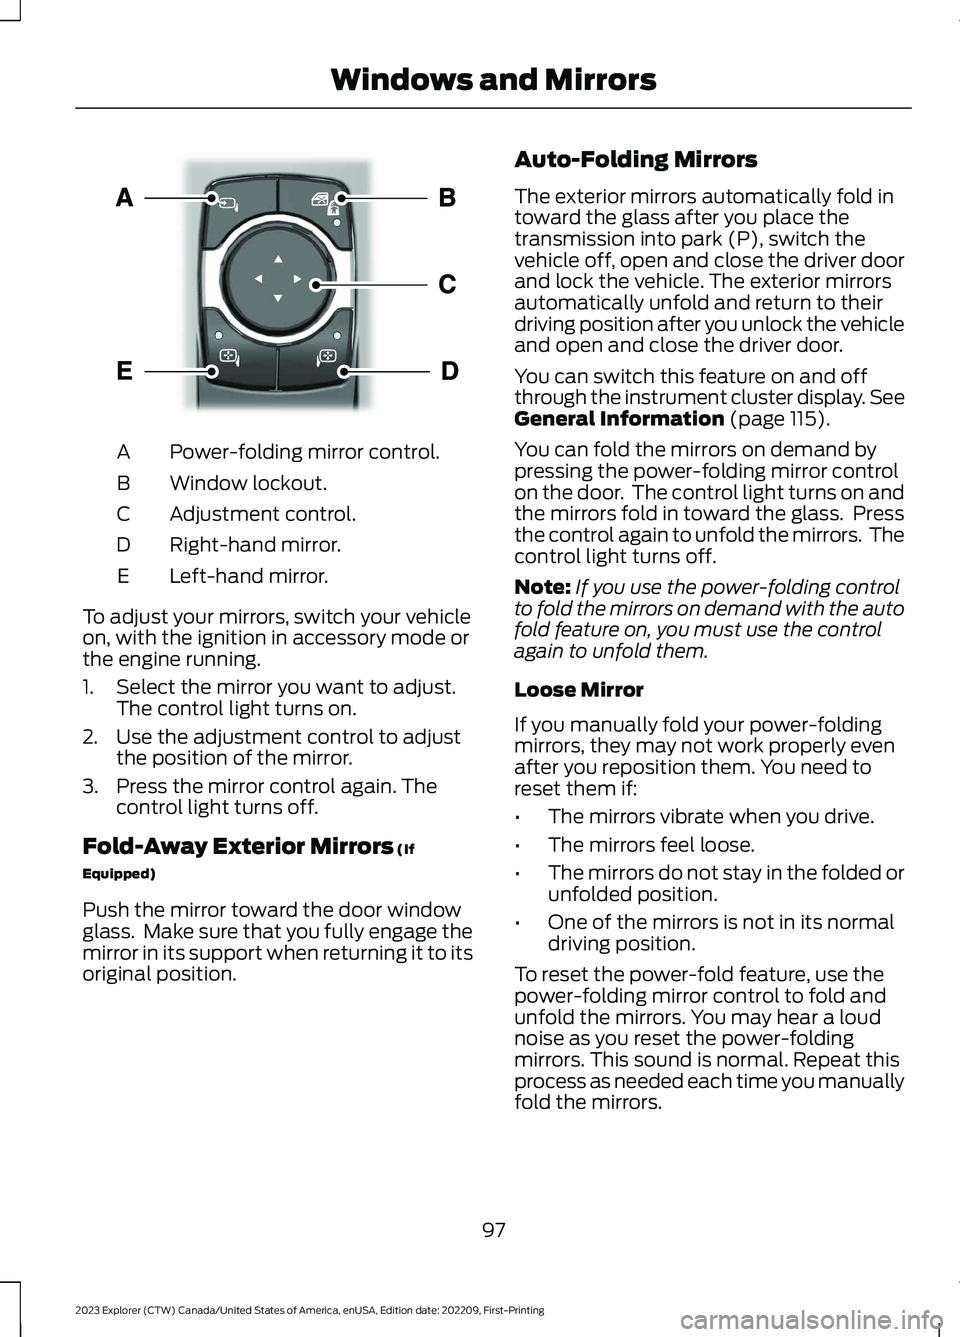
Power-folding mirror control.A
Window lockout.B
Adjustment control.C
Right-hand mirror.D
Left-hand mirror.E
To adjust your mirrors, switch your vehicleon, with the ignition in accessory mode orthe engine running.
1.Select the mirror you want to adjust.The control light turns on.
2.Use the adjustment control to adjustthe position of the mirror.
3.Press the mirror control again. Thecontrol light turns off.
Fold-Away Exterior Mirrors (If
Equipped)
Push the mirror toward the door windowglass. Make sure that you fully engage themirror in its support when returning it to itsoriginal position.
Auto-Folding Mirrors
The exterior mirrors automatically fold intoward the glass after you place thetransmission into park (P), switch thevehicle off, open and close the driver doorand lock the vehicle. The exterior mirrorsautomatically unfold and return to theirdriving position after you unlock the vehicleand open and close the driver door.
You can switch this feature on and offthrough the instrument cluster display. SeeGeneral Information (page 115).
You can fold the mirrors on demand bypressing the power-folding mirror controlon the door. The control light turns on andthe mirrors fold in toward the glass. Pressthe control again to unfold the mirrors. Thecontrol light turns off.
Note:If you use the power-folding controlto fold the mirrors on demand with the autofold feature on, you must use the controlagain to unfold them.
Loose Mirror
If you manually fold your power-foldingmirrors, they may not work properly evenafter you reposition them. You need toreset them if:
•The mirrors vibrate when you drive.
•The mirrors feel loose.
•The mirrors do not stay in the folded orunfolded position.
•One of the mirrors is not in its normaldriving position.
To reset the power-fold feature, use thepower-folding mirror control to fold andunfold the mirrors. You may hear a loudnoise as you reset the power-foldingmirrors. This sound is normal. Repeat thisprocess as needed each time you manuallyfold the mirrors.
97
2023 Explorer (CTW) Canada/United States of America, enUSA, Edition date: 202209, First-PrintingWindows and MirrorsE295322
Page 129 of 573
ActionMessage
The fuel system has finished depressurizing and you can begin torefuel.Fuel Door Open
A reminder to close the fuel door. Failure to follow this instructioncan cause the check engine light to illuminate.Close Fuel Door toAvoid ""CheckEngine"" Light
There is an error in attempting to refill your vehicle.Refuel Error SeeManual
Hill Descent Control
ActionMessage
Displays when you deactivate hill descent control mode.Hill DescentControl OFF
Displays when hill descent speed exceeds 20 mph (32 km/h).For Hill DescentReduce Speed 20MPH or Less
Displays when hill descent speed exceeds 20 mph (32 km/h).For Hill DescentReduce Speed 32Km/h or Less
Displays when hill descent control mode requires you to shift thetransmission into gear.For Hill DescentSelect Gear
Displays when the hill control mode requires you to resume control.Hill Descent DriverResume Control
Displays when a hill descent system fault is present.Hill DescentControl Fault
Displays when you disable the hill descent control mode to coolthe brake system.Hill DescentControl OffSystem Cooling
Displays when hill descent control mode is ready.Hill DescentControl Ready
Displays when you activate the hill descent control mode.Hill DescentControl Active
125
2023 Explorer (CTW) Canada/United States of America, enUSA, Edition date: 202209, First-PrintingInformation Displays
Page 138 of 573
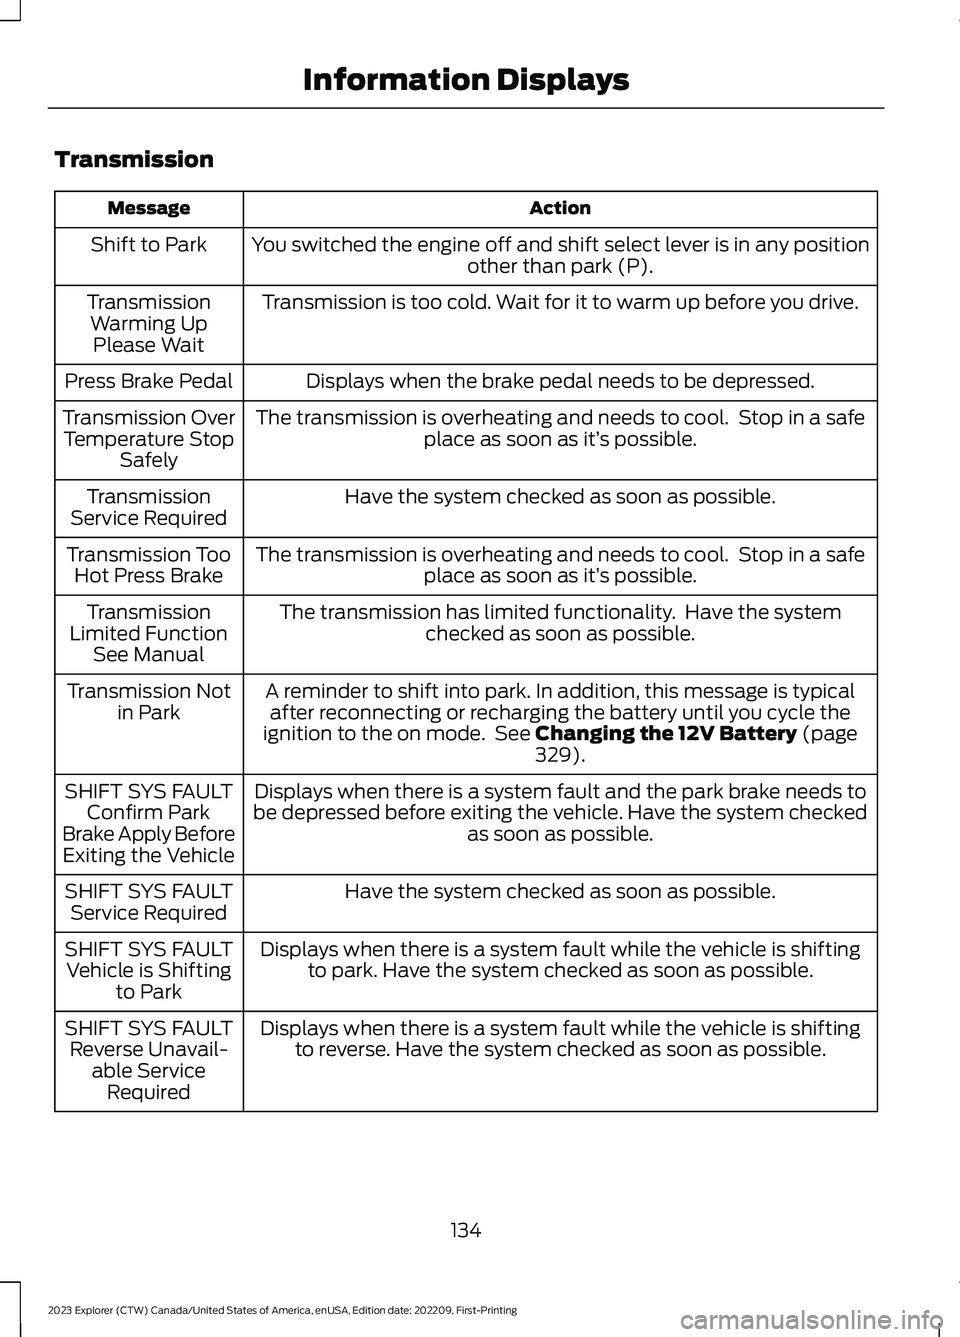
Transmission
ActionMessage
You switched the engine off and shift select lever is in any positionother than park (P).Shift to Park
Transmission is too cold. Wait for it to warm up before you drive.TransmissionWarming UpPlease Wait
Displays when the brake pedal needs to be depressed.Press Brake Pedal
The transmission is overheating and needs to cool. Stop in a safeplace as soon as it’s possible.Transmission OverTemperature StopSafely
Have the system checked as soon as possible.TransmissionService Required
The transmission is overheating and needs to cool. Stop in a safeplace as soon as it’s possible.Transmission TooHot Press Brake
The transmission has limited functionality. Have the systemchecked as soon as possible.TransmissionLimited FunctionSee Manual
A reminder to shift into park. In addition, this message is typicalafter reconnecting or recharging the battery until you cycle theignition to the on mode. See Changing the 12V Battery (page329).
Transmission Notin Park
Displays when there is a system fault and the park brake needs tobe depressed before exiting the vehicle. Have the system checkedas soon as possible.
SHIFT SYS FAULTConfirm ParkBrake Apply BeforeExiting the Vehicle
Have the system checked as soon as possible.SHIFT SYS FAULTService Required
Displays when there is a system fault while the vehicle is shiftingto park. Have the system checked as soon as possible.SHIFT SYS FAULTVehicle is Shiftingto Park
Displays when there is a system fault while the vehicle is shiftingto reverse. Have the system checked as soon as possible.SHIFT SYS FAULTReverse Unavail-able ServiceRequired
134
2023 Explorer (CTW) Canada/United States of America, enUSA, Edition date: 202209, First-PrintingInformation Displays
Page 159 of 573

2.Fold the head restraints by pulling thehead restraint release strap.
3.From the rear of the vehicle, fold theseat backrest by pulling and holdingthe strap while pushing the seatbackrest forward. Release the straponce the seat backrest starts rotatingforward.
Note:Do not use the seat anchors as cargotie downs.
Note:Make sure that the area under theseat is free of objects before stowing it.
Unfolding the Third Row Manual Seat
WARNING: Do not place cargo orany objects behind the seat backrestbefore returning it to the original position.Pull on the seat backrest to make surethat it has fully latched after returningthe seat backrest to its original position.An unlatched seat may becomedangerous if you stop suddenly or havea crash.
Note:Make sure that there are no objectssuch as books, purses or briefcases on theload floor before unstowing the seat. Failureto remove all objects from the top of theload floor prior to unstowing it may causedamage to the seat.
Note:Make sure the area under the loadfloor is free of objects before unstowing it.
1.To return the seat backrest to theupright position, pull the long strapuntil the seat backrest locks.
2.Pull the head restraints up to theirnormal positions.
Adjusting the Third Row PowerSeats
Note:The power rear seat functions disable10 minutes after you switch the ignition off.The transmission must be in park (P) andthe liftgate must be open to operate theseats.
The buttons are inside the liftgate area.
155
2023 Explorer (CTW) Canada/United States of America, enUSA, Edition date: 202209, First-PrintingSeatsE286398 E286399