2023 FORD EXPEDITION length
[x] Cancel search: lengthPage 330 of 658

Cross Traffic Alert Limitationswith a Trailer Attached
The system remains on when you attacha trailer in vehicles with blind spotinformation system with trailer tow underthe following conditions:
•You connect a trailer.
•The trailer is a bike rack or cargo rackwith a maximum length of 3 ft (1 m).
•You set the trailer length to 3 ft (1 m)in the instrument cluster display.
Note:The system may not correctly operatewhen towing a trailer. For vehicles with atrailer tow module and tow bar approvedby the manufacturer, the system turns offwhen you attach a trailer. For vehicles withan aftermarket trailer tow module or towbar, we recommend that you switch thesystem off when you attach a trailer.
SWITCHING CROSS TRAFFIC
ALERT ON AND OFF -
VEHICLES WITH: 12 INCH
SCREEN
To switch cross traffic alert on or off usethe touchscreen.
1.Press Features on the touchscreen.
2.Press Driver Assistance.
3.Switch Cross Traffic Alert on or off.
Note:The system switches on every timeyou switch the ignition on. To permanentlyswitch the system off, contact an authorizeddealer.
SWITCHING CROSS TRAFFIC
ALERT ON AND OFF -
VEHICLES WITH: 15 INCH
SCREEN
To switch cross traffic alert on or off usethe touchscreen:
1.Access the vehicle drawer.
2.Press SETTINGS.
3.Press Driver Assistance.
4.Switch Cross Traffic Alert on or off.
When you switch the system on or off, thealert indicators flash twice.
Note:The system turns on every time youstart your vehicle. To permanently switchthe system off, contact an authorizeddealer.
LOCATING THE CROSS
TRAFFIC ALERT SENSORS
The sensors are behind the rear fascia onboth sides of your vehicle.
Note:Keep the sensors free from snow, iceand large accumulations of dirt.
Note:Do not cover the sensors with bumperstickers, repair compound or other objects.
Note:Blocked sensors may affect systemaccuracy.
326
2023 Expedition (TB8) Canada/United States of America, enUSA, Edition date: 202207, DOMCross Traffic AlertE205199
Page 376 of 658
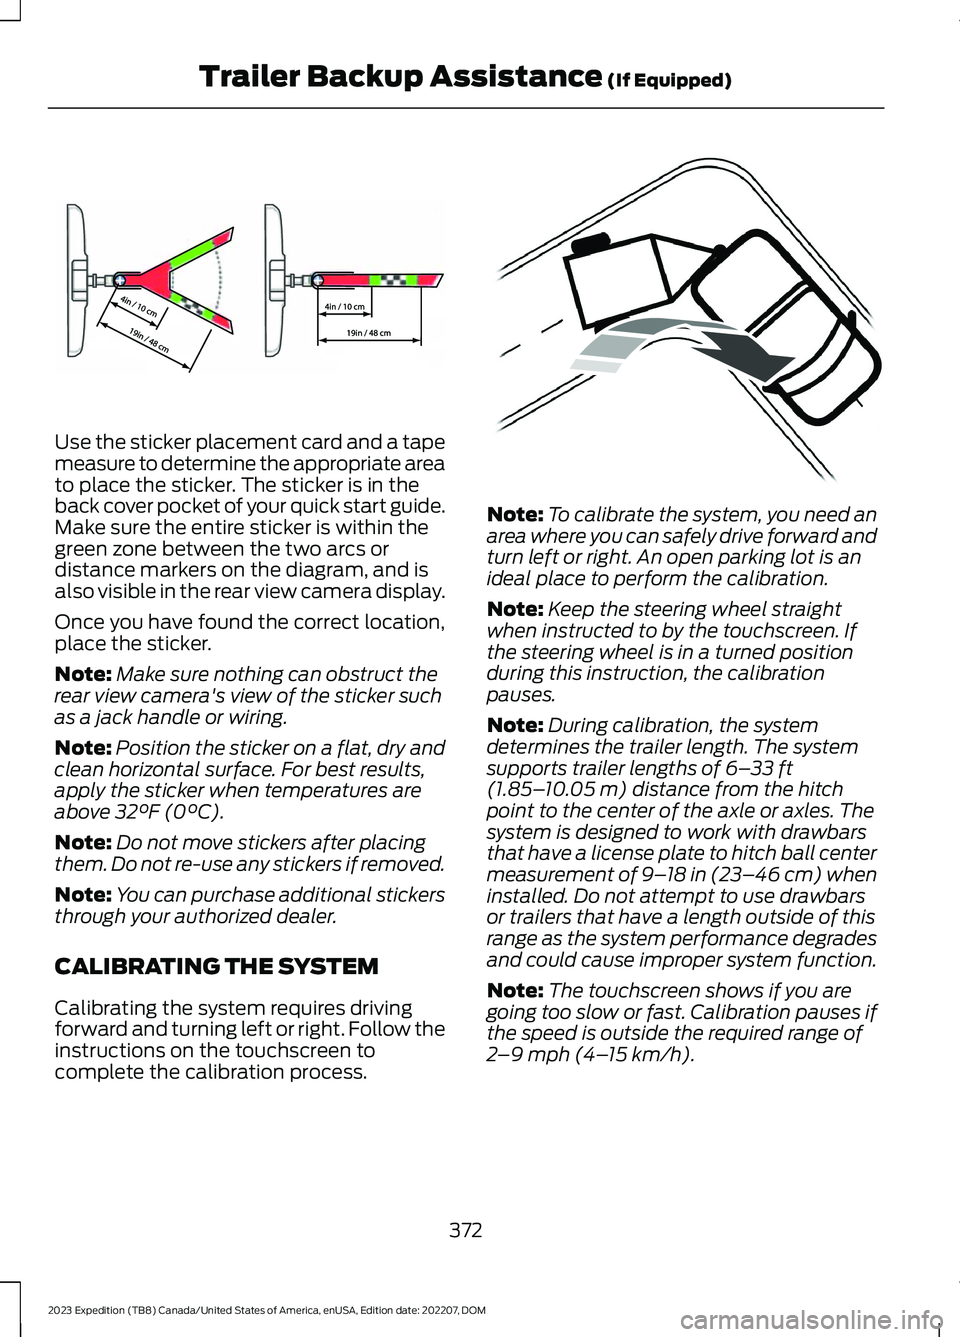
Use the sticker placement card and a tapemeasure to determine the appropriate areato place the sticker. The sticker is in theback cover pocket of your quick start guide.Make sure the entire sticker is within thegreen zone between the two arcs ordistance markers on the diagram, and isalso visible in the rear view camera display.
Once you have found the correct location,place the sticker.
Note:Make sure nothing can obstruct therear view camera's view of the sticker suchas a jack handle or wiring.
Note:Position the sticker on a flat, dry andclean horizontal surface. For best results,apply the sticker when temperatures areabove 32°F (0°C).
Note:Do not move stickers after placingthem. Do not re-use any stickers if removed.
Note:You can purchase additional stickersthrough your authorized dealer.
CALIBRATING THE SYSTEM
Calibrating the system requires drivingforward and turning left or right. Follow theinstructions on the touchscreen tocomplete the calibration process.
Note:To calibrate the system, you need anarea where you can safely drive forward andturn left or right. An open parking lot is anideal place to perform the calibration.
Note:Keep the steering wheel straightwhen instructed to by the touchscreen. Ifthe steering wheel is in a turned positionduring this instruction, the calibrationpauses.
Note:During calibration, the systemdetermines the trailer length. The systemsupports trailer lengths of 6–33 ft(1.85–10.05 m) distance from the hitchpoint to the center of the axle or axles. Thesystem is designed to work with drawbarsthat have a license plate to hitch ball centermeasurement of 9–18 in (23–46 cm) wheninstalled. Do not attempt to use drawbarsor trailers that have a length outside of thisrange as the system performance degradesand could cause improper system function.
Note:The touchscreen shows if you aregoing too slow or fast. Calibration pauses ifthe speed is outside the required range of2–9 mph (4–15 km/h).
372
2023 Expedition (TB8) Canada/United States of America, enUSA, Edition date: 202207, DOMTrailer Backup Assistance (If Equipped)E333148 E352329
Page 377 of 658
Note:You need to complete at least a 90°turn, and longer trailers could require a 180°turn. Camera trailer tracking requires thesystem to locate the hitch ball as well asdetermine the trailer length. Some trailerscould require you to drive straight then turnmultiple times before calibration completes.The touchscreen provides instructions andnotifies you when calibration completes.
Note:For best results, do not calibrate thesystem at night when calibrating.
SWITCHING TRAILER BACKUP
ASSISTANCE ON AND OFF
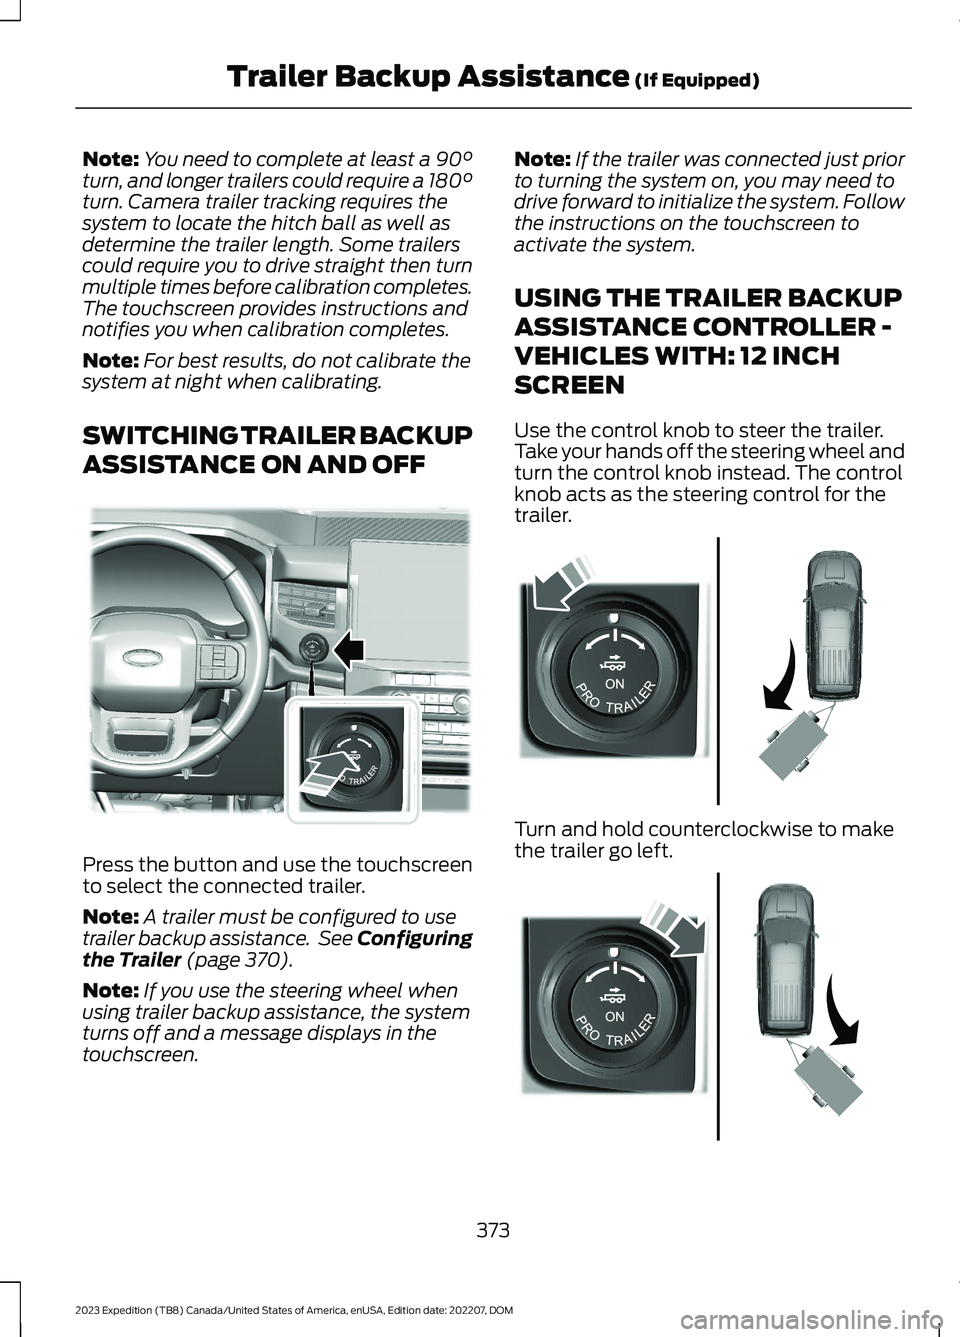
Press the button and use the touchscreento select the connected trailer.
Note:A trailer must be configured to usetrailer backup assistance. See Configuringthe Trailer (page 370).
Note:If you use the steering wheel whenusing trailer backup assistance, the systemturns off and a message displays in thetouchscreen.
Note:If the trailer was connected just priorto turning the system on, you may need todrive forward to initialize the system. Followthe instructions on the touchscreen toactivate the system.
USING THE TRAILER BACKUP
ASSISTANCE CONTROLLER -
VEHICLES WITH: 12 INCH
SCREEN
Use the control knob to steer the trailer.Take your hands off the steering wheel andturn the control knob instead. The controlknob acts as the steering control for thetrailer.
Turn and hold counterclockwise to makethe trailer go left.
373
2023 Expedition (TB8) Canada/United States of America, enUSA, Edition date: 202207, DOMTrailer Backup Assistance (If Equipped)E349261 E349262 E349263
Page 379 of 658
Note:The more you turn the knob, thesharper the trailer turns.
Note:Quickly turning and releasing theknob results in a jerky movement of thevehicle.
Note:You may have to use the knob tocorrect the trailer direction when attemptingto move the trailer straight back under someconditions.
Note:If you want the trailer to turn sharperyou can change the trailer angle limit. SeeUsing the Trailer Backup AssistanceViews (page 376).
USING THE TRAILER BACKUP
ASSISTANCE VIEWS -
VEHICLES WITH: 12 INCH
SCREEN
Up to three camera views could beavailable when using trailer backupassistance. Use the view that helps you themost when reversing your vehicle andtrailer.
360° camera view. Shows a360° view on the right-hand sideof the touchscreen with a rearcamera view on the left-hand side of thetouchscreen.
Rear view camera view. Showsyour trailer hitch or what isdirectly behind your vehicle.
Trailer reverse guidance view.Shows you a view of the sides ofyour vehicle and the trailer. Inauto mode, this view moves as the trailermoves so that you do not have to adjustthe camera as you turn. Left and rightarrows let you see other camera views.
Auto. Press to return to autoview.
Note:Auto mode is the default setting.
Hitch Angle Graphic
The hitch angle graphic shows a smallrepresentation of your vehicle and trailerwith visual feedback to help you monitorthe trailer. The graphic shows two differentcolored lines for the trailer hitch angle. Ablack line shows you where your trailer isin relation to your vehicle. The white linerepresents the amount the trailer can turnbased on knob input.
The graphic shows a yellow and red zonefor the hitch angle to warn you of a highangle condition that could require you topull forward to reduce the hitch angle. Theangle limits for each zone vary based onthe trailer length.
The yellow zone indicates you areapproaching the maximum controllabletrailer angle for the system. When thetrailer enters this zone, it is more difficultto reduce the trailer turn when backing up.It may be necessary to put your vehicleback into drive (D) and pull forward to getyour vehicle and trailer back to an in-lineposition.
The red zone indicates you have exceededthe maximum controllable trailer angle forthe system. Immediately stop reversing.Put your vehicle into drive (D) and pullforward until the trailer is no longer in thered zone.
Setting the Trailer Angle Limit
1.Press Features on the touchscreen.
2.Press Towing.
3.Press Manage trailers.
4.Press the saved trailer you want tochange.
5.Press Pro Trailer Backup Assist.
6.Press Trailer Angle Limit.
7.Press a setting.
375
2023 Expedition (TB8) Canada/United States of America, enUSA, Edition date: 202207, DOMTrailer Backup Assistance (If Equipped)E310996 E310967 E310965 E315644
Page 380 of 658
Normal Control Angle
Default setting. This provides a balancedlimit that returns from a turn to straightbacking with minimal change to the trailerdirection.
Max Control Angle
Increases the trailer angle limit close to themaximum controllable angle to allowsharper turns but also causes more changein the trailer direction when straighteningout from a turn.
USING THE TRAILER BACKUP
ASSISTANCE VIEWS -
VEHICLES WITH: 15 INCH
SCREEN
Up to three camera views could beavailable when using trailer backupassistance. Use the view that helps you themost when reversing your vehicle andtrailer.
360° camera view. Shows a360° view on the right-hand sideof the touchscreen with a rearcamera view on the left-hand side of thetouchscreen.
Rear view camera view. Showsyour trailer hitch or what isdirectly behind your vehicle.
Trailer reverse guidance view.Shows you a view of the sides ofyour vehicle and the trailer. Inauto mode, this view moves as the trailermoves so that you do not have to adjustthe camera as you turn. Left and rightarrows let you see other camera views.
Auto. Press to return to autoview.
Note:Auto mode is the default setting.
Hitch Angle Graphic
The hitch angle graphic shows a smallrepresentation of your vehicle and trailerwith visual feedback to help you monitorthe trailer. The graphic shows two differentcolored lines for the trailer hitch angle. Ablack line shows you where your trailer isin relation to your vehicle. The white linerepresents the amount the trailer can turnbased on knob input.
The graphic shows a yellow and red zonefor the hitch angle to warn you of a highangle condition that could require you topull forward to reduce the hitch angle. Theangle limits for each zone vary based onthe trailer length.
The yellow zone indicates you areapproaching the maximum controllabletrailer angle for the system. When thetrailer enters this zone, it is more difficultto reduce the trailer turn when backing up.It may be necessary to put your vehicleback into drive (D) and pull forward to getyour vehicle and trailer back to an in-lineposition.
The red zone indicates you have exceededthe maximum controllable trailer angle forthe system. Immediately stop reversing.Put your vehicle into drive (D) and pullforward until the trailer is no longer in thered zone.
Setting the Trailer Angle Limit
1.Access the vehicle drawer on thetouchscreen.
2.Press Towing.
3.Press Settings.
4.Press the saved trailer you want tochange.
5.Press Pro Trailer Backup Assist.
6.Press Trailer Angle Limit.
7.Press a setting.
376
2023 Expedition (TB8) Canada/United States of America, enUSA, Edition date: 202207, DOMTrailer Backup Assistance (If Equipped)E310996 E310967 E310965 E315644
Page 385 of 658
What does it mean if the trailer is at itsmaximum angle or the systemdeactivated by trailer angle?
You are at the maximum controllabletrailer angle for the system. Place yourvehicle in drive (D) and pull forward toget the truck and trailer back to anin-line position. If this messageconsistently displays, this couldindicate the sticker is incorrectlyapplied, the trailer needs to berecalibrated or the drawbar or thetrailer dimensions are outside of thesupported range. The system isdesigned to work with drawbars thathave a license plate to hitch ball centermeasurement of 9–18 in (23–46 cm)when installed. The system is designedto work with trailers that have a hitchpoint to center of the axle or axlesmeasurement of 6–33 ft(1.85–10.05 m). Do not attempt to usedrawbars or trailers that have a lengthoutside of this range as the systemperformance degrades and couldcause improper system function.Check that the correct trailer isselected on the touchscreen. Verifythe sticker is correctly applied andcheck that the drawbar and the trailerdimensions are within the allowedrange. Then, delete the trailer from thesystem and repeat the setup processto calibrate the trailer.
What does it mean when the systemtells you to take control of the steeringwheel?
The system is no longer steering thevehicle and you must take oversteering. There are four reasons thesystem could display this message.The first reason the system coulddisplay this message is that you havetouched the steering wheel when thesystem is steering. The second reasonthe system could display this messageis that you have exceeded themaximum speed for the feature. Thethird reason the system could displaythis message is that the trailer is notdetected. The final reason the systemcould display this message is that aninternal condition for system operationis not met that requires your vehicle toreturn to manual control of thesteering.
What does it mean if the system doesnot detect a trailer?
The system requires a clear view of thesticker placed on the trailer. You mustkeep the camera lens and sticker cleanfor the system to correctly operate. Ifthe system cannot initially detect thetrailer, it could be necessary for you tochange the lighting conditions bymoving your vehicle and trailer orwaiting until the conditions change.See Applying the Trailer ReversingAid Sticker (page 371). Some trailersare not compatible with the stickerand camera system.
Note:The system is designed to be usedwith the same trailer connection every timeyou choose the trailer from the touchscreen.When using a different drawbar or adifferent pinhole on drawbars with morethan one, connecting the drawbar to yourvehicle affects the trailer position and youmay need to repeat the trailer setup andcalibration process.
381
2023 Expedition (TB8) Canada/United States of America, enUSA, Edition date: 202207, DOMTrailer Backup Assistance (If Equipped)
Page 388 of 658
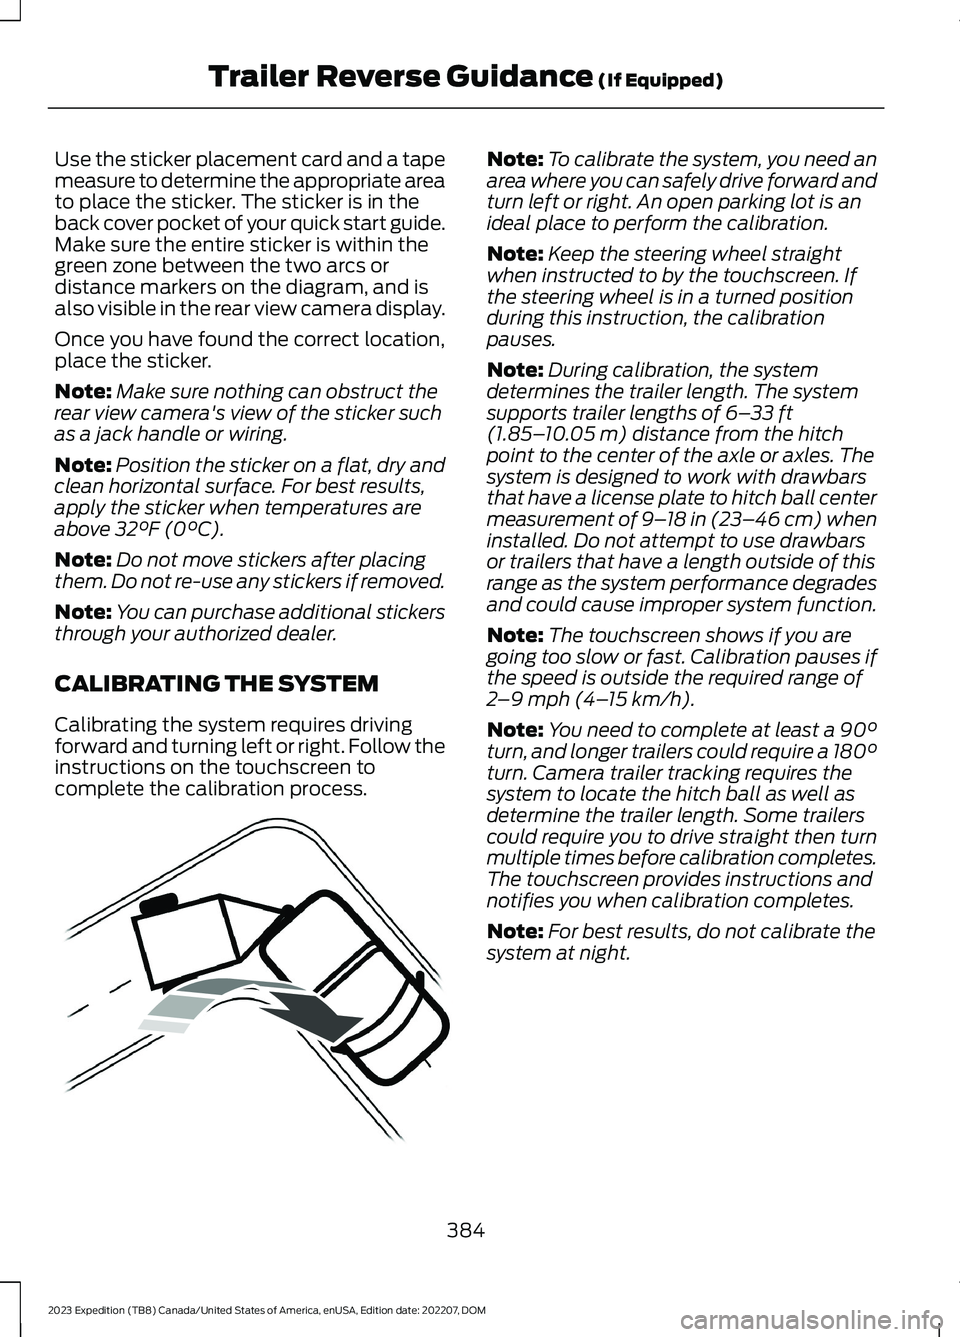
Use the sticker placement card and a tapemeasure to determine the appropriate areato place the sticker. The sticker is in theback cover pocket of your quick start guide.Make sure the entire sticker is within thegreen zone between the two arcs ordistance markers on the diagram, and isalso visible in the rear view camera display.
Once you have found the correct location,place the sticker.
Note:Make sure nothing can obstruct therear view camera's view of the sticker suchas a jack handle or wiring.
Note:Position the sticker on a flat, dry andclean horizontal surface. For best results,apply the sticker when temperatures areabove 32°F (0°C).
Note:Do not move stickers after placingthem. Do not re-use any stickers if removed.
Note:You can purchase additional stickersthrough your authorized dealer.
CALIBRATING THE SYSTEM
Calibrating the system requires drivingforward and turning left or right. Follow theinstructions on the touchscreen tocomplete the calibration process.
Note:To calibrate the system, you need anarea where you can safely drive forward andturn left or right. An open parking lot is anideal place to perform the calibration.
Note:Keep the steering wheel straightwhen instructed to by the touchscreen. Ifthe steering wheel is in a turned positionduring this instruction, the calibrationpauses.
Note:During calibration, the systemdetermines the trailer length. The systemsupports trailer lengths of 6–33 ft(1.85–10.05 m) distance from the hitchpoint to the center of the axle or axles. Thesystem is designed to work with drawbarsthat have a license plate to hitch ball centermeasurement of 9–18 in (23–46 cm) wheninstalled. Do not attempt to use drawbarsor trailers that have a length outside of thisrange as the system performance degradesand could cause improper system function.
Note:The touchscreen shows if you aregoing too slow or fast. Calibration pauses ifthe speed is outside the required range of2–9 mph (4–15 km/h).
Note:You need to complete at least a 90°turn, and longer trailers could require a 180°turn. Camera trailer tracking requires thesystem to locate the hitch ball as well asdetermine the trailer length. Some trailerscould require you to drive straight then turnmultiple times before calibration completes.The touchscreen provides instructions andnotifies you when calibration completes.
Note:For best results, do not calibrate thesystem at night.
384
2023 Expedition (TB8) Canada/United States of America, enUSA, Edition date: 202207, DOMTrailer Reverse Guidance (If Equipped)E352329
Page 389 of 658
SWITCHING TRAILER
REVERSE GUIDANCE ON AND
OFF
Shift into reverse (R), press the rearcamera button to expand the menu, pressthe trailer icon and use the touchscreen toselect the connected trailer.
Note:If the trailer was connected just priorto turning the system on, you may need todrive forward to initialize the system. Followthe instructions on the touchscreen toactivate the system.
USING TRAILER REVERSE
GUIDANCE VIEWS
Up to three camera views could beavailable when using trailer reverseguidance. Use the view that helps you themost when reversing your vehicle andtrailer.
360° camera view. Shows a360° view on the right-hand sideof the touchscreen with a rearcamera view on the left-hand side of thetouchscreen.
Rear view camera view. Showsyour trailer hitch or what isdirectly behind your vehicle.
Trailer reverse guidance view.Shows you a view of the sides ofyour vehicle and the trailer. Inauto mode, this view moves as the trailermoves so that you do not have to adjustthe camera as you turn. Left and rightarrows let you see other camera views.
Straight backup mode. Showswhich way to turn your steeringwheel to keep the trailer straight.Use this view when you want to keep yourtrailer completely in line with your vehicle.
Note: It may be helpful to shift your vehicleinto drive (D), pull forward and straightenout the vehicle and trailer before engagingstraight backup mode.
This takes you back to the 360°camera system and out of thetrailer reverse guidance feature.
Auto. Press to return to autoview.
Note:Auto mode is the default setting.
Hitch Angle Graphic
The hitch angle graphic shows a smallrepresentation of your vehicle and trailerwith visual feedback to help you monitorthe trailer. The graphic shows two differentcolored lines for the trailer hitch angle. Ablack line shows you where your trailer isin relation to your vehicle. The white linerepresents the amount the trailer can turnbased on steering wheel position.
The graphic shows a yellow and red zonefor the hitch angle to warn you of a highangle condition that could require you topull forward to reduce the hitch angle. Theangle limits for each zone vary based onthe trailer length.
The yellow zone indicates you areapproaching the maximum controllabletrailer angle for the system. When thetrailer enters this zone, it is more difficultto reduce the trailer turn when backing up.It may be necessary to put your vehicleback into drive (D) and pull forward to getyour vehicle and trailer back to an in-lineposition.
The red zone indicates you have exceededthe maximum controllable trailer angle forthe system. Immediately stop reversing.Put your vehicle into drive (D) and pullforward until the trailer is no longer in thered zone.
385
2023 Expedition (TB8) Canada/United States of America, enUSA, Edition date: 202207, DOMTrailer Reverse Guidance (If Equipped)E310996 E310967 E310965 E224484 E224486 E315644