2023 FORD BRONCO rotate
[x] Cancel search: rotatePage 104 of 642
WIPERS
WIPER PRECAUTIONS
The vehicle is equipped with protectionfeatures to prevent damage to the wipermotor in case of overheating, usage on drywindshields or obstructions to the wiperblade due to snow or ice accumulation onthe windshield.
In such conditions, the wiper motor mayrestrict its speed, reduce area of cleaningor completely stop operation. Systemreturns back to normal operation modeonce conditions are resolved.
Do not operate the wipers on a drywindshield. This could scratch the glass ordamage the wiper blades. Use thewindshield washers before wiping a drywindshield.
Fully defrost the windshield before youswitch the windshield wipers on.
Switch the windshield wipers off beforeentering a car wash.
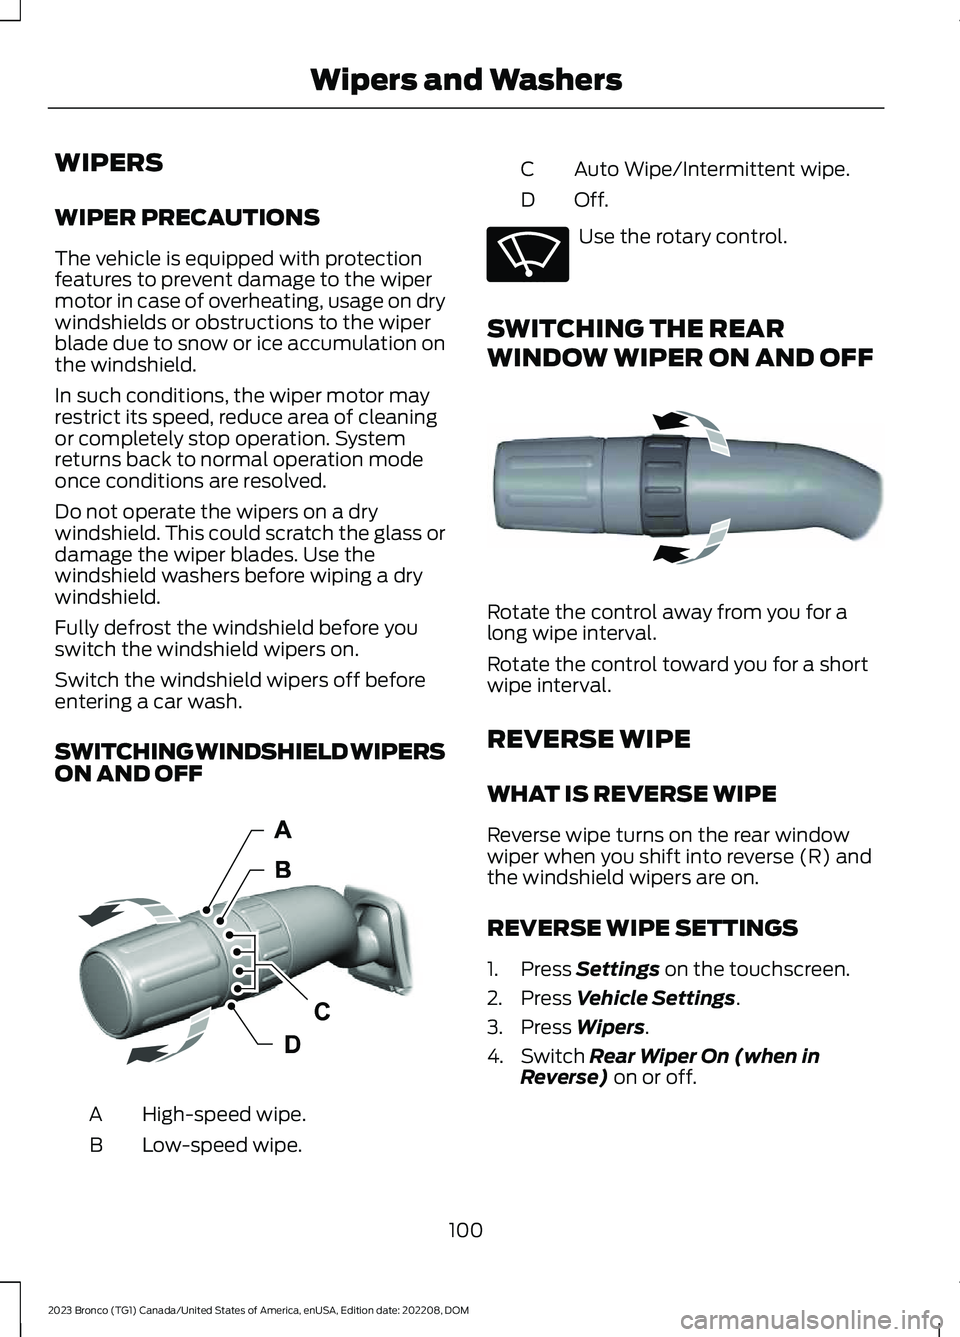
SWITCHING WINDSHIELD WIPERSON AND OFF
High-speed wipe.A
Low-speed wipe.B
Auto Wipe/Intermittent wipe.C
Off.D
Use the rotary control.
SWITCHING THE REAR
WINDOW WIPER ON AND OFF
Rotate the control away from you for along wipe interval.
Rotate the control toward you for a shortwipe interval.
REVERSE WIPE
WHAT IS REVERSE WIPE
Reverse wipe turns on the rear windowwiper when you shift into reverse (R) andthe windshield wipers are on.
REVERSE WIPE SETTINGS
1.Press Settings on the touchscreen.
2.Press Vehicle Settings.
3.Press Wipers.
4.Switch Rear Wiper On (when inReverse) on or off.
100
2023 Bronco (TG1) Canada/United States of America, enUSA, Edition date: 202208, DOMWipers and WashersE383137 E270969 E340280
Page 107 of 642

SWITCHING THE COURTESY WIPEON AND OFF
Courtesy Wipe
1.Press Settings on the touchscreen.
2.Press Vehicle Settings.
3.Press Wipers.
4.Switch Courtesy Wipe on or off.
USING THE REAR WINDOWWASHER
Rotate the control to the top or bottomposition and hold it to operate the rearwindow washer.
Note:A courtesy wipe occurs a short timeafter the wipers stop to clear any remainingwasher fluid when switched on. SeeSwitching the Courtesy Wipe On and Off(page 103).
ADDING WASHER FLUID
WASHER FLUID SPECIFICATION
See Washer Fluid Specification (page476).
WIPERS AND WASHERS –
TROUBLESHOOTING
WIPERS AND WASHERS –WARNING LAMPS
Illuminates when the windshieldwasher fluid is low.
WIPERS AND WASHERS –FREQUENTLY ASKED QUESTIONS
Why are there streaks and smears onthe windshield?
The wiper blades could be dirty, wornor damaged. Check the wiper blades.See Checking the Wiper Blades(page 101). If the wiper blades are dirty,clean them with washer fluid or waterapplied with a soft sponge or cloth. Ifthe wiper blades are worn or damaged,install new ones. See Replacing theFront Wiper Blades (page 101).
103
2023 Bronco (TG1) Canada/United States of America, enUSA, Edition date: 202208, DOMWipers and WashersE340280 E340983 E132353
Page 108 of 642

EXTERIOR LIGHTING
CONTROL
Lamps off.A
Parking lamps on.B
Autolamps on.C
Headlamps on.D
Rotate the control to make a selection.
Note:The lighting control defaults toautolamps every time you switch yourvehicle on.
HEADLAMPS
USING THE HIGH BEAMHEADLAMPS
Push the lever away from you toswitch the high beam on.
Push the lever forward again or pull thelever toward you to switch the high beamsoff.
Slightly pull the lever toward you andrelease it to flash the headlamps.
HEADLAMP INDICATORS
Lamps On
Illuminates when you switch thelow beam headlamps or theparking lamps on.
Headlamp High Beam
Illuminates when you switch thehigh beam headlamps on.
HEADLAMPS –
TROUBLESHOOTING
HEADLAMPS – FREQUENTLYASKED QUESTIONS
Why is there condensation in theheadlamps?
•Headlamps have vents toaccommodate normal changes in airpressure. Condensation can be anatural by-product of this design.When moist air enters the lampassembly through the vents, there is apossibility that condensation can occurwhen the temperature is cold. Whennormal condensation occurs, a finemist can form on the interior of thelens. The fine mist eventually clearsand exits through the vents duringnormal operation.
How much condensation isacceptable?
•The presence of a fine mist, forexample no streaks, drip marks or largedroplets. A fine mist covers less than50% of the lens.
104
2023 Bronco (TG1) Canada/United States of America, enUSA, Edition date: 202208, DOMExterior LightingE327629 E327570 E67019 E71341 E67019
Page 152 of 642

2-Door
Pull the strap to fold the head restraintrearward.
REMOVING THE HEAD RESTRAINT
1.Pull up the head restraint until itreaches its highest position.
2.Press and hold the adjust and releasebutton and the unlock and removebutton.
3.Pull up the head restraint.
Note:The head restraints are notremovable on 2-door vehicles.
INSTALLING THE HEADRESTRAINT
Align the steel stems into the guide sleevesand push the head restraint down until itlocks.
ADJUSTING THE SEAT BACKREST
WARNING: Do not place cargo orany objects behind the seat backrestbefore returning it to the original position.Pull on the seat backrest to make surethat it has fully latched after returningthe seat backrest to its original position.An unlatched seat may becomedangerous if you stop suddenly or havea crash.
Note:The rear seats are not adjustable on2-door vehicles.
4-Door
Pull the lever up to fold the seat backrestfully forward.
Note:Make sure that the area under theseat is free of objects before folding thebackrest.
To return the seat backrest to the uprightposition, rotate it up until it locks.
Note:To store the removable doors, theseat backrest must be in the uprightposition.
To recline the seat backrest to the optimalseating position, pull the lever up and pushthe backrest rearward.
FOLDING THE SEATS
WARNING: Do not drive yourvehicle with a seat that is unlatched orin the folded position. Failure to followthis instruction could result in personalinjury or death in the event of a suddenstop or crash.
WARNING: Do not adjust a seat orrelease a seat floor latch when thevehicle is moving. Failure to follow thisinstruction could result in personal injuryor death in a sudden stop or crash.
148
2023 Bronco (TG1) Canada/United States of America, enUSA, Edition date: 202208, DOMRear SeatsE327939
Page 153 of 642

2-Door
1.Pull the strap at the front of the seatcushion. Then, flip the seat cushion upto the vertical position.
2.Pull the strap on the top of the seatbackrest to fold it forward.
UNFOLDING THE SEATS
WARNING: Make sure that cargoand other objects are not trapped underthe seat cushion and that you return theseat cushion to the full-down position.Failure to do so may prevent the seatfrom operating properly, which couldincrease the risk of serious injury in acrash.
For 2-door vehicles, rotate the seatbackrest upright until it locks in the seatingposition. Then, move the seat cushion backto the seating position.
149
2023 Bronco (TG1) Canada/United States of America, enUSA, Edition date: 202208, DOMRear SeatsE342383 E342771
Page 304 of 642

Make sure that you securely fasten theload. Check the tightness of the loadbefore driving and at each fuel stop.
REMOVING AND INSTALLING THEROOF RACK
Removing the Roof Rack (If Equipped)
1.Using the provided T30 tool, removethe front roof rack cover fasteners.
2.Remove the front roof rack covers bypulling upward at the rear edge androtating forward.
3.Using a 10 mm socket, remove the frontroof rack fasteners.
4.Remove the cover to access the rearfastener.
5.Using the supplied special tool, loosenthe fastener until you can remove therack.
6.Remove the rack from the vehicle.
Note:The windshield trim cover, retainingplate and fasteners are provided. The trimcover is installed when you remove the roofrack.
7.Locate the trim cover components.
8.Place the trim cover retaining plateover the mounting studs.
9.Install the supplied fasteners. Torquenuts to 7.7 lb.ft (10.5 Nm).
10.Align the cover with the alignmentslot at the front of the cover, thenrotate rearward and snap into place.
300
2023 Bronco (TG1) Canada/United States of America, enUSA, Edition date: 202208, DOMLoad Carrying12E339405 E339073 E339074 E339407
Page 305 of 642

Installing the Roof Rack
1.To remove, press the button on the rearof the trim cover and rotate forward.
2.Remove the fasteners and remove thetrim cover retaining plate.
3.Store the trim cover components.
4.Position the roof rack on the vehicle.
5.Hand start the front roof rack fasteners.
6.Using a 10 mm socket, tighten the frontroof rack fasteners. Torque bolts to7.7 lb.ft (10.5 Nm).
7.Align the cover with the alignment slotand rotate rearward.
8.Hand start the front roof rack coverfasteners.
9.Using the provided T30 tool, tightenthe front roof rack cover fasteners.Torque bolts to 5.9 lb.ft (8 Nm).
Note:The rear crossbar is part of theclamping system. If you removed thecrossbar you must install it first for properattachment to the hard top.
10.Using the supplied special tool,tighten the fastener.
Note:The supplied special tool stopsturning the fastener when you have propertorque applied.
11.Install the rear roof rack fastenercover.
301
2023 Bronco (TG1) Canada/United States of America, enUSA, Edition date: 202208, DOMLoad Carrying12E339406 E339073 E339074
Page 373 of 642

7.Remove the three retaining boltssecuring the rear lamp to the body.
Note:Remove and install the retaining boltnear the wheel well before the retainingbolts near the luggage compartment.
8.Pull the rear lamp away from thevehicle and disconnect the electricalconnectors as needed.
9.To install, reverse the removalprocedure.
CHANGING A REAR LAMP BULB
Stoplamp, rear and turn signalbulb.A.
Reversing lamp bulb.B.
1.Remove the rear lamp assembly. SeeRemoving a Rear Lamp Assembly(page 368).
2.Rotate the bulb socketcounterclockwise and remove it fromthe rear lamp assembly.
3.To install, reverse the removalprocedure.
INTERIOR BULBS
INTERIOR BULB SPECIFICATIONCHART
Your vehicle has LED lamps. These are notserviceable items. See an authorized dealerif they fail.
DRIVE BELT ROUTING - 2.3L
ECOBOOST™
Short drive belt is on the secondpulley groove farthest fromengine.
A.
Long drive belt is on the firstpulley groove closest to engine.B.
369
2023 Bronco (TG1) Canada/United States of America, enUSA, Edition date: 202208, DOMMaintenanceABE339583 BAE357477