2023 DODGE CHARGER light
[x] Cancel search: lightPage 119 of 292
MULTIMEDIA117
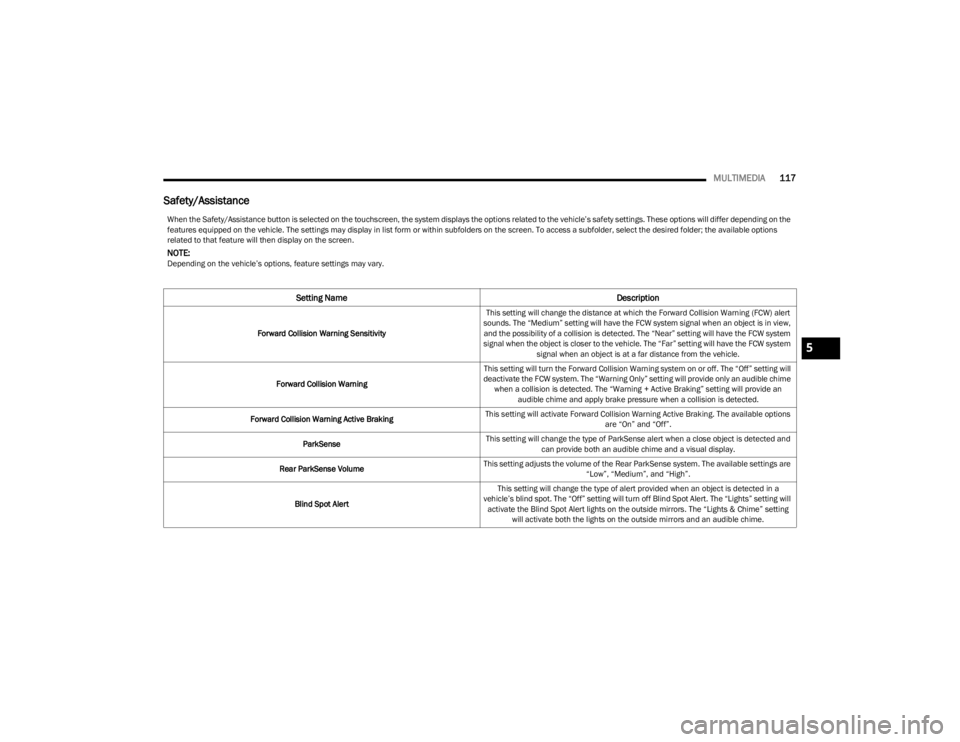
Safety/Assistance
When the Safety/Assistance button is selected on the touchscreen, the system displays the options related to the vehicle’s safety settings. These options will differ depending on the
features equipped on the vehicle. The settings may display in list form or within subfolders on the screen. To access a subfolder, select the desired folder; the available options
related to that feature will then display on the screen.
NOTE:Depending on the vehicle’s options, feature settings may vary.
Setting Name Description
Forward Collision Warning SensitivityThis setting will change the distance at which the Forward Collision Warning (FCW) alert
sounds. The “Medium” setting will have the FCW system signal when an object is in view, and the possibility of a collision is detected. The “Near” setting will have the FCW system
signal when the object is closer to the vehicle. The “Far” setting will have the FCW system signal when an object is at a far distance from the vehicle.
Forward Collision Warning This setting will turn the Forward Collision Warning system on or off. The “Off” setting will
deactivate the FCW system. The “Warning Only” setting will provide only an audible chime when a collision is detected. The “Warning + Active Braking” setting will provide an audible chime and apply brake pressure when a collision is detected.
Forward Collision Warning Active Braking This setting will activate Forward Collision Warning Active Braking. The available options
are “On” and “Off”.
ParkSense This setting will change the type of ParkSense alert when a close object is detected and
can provide both an audible chime and a visual display.
Rear ParkSense Volume This setting adjusts the volume of the Rear ParkSense system. The available settings are
“Low”, “Medium”, and “High”.
Blind Spot Alert This setting will change the type of alert provided when an object is detected in a
vehicle’s blind spot. The “Off” setting will turn off Blind Spot Alert. The “Lights” setting will activate the Blind Spot Alert lights on the outside mirrors. The “Lights & Chime” setting will activate both the lights on the outside mirrors and an audible chime.
5
23_LD_OM_EN_USC_t.book Page 117
Page 121 of 292
MULTIMEDIA119
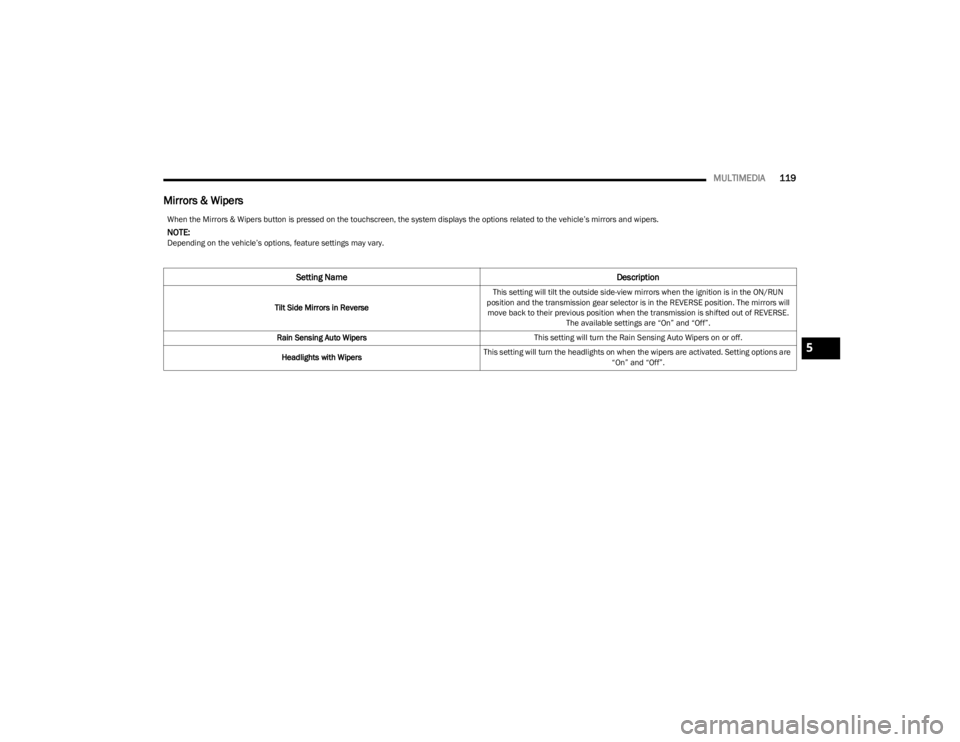
Mirrors & Wipers
When the Mirrors & Wipers button is pressed on the touchscreen, the system displays the options related to the vehicle’s mirrors and wipers.
NOTE:Depending on the vehicle’s options, feature settings may vary.
Setting Name Description
Tilt Side Mirrors in ReverseThis setting will tilt the outside side-view mirrors when the ignition is in the ON/RUN
position and the transmission gear selector is in the REVERSE position. The mirrors will move back to their previous position when the transmission is shifted out of REVERSE. The available settings are “On” and “Off”.
Rain Sensing Auto Wipers This setting will turn the Rain Sensing Auto Wipers on or off.
Headlights with Wipers This setting will turn the headlights on when the wipers are activated. Setting options are
“On” and “Off”.
5
23_LD_OM_EN_USC_t.book Page 119
Page 122 of 292

120MULTIMEDIA
Lights
When the Lights button is pressed on the touchscreen, the system displays the options related to the vehicle’s exterior and interior lights.
NOTE:
When the “Daytime Running Lights” feature is selected, the daytime running lights can be turned On or Off. This feature is only allowed by law in the country of the vehicle purchase.
Depending on the vehicle’s options, feature settings may vary.
Setting Name Description
Headlight Off DelayThis setting will allow you to set the amount of time it takes for the headlights to shut off
after the vehicle is turned off. The available settings are “0 sec”, “30 sec”, “60 sec”, and “90 sec”.
Headlight Illumination On Approach This setting will allow you to set the amount of time it takes for the headlights to shut off
after the vehicle is unlocked. The available settings are “0 sec”, “30 sec”, “60 sec”, and “90 sec”.
Headlights with Wipers This setting will turn the headlights on when the wipers are activated.
Daytime Running Lights This setting will allow you to turn the Daytime Running Lights on or off.
Flash Lights With Lock This setting will allow you to turn on or off the flashing of the lights when the Lock button
is pushed on the key fob. Available settings are “On” and “Off”.
Auto Dim High Beams This setting will allow you to turn the Auto Dim High Beams on or off.
23_LD_OM_EN_USC_t.book Page 120
Page 123 of 292
MULTIMEDIA121
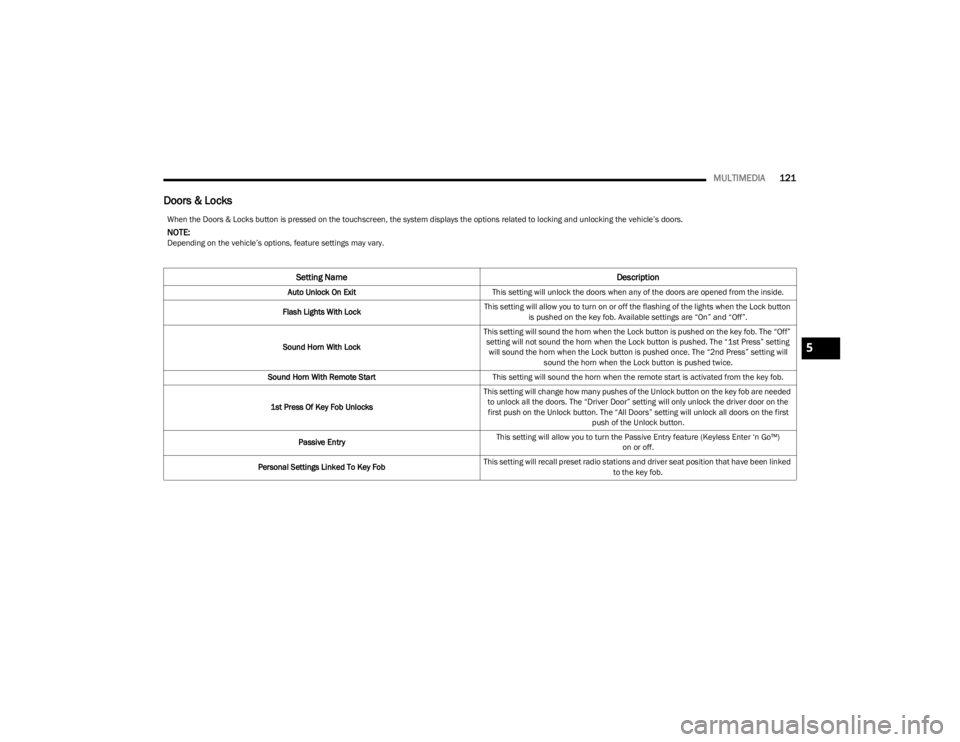
Doors & Locks
When the Doors & Locks button is pressed on the touchscreen, the system displays the options related to locking and unlocking the vehicle’s doors.
NOTE:Depending on the vehicle’s options, feature settings may vary.
Setting Name Description
Auto Unlock On ExitThis setting will unlock the doors when any of the doors are opened from the inside.
Flash Lights With Lock This setting will allow you to turn on or off the flashing of the lights when the Lock button
is pushed on the key fob. Available settings are “On” and “Off”.
Sound Horn With Lock This setting will sound the horn when the Lock button is pushed on the key fob. The “Off”
setting will not sound the horn when the Lock button is pushed. The “1st Press” setting will sound the horn when the Lock button is pushed once. The “2nd Press” setting will sound the horn when the Lock button is pushed twice.
Sound Horn With Remote Start This setting will sound the horn when the remote start is activated from the key fob.
1st Press Of Key Fob Unlocks This setting will change how many pushes of the Unlock button on the key fob are needed
to unlock all the doors. The “Driver Door” setting will only unlock the driver door on the first push on the Unlock button. The “All Doors” setting will unlock all doors on the first push of the Unlock button.
Passive Entry This setting will allow you to turn the Passive Entry feature (Keyless Enter ‘n Go™)
on or off.
Personal Settings Linked To Key Fob This setting will recall preset radio stations and driver seat position that have been linked
to the key fob.
5
23_LD_OM_EN_USC_t.book Page 121
Page 124 of 292

122MULTIMEDIA
Seats & Comfort
Key Off Options
When Seats & Comfort button is pressed on the touchscreen, the system displays the option related to the vehicle’s comfort systems when remote start has been activated or the
vehicle has been started.
NOTE:Depending on the vehicle’s options, feature settings may vary.
Setting Name Description
Auto-On Driver Heated/Ventilated Seat & Steering Wheel With Vehicle Start This setting will activate the vehicle’s comfort systems and heated seats or heated
steering wheel when the vehicle is remote started or ignition is started. The “Off” setting will not activate the comfort systems. The “Remote Start” setting (if equipped) will only activate the comfort systems when using Remote Start. The “All Start” setting will activate the comfort systems whenever the vehicle is started.
When the Key Off Options button is pressed on the touchscreen, the system displays the options related to vehicle shut off. These settings will only activate when the ignition is set
to OFF.
NOTE:Depending on the vehicle’s options, feature settings may vary.
Setting Name Description
Easy Exit SeatThis setting adjusts the seats to make exiting the vehicle easier.
Key Off Power Delay This setting will keep certain electrical features running after the engine is turned off.
When any door is opened, the electronics will deactivate. The available settings are “0 sec”, “45 sec”, “5 min”, and “10 min”.
Headlight Off Delay This setting will allow you to set the amount of time the headlights remain on after the
vehicle has been turned off. The available settings are “0 sec”, “30 sec”, “60 sec”, and “90 sec”.
23_LD_OM_EN_USC_t.book Page 122
Page 129 of 292
MULTIMEDIA127
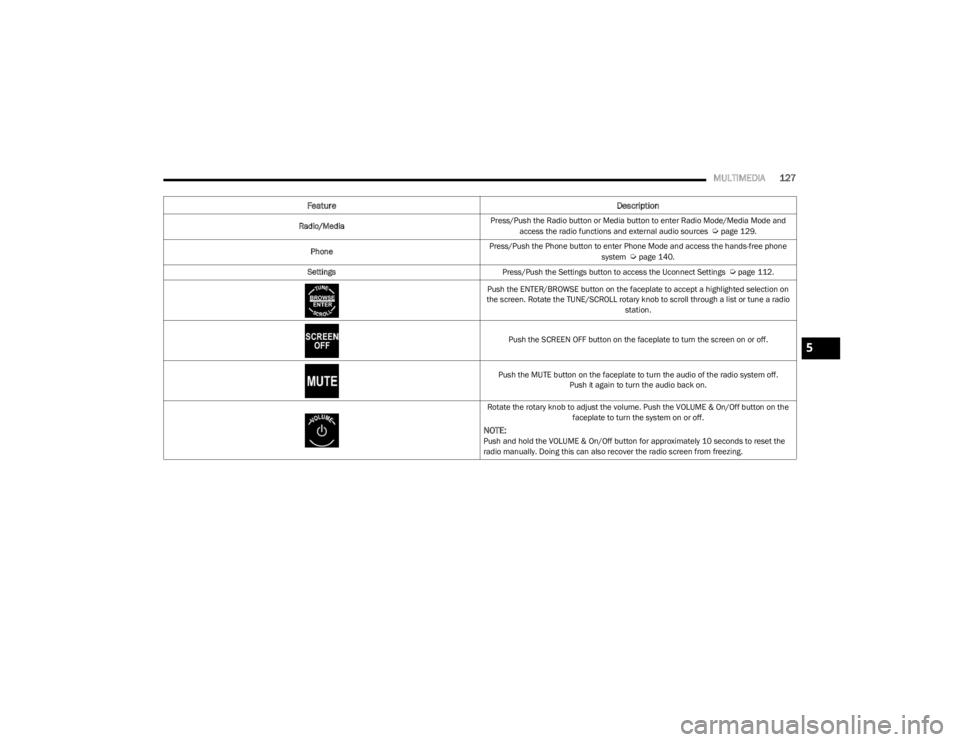
Feature Description
Radio/MediaPress/Push the Radio button or Media button to enter Radio Mode/Media Mode and
access the radio functions and external audio sources Úpage 129.
Phone Press/Push the Phone button to enter Phone Mode and access the hands-free phone
system
Úpage 140.
Settings Press/Push the Settings button to access the Uconnect Settings
Úpage 112.
Push the ENTER/BROWSE button on the faceplate to accept a highlighted selection on
the screen. Rotate the TUNE/SCROLL rotary knob to scroll through a list or tune a radio station.
Push the SCREEN OFF button on the faceplate to turn the screen on or off.
Push the MUTE button on the faceplate to turn the audio of the radio system off. Push it again to turn the audio back on.
Rotate the rotary knob to adjust the volume. Push the VOLUME & On/Off button on the faceplate to turn the system on or off.
NOTE:Push and hold the VOLUME & On/Off button for approximately 10 seconds to reset the
radio manually. Doing this can also recover the radio screen from freezing.
5
23_LD_OM_EN_USC_t.book Page 127
Page 134 of 292

132MULTIMEDIA
No Subscription
Radios equipped with a Satellite receiver require a
subscription to the SiriusXM® Service. When the radio
does not have the necessary subscription, the radio is
able to receive the Preview channel only.
Acquiring SiriusXM® Subscription
To activate the SiriusXM® Satellite Radio subscription, US
residents visit https://www.siriusxm.com/phx/getlogin or
call: 1-800-643-2112
Canadian residents visit https://www.siriusxm.ca/ or call:
1-888-539-7474.
NOTE:You will need to provide the SiriusXM® ID (RID) located at
the bottom of the Channel 0 screen.
The Satellite Mode is activated by a press of the SXM
button on the touchscreen. When in Satellite Mode:
The SXM button on the touchscreen is highlighted.
The SiriusXM® Presets are displayed at the top of the
screen.
The SiriusXM® Channel Number is displayed in the
center.
The Program Information is displayed at the bottom of
the Channel Number.
The SiriusXM® function buttons are displayed below
the Program Information.
Tuning is done by operating the Tune Knob or by Direct
Tune, similar to other Radio Bands.
In addition to the tuning operation functions common
to all radio modes, the Replay, Traffic/Weather button,
and Favorite button functions are available in
SiriusXM® Mode.
Uconnect 4 With 7-inch Display SiriusXM® Satellite Radio
1 — Browse
2 — Replay
3 — Seek Down Button
4 — Direct Tune Button
5 — Seek Up Button
6 — Audio Settings Button
23_LD_OM_EN_USC_t.book Page 132
Page 136 of 292
134MULTIMEDIA
FAVORITES
Press the Favorites button on the touchscreen to activate
the favorites menu, which will time out within 20 seconds
in absence of user interaction.
You can exit the Favorites Menu by a press of the X button.
The Favorites feature enables you to set a favorite artist or
song that is currently playing. The radio then uses this
information to alert you when either the favorite artist or
song is being played at any time by any of the SiriusXM®
Channels.
The maximum number of favorites that can be stored in
the Radio is 50.
Favorite Artist: While the song is playing, to set a favorite
artist, press the Favorites button on the touchscreen and
then the Favorite Artist button on the touchscreen.
Favorite Song: While the song is playing, to set a favorite
song, press the Favorites button on the touchscreen and
then the Favorite Song button on the touchscreen.
BROWSE IN SXM
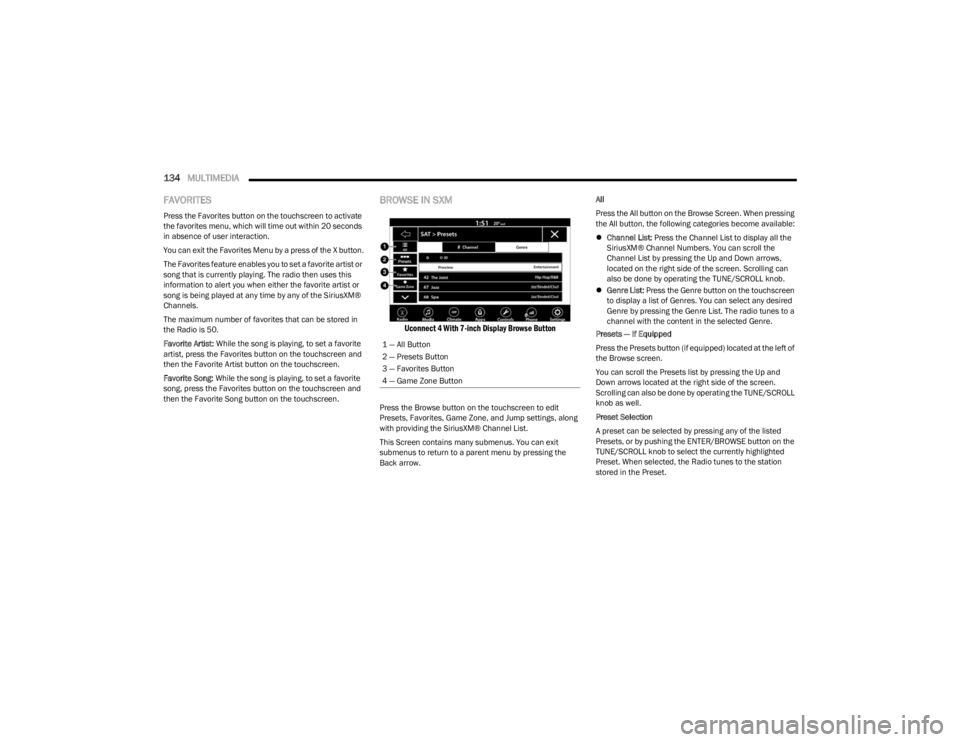
Uconnect 4 With 7-inch Display Browse Button
Press the Browse button on the touchscreen to edit
Presets, Favorites, Game Zone, and Jump settings, along
with providing the SiriusXM® Channel List.
This Screen contains many submenus. You can exit
submenus to return to a parent menu by pressing the
Back arrow. All
Press the All button on the Browse Screen. When pressing
the All button, the following categories become available:
Channel List: Press the Channel List to display all the
SiriusXM® Channel Numbers. You can scroll the
Channel List by pressing the Up and Down arrows,
located on the right side of the screen. Scrolling can
also be done by operating the TUNE/SCROLL knob.
Genre List: Press the Genre button on the touchscreen
to display a list of Genres. You can select any desired
Genre by pressing the Genre List. The radio tunes to a
channel with the content in the selected Genre.
Presets — If Equipped
Press the Presets button (if equipped) located at the left of
the Browse screen.
You can scroll the Presets list by pressing the Up and
Down arrows located at the right side of the screen.
Scrolling can also be done by operating the TUNE/SCROLL
knob as well.
Preset Selection
A preset can be selected by pressing any of the listed
Presets, or by pushing the ENTER/BROWSE button on the
TUNE/SCROLL knob to select the currently highlighted
Preset. When selected, the Radio tunes to the station
stored in the Preset.
1 — All Button
2 — Presets Button
3 — Favorites Button
4 — Game Zone Button
23_LD_OM_EN_USC_t.book Page 134