2023 DODGE CHARGER instrument cluster
[x] Cancel search: instrument clusterPage 100 of 292

98STARTING AND OPERATING
LANESENSE — IF EQUIPPED
LANESENSE OPERATION
The LaneSense system is operational at speeds above
37 mph (60 km/h) and below 112 mph (180 km/h). The
LaneSense system uses a forward looking camera to
detect lane markings and measure vehicle position within
the lane boundaries.
When both lane markings are detected and the driver
unintentionally drifts out of the lane (no turn signal
applied), the LaneSense system provides a haptic warning
in the form of torque applied to the steering wheel to
prompt the driver to remain within the lane boundaries. If
the driver unintentionally drifts out of the lane, the
LaneSense system provides a visual warning through the
instrument cluster display to prompt the driver to remain
within the lane boundaries. The driver may manually override the haptic warning by
applying torque to the steering wheel at any time.
When only a single lane marking is detected and the driver
drifts across the lane marking (no turn signal applied), the
LaneSense system provides visual warnings through the
instrument cluster display to prompt the driver to remain
within the lane. When only a single lane marking is
detected, a haptic or a torque warning will not be provided.
NOTE:When operating conditions have been met, the Lane
-
Sense system will monitor if the driver’s hands are on the
steering wheel and provide an audible warning to the
driver if removed. The system will cancel if the driver does
not return their hands to the wheel.
TURNING LANESENSE ON OR OFF
The LaneSense button is located on the
center stack below the Uconnect display.
To turn the LaneSense system on, push the
LaneSense button (LED turns off). A
“LaneSense On” message is shown in the instrument
cluster display.
To turn the LaneSense system off, push the LaneSense
button once (LED turns on).
NOTE:The LaneSense system will retain the last system state, on
or off, from the last ignition cycle when the ignition is
placed in the ON/RUN position.
LANESENSE WARNING MESSAGE
The LaneSense system will indicate the current lane drift
condition through the instrument cluster display.
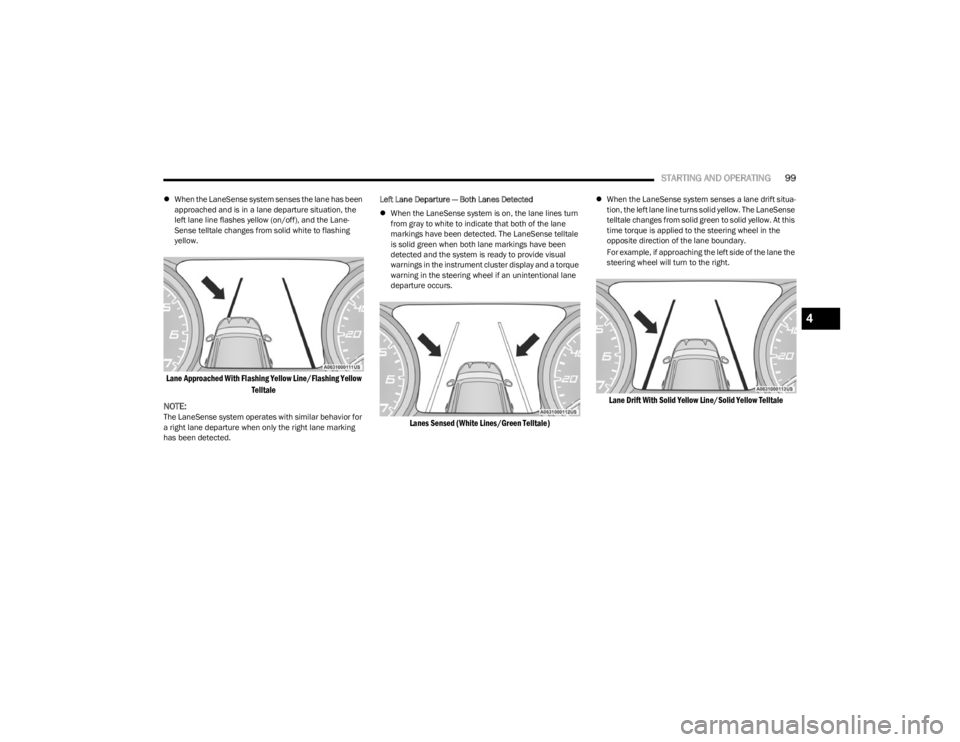
When the LaneSense system is on, the lane lines are gray
when both of the lane boundaries have not been detected
and the LaneSense telltale is solid white.
System On (Gray Lines/White Telltale)
Left Lane Departure — Only Left Lane Detected
When the LaneSense system is on, the LaneSense tell -
tale is solid white when only the left lane marking has
been detected and the system is ready to provide
visual warnings in the instrument cluster display if a
lane departure occurs.
CAUTION!
ParkSense is only a parking aid and it is unable to
recognize every obstacle, including small obstacles.
Parking curbs might be temporarily detected or not
detected at all. Obstacles located above or below the
sensors will not be detected when they are in close
proximity.
The vehicle must be driven slowly when using Park -
Sense in order to be able to stop in time when an
obstacle is detected. It is recommended that the
driver looks over his/her shoulder when using Park -
Sense.
23_LD_OM_EN_USC_t.book Page 98
Page 101 of 292
STARTING AND OPERATING99
When the LaneSense system senses the lane has been
approached and is in a lane departure situation, the
left lane line flashes yellow (on/off), and the Lane -
Sense telltale changes from solid white to flashing
yellow.
Lane Approached With Flashing Yellow Line/Flashing Yellow
Telltale
NOTE:
The LaneSense system operates with similar behavior for
a right lane departure when only the right lane marking
has been detected. Left Lane Departure — Both Lanes Detected
When the LaneSense system is on, the lane lines turn
from gray to white to indicate that both of the lane
markings have been detected. The LaneSense telltale
is solid green when both lane markings have been
detected and the system is ready to provide visual
warnings in the instrument cluster display and a torque
warning in the steering wheel if an unintentional lane
departure occurs.
Lanes Sensed (White Lines/Green Telltale)
When the LaneSense system senses a lane drift situa -
tion, the left lane line turns solid yellow. The LaneSense
telltale changes from solid green to solid yellow. At this
time torque is applied to the steering wheel in the
opposite direction of the lane boundary.
For example, if approaching the left side of the lane the
steering wheel will turn to the right.
Lane Drift With Solid Yellow Line/Solid Yellow Telltale
4
23_LD_OM_EN_USC_t.book Page 99
Page 115 of 292
MULTIMEDIA113
Language
Display
When the Language button is pressed on the touchscreen, the system displays the different language options. Once an option is selected, the system will display in the chosen
language.
NOTE:Depending on the vehicle’s options, feature settings may vary.
Setting Name Description
LanguageThis setting will change the language of the Uconnect system and Instrument Cluster
Display. The available languages are English, Français, and Español.
When the Display button is pressed on the touchscreen, the system will display the options related to the theme (if equipped), brightness, and color of the touchscreen. The available
settings are:
NOTE:Depending on the vehicle’s options, feature settings may vary.
Setting Name Description
Display ModeThis setting will allow you to set the brightness manually or have the system
set it automatically. The “Auto” setting has the system automatically adjust the
display brightness. The “Manual” setting will allow the user to adjust the brightness of the display.
Display Brightness With Headlights ON This setting will allow you to set the brightness when the headlights are on. To access this
setting, Display Mode must be set to “Manual”. The “+” setting will increase the brightness; the “-” will decrease the brightness.
Display Brightness With Headlights OFF This setting will allow you to set the brightness when the headlights are off. To access this
setting, Display Mode must be set to “Manual”. The “+” setting will increase the brightness; the “-” will decrease the brightness.
5
23_LD_OM_EN_USC_t.book Page 113
Page 116 of 292

114MULTIMEDIA
Units
Set Theme This setting will allow you to change the display theme.
Touchscreen Beep This setting will allow you to turn the touchscreen beep on or off.
Control Screen Timeout This setting will allow you to set the Control Screen to turn off automatically after five
seconds or stay open until manually closed.
Navigation Next Turn Pop-ups Displayed in Cluster This setting will display navigation prompts in the Instrument Cluster Display.
SiriusXM® Travel Link Weather Alerts This setting will turn the weather alerts on or off.
Setting Name Description
When the Units button is pressed on the touchscreen, the system displays the different measurement options. The selected unit of measurement will display in the instrument
cluster display and Navigation system (if equipped). The available settings are:
NOTE:Depending on the vehicle’s options, feature settings may vary.
Setting NameDescription
USThis setting will change the unit of measurement on the display to US.
Metric This setting will change the unit of measurement on the display to Metric.
Custom This setting changes the “Speed” (MPH or km/h), “Distance” (mi or km),
“Fuel Consumption” (MPG [US], MPG [UK], L/100 km, or km/L), “Pressure”
(psi, kPa, or bar), “Temperature” (°C or °F), “Power” (HP [US], HP [UK], or kW), and “Torque” (lb-ft or Nm) units of measurement independently.
23_LD_OM_EN_USC_t.book Page 114
Page 126 of 292
124MULTIMEDIA
Phone/Bluetooth®
SiriusXM® Setup — If Equipped
When the Phone/Bluetooth® button is pressed on the touchscreen, the system displays the options related to Bluetooth® connectivity from an external audio device or smartphone.
The list of paired audio devices or smartphones can be accessed from this menu.
NOTE:Depending on the vehicle’s options, feature settings may vary.
Setting Name Description
Phone Pop-Ups Displayed In ClusterThis setting will activate phone message pop-ups in the Instrument Cluster Display.
Do Not Disturb This setting will open the Do Not Disturb settings menu. The following settings are
“Auto Reply” (both, text, call), “Auto Reply Message” (custom, default), and “Custom Auto Reply Message” (create message).
Paired Phones And Audio Devices This setting will show the list of paired phones and audio devices.
Projection Manager This setting will activate your smartphone to project on the vehicle’s touchscreen.
When the SiriusXM® Setup button is pressed on the touchscreen, the system displays options related to SiriusXM® Satellite Radio. These settings can be used to skip specific radio
channels and restart favorite songs from the beginning.
NOTE:
A subscription to SiriusXM® Satellite Radio is required for these settings to be functional.
Depending on the vehicle’s options, feature settings may vary.
Setting Name Description
Tune StartThis setting will play the current song from the beginning when you tune to a music
channel using one of the 12 presets.
23_LD_OM_EN_USC_t.book Page 124
Page 155 of 292
MULTIMEDIA153
PERFORMANCE PAGES
Performance Pages is an application that provides a
display for performance indicators, as received from the
instrument cluster, that will help you gain familiarity with
the capabilities of your vehicle in real time.
To access the Performance Pages, press the Apps button
on the touchscreen then press the Performance Pages
button on the touchscreen. Press the desired button on
the touchscreen to access that specific Performance
Page. The Performance Pages include the following:
Home
Timers
Gauges
G-Force
Engine
Dyno
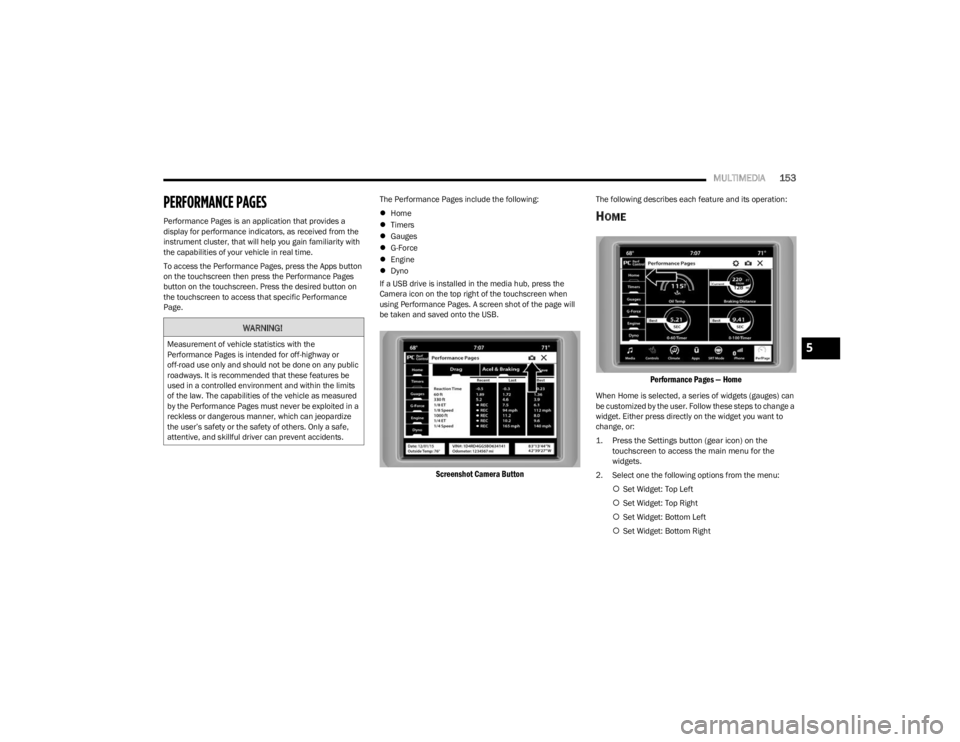
If a USB drive is installed in the media hub, press the
Camera icon on the top right of the touchscreen when
using Performance Pages. A screen shot of the page will
be taken and saved onto the USB.
Screenshot Camera Button
The following describes each feature and its operation:
HOME
Performance Pages — Home
When Home is selected, a series of widgets (gauges) can
be customized by the user. Follow these steps to change a
widget. Either press directly on the widget you want to
change, or:
1. Press the Settings button (gear icon) on the touchscreen to access the main menu for the
widgets.
2. Select one the following options from the menu: Set Widget: Top Left
Set Widget: Top Right
Set Widget: Bottom Left
Set Widget: Bottom Right
WARNING!
Measurement of vehicle statistics with the
Performance Pages is intended for off-highway or
off-road use only and should not be done on any public
roadways. It is recommended that these features be
used in a controlled environment and within the limits
of the law. The capabilities of the vehicle as measured
by the Performance Pages must never be exploited in a
reckless or dangerous manner, which can jeopardize
the user’s safety or the safety of others. Only a safe,
attentive, and skillful driver can prevent accidents.5
23_LD_OM_EN_USC_t.book Page 153
Page 158 of 292
156MULTIMEDIA
Best
The best recorded run of performance timers, except
for braking data.
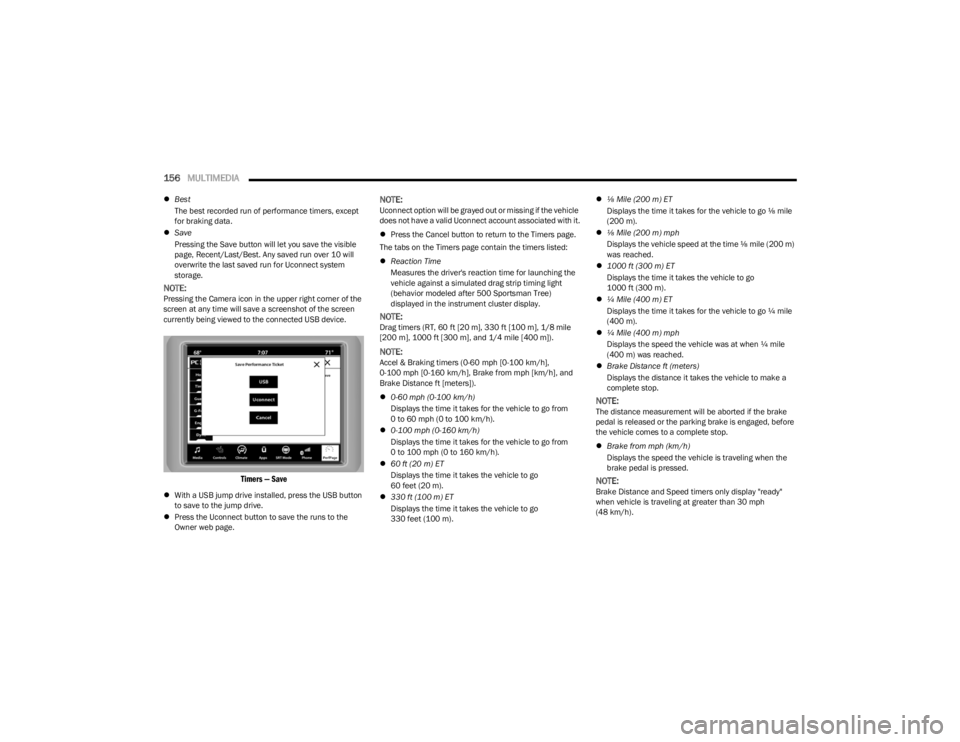
Save
Pressing the Save button will let you save the visible
page, Recent/Last/Best. Any saved run over 10 will
overwrite the last saved run for Uconnect system
storage.
NOTE:Pressing the Camera icon in the upper right corner of the
screen at any time will save a screenshot of the screen
currently being viewed to the connected USB device.
Timers — Save
With a USB jump drive installed, press the USB button
to save to the jump drive.
Press the Uconnect button to save the runs to the
Owner web page.
NOTE:Uconnect option will be grayed out or missing if the vehicle
does not have a valid Uconnect account associated with it.
Press the Cancel button to return to the Timers page.
The tabs on the Timers page contain the timers listed:
Reaction Time
Measures the driver's reaction time for launching the
vehicle against a simulated drag strip timing light
(behavior modeled after 500 Sportsman Tree)
displayed in the instrument cluster display.
NOTE:Drag timers (RT, 60 ft [20 m], 330 ft [100 m], 1/8 mile
[200 m], 1000 ft [300 m], and 1/4 mile [400 m]).
NOTE:Accel & Braking timers (0-60 mph [0-100 km/h],
0-100 mph [0-160 km/h], Brake from mph [km/h], and
Brake Distance ft [meters]).
0-60 mph (0-100 km/h)
Displays the time it takes for the vehicle to go from
0 to 60 mph (0 to 100 km/h).
0-100 mph (0-160 km/h)
Displays the time it takes for the vehicle to go from
0 to 100 mph (0 to 160 km/h).
60 ft (20 m) ET
Displays the time it takes the vehicle to go
60 feet (20 m).
330 ft (100 m) ET
Displays the time it takes the vehicle to go
330 feet (100 m).
⅛ Mile (200 m) ET
Displays the time it takes for the vehicle to go ⅛ mile
(200 m).
⅛ Mile (200 m) mph
Displays the vehicle speed at the time ⅛ mile (200 m)
was reached.
1000 ft (300 m) ET
Displays the time it takes the vehicle to go
1000 ft (300 m).
¼ Mile (400 m) ET
Displays the time it takes for the vehicle to go ¼ mile
(400 m).
¼ Mile (400 m) mph
Displays the speed the vehicle was at when ¼ mile
(400 m) was reached.
Brake Distance ft (meters)
Displays the distance it takes the vehicle to make a
complete stop.
NOTE:The distance measurement will be aborted if the brake
pedal is released or the parking brake is engaged, before
the vehicle comes to a complete stop.
Brake from mph (km/h)
Displays the speed the vehicle is traveling when the
brake pedal is pressed.
NOTE:Brake Distance and Speed timers only display "ready"
when vehicle is traveling at greater than 30 mph
(48 km/h).
23_LD_OM_EN_USC_t.book Page 156
Page 160 of 292

158MULTIMEDIA
Right G-Force:
Measures the peak force on the right side of the
vehicle.
Left G-Force:
Measures the peak force on the left side of the vehicle.
Rear G-Force:
Measures the peak acceleration force on the rear of
the vehicle.
NOTE:Front, Right, Left, and Rear G-Forces are all peak values.
These readings can be reset by clearing peak G-Force on
the instrument cluster.
Steering Wheel Angle
Steering Wheel Angle utilizes the steering angle sensor
to measure the degree of the steering wheel relative to
zero (straight ahead) reference angle. The zero degree
reference angle measurement indicates a steering
wheel straight ahead position.
The friction circle display shows instantaneous G-Force as
a highlight and previous G-Force as dots within the circle.
The system records previous G-Force for three minutes. If
there are multiple samples at a given point, the color of
the dot will darken from blue to red. Vectors more frequent
will show in red; infrequent vectors will show in blue.
ENGINE
Performance Pages — Engine
When selected, this screen displays the following values:
Vehicle Speed
Shows the actual vehicle speed.
Engine Power
Shows the instantaneous power.
Engine Torque
Shows the instantaneous torque.
Oil Pressure (6.4L Only) — If Equipped
Shows the actual engine oil pressure.
Boost Pressure (6.2L Only) — If Equipped
Shows the actual boost pressure.
Gear (Automatic Transmission Only)
Shows the current (or pending) operating gear of the
vehicle.
DYNAMOMETER (DYNO)
Performance Pages — Dyno
The system will start drawing graphs for Power and Torque
(top chart) and Engine Speed (bottom chart). The graph
will fill to the right side of the page (based on History time
selected). Once the right side of the page is reached, the
graph will scroll with the right side always being the most
recent recorded sample.
23_LD_OM_EN_USC_t.book Page 158