2023 DODGE CHARGER reset
[x] Cancel search: resetPage 134 of 292

132MULTIMEDIA
No Subscription
Radios equipped with a Satellite receiver require a
subscription to the SiriusXM® Service. When the radio
does not have the necessary subscription, the radio is
able to receive the Preview channel only.
Acquiring SiriusXM® Subscription
To activate the SiriusXM® Satellite Radio subscription, US
residents visit https://www.siriusxm.com/phx/getlogin or
call: 1-800-643-2112
Canadian residents visit https://www.siriusxm.ca/ or call:
1-888-539-7474.
NOTE:You will need to provide the SiriusXM® ID (RID) located at
the bottom of the Channel 0 screen.
The Satellite Mode is activated by a press of the SXM
button on the touchscreen. When in Satellite Mode:
The SXM button on the touchscreen is highlighted.
The SiriusXM® Presets are displayed at the top of the
screen.
The SiriusXM® Channel Number is displayed in the
center.
The Program Information is displayed at the bottom of
the Channel Number.
The SiriusXM® function buttons are displayed below
the Program Information.
Tuning is done by operating the Tune Knob or by Direct
Tune, similar to other Radio Bands.
In addition to the tuning operation functions common
to all radio modes, the Replay, Traffic/Weather button,
and Favorite button functions are available in
SiriusXM® Mode.
Uconnect 4 With 7-inch Display SiriusXM® Satellite Radio
1 — Browse
2 — Replay
3 — Seek Down Button
4 — Direct Tune Button
5 — Seek Up Button
6 — Audio Settings Button
23_LD_OM_EN_USC_t.book Page 132
Page 136 of 292

134MULTIMEDIA
FAVORITES
Press the Favorites button on the touchscreen to activate
the favorites menu, which will time out within 20 seconds
in absence of user interaction.
You can exit the Favorites Menu by a press of the X button.
The Favorites feature enables you to set a favorite artist or
song that is currently playing. The radio then uses this
information to alert you when either the favorite artist or
song is being played at any time by any of the SiriusXM®
Channels.
The maximum number of favorites that can be stored in
the Radio is 50.
Favorite Artist: While the song is playing, to set a favorite
artist, press the Favorites button on the touchscreen and
then the Favorite Artist button on the touchscreen.
Favorite Song: While the song is playing, to set a favorite
song, press the Favorites button on the touchscreen and
then the Favorite Song button on the touchscreen.
BROWSE IN SXM
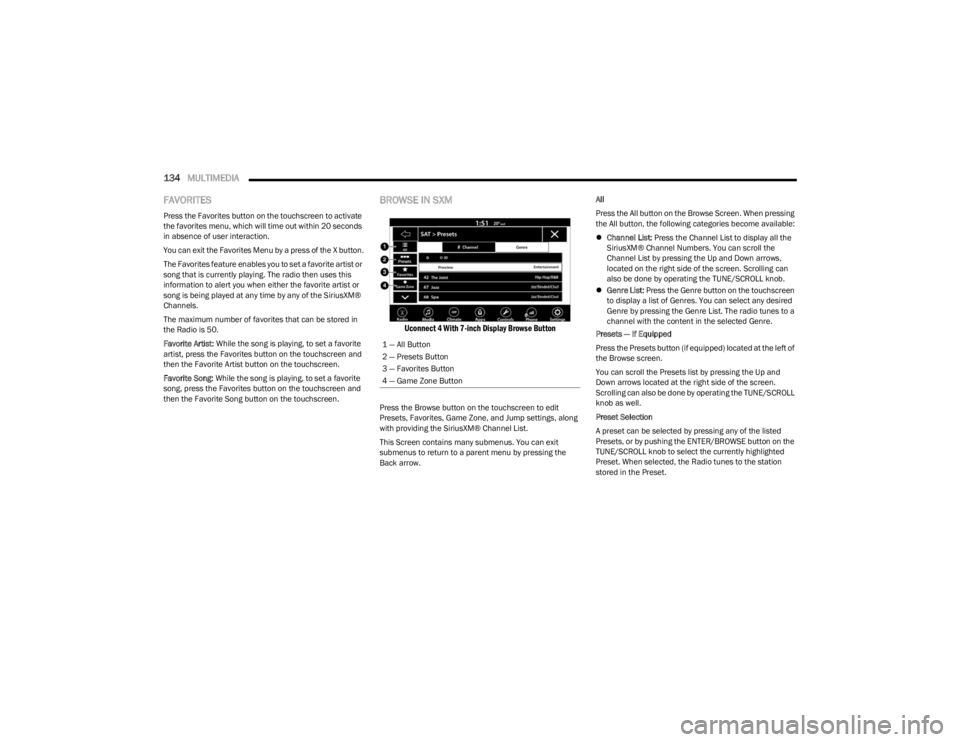
Uconnect 4 With 7-inch Display Browse Button
Press the Browse button on the touchscreen to edit
Presets, Favorites, Game Zone, and Jump settings, along
with providing the SiriusXM® Channel List.
This Screen contains many submenus. You can exit
submenus to return to a parent menu by pressing the
Back arrow. All
Press the All button on the Browse Screen. When pressing
the All button, the following categories become available:
Channel List: Press the Channel List to display all the
SiriusXM® Channel Numbers. You can scroll the
Channel List by pressing the Up and Down arrows,
located on the right side of the screen. Scrolling can
also be done by operating the TUNE/SCROLL knob.
Genre List: Press the Genre button on the touchscreen
to display a list of Genres. You can select any desired
Genre by pressing the Genre List. The radio tunes to a
channel with the content in the selected Genre.
Presets — If Equipped
Press the Presets button (if equipped) located at the left of
the Browse screen.
You can scroll the Presets list by pressing the Up and
Down arrows located at the right side of the screen.
Scrolling can also be done by operating the TUNE/SCROLL
knob as well.
Preset Selection
A preset can be selected by pressing any of the listed
Presets, or by pushing the ENTER/BROWSE button on the
TUNE/SCROLL knob to select the currently highlighted
Preset. When selected, the Radio tunes to the station
stored in the Preset.
1 — All Button
2 — Presets Button
3 — Favorites Button
4 — Game Zone Button
23_LD_OM_EN_USC_t.book Page 134
Page 137 of 292

MULTIMEDIA135
Deleting A Preset
A preset can be deleted in the Presets Browse screen by
pressing the Trash Can icon for the corresponding preset.
Favorites
Press the Favorites button on the Browse screen.
The Favorites menu provides a means to edit the Favorites
list and to configure the Alert Settings, along with
providing a list of Channels currently airing any of the
items in the Favorites list.
You can scroll the Favorites list by pressing the Up and
Down arrows located at the right side of the screen.
Scrolling can also be done by operating the TUNE/SCROLL
knob as well.
Remove Favorites
Press the Remove Favorites tab at the top of the screen.
Press the Delete All button on the touchscreen to delete
all of the Favorites or press the Trash Can icon next to the
Favorite to be deleted.
Alert Settings
Press the Alert Settings tab at the top of the Favorites
screen. The Alert Settings menu allows you to choose from
a visual alert or audible and visual alert when one of your
favorites is airing on any of the SiriusXM® channels. Game Zone
Press the Game Zone button, located at the left of the
Browse screen. This feature provides you with the ability to
select teams, edit the selection, and set alerts.
On-Air
Press the On-Air tab at the top of the screen. The On-Air list
provides a list of Channels currently airing any of the items
in the Selections list, and pressing any of the items in the
list tunes the radio to that channel.
Select Team — If Equipped
Press the Select Team button on the touchscreen to
activate the League Scroll list. Press the chosen league
and a scroll list of all teams within the league will appear,
then you can select a team by pressing the corresponding
box. A check mark appears for all teams that are chosen.
Remove Selection/Trash Can Icon
Press the Remove Selection tab at the top of the screen.
Press the Delete All button on the touchscreen to delete
all of the selections or press the Trash Can icon next to the
selection to be deleted. Alert Settings
Press the Alert Setting tab at the top of the screen. The
Alert Settings menu allows you to choose from “Alert me to
on-air games upon start” or “Alert upon score update” or
both when one or more of your selections is airing on any
of the SiriusXM® channels.
Tune Start
Tune Start begins playing the current song from the
beginning when you tune to a music channel using one of
the 12 presets. This feature occurs the first time the
preset is selected during that current song.
Setting Presets
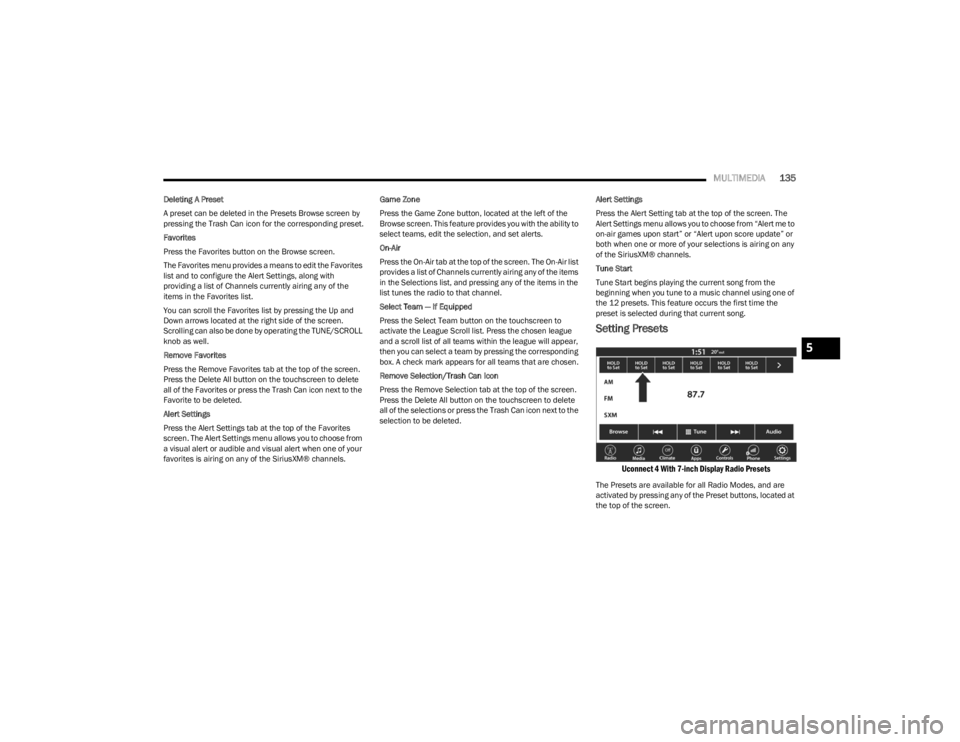
Uconnect 4 With 7-inch Display Radio Presets
The Presets are available for all Radio Modes, and are
activated by pressing any of the Preset buttons, located at
the top of the screen.
5
23_LD_OM_EN_USC_t.book Page 135
Page 138 of 292

136MULTIMEDIA
When you are on a station that you wish to save as a
preset, press and hold the numbered button on the
touchscreen for more than two seconds.
The Radio stores up to 12 presets in each of the
Radio Modes.
A total of six presets will appear on the screen. You can
switch between the radio presets list by pressing the Arrow
button located in the upper right of the radio touchscreen.
PRESET FEATURES — IF EQUIPPED
Browse In AM/FM
When in either AM or FM, the Browse Screen provides a
means to edit the Presets List and is entered by pushing
the ENTER/BROWSE button.
Scrolling Preset List
Once in the Browse Presets screen, you can scroll the
preset list by rotation of the TUNE/SCROLL knob or by
pressing the Up or Down Arrow key, located on the right of
the screen. Preset Selection From List
A preset can be selected by pressing any of the listed
Presets, or by pushing the ENTER/BROWSE button or the
TUNE/SCROLL knob to select the currently highlighted
Preset.
When selected, the radio tunes to the station stored in the
Presets.
Deleting Presets
A preset can be deleted in the Presets Browse screen by
pressing the Trash Can icon for the corresponding preset.
Return To Main Radio Screen
You can return to the Main Radio Screen by pressing
the X button or the Back Arrow button when in the
Browse Presets screen.
Audio Settings
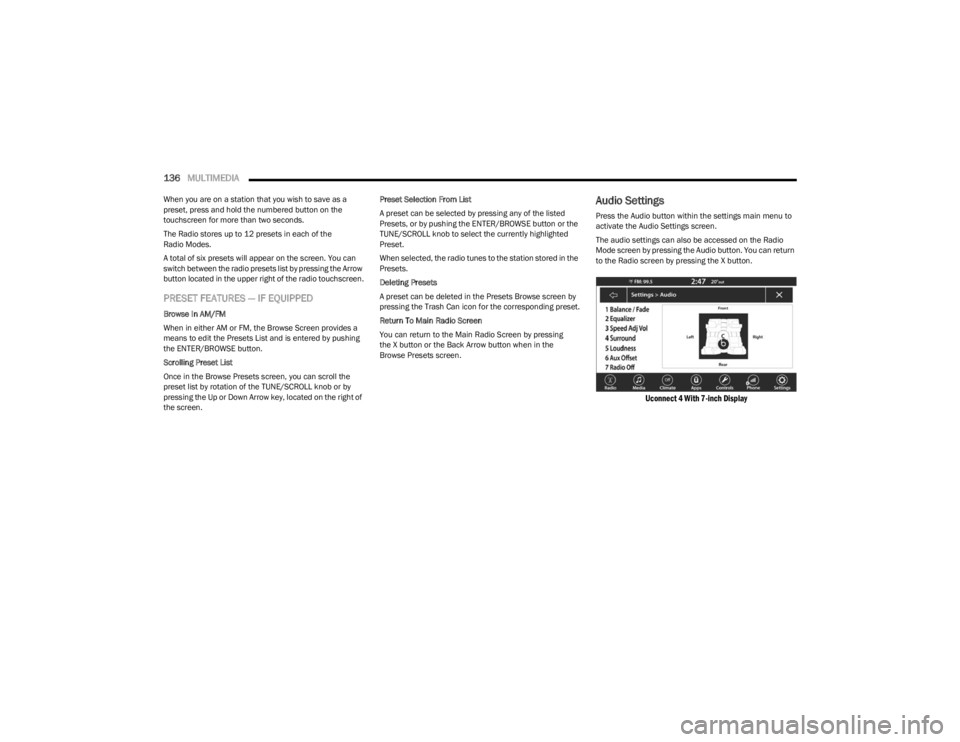
Press the Audio button within the settings main menu to
activate the Audio Settings screen.
The audio settings can also be accessed on the Radio
Mode screen by pressing the Audio button. You can return
to the Radio screen by pressing the X button.
Uconnect 4 With 7-inch Display
23_LD_OM_EN_USC_t.book Page 136
Page 160 of 292

158MULTIMEDIA
Right G-Force:
Measures the peak force on the right side of the
vehicle.
Left G-Force:
Measures the peak force on the left side of the vehicle.
Rear G-Force:
Measures the peak acceleration force on the rear of
the vehicle.
NOTE:Front, Right, Left, and Rear G-Forces are all peak values.
These readings can be reset by clearing peak G-Force on
the instrument cluster.
Steering Wheel Angle
Steering Wheel Angle utilizes the steering angle sensor
to measure the degree of the steering wheel relative to
zero (straight ahead) reference angle. The zero degree
reference angle measurement indicates a steering
wheel straight ahead position.
The friction circle display shows instantaneous G-Force as
a highlight and previous G-Force as dots within the circle.
The system records previous G-Force for three minutes. If
there are multiple samples at a given point, the color of
the dot will darken from blue to red. Vectors more frequent
will show in red; infrequent vectors will show in blue.
ENGINE
Performance Pages — Engine
When selected, this screen displays the following values:
Vehicle Speed
Shows the actual vehicle speed.
Engine Power
Shows the instantaneous power.
Engine Torque
Shows the instantaneous torque.
Oil Pressure (6.4L Only) — If Equipped
Shows the actual engine oil pressure.
Boost Pressure (6.2L Only) — If Equipped
Shows the actual boost pressure.
Gear (Automatic Transmission Only)
Shows the current (or pending) operating gear of the
vehicle.
DYNAMOMETER (DYNO)
Performance Pages — Dyno
The system will start drawing graphs for Power and Torque
(top chart) and Engine Speed (bottom chart). The graph
will fill to the right side of the page (based on History time
selected). Once the right side of the page is reached, the
graph will scroll with the right side always being the most
recent recorded sample.
23_LD_OM_EN_USC_t.book Page 158
Page 164 of 292

162MULTIMEDIA
PADDLE SHIFTERS — IF EQUIPPED WITH
AUTOMATIC TRANSMISSION
Paddle Shifters – Automatic Transmission
ON
Press the On button on the touchscreen to enable
steering wheel Paddle Shifters.
OFF
Press the Off button on the touchscreen to disable
steering wheel Paddle Shifters.
TRACTION
Traction Control
SPORT
Press the Sport button on the touchscreen to turn off
traction control and reduce stability control.
NORMAL
Press the Normal button on the touchscreen to provide
full traction control and full stability control.
STEERING — IF EQUIPPED
Steering
SPORT
Press the Sport button on the touchscreen to provide
an increased amount of steering feel, requiring a
higher amount of steering effort.
NORMAL
Press the Normal button on the touchscreen to provide
a balanced steering feel and steering effort. This is also
your vehicle’s preset steering setting.
COMFORT
Press the Comfort button on the touchscreen to
provide a lower steering effort.
23_LD_OM_EN_USC_t.book Page 162
Page 191 of 292

SAFETY189
(Continued)
Your vehicle may also be designed to perform any of these
other functions in response to the Enhanced Accident
Response System:
Turn off the Fuel Filter Heater, Turn off the HVAC Blower
Motor, Close the HVAC Circulation Door
Cut off battery power to the:
Engine
Electric Motor (if equipped)
Electric power steering
Brake booster
Electric park brake
Automatic transmission gear selector
Horn
Front wiper
NOTE:After an accident, remember to cycle the ignition to the
STOP (OFF/LOCK) position and remove the key from the
ignition switch to avoid draining the battery. Carefully
check the vehicle for fuel leaks in the engine compartment
and on the ground near the engine compartment and fuel
tank before resetting the system and starting the engine.
If there are no fuel leaks or damage to the vehicle elec -
trical devices (e.g. headlights) after an accident, reset the
system by following the procedure described below. If you
have any doubt, contact an authorized dealer.
Enhanced Accident Response System
Reset Procedure
In order to reset the Enhanced Accident Response System
functions after an event, the ignition switch must be
changed from ignition START or ON/RUN to ignition OFF.
Carefully check the vehicle for fuel leaks in the engine
compartment and on the ground near the engine
compartment and fuel tank before resetting the system
and starting the engine.
After an accident, if the vehicle will not start after
performing the reset procedure, the vehicle must be
towed to an authorized dealer to be inspected and to have
the Enhanced Accident Response System reset.
Maintaining Your Air Bag System Event Data Recorder (EDR)
This vehicle is equipped with an event data recorder
(EDR). The main purpose of an EDR is to record, in certain
crash or near crash-like situations, such as an air bag
deployment or hitting a road obstacle, data that will assist
in understanding how a vehicle’s systems performed. The
EDR is designed to record data related to vehicle
dynamics and safety systems for a short period of time,
typically 30 seconds or less. The EDR in this vehicle is
designed to record such data as:
How various systems in your vehicle were operating;
Whether or not the driver and passenger safety belts
were buckled/fastened;
How far (if at all) the driver was depressing the acceler -
ator and/or brake pedal; and,
How fast the vehicle was traveling.WARNING!
Modifications to any part of the air bag system could
cause it to fail when you need it. You could be injured
if the air bag system is not there to protect you. Do
not modify the components or wiring, including
adding any kind of badges or stickers to the steering
wheel hub trim cover or the upper passenger side of
the instrument panel. Do not modify the front fascia/
bumper, vehicle body structure, or add aftermarket
side steps or running boards.
It is dangerous to try to repair any part of the air bag
system yourself. Be sure to tell anyone who works on
your vehicle that it has an air bag system.
Do not attempt to modify any part of your air bag
system. The air bag may inflate accidentally or may
not function properly if modifications are made. Take
your vehicle to an authorized dealer for any air bag
system service. If your seat, including your trim cover
and cushion, needs to be serviced in any way
(including removal or loosening/tightening of seat
attachment bolts), take the vehicle to an authorized
dealer. Only manufacturer approved seat accesso -
ries may be used. If it is necessary to modify the air
bag system for persons with disabilities, contact an
authorized dealer.
WARNING!
6
23_LD_OM_EN_USC_t.book Page 189
Page 219 of 292

IN CASE OF EMERGENCY217
In order to move the vehicle in cases where the
transmission will not shift out of PARK (P) (such as a
depleted battery), a Manual Park Release is available. The
manual park release lever is located in the center console
next to the gear shifter.
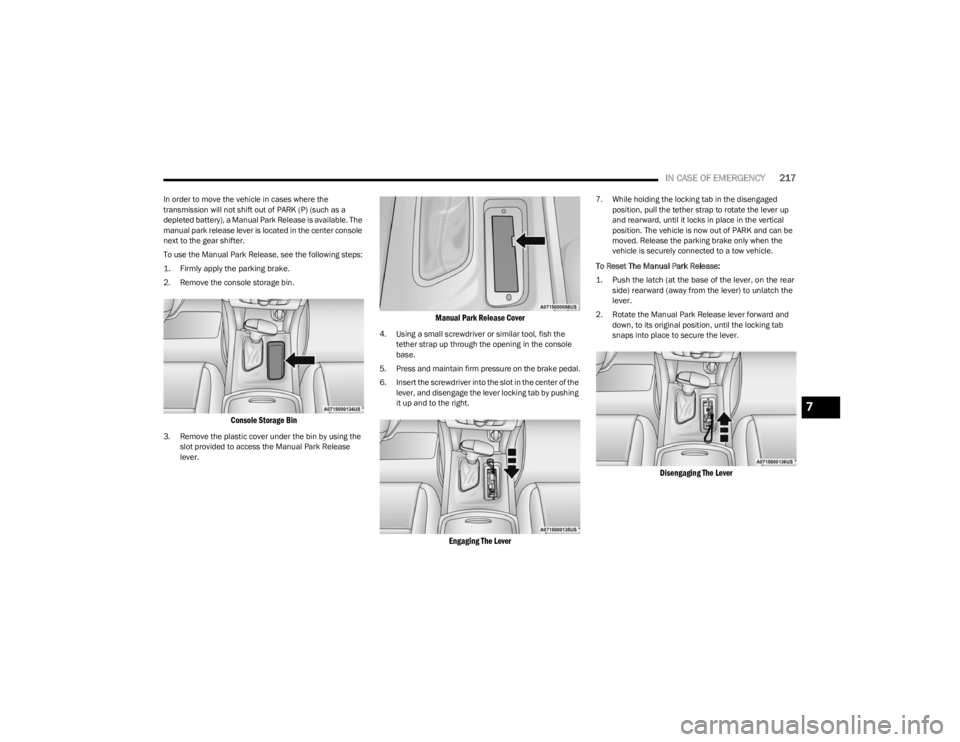
To use the Manual Park Release, see the following steps:
1. Firmly apply the parking brake.
2. Remove the console storage bin.
Console Storage Bin
3. Remove the plastic cover under the bin by using the
slot provided to access the Manual Park Release
lever.
Manual Park Release Cover
4. Using a small screwdriver or similar tool, fish the tether strap up through the opening in the console
base.
5. Press and maintain firm pressure on the brake pedal.
6. Insert the screwdriver into the slot in the center of the lever, and disengage the lever locking tab by pushing
it up and to the right.
Engaging The Lever
7. While holding the locking tab in the disengaged position, pull the tether strap to rotate the lever up
and rearward, until it locks in place in the vertical
position. The vehicle is now out of PARK and can be
moved. Release the parking brake only when the
vehicle is securely connected to a tow vehicle.
To Reset The Manual Park Release:
1. Push the latch (at the base of the lever, on the rear side) rearward (away from the lever) to unlatch the
lever.
2. Rotate the Manual Park Release lever forward and down, to its original position, until the locking tab
snaps into place to secure the lever.
Disengaging The Lever
7
23_LD_OM_EN_USC_t.book Page 217