2023 DODGE CHARGER engine oil
[x] Cancel search: engine oilPage 228 of 292

226SERVICING AND MAINTENANCE
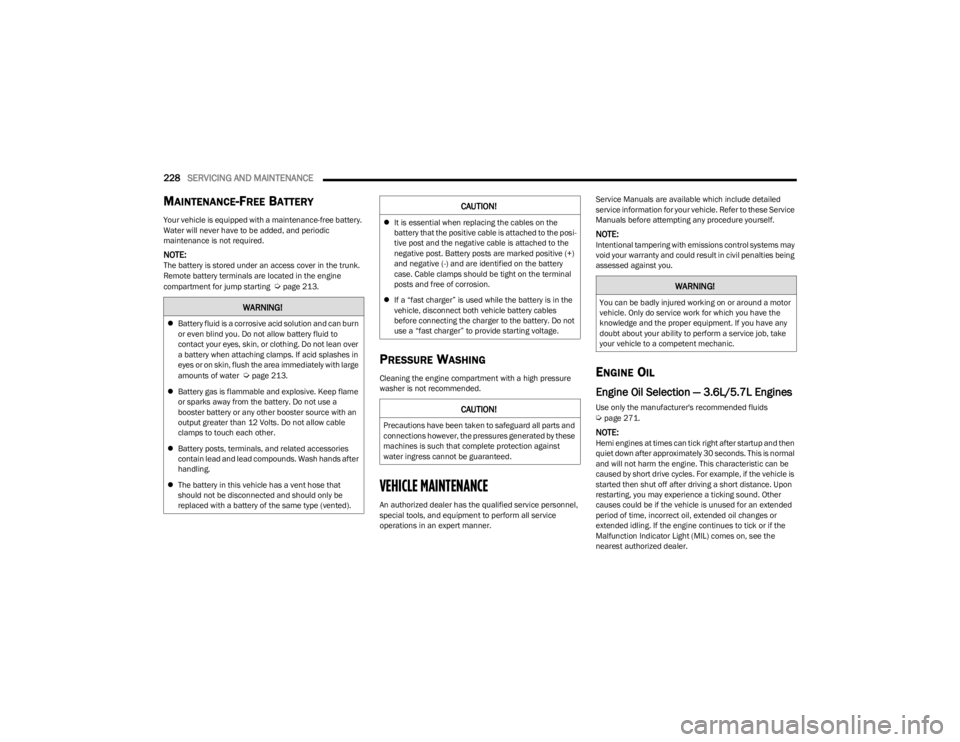
5.7L ENGINE
1 — Brake Fluid Reservoir Access Cover 5 — Engine Oil Fill
2 — Washer Fluid Reservoir Cap 6 — Engine Air Cleaner Filter
3 — Power Distribution Center (Fuses) 7 — Engine Coolant Pressure Reservoir
4 — Engine Oil Dipstick
23_LD_OM_EN_USC_t.book Page 226
Page 229 of 292

SERVICING AND MAINTENANCE227
CHECKING OIL LEVELTo ensure proper engine lubrication, the engine oil must
be maintained at the correct level. Check the oil level at
regular intervals, such as every fuel stop. The best time to
check the engine oil level is about ten minutes after a fully
warmed up engine is shut off.
Checking the oil while the vehicle is on level ground will
improve the accuracy of the oil level readings.
There are four possible dipstick types:
Crosshatched zone.
Crosshatched zone marked SAFE.
Crosshatched zone marked with MIN at the low end of
the range and MAX at the high end of the range.
Crosshatched zone marked with dimples at the MIN
and the MAX ends of the range.
NOTE:Always maintain the oil level within the crosshatch
markings on the dipstick.
Adding 1 qt (1 L) of oil when the reading is at the low end
of the dipstick range will raise the oil level to the high end
of the range marking.
ADDING WASHER FLUID
The windshield washer fluid reservoir is located in the
front of the engine compartment. Be sure to check the
fluid level at regular intervals. Fill the reservoir with
windshield washer solvent (not radiator antifreeze) and
operate the system for a few seconds to flush out the
residual water.
When refilling the washer fluid reservoir, apply some
washer fluid to a cloth or towel and wipe the wiper blades
clean. This will help blade performance.
To prevent freeze-up of your windshield washer system in
cold weather, select a solution or mixture that meets or
exceeds the temperature range of your climate. This rating
information can be found on most washer fluid containers.
The fluid reservoir will hold nearly 1 gal (4 L) of washer
fluid when the message “Low Washer Fluid” appears in
the instrument cluster.WARNING!
Never smoke while working in the engine compart -
ment: gas and flammable vapors may be present,
with the risk of fire.
Be very careful when working in the engine compart -
ment when the engine is hot: you may get burned. Do
not get too close to the radiator cooling fan: the elec -
tric fan may start; danger of injury. Scarves, ties and
other loose clothing might be pulled by moving parts.
CAUTION!
Be careful not to confuse the various types of fluids
while topping up: they are not compatible with each
other! Topping up with an unsuitable fluid could
severely damage your car.
The oil level must never exceed the MAX mark.
Always top up using engine oil of the same specifica -
tions as that already in the engine.
If the engine oil is being topped up, wait for the
engine to cool down before loosening the filler cap,
particularly for vehicles with aluminum caps (if
equipped). WARNING: risk of burns!
Overfilling or underfilling the crankcase will cause
aeration or loss of oil pressure. This could damage
your engine.
CAUTION!
Overfilling or underfilling the crankcase will cause
aeration or loss of oil pressure. This could damage your
engine.
WARNING!
Commercially available windshield washer solvents are
flammable. They could ignite and burn you. Care must
be exercised when filling or working around the washer
solution.
8
23_LD_OM_EN_USC_t.book Page 227
Page 230 of 292

228SERVICING AND MAINTENANCE
MAINTENANCE-FREE BATTERY
Your vehicle is equipped with a maintenance-free battery.
Water will never have to be added, and periodic
maintenance is not required.
NOTE:The battery is stored under an access cover in the trunk.
Remote battery terminals are located in the engine
compartment for jump starting
Úpage 213.
PRESSURE WASHING
Cleaning the engine compartment with a high pressure
washer is not recommended.
VEHICLE MAINTENANCE
An authorized dealer has the qualified service personnel,
special tools, and equipment to perform all service
operations in an expert manner. Service Manuals are available which include detailed
service information for your vehicle. Refer to these Service
Manuals before attempting any procedure yourself.
NOTE:Intentional tampering with emissions control systems may
void your warranty and could result in civil penalties being
assessed against you.
ENGINE OIL
Engine Oil Selection — 3.6L/5.7L Engines
Use only the manufacturer's recommended fluids Úpage 271.
NOTE:Hemi engines at times can tick right after startup and then
quiet down after approximately 30 seconds. This is normal
and will not harm the engine. This characteristic can be
caused by short drive cycles. For example, if the vehicle is
started then shut off after driving a short distance. Upon
restarting, you may experience a ticking sound. Other
causes could be if the vehicle is unused for an extended
period of time, incorrect oil, extended oil changes or
extended idling. If the engine continues to tick or if the
Malfunction Indicator Light (MIL) comes on, see the
nearest authorized dealer.
WARNING!
Battery fluid is a corrosive acid solution and can burn
or even blind you. Do not allow battery fluid to
contact your eyes, skin, or clothing. Do not lean over
a battery when attaching clamps. If acid splashes in
eyes or on skin, flush the area immediately with large
amounts of water
Úpage 213.
Battery gas is flammable and explosive. Keep flame
or sparks away from the battery. Do not use a
booster battery or any other booster source with an
output greater than 12 Volts. Do not allow cable
clamps to touch each other.
Battery posts, terminals, and related accessories
contain lead and lead compounds. Wash hands after
handling.
The battery in this vehicle has a vent hose that
should not be disconnected and should only be
replaced with a battery of the same type (vented).
CAUTION!
It is essential when replacing the cables on the
battery that the positive cable is attached to the posi -
tive post and the negative cable is attached to the
negative post. Battery posts are marked positive (+)
and negative (-) and are identified on the battery
case. Cable clamps should be tight on the terminal
posts and free of corrosion.
If a “fast charger” is used while the battery is in the
vehicle, disconnect both vehicle battery cables
before connecting the charger to the battery. Do not
use a “fast charger” to provide starting voltage.
CAUTION!
Precautions have been taken to safeguard all parts and
connections however, the pressures generated by these
machines is such that complete protection against
water ingress cannot be guaranteed.
WARNING!
You can be badly injured working on or around a motor
vehicle. Only do service work for which you have the
knowledge and the proper equipment. If you have any
doubt about your ability to perform a service job, take
your vehicle to a competent mechanic.
23_LD_OM_EN_USC_t.book Page 228
Page 231 of 292

SERVICING AND MAINTENANCE229
American Petroleum Institute (API)
Approved Engine Oil
These symbols mean that the oil has been certified by the
API. The manufacturer only recommends API trademark
oils.
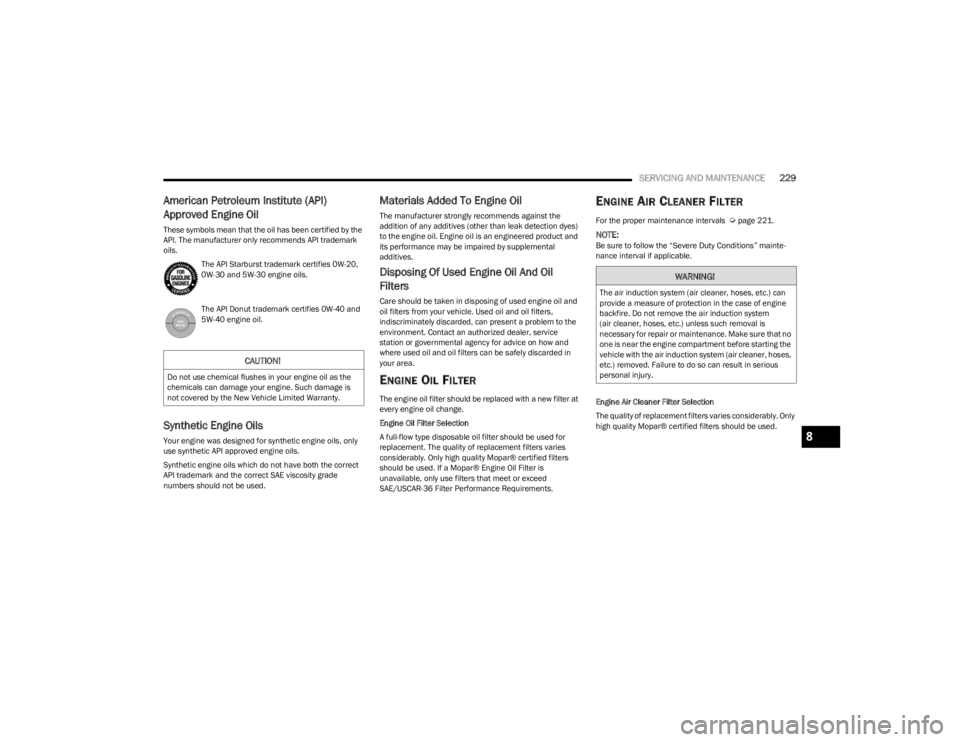
The API Starburst trademark certifies 0W-20,
0W-30 and 5W-30 engine oils.
The API Donut trademark certifies 0W-40 and
5W-40 engine oil.
Synthetic Engine Oils
Your engine was designed for synthetic engine oils, only
use synthetic API approved engine oils.
Synthetic engine oils which do not have both the correct
API trademark and the correct SAE viscosity grade
numbers should not be used.
Materials Added To Engine Oil
The manufacturer strongly recommends against the
addition of any additives (other than leak detection dyes)
to the engine oil. Engine oil is an engineered product and
its performance may be impaired by supplemental
additives.
Disposing Of Used Engine Oil And Oil
Filters
Care should be taken in disposing of used engine oil and
oil filters from your vehicle. Used oil and oil filters,
indiscriminately discarded, can present a problem to the
environment. Contact an authorized dealer, service
station or governmental agency for advice on how and
where used oil and oil filters can be safely discarded in
your area.
ENGINE OIL FILTER
The engine oil filter should be replaced with a new filter at
every engine oil change.
Engine Oil Filter Selection
A full-flow type disposable oil filter should be used for
replacement. The quality of replacement filters varies
considerably. Only high quality Mopar® certified filters
should be used. If a Mopar® Engine Oil Filter is
unavailable, only use filters that meet or exceed
SAE/USCAR-36 Filter Performance Requirements.
ENGINE AIR CLEANER FILTER
For the proper maintenance intervals Úpage 221.
NOTE:Be sure to follow the “Severe Duty Conditions” mainte -
nance interval if applicable.
Engine Air Cleaner Filter Selection
The quality of replacement filters varies considerably. Only
high quality Mopar® certified filters should be used.
CAUTION!
Do not use chemical flushes in your engine oil as the
chemicals can damage your engine. Such damage is
not covered by the New Vehicle Limited Warranty.
WARNING!
The air induction system (air cleaner, hoses, etc.) can
provide a measure of protection in the case of engine
backfire. Do not remove the air induction system
(air cleaner, hoses, etc.) unless such removal is
necessary for repair or maintenance. Make sure that no
one is near the engine compartment before starting the
vehicle with the air induction system (air cleaner, hoses,
etc.) removed. Failure to do so can result in serious
personal injury.
8
23_LD_OM_EN_USC_t.book Page 229
Page 234 of 292

232SERVICING AND MAINTENANCE
Particular attention should also be given to hood latching
components to ensure proper function. When performing
other underhood services, the hood latch, release
mechanism and safety catch should be cleaned and
lubricated.
The external lock cylinders should be lubricated twice a
year, preferably in the Autumn and Spring. Apply a small
amount of a high quality lubricant, such as Mopar® Lock
Cylinder Lubricant directly into the lock cylinder.
WINDSHIELD WIPER BLADES
Clean the rubber edges of the wiper blades and the
windshield periodically with a sponge or soft cloth and a
mild nonabrasive cleaner. This will remove accumulations
of salt or road film.
Operation of the wipers on dry glass for long periods may
cause deterioration of the wiper blades. Always use
washer fluid when using the wipers to remove salt or dirt
from a dry windshield.
Avoid using the wiper blades to remove frost or ice from
the windshield. Keep the blade rubber out of contact with
petroleum products such as engine oil, gasoline, etc.
NOTE:Life expectancy of wiper blades varies depending on
geographical area and frequency of use. Poor perfor -
mance of blades may be present with chattering, marks,
water lines or wet spots. If any of these conditions are
present, clean the wiper blades or replace as necessary.
Wiper Blade Removal/Installation
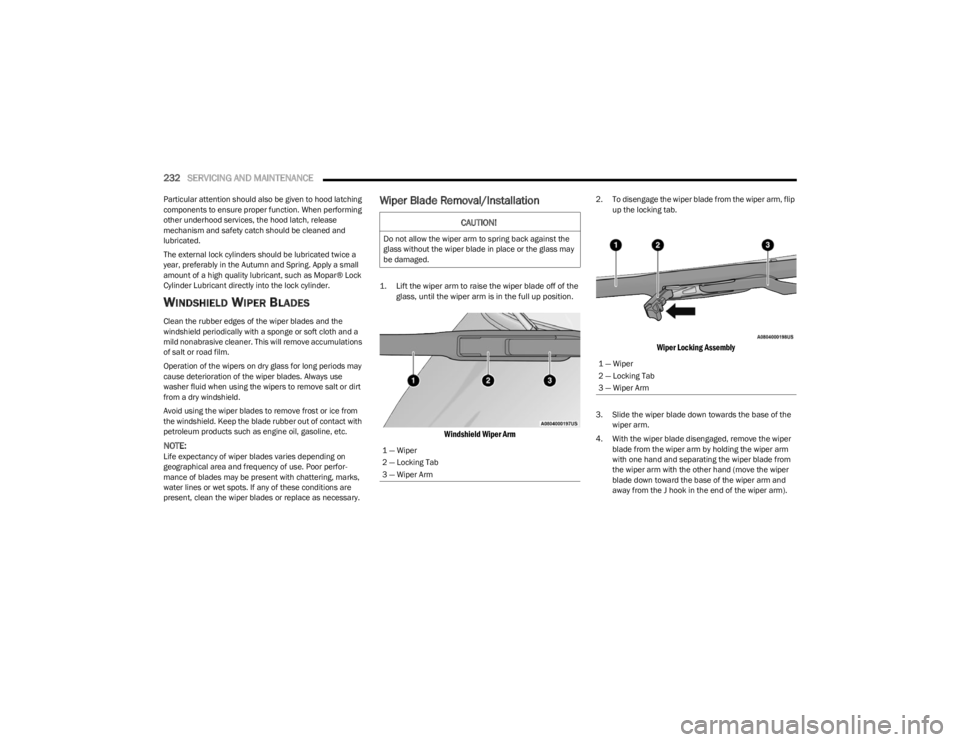
1. Lift the wiper arm to raise the wiper blade off of the glass, until the wiper arm is in the full up position.
Windshield Wiper Arm
2. To disengage the wiper blade from the wiper arm, flip up the locking tab.
Wiper Locking Assembly
3. Slide the wiper blade down towards the base of the wiper arm.
4. With the wiper blade disengaged, remove the wiper blade from the wiper arm by holding the wiper arm
with one hand and separating the wiper blade from
the wiper arm with the other hand (move the wiper
blade down toward the base of the wiper arm and
away from the J hook in the end of the wiper arm).
CAUTION!
Do not allow the wiper arm to spring back against the
glass without the wiper blade in place or the glass may
be damaged.
1 — Wiper
2 — Locking Tab
3 — Wiper Arm
1 — Wiper
2 — Locking Tab
3 — Wiper Arm
23_LD_OM_EN_USC_t.book Page 232
Page 235 of 292

SERVICING AND MAINTENANCE233
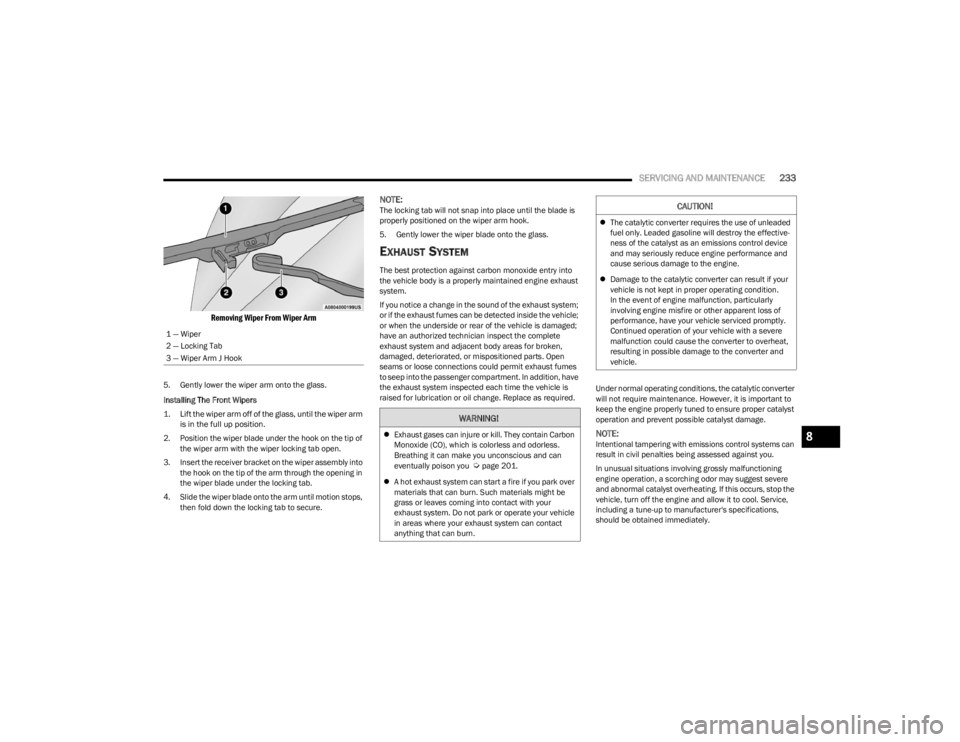
Removing Wiper From Wiper Arm
5. Gently lower the wiper arm onto the glass.
Installing The Front Wipers
1. Lift the wiper arm off of the glass, until the wiper arm
is in the full up position.
2. Position the wiper blade under the hook on the tip of the wiper arm with the wiper locking tab open.
3. Insert the receiver bracket on the wiper assembly into the hook on the tip of the arm through the opening in
the wiper blade under the locking tab.
4. Slide the wiper blade onto the arm until motion stops, then fold down the locking tab to secure.
NOTE:The locking tab will not snap into place until the blade is
properly positioned on the wiper arm hook.
5. Gently lower the wiper blade onto the glass.
EXHAUST SYSTEM
The best protection against carbon monoxide entry into
the vehicle body is a properly maintained engine exhaust
system.
If you notice a change in the sound of the exhaust system;
or if the exhaust fumes can be detected inside the vehicle;
or when the underside or rear of the vehicle is damaged;
have an authorized technician inspect the complete
exhaust system and adjacent body areas for broken,
damaged, deteriorated, or mispositioned parts. Open
seams or loose connections could permit exhaust fumes
to seep into the passenger compartment. In addition, have
the exhaust system inspected each time the vehicle is
raised for lubrication or oil change. Replace as required. Under normal operating conditions, the catalytic converter
will not require maintenance. However, it is important to
keep the engine properly tuned to ensure proper catalyst
operation and prevent possible catalyst damage.
NOTE:Intentional tampering with emissions control systems can
result in civil penalties being assessed against you.
In unusual situations involving grossly malfunctioning
engine operation, a scorching odor may suggest severe
and abnormal catalyst overheating. If this occurs, stop the
vehicle, turn off the engine and allow it to cool. Service,
including a tune-up to manufacturer's specifications,
should be obtained immediately.
1 — Wiper
2 — Locking Tab
3 — Wiper Arm J Hook
WARNING!
Exhaust gases can injure or kill. They contain Carbon
Monoxide (CO), which is colorless and odorless.
Breathing it can make you unconscious and can
eventually poison you
Úpage 201.
A hot exhaust system can start a fire if you park over
materials that can burn. Such materials might be
grass or leaves coming into contact with your
exhaust system. Do not park or operate your vehicle
in areas where your exhaust system can contact
anything that can burn.
CAUTION!
The catalytic converter requires the use of unleaded
fuel only. Leaded gasoline will destroy the effective -
ness of the catalyst as an emissions control device
and may seriously reduce engine performance and
cause serious damage to the engine.
Damage to the catalytic converter can result if your
vehicle is not kept in proper operating condition.
In the event of engine malfunction, particularly
involving engine misfire or other apparent loss of
performance, have your vehicle serviced promptly.
Continued operation of your vehicle with a severe
malfunction could cause the converter to overheat,
resulting in possible damage to the converter and
vehicle.
8
23_LD_OM_EN_USC_t.book Page 233
Page 239 of 292

SERVICING AND MAINTENANCE237
AUTOMATIC TRANSMISSION
Special Additives
The manufacturer strongly recommends against using any
special additives in the transmission. Automatic
Transmission Fluid (ATF) is an engineered product and its
performance may be impaired by supplemental additives.
Therefore, do not add any fluid additives to the
transmission. Avoid using transmission sealers as they
may adversely affect seals.
Fluid Level Check
The fluid level is preset at the factory and does not require
adjustment under normal operating conditions. Routine
fluid level checks are not required; therefore the
transmission has no dipstick. An authorized dealer can
check your transmission fluid level using special service
tools. If you notice fluid leakage or transmission
malfunction, visit an authorized dealer immediately to
have the transmission fluid level checked. Operating the
vehicle with an improper fluid level can cause severe
transmission damage.
Fluid And Filter Changes — 8-Speed
Transmission
Under normal operating conditions, the fluid installed at
the factory will provide satisfactory lubrication for the life
of the vehicle. Routine fluid and filter changes are not required. However,
change the fluid and filter if the fluid becomes
contaminated (with water, etc.), or if the transmission is
disassembled for any reason.
Selection Of Lubricant
It is important to use the proper transmission fluid to
ensure optimum transmission performance and life.
Use only the manufacturer's specified transmission fluid
Úpage 271. It is important to maintain the transmission
fluid at the correct level using the recommended fluid.
NOTE:No chemical flushes should be used in any transmission;
only the approved lubricant should be used.
REAR AXLE
For normal service, periodic fluid level checks are not
required. When the vehicle is serviced for other reasons
the exterior surfaces of the axle assembly should be
inspected. If gear oil leakage is suspected inspect the fluid
level
Úpage 271.
To avoid contamination from foreign matter or mois -
ture, use only new brake fluid or fluid that has been
in a tightly closed container. Keep the master
cylinder reservoir cap secured at all times. Brake
fluid in an open container absorbs moisture from the
air resulting in a lower boiling point. This may cause
it to boil unexpectedly during hard or prolonged
braking, resulting in sudden brake failure. This could
result in a collision.
Overfilling the brake fluid reservoir can result in
spilling brake fluid on hot engine parts, causing the
brake fluid to catch fire. Brake fluid can also damage
painted and vinyl surfaces, care should be taken to
avoid its contact with these surfaces.
Do not allow petroleum based fluid to contaminate
the brake fluid. Brake seal components could be
damaged, causing partial or complete brake failure.
This could result in a collision.
WARNING!CAUTION!
Do not use chemical flushes in your transmission as the
chemicals can damage your transmission components.
Such damage is not covered by the New Vehicle Limited
Warranty.
CAUTION!
If a transmission fluid leak occurs, visit an authorized
dealer immediately. Severe transmission damage may
occur. An authorized dealer has the proper tools to
adjust the fluid level accurately.
CAUTION!
Using a transmission fluid other than the
manufacturer’s recommended fluid may cause
deterioration in transmission shift quality and/or torque
converter shudder
Úpage 271.
8
23_LD_OM_EN_USC_t.book Page 237
Page 269 of 292

267
TECHNICAL SPECIFICATIONS
VEHICLE IDENTIFICATION NUMBER (VIN)
The VIN is on the left front corner of the instrument panel.
The VIN is visible from outside of the vehicle through the
windshield.
Windshield VIN Location
NOTE:
It is illegal to remove or alter the VIN.
BRAKE SYSTEM
Your vehicle is equipped with dual hydraulic brake
systems. If either of the two hydraulic systems lose normal
capability, the remaining system will still function. There
will be some loss of overall braking effectiveness. This
may be evident by increased pedal travel during
application, greater pedal force required to slow or stop,
and potential activation of the Brake Warning Light.
In the event power assist is lost for any reason (for
example, repeated brake applications with the engine off),
the brakes will still function. The effort required to brake
the vehicle will be much greater than that required with
the power system operating.
WHEEL AND TIRE TORQUE SPECIFICATIONS
Proper lug nut/bolt torque is very important to ensure that
the wheel is properly mounted to the vehicle. Any time a
wheel has been removed and reinstalled on the vehicle,
the lug nuts/bolts should be torqued using a properly
calibrated torque wrench using a six-sided (hex)
deep wall socket.
TORQUE SPECIFICATIONS
**Use only authorized dealer recommended lug
nuts/bolts and clean or remove any dirt or oil before
tightening.
Inspect the wheel mounting surface prior to mounting the
tire and remove any corrosion or loose particles.
Wheel Mounting Surface
Lug Nut/Bolt Torque **Lug Nut/Bolt
Size Lug Nut/Bolt
Socket Size
130 ft-lb
(176 N·m) M14 x 1.50 22 mm
9
23_LD_OM_EN_USC_t.book Page 267