2023 DODGE CHARGER automatic transmission
[x] Cancel search: automatic transmissionPage 83 of 292
STARTING AND OPERATING81
IGNITION PARK INTERLOCK
This vehicle is equipped with an Ignition Park Interlock
which requires the transmission to be in PARK before the
ignition can be turned to the OFF position. This helps the
driver avoid inadvertently leaving the vehicle without
placing the transmission in PARK. This system also locks
the transmission in PARK whenever the ignition is in the
OFF position.
NOTE:The transmission is NOT locked in PARK when the ignition
is in the ACC position (even though the engine will be off).
Ensure that the transmission is in PARK, and the ignition
is OFF (not in ACC position) before exiting the vehicle.
BRAKE TRANSMISSION SHIFT
I
NTERLOCK (BTSI) SYSTEM
This vehicle is equipped with a BTSI that holds the
transmission gear selector in PARK unless the brakes are
applied. To shift the transmission out of PARK, the engine
must be running and the brake pedal must be pressed. The brake pedal must also be pressed to shift from
NEUTRAL into DRIVE or REVERSE when the vehicle is
stopped or moving at low speeds.
8-SPEED AUTOMATIC TRANSMISSION
The transmission gear range is displayed both on the gear
selector and in the instrument cluster. To select a gear
range, push the lock button on the gear selector and move
the selector rearward or forward. To shift the transmission
out of PARK, the engine must be running and the brake
pedal must be pressed. You must also press the brake
pedal to shift from NEUTRAL into DRIVE or REVERSE when
the vehicle is stopped or moving at low speeds. Select the
DRIVE range for normal driving.
NOTE:
The transmission electronics are self-calibrating; there -
fore, the first few shifts on a new vehicle may be some -
what abrupt. This is a normal condition, and precision
shifts will develop within a few hundred miles (kilome -
ters).
In the event of a mismatch between the gear selector
position and the actual transmission gear (for example,
driver selects PARK while driving), the position indi -
cator will blink continuously until the selector is
returned to the proper position, or the requested shift
can be completed.
The electronically-controlled transmission adapts its shift
schedule based on driver inputs, along with environmental
and road conditions.
Only shift from DRIVE to PARK or REVERSE when the
accelerator pedal is released and the vehicle is stopped.
Be sure to keep your foot on the brake pedal when shifting
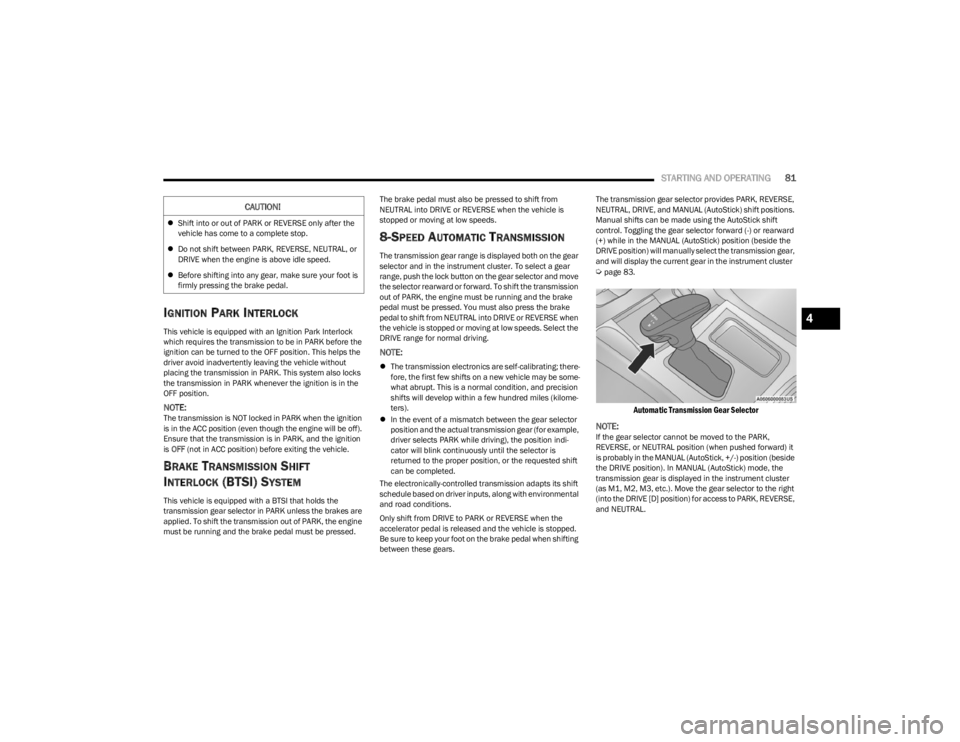
between these gears. The transmission gear selector provides PARK, REVERSE,
NEUTRAL, DRIVE, and MANUAL (AutoStick) shift positions.
Manual shifts can be made using the AutoStick shift
control. Toggling the gear selector forward (-) or rearward
(+) while in the MANUAL (AutoStick) position (beside the
DRIVE position) will manually select the transmission gear,
and will display the current gear in the instrument cluster
Úpage 83.
Automatic Transmission Gear Selector
NOTE:
If the gear selector cannot be moved to the PARK,
REVERSE, or NEUTRAL position (when pushed forward) it
is probably in the MANUAL (AutoStick, +/-) position (beside
the DRIVE position). In MANUAL (AutoStick) mode, the
transmission gear is displayed in the instrument cluster
(as M1, M2, M3, etc.). Move the gear selector to the right
(into the DRIVE [D] position) for access to PARK, REVERSE,
and NEUTRAL.
CAUTION!
Shift into or out of PARK or REVERSE only after the
vehicle has come to a complete stop.
Do not shift between PARK, REVERSE, NEUTRAL, or
DRIVE when the engine is above idle speed.
Before shifting into any gear, make sure your foot is
firmly pressing the brake pedal.
4
23_LD_OM_EN_USC_t.book Page 81
Page 84 of 292
82STARTING AND OPERATING
(Continued)
Gear Ranges
Do not press the accelerator pedal when shifting out of
PARK (P) or NEUTRAL (N).
NOTE:After selecting any gear range, wait a moment to allow the
selected gear to engage before accelerating. This is espe -
cially important when the engine is cold.
PARK (P)
This range supplements the parking brake by locking the
transmission. The engine can be started in this range.
Never attempt to use PARK while the vehicle is in motion.
Apply the parking brake when exiting the vehicle in this
range.
When parking on a hill, apply the parking brake before
shifting the transmission to PARK. As an added
precaution, turn the front wheels toward the curb on a
downhill grade and away from the curb on an uphill grade.
When exiting the vehicle, always:
Apply the parking brake.
Shift the transmission into PARK.
Turn the ignition OFF.
Remove the key fob from the vehicle. The following indicators should be used to ensure that you
have properly engaged the transmission into the PARK
position:
When shifting into PARK, push the lock button on the
gear selector and firmly move the selector all the way
forward until it stops and is fully seated.
Look at the transmission gear position display and
verify that it indicates the PARK (P) position, and is not
blinking.
With the brake pedal released, verify that the gear
selector will not move out of PARK.
REVERSE (R)
This range is for moving the vehicle backward. Shift into
REVERSE only after the vehicle has come to a complete
stop.
NEUTRAL (N)
Use this range when the vehicle is standing for prolonged
periods with the engine running. Apply the parking brake
and shift the transmission into PARK if you must exit the
vehicle.
DRIVE (D)
This range should be used for most city and highway
driving. It provides the smoothest upshifts and downshifts,
and the best fuel economy. The transmission
automatically upshifts through all forward gears. The
DRIVE position provides optimum driving characteristics
under all normal operating conditions.
When frequent transmission shifting occurs (such as
when operating the vehicle under heavy loading
conditions, in hilly terrain, traveling into strong head
winds, or while towing a heavy trailer), use the AutoStick
shift control (if equipped) to select a lower gear
Úpage 83. Under these conditions, using a lower gear will
improve performance and extend transmission life by
reducing excessive shifting and heat buildup.
CAUTION!
Before moving the transmission gear selector out of
PARK, you must start the engine, and also press the
brake pedal. Otherwise, damage to the gear selector
could result.
DO NOT race the engine when shifting from PARK or
NEUTRAL into another gear range, as this can
damage the drivetrain.
CAUTION!WARNING!
Do not coast in NEUTRAL and never turn off the ignition
to coast down a hill. These are unsafe practices that
limit your response to changing traffic or road
conditions. You might lose control of the vehicle and
have a collision.
CAUTION!
Towing the vehicle, coasting, or driving for any other
reason with the transmission in NEUTRAL can cause
severe transmission damage.
For “Recreational Towing”
Úpage 109.
For “Towing A Disabled Vehicle”
Úpage 219.
23_LD_OM_EN_USC_t.book Page 82
Page 86 of 292
84STARTING AND OPERATING
NOTE:
Tapping one of the steering wheel-mounted shift
paddles (+/-), if equipped, while the gear selector is in
DRIVE, will activate a temporary AutoStick mode.
Tapping (-) to enter AutoStick mode will downshift the
transmission to the next lower gear, while tapping (+) to
enter AutoStick mode will retain the current gear. The
current gear will be displayed in the instrument cluster,
but the “M” will not be highlighted. The transmission
will revert back to normal operation (if the gear selector
remains in DRIVE) after a period of time, depending on
accelerator pedal activity.
In some models, the shift paddles may be disabled (or
re-enabled, as desired) using Drive Mode Set-Up,
accessed by selecting Performance Control.
In AutoStick mode, the transmission will shift up or down
when (+/-) is manually selected by the driver (using the
gear selector, or the shift paddles [if equipped]), unless an
engine lugging or overspeed condition would result. It will
remain in the selected gear until another upshift or
downshift is chosen, except as follows:
If normal AutoStick mode is engaged (gear selector in
MANUAL position), manual gear selection will be main -
tained until the gear selector is returned to DRIVE, or as
described in the following conditions. The transmission
will not upshift automatically at redline in this mode,
nor will downshifts be obtained if the accelerator pedal
is pressed to the floor.
The transmission will automatically downshift as the
vehicle slows (to prevent engine lugging) and will
display the current gear.
The transmission will automatically downshift to FIRST
gear when coming to a stop. After a stop, the driver
should manually upshift (+) the transmission as the
vehicle is accelerated.
You can start out, from a stop, in FIRST or SECOND
gear. Tapping (+) (at a stop) will allow starting in
SECOND gear. Starting out in SECOND gear can be
helpful in snowy or icy conditions.
If a requested downshift would cause the engine to
over-speed, that shift will not occur.
The system will ignore attempts to upshift at too low of
a vehicle speed and an indication will display.
Holding the (-) paddle pressed (if equipped), or holding
the gear selector in the (-) position, will downshift the
transmission to the lowest gear possible at the current
speed.
Transmission shifting will be more noticeable when
AutoStick is enabled.
The system may revert to automatic shift mode if a
fault or overheat condition is detected.
To disengage AutoStick mode, return the gear selector to
the DRIVE position, or press and hold the (+) shift paddle
(if equipped, and the gear selector is already in DRIVE)
until “D” is once again indicated in the instrument cluster.
You can shift in or out of the AutoStick mode at any time
without taking your foot off the accelerator pedal.SPORT MODE — WITHOUT PERFORMANCE
CONTROL
Your vehicle is equipped with a SPORT Mode feature. This
mode is a configuration set up for typical enthusiast
driving. The engine, transmission, and steering systems
are all set to their SPORT settings. SPORT Mode will
provide improved throttle response and modified shifting
for an enhanced driving experience, as well the greatest
amount of steering feel. This mode may be activated and
deactivated by pushing the Sport button on the instrument
panel switch bank.
For vehicles equipped with Drive Modes or a SUPER
TRACK PAK button, refer to Drive Modes Supplement for
further information.
FUEL SAVER TECHNOLOGY 5.7L ONLY— IF
EQUIPPED
This feature offers improved fuel economy by shutting off
four of the engine's eight cylinders during light load and
cruise conditions. The system is automatic with no driver
inputs or additional driving skills required.
NOTE:This system may take some time to return to full function -
ality after a battery disconnect.
WARNING!
Do not downshift for additional engine braking on a
slippery surface. The drive wheels could lose their grip
and the vehicle could skid, causing a collision or
personal injury.
23_LD_OM_EN_USC_t.book Page 84
Page 107 of 292

STARTING AND OPERATING105
TRAILER HITCH CLASSIFICATION
The following chart provides the industry standard for the maximum trailer weight a given trailer hitch class can tow and should be used to assist you in selecting the correct trailer hitch
for your intended towing condition.
TRAILER TOWING WEIGHTS (MAXIMUM TRAILER WEIGHT RATINGS)
Trailer towing with the 6.4L or 6.2L Supercharged engine is not recommended.
Trailer Hitch Classification Definitions
Class Max. Trailer Hitch Industry Standards
Class I - Light Duty 2,000 lb (907 kg)
Class II - Medium Duty 3,500 lb (1,587 kg)
Class III - Heavy Duty 6,000 lb (2,722 kg)
Class IV - Extra Heavy Duty 10,000 lb (4,535 kg)
Refer to the “Trailer Towing Weights (Maximum Trailer Weight Ratings)” chart for the Maximum Gross Trailer Weight (GTW) towable for your given drivetrain.
All trailer hitches should be professionally installed on your vehicle.
Engine/Transmission Frontal AreaMaximum GTWMaximum Trailer TW
3.6L Automatic 12 sq ft (1.11 sq m)1,000 lb (454 kg) 100 lb (45 kg)
5.7L Automatic 12 sq ft (1.11 sq m)1,000 lb (454 kg) 100 lb (45 kg)
Refer to local laws for maximum trailer towing speeds.
4
23_LD_OM_EN_USC_t.book Page 105
Page 110 of 292
108STARTING AND OPERATING
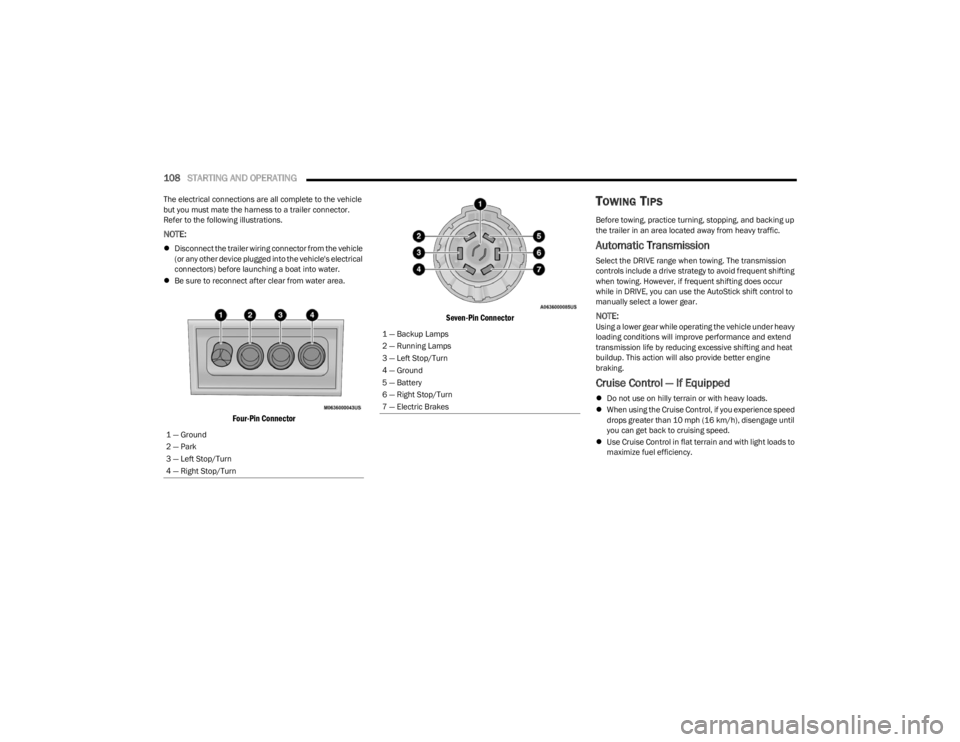
The electrical connections are all complete to the vehicle
but you must mate the harness to a trailer connector.
Refer to the following illustrations.
NOTE:
Disconnect the trailer wiring connector from the vehicle
(or any other device plugged into the vehicle's electrical
connectors) before launching a boat into water.
Be sure to reconnect after clear from water area.
Four-Pin Connector Seven-Pin Connector
TOWING TIPS
Before towing, practice turning, stopping, and backing up
the trailer in an area located away from heavy traffic.
Automatic Transmission
Select the DRIVE range when towing. The transmission
controls include a drive strategy to avoid frequent shifting
when towing. However, if frequent shifting does occur
while in DRIVE, you can use the AutoStick shift control to
manually select a lower gear.
NOTE:Using a lower gear while operating the vehicle under heavy
loading conditions will improve performance and extend
transmission life by reducing excessive shifting and heat
buildup. This action will also provide better engine
braking.
Cruise Control — If Equipped
Do not use on hilly terrain or with heavy loads.
When using the Cruise Control, if you experience speed
drops greater than 10 mph (16 km/h), disengage until
you can get back to cruising speed.
Use Cruise Control in flat terrain and with light loads to
maximize fuel efficiency.
1 — Ground
2 — Park
3 — Left Stop/Turn
4 — Right Stop/Turn
1 — Backup Lamps
2 — Running Lamps
3 — Left Stop/Turn
4 — Ground
5 — Battery
6 — Right Stop/Turn
7 — Electric Brakes
23_LD_OM_EN_USC_t.book Page 108
Page 156 of 292

154MULTIMEDIA
3. After selecting a widget location, select the gauge to
display:
Gauge: Oil Temp
Gauge: Oil Pressure
Gauge: Coolant Temp
Gauge: Battery Voltage
Gauge: Trans Temp — If Equipped with an
Automatic Transmission
Gauge: Boost Pressure — If Equipped
Gauge: Air/Fuel Ratio — If Equipped
Gauge: I/C Coolant Temp — If Equipped
Gauge: Intake Air Temp
Gauge: Engine Torque
Gauge: Engine Power
Gauge: G-Force
Gauge: Steering Angle
Gauge: Current Gear
Gauge: Current Speed
Timer: 0–60 mph (0–100 km/h)
Timer: 0–100 mph (0–160 km/h)
Timer: 60 ft (20 m)
Timer: 330 ft (100 m)
Timer: 1/8 Mile (200 m)
Timer: 1000 ft (300 m)
Timer: 1/4 Mile (400 m)
Timer: Braking Distance
Timer: Reaction Time
Historical Data
The Historical Data feature allows you to view information
about your vehicle such as the VIN, miles on the odometer,
longitude and latitude coordinates, and more.
To activate the Historical Data feature on your
touchscreen, follow these steps:
1. Select the Home page tab within Performance Pages. Then, press the settings icon (gear icon) in
the upper right hand corner of the touchscreen.
Home Page Settings
2. Towards the bottom of the screen, a checkbox will appear next to “Include historical data in
screenshot.” Click the box to signify that this feature
will be on.
Historical Data
NOTE:
Once the checkbox is selected, the bottom bar of the
screen will be replaced with the historical data from your
vehicle present at the time the screenshot icon was
pressed.
23_LD_OM_EN_USC_t.book Page 154
Page 159 of 292
MULTIMEDIA157
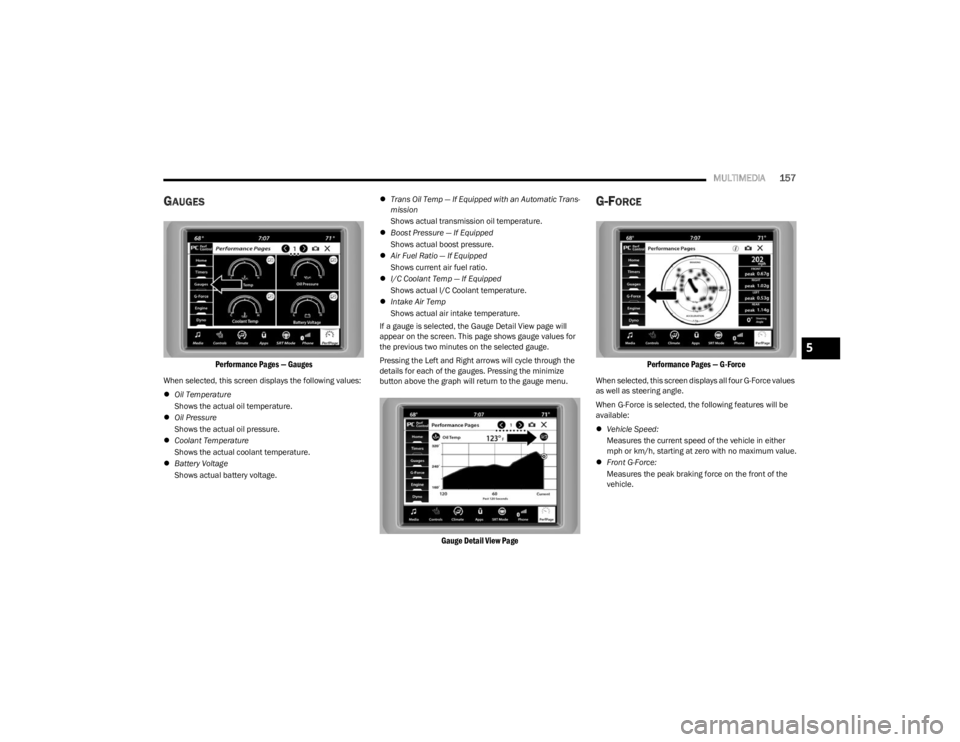
GAUGES
Performance Pages — Gauges
When selected, this screen displays the following values:
Oil Temperature
Shows the actual oil temperature.
Oil Pressure
Shows the actual oil pressure.
Coolant Temperature
Shows the actual coolant temperature.
Battery Voltage
Shows actual battery voltage.
Trans Oil Temp — If Equipped with an Automatic Trans -
mission
Shows actual transmission oil temperature.
Boost Pressure — If Equipped
Shows actual boost pressure.
Air Fuel Ratio — If Equipped
Shows current air fuel ratio.
I/C Coolant Temp — If Equipped
Shows actual I/C Coolant temperature.
Intake Air Temp
Shows actual air intake temperature.
If a gauge is selected, the Gauge Detail View page will
appear on the screen. This page shows gauge values for
the previous two minutes on the selected gauge.
Pressing the Left and Right arrows will cycle through the
details for each of the gauges. Pressing the minimize
button above the graph will return to the gauge menu.
Gauge Detail View Page
G-FORCE
Performance Pages — G-Force
When selected, this screen displays all four G-Force values
as well as steering angle.
When G-Force is selected, the following features will be
available:
Vehicle Speed:
Measures the current speed of the vehicle in either
mph or km/h, starting at zero with no maximum value.
Front G-Force:
Measures the peak braking force on the front of the
vehicle.
5
23_LD_OM_EN_USC_t.book Page 157
Page 160 of 292

158MULTIMEDIA
Right G-Force:
Measures the peak force on the right side of the
vehicle.
Left G-Force:
Measures the peak force on the left side of the vehicle.
Rear G-Force:
Measures the peak acceleration force on the rear of
the vehicle.
NOTE:Front, Right, Left, and Rear G-Forces are all peak values.
These readings can be reset by clearing peak G-Force on
the instrument cluster.
Steering Wheel Angle
Steering Wheel Angle utilizes the steering angle sensor
to measure the degree of the steering wheel relative to
zero (straight ahead) reference angle. The zero degree
reference angle measurement indicates a steering
wheel straight ahead position.
The friction circle display shows instantaneous G-Force as
a highlight and previous G-Force as dots within the circle.
The system records previous G-Force for three minutes. If
there are multiple samples at a given point, the color of
the dot will darken from blue to red. Vectors more frequent
will show in red; infrequent vectors will show in blue.
ENGINE
Performance Pages — Engine
When selected, this screen displays the following values:
Vehicle Speed
Shows the actual vehicle speed.
Engine Power
Shows the instantaneous power.
Engine Torque
Shows the instantaneous torque.
Oil Pressure (6.4L Only) — If Equipped
Shows the actual engine oil pressure.
Boost Pressure (6.2L Only) — If Equipped
Shows the actual boost pressure.
Gear (Automatic Transmission Only)
Shows the current (or pending) operating gear of the
vehicle.
DYNAMOMETER (DYNO)
Performance Pages — Dyno
The system will start drawing graphs for Power and Torque
(top chart) and Engine Speed (bottom chart). The graph
will fill to the right side of the page (based on History time
selected). Once the right side of the page is reached, the
graph will scroll with the right side always being the most
recent recorded sample.
23_LD_OM_EN_USC_t.book Page 158