2023 DODGE CHARGER remove seats
[x] Cancel search: remove seatsPage 35 of 292

GETTING TO KNOW YOUR VEHICLE33
NOTE:The engine must be running for the ventilated seats to
operate.
For information on use with the Remote Start system, see
Úpage 18.
HEAD RESTRAINTS
Head restraints are designed to reduce the risk of injury by
restricting head movement in the event of a rear impact.
Head restraints should be adjusted so that the top of the
head restraint is located above the top of your ear.
NOTE:Do not reverse the head restraints (making the rear of the
head restraint face forward) in an attempt to gain addi -
tional clearance to the back of your head.
Reactive Head Restraints — Front Seats
The front driver and passenger seats are equipped with
Reactive Head Restraints (RHR). In the event of a rear
impact, the RHR will automatically extend forward
minimizing the gap between the back of the occupant’s
head and the RHR.
The RHR will automatically return to their normal position
following a rear impact. If the RHR do not return to their
normal position, see an authorized dealer immediately.
To raise the head restraint, pull upward on the head
restraint. To lower the head restraint, push the adjustment
button located at the base of the head restraint and push
downward on the head restraint.
Adjustment Button
Rear Head Restraints
The center head restraint has two adjustable positions: up
or down. When the center seat is being occupied, the head
restraint should be in the raised position. When there are
no occupants in the center seat, the head restraint can be
lowered for maximum visibility for the driver.
WARNING!
All occupants, including the driver, should not
operate a vehicle or sit in a vehicle’s seat until the
head restraints are placed in their proper positions in
order to minimize the risk of neck injury in the event
of a crash.
Head restraints should never be adjusted while the
vehicle is in motion. Driving a vehicle with the head
restraints improperly adjusted or removed could
cause serious injury or death in the event of a
collision.
1 — Release Button
2 — Adjustment Button
WARNING!
A loose head restraint thrown forward in a collision or
hard stop could cause serious injury or death to occu -
pants of the vehicle. Always securely stow removed
head restraints in a location outside the occupant
compartment.
ALL the head restraints MUST be reinstalled in the
vehicle to properly protect the occupants. Follow the
reinstallation instructions prior to operating the
vehicle or occupying a seat.
Do not place items over the top of the Reactive Head
Restraint, such as coats, seat covers or portable DVD
players. These items may interfere with the operation
of the Reactive Head Restraint in the event of a colli -
sion and could result in serious injury or death.
2
23_LD_OM_EN_USC_t.book Page 33
Page 183 of 292
SAFETY181
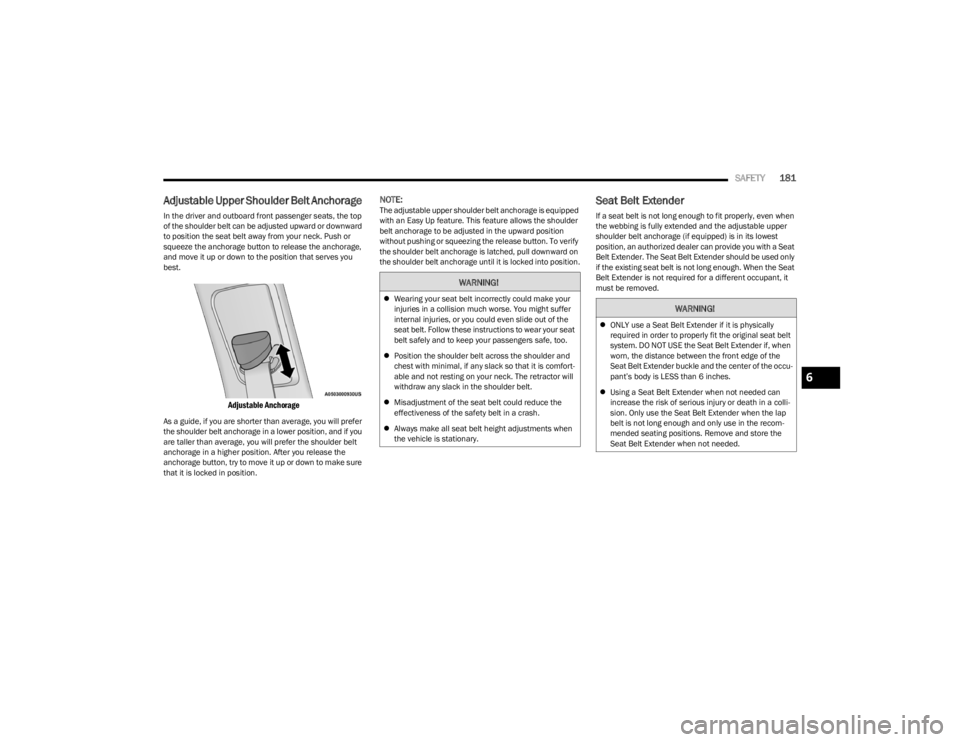
Adjustable Upper Shoulder Belt Anchorage
In the driver and outboard front passenger seats, the top
of the shoulder belt can be adjusted upward or downward
to position the seat belt away from your neck. Push or
squeeze the anchorage button to release the anchorage,
and move it up or down to the position that serves you
best.
Adjustable Anchorage
As a guide, if you are shorter than average, you will prefer
the shoulder belt anchorage in a lower position, and if you
are taller than average, you will prefer the shoulder belt
anchorage in a higher position. After you release the
anchorage button, try to move it up or down to make sure
that it is locked in position.
NOTE:The adjustable upper shoulder belt anchorage is equipped
with an Easy Up feature. This feature allows the shoulder
belt anchorage to be adjusted in the upward position
without pushing or squeezing the release button. To verify
the shoulder belt anchorage is latched, pull downward on
the shoulder belt anchorage until it is locked into position.Seat Belt Extender
If a seat belt is not long enough to fit properly, even when
the webbing is fully extended and the adjustable upper
shoulder belt anchorage (if equipped) is in its lowest
position, an authorized dealer can provide you with a Seat
Belt Extender. The Seat Belt Extender should be used only
if the existing seat belt is not long enough. When the Seat
Belt Extender is not required for a different occupant, it
must be removed.
WARNING!
Wearing your seat belt incorrectly could make your
injuries in a collision much worse. You might suffer
internal injuries, or you could even slide out of the
seat belt. Follow these instructions to wear your seat
belt safely and to keep your passengers safe, too.
Position the shoulder belt across the shoulder and
chest with minimal, if any slack so that it is comfort -
able and not resting on your neck. The retractor will
withdraw any slack in the shoulder belt.
Misadjustment of the seat belt could reduce the
effectiveness of the safety belt in a crash.
Always make all seat belt height adjustments when
the vehicle is stationary.WARNING!
ONLY use a Seat Belt Extender if it is physically
required in order to properly fit the original seat belt
system. DO NOT USE the Seat Belt Extender if, when
worn, the distance between the front edge of the
Seat Belt Extender buckle and the center of the occu -
pant’s body is LESS than 6 inches.
Using a Seat Belt Extender when not needed can
increase the risk of serious injury or death in a colli-
sion. Only use the Seat Belt Extender when the lap
belt is not long enough and only use in the recom -
mended seating positions. Remove and store the
Seat Belt Extender when not needed.
6
23_LD_OM_EN_USC_t.book Page 181
Page 194 of 292
192SAFETY
All children whose weight or height is above the
forward-facing limit for the child seat should use a
belt-positioning booster seat until the vehicle’s seat belts
fit properly. If the child cannot sit with knees bent over the
vehicle’s seat cushion while the child’s back is against the
seatback, they should use a belt-positioning booster seat.
The child and belt-positioning booster seat are held in the
vehicle by the seat belt.Children Too Large For Booster Seats
Children who are large enough to wear the shoulder belt
comfortably, and whose legs are long enough to bend over
the front of the seat when their back is against the
seatback, should use the seat belt in a rear seat. Use this
simple 5-step test to decide whether the child can use the
vehicle’s seat belt alone:
1. Can the child sit all the way back against the back of
the vehicle seat?
2. Do the child’s knees bend comfortably over the front of the vehicle seat while the child is still sitting all the
way back?
3. Does the shoulder belt cross the child’s shoulder between the neck and arm?
4. Is the lap part of the belt as low as possible, touching the child’s thighs and not the stomach?
5. Can the child stay seated like this for the whole trip? If the answer to any of these questions was “no,” then the
child still needs to use a booster seat in this vehicle. If the
child is using the lap/shoulder belt, check seat belt fit
periodically and make sure the seat belt buckle is latched.
A child’s squirming or slouching can move the belt out of
position. If the shoulder belt contacts the face or neck,
move the child closer to the center of the vehicle, or use a
booster seat to position the seat belt on the child correctly.
WARNING!
Improper installation can lead to failure of an infant
or child restraint. It could come loose in a collision.
The child could be badly injured or killed. Follow the
child restraint manufacturer’s directions exactly
when installing an infant or child restraint.
After a child restraint is installed in the vehicle, do
not move the vehicle seat forward or rearward
because it can loosen the child restraint attach-
ments. Remove the child restraint before adjusting
the vehicle seat position. When the vehicle seat has
been adjusted, reinstall the child restraint.
When your child restraint is not in use, secure it in the
vehicle with the seat belt or LATCH anchorages, or
remove it from the vehicle. Do not leave it loose in
the vehicle. In a sudden stop or accident, it could
strike the occupants or seatbacks and cause serious
personal injury.
WARNING!
Never allow a child to put the shoulder belt under an
arm or behind their back. In a crash, the shoulder belt
will not protect a child properly, which may result in
serious injury or death. A child must always wear both
the lap and shoulder portions of the seat belt correctly.
23_LD_OM_EN_USC_t.book Page 192
Page 196 of 292
194SAFETY
Frequently Asked Questions About Installing Child Restraints With LATCH
What is the weight limit (child’s weight + weight of the child
restraint) for using the LATCH anchorage system to attach
the child restraint? 65 lb (29.5 kg)Use the LATCH anchorage system until the combined
weight of the child and the child restraint is 65 lb (29.5
kg). Use the seat belt and tether anchor instead of the
LATCH system once the combined weight is more than
65 lb (29.5 kg).
Can the LATCH anchorages and the seat belt be used
together to attach a rear-facing or forward-facing child
restraint? NoDo not use the seat belt when you use the LATCH
anchorage system to attach a rear-facing or forward-facing
child restraint.
Booster seats may be attached to the LATCH anchorages if
allowed by the booster seat manufacturer. See your
booster seat owner’s manual for more information.
Can two child restraints be attached using a common
lower LATCH anchorage? NoNever “share” a LATCH anchorage with two or more child
restraints. If the center position does not have dedicated
LATCH lower anchorages, use the seat belt to install a child
seat in the center position next to a child seat using the
LATCH anchorages in an outboard position.
Can the rear-facing child restraint touch the back of the
front passenger seat? YesThe child seat may touch the back of the front passenger
seat if the child restraint manufacturer also allows
contact. See your child restraint owner’s manual for more
information.
Can the rear head restraints be removed? No
23_LD_OM_EN_USC_t.book Page 194
Page 198 of 292
196SAFETY
3. Attach the lower hooks or connectors of the child
restraint to the lower anchorages in the selected
seating position.
4. If the child restraint has a tether strap, connect it to the top tether anchorage. See
Úpage 198 for
directions to attach a tether anchor.
5. Tighten all of the straps as you push the child restraint rearward and downward into the seat.
Remove slack in the straps according to the child
restraint manufacturer’s instructions.
6. Test that the child restraint is installed tightly by pulling back and forth on the child seat at the belt
path. It should not move more than 1 inch (25.4 mm) in any direction.
How To Stow An Unused Switchable-ALR
Seat Belt:
When using the LATCH attaching system to install a child
restraint, stow all ALR seat belts that are not being used
by other occupants or being used to secure child
restraints. An unused belt could injure a child if they play
with it and accidentally lock the seat belt retractor. Before
installing a child restraint using the LATCH system, buckle
the seat belt behind the child restraint and out of the
child’s reach. If the buckled seat belt interferes with the
child restraint installation, instead of buckling it behind
the child restraint, route the seat belt through the child
restraint belt path and then buckle it. Do not lock the seat
belt. Remind all children in the vehicle that the seat belts
are not toys and that they should not play with them.
Installing Child Restraints Using The
Vehicle Seat Belt
Child restraint systems are designed to be secured in
vehicle seats by lap belts or the lap belt portion of a lap/
shoulder belt.
The seat belts in the passenger seating positions are
equipped with a Switchable Automatic Locking Retractor
(ALR) that is designed to keep the lap portion of the seat
belt tight around the child restraint so that it is not
necessary to use a locking clip. The ALR retractor can be “switched” into a locked mode by
pulling all of the webbing out of the retractor and then
letting the webbing retract back into the retractor. If it is
locked, the ALR will make a clicking noise while the
webbing is pulled back into the retractor.
Refer to the “Automatic Locking Mode” description in
“Switchable Automatic Locking Retractors (ALR)”
Úpage 182 for additional information on ALR.
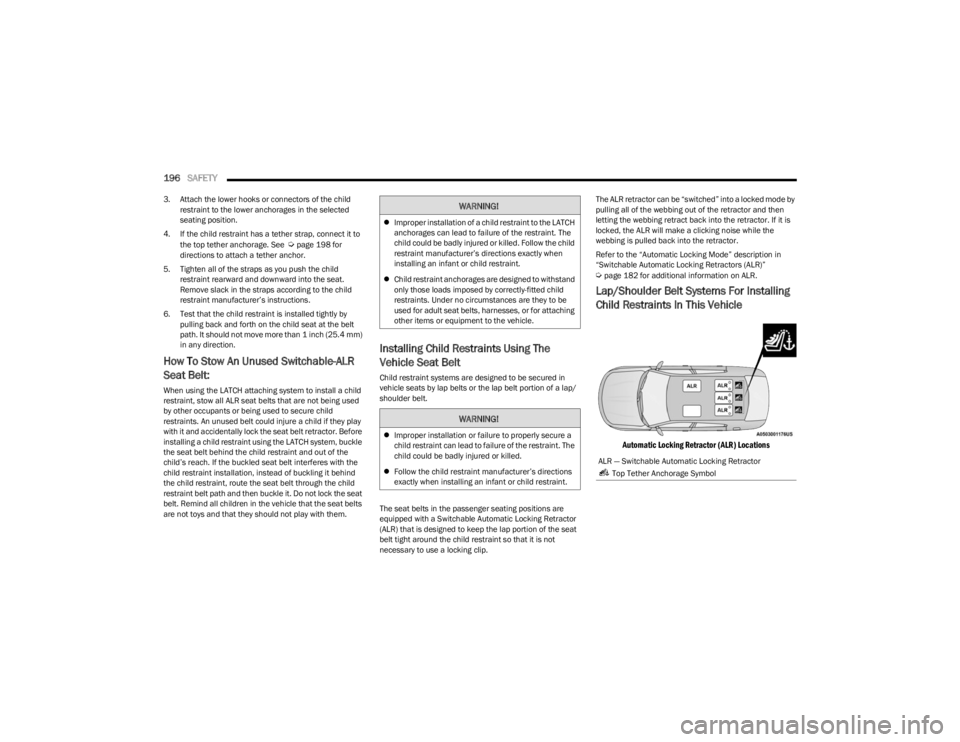
Lap/Shoulder Belt Systems For Installing
Child Restraints In This Vehicle
Automatic Locking Retractor (ALR) Locations
WARNING!
Improper installation of a child restraint to the LATCH
anchorages can lead to failure of the restraint. The
child could be badly injured or killed. Follow the child
restraint manufacturer’s directions exactly when
installing an infant or child restraint.
Child restraint anchorages are designed to withstand
only those loads imposed by correctly-fitted child
restraints. Under no circumstances are they to be
used for adult seat belts, harnesses, or for attaching
other items or equipment to the vehicle.
WARNING!
Improper installation or failure to properly secure a
child restraint can lead to failure of the restraint. The
child could be badly injured or killed.
Follow the child restraint manufacturer’s directions
exactly when installing an infant or child restraint.
ALR — Switchable Automatic Locking Retractor
Top Tether Anchorage Symbol
23_LD_OM_EN_USC_t.book Page 196
Page 199 of 292
SAFETY197
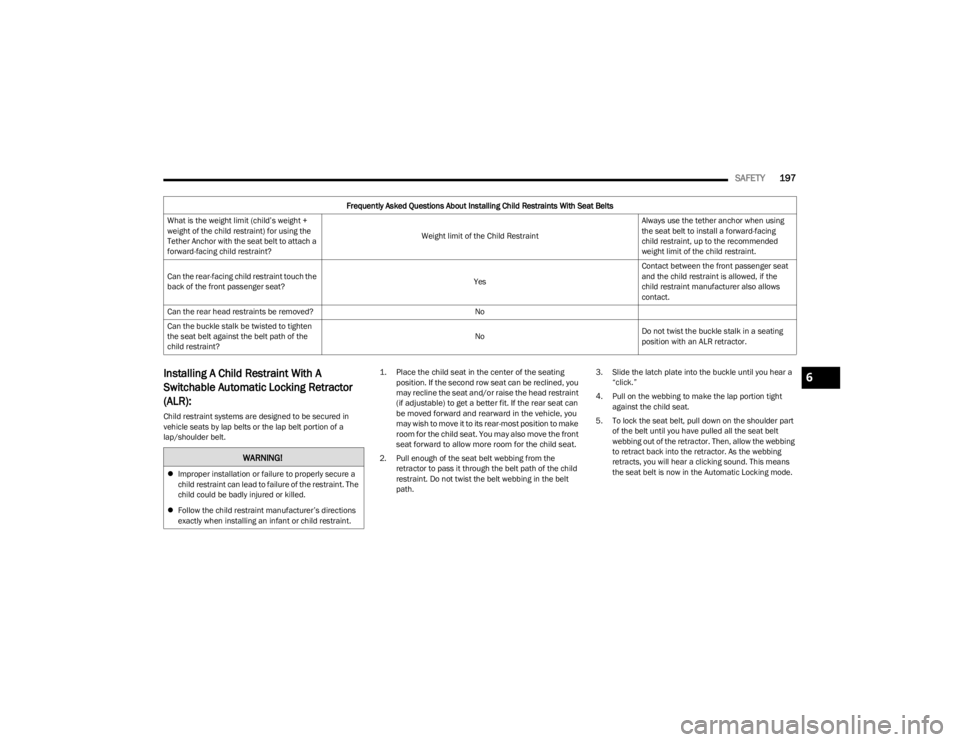
Installing A Child Restraint With A
Switchable Automatic Locking Retractor
(ALR):
Child restraint systems are designed to be secured in
vehicle seats by lap belts or the lap belt portion of a
lap/shoulder belt.
1. Place the child seat in the center of the seating
position. If the second row seat can be reclined, you
may recline the seat and/or raise the head restraint
(if adjustable) to get a better fit. If the rear seat can
be moved forward and rearward in the vehicle, you
may wish to move it to its rear-most position to make
room for the child seat. You may also move the front
seat forward to allow more room for the child seat.
2. Pull enough of the seat belt webbing from the retractor to pass it through the belt path of the child
restraint. Do not twist the belt webbing in the belt
path. 3. Slide the latch plate into the buckle until you hear a
“click.”
4. Pull on the webbing to make the lap portion tight against the child seat.
5. To lock the seat belt, pull down on the shoulder part of the belt until you have pulled all the seat belt
webbing out of the retractor. Then, allow the webbing
to retract back into the retractor. As the webbing
retracts, you will hear a clicking sound. This means
the seat belt is now in the Automatic Locking mode.
Frequently Asked Questions About Installing Child Restraints With Seat Belts
What is the weight limit (child’s weight +
weight of the child restraint) for using the
Tether Anchor with the seat belt to attach a
forward-facing child restraint? Weight limit of the Child RestraintAlways use the tether anchor when using
the seat belt to install a forward-facing
child restraint, up to the recommended
weight limit of the child restraint.
Can the rear-facing child restraint touch the
back of the front passenger seat? YesContact between the front passenger seat
and the child restraint is allowed, if the
child restraint manufacturer also allows
contact.
Can the rear head restraints be removed? No
Can the buckle stalk be twisted to tighten
the seat belt against the belt path of the
child restraint? No
Do not twist the buckle stalk in a seating
position with an ALR retractor.
WARNING!
Improper installation or failure to properly secure a
child restraint can lead to failure of the restraint. The
child could be badly injured or killed.
Follow the child restraint manufacturer’s directions
exactly when installing an infant or child restraint.
6
23_LD_OM_EN_USC_t.book Page 197
Page 201 of 292
SAFETY199
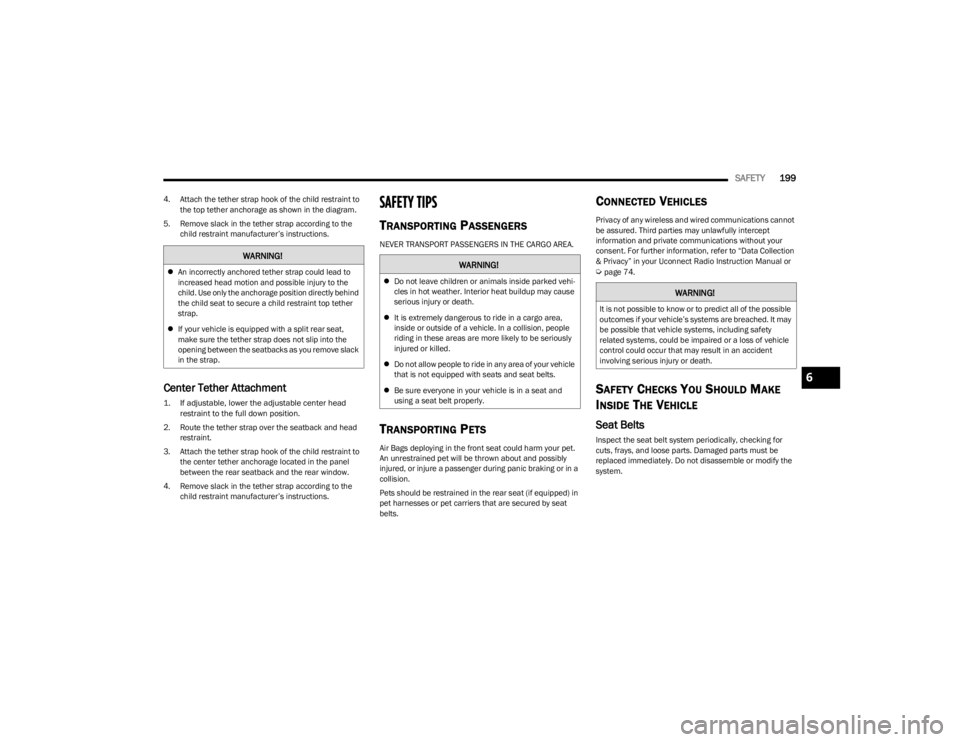
4. Attach the tether strap hook of the child restraint to
the top tether anchorage as shown in the diagram.
5. Remove slack in the tether strap according to the child restraint manufacturer’s instructions.
Center Tether Attachment
1. If adjustable, lower the adjustable center head restraint to the full down position.
2. Route the tether strap over the seatback and head restraint.
3. Attach the tether strap hook of the child restraint to the center tether anchorage located in the panel
between the rear seatback and the rear window.
4. Remove slack in the tether strap according to the child restraint manufacturer’s instructions.
SAFETY TIPS
TRANSPORTING PASSENGERS
NEVER TRANSPORT PASSENGERS IN THE CARGO AREA.
TRANSPORTING PETS
Air Bags deploying in the front seat could harm your pet.
An unrestrained pet will be thrown about and possibly
injured, or injure a passenger during panic braking or in a
collision.
Pets should be restrained in the rear seat (if equipped) in
pet harnesses or pet carriers that are secured by seat
belts.
CONNECTED VEHICLES
Privacy of any wireless and wired communications cannot
be assured. Third parties may unlawfully intercept
information and private communications without your
consent. For further information, refer to “Data Collection
& Privacy” in your Uconnect Radio Instruction Manual or
Úpage 74.
SAFETY CHECKS YOU SHOULD MAKE
I
NSIDE THE VEHICLE
Seat Belts
Inspect the seat belt system periodically, checking for
cuts, frays, and loose parts. Damaged parts must be
replaced immediately. Do not disassemble or modify the
system.
WARNING!
An incorrectly anchored tether strap could lead to
increased head motion and possible injury to the
child. Use only the anchorage position directly behind
the child seat to secure a child restraint top tether
strap.
If your vehicle is equipped with a split rear seat,
make sure the tether strap does not slip into the
opening between the seatbacks as you remove slack
in the strap.WARNING!
Do not leave children or animals inside parked vehi -
cles in hot weather. Interior heat buildup may cause
serious injury or death.
It is extremely dangerous to ride in a cargo area,
inside or outside of a vehicle. In a collision, people
riding in these areas are more likely to be seriously
injured or killed.
Do not allow people to ride in any area of your vehicle
that is not equipped with seats and seat belts.
Be sure everyone in your vehicle is in a seat and
using a seat belt properly.WARNING!
It is not possible to know or to predict all of the possible
outcomes if your vehicle’s systems are breached. It may
be possible that vehicle systems, including safety
related systems, could be impaired or a loss of vehicle
control could occur that may result in an accident
involving serious injury or death.
6
23_LD_OM_EN_USC_t.book Page 199
Page 267 of 292
SERVICING AND MAINTENANCE265
Outside parking, which exposes your vehicle to airborne
contaminants, road surfaces on which the vehicle is
operated, extreme hot or cold weather and other extreme
conditions will have an adverse effect on paint, metal trim,
and underbody protection.
The following maintenance recommendations will enable
you to obtain maximum benefit from the corrosion
resistance built into your vehicle.
What Causes Corrosion?
Corrosion is the result of deterioration or removal of paint
and protective coatings from your vehicle.
The most common causes are:
Road salt, dirt and moisture accumulation.
Stone and gravel impact.
Insects, tree sap and tar.
Salt in the air near seacoast localities.
Atmospheric fallout/industrial pollutants.
BODY AND UNDERBODY MAINTENANCE
Cleaning Headlights
Your vehicle is equipped with plastic headlights and fog
lights that are lighter and less susceptible to stone
breakage than glass headlights.
Plastic is not as scratch resistant as glass and therefore
different lens cleaning procedures must be followed.
To minimize the possibility of scratching the lenses and
reducing light output, avoid wiping with a dry cloth. To
remove road dirt, wash with a mild soap solution followed
by rinsing. Do not use abrasive cleaning components, solvents, steel
wool or other aggressive material to clean the lenses.
PRESERVING THE BODYWORK
Washing
Wash your vehicle regularly. Always wash your vehicle
in the shade using Mopar® Car Wash, or a mild car
wash soap, and rinse the panels completely with water.
If insects, tar, or other similar deposits have accumu -
lated on your vehicle, use Mopar® Super Kleen Bug
and Tar Remover to remove.
Use a high quality cleaner wax, such as Mopar®
Cleaner Wax to remove road film, stains and to protect
your paint finish. Use precautions to not scratch the
paint.
Avoid using abrasive compounds and power buffing
that may diminish the gloss or thin out the paint finish.
Special Care
If you drive on salted or dusty roads or if you drive near
the ocean, hose off the undercarriage at least once a
month.
It is important that the drain holes in the lower edges of
the doors, rocker panels, and trunk be kept clear and
open.
If you detect any stone chips or scratches in the paint,
touch them up immediately.
If your vehicle is damaged due to a collision or similar
cause that destroys the paint and protective coating,
have your vehicle repaired as soon as possible.
If you carry special cargo such as chemicals, fertilizers,
de-icer salt, etc., be sure that such materials are well
packaged and sealed.
If a lot of driving is done on gravel roads, consider mud
or stone shields behind each wheel.
Use Mopar® Touch Up Paint on scratches as soon as
possible. An authorized dealer has touch up paint to
match the color of your vehicle.
INTERIORS
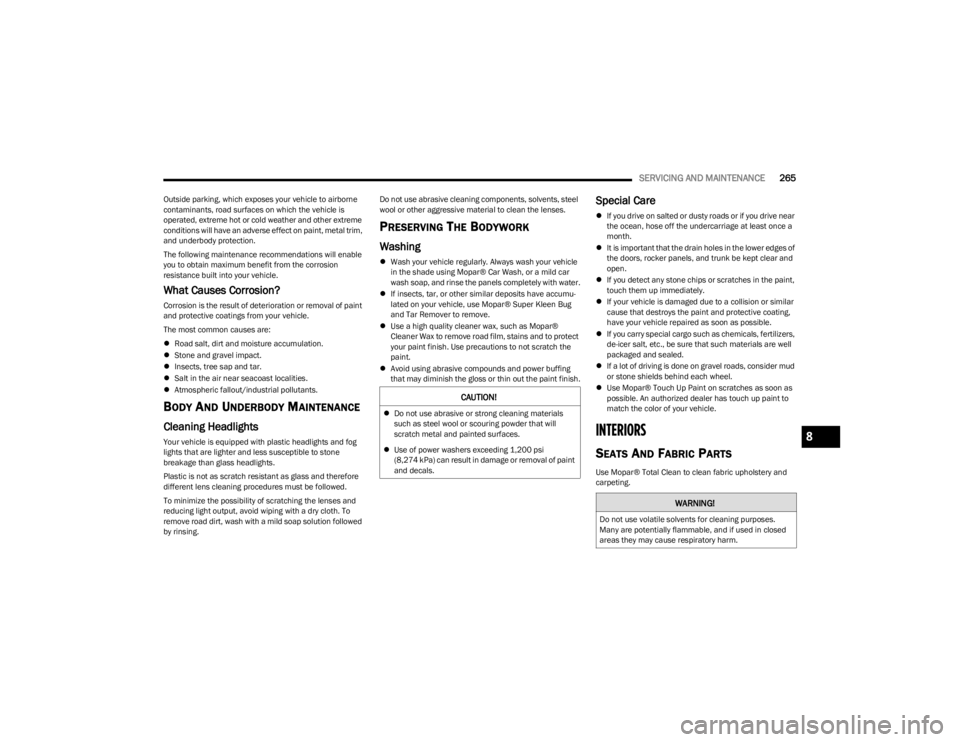
SEATS AND FABRIC PARTS
Use Mopar® Total Clean to clean fabric upholstery and
carpeting.
CAUTION!
Do not use abrasive or strong cleaning materials
such as steel wool or scouring powder that will
scratch metal and painted surfaces.
Use of power washers exceeding 1,200 psi
(8,274 kPa) can result in damage or removal of paint
and decals.
WARNING!
Do not use volatile solvents for cleaning purposes.
Many are potentially flammable, and if used in closed
areas they may cause respiratory harm.
8
23_LD_OM_EN_USC_t.book Page 265