2023 DODGE CHALLENGER tow
[x] Cancel search: towPage 238 of 300
236SERVICING AND MAINTENANCE
Particular attention should also be given to hood latching
components to ensure proper function. When performing
other underhood services, the hood latch, release
mechanism and safety catch should be cleaned and
lubricated.
The external lock cylinders should be lubricated twice a
year, preferably in the Autumn and Spring. Apply a small
amount of a high quality lubricant, such as Mopar® Lock
Cylinder Lubricant directly into the lock cylinder.
WINDSHIELD WIPER BLADES
Clean the rubber edges of the wiper blades and the
windshield periodically with a sponge or soft cloth and a
mild nonabrasive cleaner. This will remove accumulations
of salt or road film.
Operation of the wipers on dry glass for long periods may
cause deterioration of the wiper blades. Always use
washer fluid when using the wipers to remove salt or dirt
from a dry windshield.
Avoid using the wiper blades to remove frost or ice from
the windshield. Keep the blade rubber out of contact with
petroleum products such as engine oil, gasoline, etc.
NOTE:Life expectancy of wiper blades varies depending on
geographical area and frequency of use. Poor perfor -
mance of blades may be present with chattering, marks,
water lines or wet spots. If any of these conditions are
present, clean the wiper blades or replace as necessary.
Wiper Blade Removal/Installation
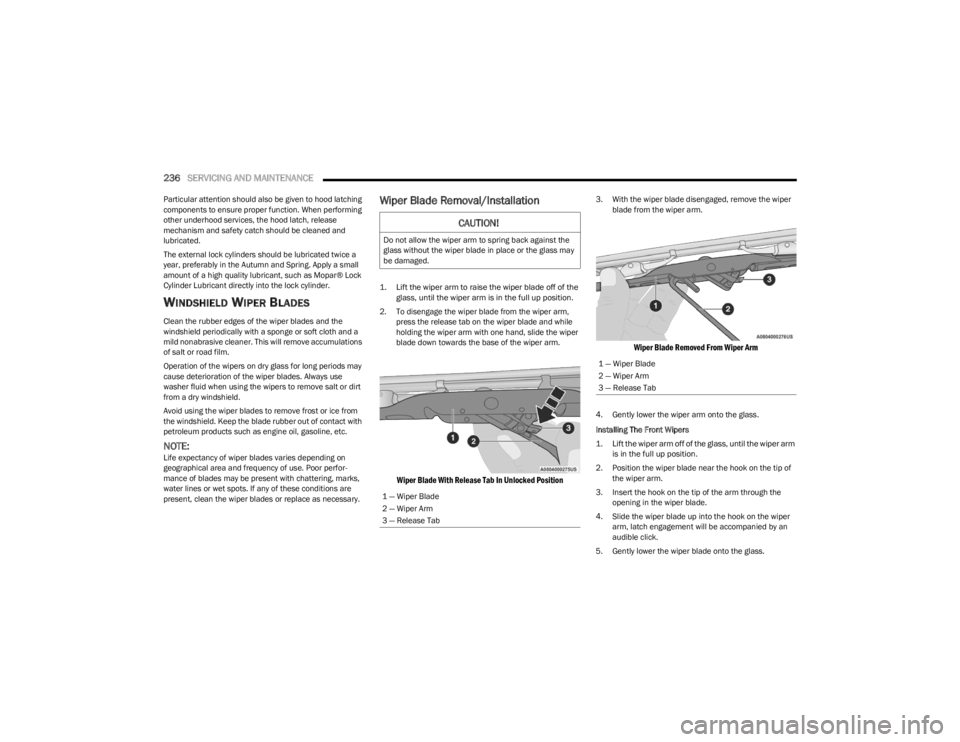
1. Lift the wiper arm to raise the wiper blade off of the glass, until the wiper arm is in the full up position.
2. To disengage the wiper blade from the wiper arm, press the release tab on the wiper blade and while
holding the wiper arm with one hand, slide the wiper
blade down towards the base of the wiper arm.
Wiper Blade With Release Tab In Unlocked Position
3. With the wiper blade disengaged, remove the wiper blade from the wiper arm.
Wiper Blade Removed From Wiper Arm
4. Gently lower the wiper arm onto the glass.
Installing The Front Wipers
1. Lift the wiper arm off of the glass, until the wiper arm is in the full up position.
2. Position the wiper blade near the hook on the tip of the wiper arm.
3. Insert the hook on the tip of the arm through the opening in the wiper blade.
4. Slide the wiper blade up into the hook on the wiper arm, latch engagement will be accompanied by an
audible click.
5. Gently lower the wiper blade onto the glass.
CAUTION!
Do not allow the wiper arm to spring back against the
glass without the wiper blade in place or the glass may
be damaged.
1 — Wiper Blade
2 — Wiper Arm
3 — Release Tab
1 — Wiper Blade
2 — Wiper Arm
3 — Release Tab
23_LA_OM_EN_USC_t.book Page 236
Page 239 of 300
SERVICING AND MAINTENANCE237
EXHAUST SYSTEM
The best protection against carbon monoxide entry into
the vehicle body is a properly maintained engine exhaust
system.
If you notice a change in the sound of the exhaust system;
or if the exhaust fumes can be detected inside the vehicle;
or when the underside or rear of the vehicle is damaged;
have an authorized technician inspect the complete
exhaust system and adjacent body areas for broken,
damaged, deteriorated, or mispositioned parts. Open
seams or loose connections could permit exhaust fumes
to seep into the passenger compartment. In addition, have
the exhaust system inspected each time the vehicle is
raised for lubrication or oil change. Replace as required.
Under normal operating conditions, the catalytic converter
will not require maintenance. However, it is important to
keep the engine properly tuned to ensure proper catalyst
operation and prevent possible catalyst damage.
NOTE:Intentional tampering with emissions control systems can
result in civil penalties being assessed against you.
In unusual situations involving grossly malfunctioning
engine operation, a scorching odor may suggest severe
and abnormal catalyst overheating. If this occurs, stop the
vehicle, turn off the engine and allow it to cool. Service,
including a tune-up to manufacturer's specifications,
should be obtained immediately.To minimize the possibility of catalytic converter damage:
Do not shut off the engine or interrupt the ignition when
the transmission is in gear and the vehicle is in motion.
Do not try to start the engine by pushing or towing the
vehicle.
Do not idle the engine with any spark plug wires discon -
nected or removed, such as when diagnostic testing, or
for prolonged periods during very rough idle or malfunc -
tioning operating conditions.
NOTE:The vehicle exhaust system may be equipped with an Elec -
tronic Exhaust Valve (EEV) system, if the exhaust system is
replaced with aftermarket products a Malfunction Indi -
cator Lamp (MIL) will illuminate.
COOLING SYSTEM WARNING!
Exhaust gases can injure or kill. They contain carbon
monoxide (CO), which is colorless and odorless.
Breathing it can make you unconscious and can
eventually poison you. To avoid breathing CO,
Úpage 196.
A hot exhaust system can start a fire if you park over
materials that can burn. Such materials might be
grass or leaves coming into contact with your
exhaust system. Do not park or operate your vehicle
in areas where your exhaust system can contact
anything that can burn.
CAUTION!
The catalytic converter requires the use of unleaded
fuel only. Leaded gasoline will destroy the effective -
ness of the catalyst as an emissions control device
and may seriously reduce engine performance and
cause serious damage to the engine.
Damage to the catalytic converter can result if your
vehicle is not kept in proper operating condition. In
the event of engine malfunction, particularly
involving engine misfire or other apparent loss of
performance, have your vehicle serviced promptly.
Continued operation of your vehicle with a severe
malfunction could cause the converter to overheat,
resulting in possible damage to the converter and
vehicle.
WARNING!
You or others can be badly burned by hot engine
coolant (antifreeze) or steam from your radiator. If
you see or hear steam coming from under the hood,
do not open the hood until the radiator has had time
to cool. Never open a cooling system pressure cap
when the radiator or coolant bottle is hot.
Keep hands, tools, clothing, and jewelry away from
the radiator cooling fan when the hood is raised. The
fan starts automatically and may start at any time,
whether the engine is running or not.
When working near the radiator cooling fan, discon -
nect the fan motor lead or turn the ignition to the OFF
position. The fan is temperature controlled and can
start at any time the ignition is in the ON position.
8
23_LA_OM_EN_USC_t.book Page 237
Page 260 of 300
258SERVICING AND MAINTENANCE
Tire Loading And Tire Pressure
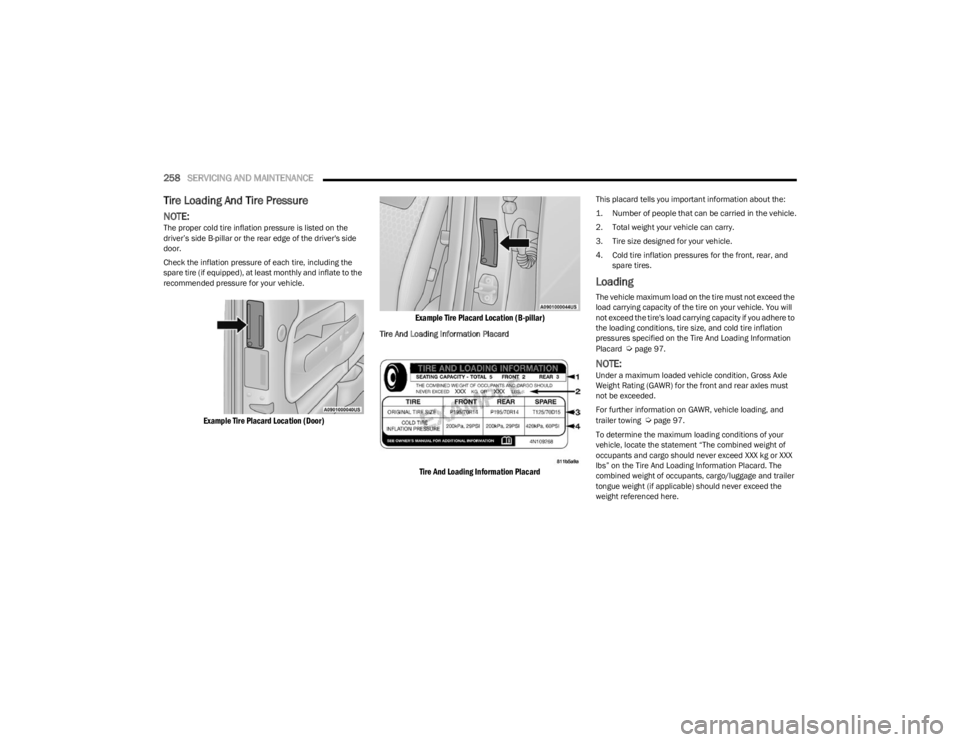
NOTE:The proper cold tire inflation pressure is listed on the
driver’s side B-pillar or the rear edge of the driver's side
door.
Check the inflation pressure of each tire, including the
spare tire (if equipped), at least monthly and inflate to the
recommended pressure for your vehicle.
Example Tire Placard Location (Door) Example Tire Placard Location (B-pillar)
Tire And Loading Information Placard
Tire And Loading Information Placard
This placard tells you important information about the:
1. Number of people that can be carried in the vehicle.
2. Total weight your vehicle can carry.
3. Tire size designed for your vehicle.
4. Cold tire inflation pressures for the front, rear, and
spare tires.
Loading
The vehicle maximum load on the tire must not exceed the
load carrying capacity of the tire on your vehicle. You will
not exceed the tire's load carrying capacity if you adhere to
the loading conditions, tire size, and cold tire inflation
pressures specified on the Tire And Loading Information
Placard
Úpage 97.
NOTE:Under a maximum loaded vehicle condition, Gross Axle
Weight Rating (GAWR) for the front and rear axles must
not be exceeded.
For further information on GAWR, vehicle loading, and
trailer towing
Úpage 97.
To determine the maximum loading conditions of your
vehicle, locate the statement “The combined weight of
occupants and cargo should never exceed XXX kg or XXX
lbs” on the Tire And Loading Information Placard. The
combined weight of occupants, cargo/luggage and trailer
tongue weight (if applicable) should never exceed the
weight referenced here.
23_LA_OM_EN_USC_t.book Page 258
Page 261 of 300
SERVICING AND MAINTENANCE259
Steps For Determining Correct Load Limit—
(1) Locate the statement “The combined
weight of occupants and cargo should
never exceed XXX kg or XXX lbs.” on your
vehicle's placard.
(2) Determine the combined weight of
the driver and passengers that will be
riding in your vehicle.
(3) Subtract the combined weight of the
driver and passengers from XXX kg or
XXX lbs. (4) The resulting figure equals the
available amount of cargo and luggage
load capacity. For example, if “XXX”
amount equals 1400 lbs. and there will
be five 150 lb passengers in your
vehicle, the amount of available cargo
and luggage load capacity is 650 lbs.
(1400-750 (5x150) = 650 lbs.)
(5) Determine the combined weight of
luggage and cargo being loaded on the
vehicle. That weight may not safely
exceed the available cargo and luggage
load capacity calculated in Step 4.
(6) If your vehicle will be towing a trailer,
load from your trailer will be transferred
to your vehicle. Consult this manual to
determine how this reduces the
available cargo and luggage load
capacity of your vehicle.
Metric Example For Load Limit
For example, if “XXX” amount equals 635 kg and there will
be five 68 kg passengers in your vehicle, the amount of
available cargo and luggage load capacity is 295 kg
(635-340 (5x68) = 295 kg) as shown in step 4.
NOTE:
If your vehicle will be towing a trailer, load from your
trailer will be transferred to your vehicle. The following
table shows examples on how to calculate total load,
cargo/luggage, and towing capacities of your vehicle
with varying seating configurations and number and
size of occupants. This table is for illustration purposes
only and may not be accurate for the seating and load
carry capacity of your vehicle.
For the following example, the combined weight of
occupants and cargo should never exceed 865 lbs
(392 kg).
8
23_LA_OM_EN_USC_t.book Page 259
Page 264 of 300

262SERVICING AND MAINTENANCE
Check tire pressures more often if subject to a wide range
of outdoor temperatures, as tire pressures vary with
temperature changes.
Tire pressures change by approximately 1 psi (7 kPa) per
12°F (7°C) of air temperature change. Keep this in mind
when checking tire pressure inside a garage, especially in
the Winter.
Example: If garage temperature = 68°F (20°C) and the
outside temperature = 32°F (0°C) then the cold tire
inflation pressure should be increased by 3 psi (21 kPa),
which equals 1 psi (7 kPa) for every 12°F (7°C) for this
outside temperature condition.
Tire pressure may increase from 2 to 6 psi (13 to 40 kPa)
during operation. DO NOT reduce this normal pressure
build up or your tire pressure will be too low.
Tire Pressures For High Speed Operation
The manufacturer advocates driving at safe speeds and
within posted speed limits. Where speed limits or
conditions are such that the vehicle can be driven at high
speeds, maintaining correct tire inflation pressure is very
important. Increased tire pressure and reduced vehicle
loading may be required for high-speed vehicle operation.
Refer to an authorized tire dealer or original equipment
vehicle dealer for recommended safe operating speeds,
loading and cold tire inflation pressures.
Radial Ply Tires
Tire Repair
If your tire becomes damaged, it may be repaired if it
meets the following criteria:
The tire has not been driven on when flat.
The damage is only on the tread section of your tire
(sidewall damage is not repairable).
The puncture is no greater than ¼ of an inch (6 mm).
Consult an authorized tire dealer for tire repairs and
additional information.
Damaged Run Flat tires, or Run Flat tires that have
experienced a loss of pressure should be replaced
immediately with another Run Flat tire of identical size and
service description (Load Index and Speed Symbol). Replace the tire pressure sensor as well as it is not
designed to be reused.
Run Flat Tires — If Equipped
Run Flat tires allow you the capability to drive 50 miles
(80 km) at 50 mph (80 km/h) after a rapid loss of inflation
pressure. This rapid loss of inflation is referred to as the
Run Flat mode. A Run Flat mode occurs when the tire
inflation pressure is of/or below 14 psi (96 kPa).
Once a Run Flat tire reaches the Run Flat mode it has
limited driving capabilities and needs to be replaced
immediately. A Run Flat tire is not repairable. When a Run
Flat tire is changed after being driven under a Run Flat
mode 14 psi (96 kPa) condition, please replace the TPMS
sensor as it is not designed to be reused.
NOTE:TPMS sensor must be replaced after driving the vehicle on
a flat tire condition.
It is not recommended driving a vehicle loaded at full
capacity or to tow a trailer while a tire is in the Run Flat
mode.
See the Tire Pressure Monitoring System section for more
information.
Tire Spinning
When stuck in mud, sand, snow, or ice conditions, do not
spin your vehicle's wheels above 30 mph (48 km/h) or for
longer than 30 seconds continuously without stopping.
For further information
Úpage 220.
WARNING!
High speed driving with your vehicle under maximum
load is dangerous. The added strain on your tires could
cause them to fail. You could have a serious collision.
Do not drive a vehicle loaded to the maximum capacity
at continuous speeds above 75 mph (120 km/h).
WARNING!
Combining radial ply tires with other types of tires on
your vehicle will cause your vehicle to handle poorly.
The instability could cause a collision. Always use radial
ply tires in sets of four. Never combine them with other
types of tires.
23_LA_OM_EN_USC_t.book Page 262
Page 267 of 300
SERVICING AND MAINTENANCE265
For restrictions when towing with a spare tire designated
for temporary emergency use Úpage 102.
Spare Tire Matching Original Equipped Tire
And Wheel — If Equipped
Your vehicle may be equipped with a spare tire and wheel
equivalent in look and function to the original equipment
tire and wheel found on the front or rear axle of your
vehicle. This spare tire may be used in the tire rotation for
your vehicle. If your vehicle has this option, refer to an
authorized tire dealer for the recommended tire rotation
pattern.
Compact Spare Tire — If Equipped
The compact spare is for temporary emergency use only.
You can identify if your vehicle is equipped with a compact
spare by looking at the spare tire description on the Tire
And Loading Information Placard located on the driver’s
side door opening or on the sidewall of the tire. Compact
spare tire descriptions begin with the letter “T” or “S”
preceding the size designation.
Example: T145/80D18 103M.
T, S = Temporary Spare Tire Since this tire has limited tread life, the original equipment
tire should be repaired (or replaced) and reinstalled on
your vehicle at the first opportunity.
Do not install a wheel cover or attempt to mount a
conventional tire on the compact spare wheel, since the
wheel is designed specifically for the compact spare tire.
Do not install more than one compact spare tire and wheel
on the vehicle at any given time.
Collapsible Spare Tire — If Equipped
The collapsible spare is for temporary emergency use only.
You can identify if your vehicle is equipped with a
collapsible spare by looking at the spare tire description
on the Tire and Loading Information Placard located on
the driver’s side door opening or on the sidewall of the tire.
Collapsible spare tire description
Example: 165/80-17 101P.
Since this tire has limited tread life, the original equipment
tire should be repaired (or replaced) and reinstalled on
your vehicle at the first opportunity.Inflate collapsible tire only after the wheel is properly
installed to the vehicle. Inflate the collapsible tire using
the electric air pump before lowering the vehicle.
Do not install a wheel cover or attempt to mount a
conventional tire on the collapsible spare wheel, since the
wheel is designed specifically for the collapsible spare tire.
Full Size Spare — If Equipped
The full size spare is for temporary emergency use only.
This tire may look like the originally equipped tire on the
front or rear axle of your vehicle, but it is not. This spare
tire may have limited tread life. When the tread is worn to
the tread wear indicators, the temporary use full size
spare tire needs to be replaced. Since it is not the same as
your original equipment tire, replace (or repair) the original
equipment tire and reinstall on the vehicle at the first
opportunity.
CAUTION!
Because of the reduced ground clearance, do not take
your vehicle through an automatic car wash with a
compact or limited use temporary spare installed.
Damage to the vehicle may result.
WARNING!
Compact and collapsible spares are for temporary
emergency use only. With these spares, do not drive
more than 50 mph (80 km/h). Temporary use spares
have limited tread life. When the tread is worn to the
tread wear indicators, the temporary use spare tire
needs to be replaced. Be sure to follow the warnings,
which apply to your spare. Failure to do so could result
in spare tire failure and loss of vehicle control.
WARNING!
Compact and Collapsible spares are for temporary
emergency use only. With these spares, do not drive
more than 50 mph (80 km/h). Temporary use spares have limited tread life. When the tread is worn to the
tread wear indicators, the temporary use spare tire
needs to be replaced. Be sure to follow the warnings,
which apply to your spare. Failure to do so could result
in spare tire failure and loss of vehicle control.
8
23_LA_OM_EN_USC_t.book Page 265
Page 274 of 300
272SERVICING AND MAINTENANCE
Cleaning Plastic Instrument Cluster
Lenses
The lenses in front of the instruments in this vehicle are
molded in clear plastic. When cleaning the lenses, care
must be taken to avoid scratching the plastic.
Clean with a wet soft cloth. A mild soap solution may be
used, but do not use high alcohol content or abrasive
cleaners. If soap is used, wipe clean with a clean damp
cloth. Dry with a soft cloth.
LEATHER SURFACES
Mopar® Total Clean is specifically recommended for
leather upholstery. Your leather upholstery can be best preserved by regular
cleaning with a damp soft cloth. Small particles of dirt can
act as an abrasive and damage the leather upholstery and
should be removed promptly with a damp cloth. Stubborn
soils can be removed easily with a soft cloth and Mopar®
Total Clean. Care should be taken to avoid soaking your
leather upholstery with any liquid. Please do not use
polishes, oils, cleaning fluids, solvents, detergents, or
ammonia-based cleaners to clean your leather upholstery.
NOTE:If equipped with light colored leather, it tends to show any
foreign material, dirt, and fabric dye transfer more so than
darker colors. The leather is designed for easy cleaning,
and the manufacturer recommends Mopar® total care
leather cleaner applied on a cloth to clean the leather
seats as needed.
GLASS SURFACES
All glass surfaces should be cleaned on a regular basis
with Mopar® Glass Cleaner, or any commercial
household-type glass cleaner. Never use an abrasive type
cleaner. Use caution when cleaning the inside rear
window equipped with electric defrosters or windows
equipped with radio antennas. Do not use scrapers or
other sharp instruments that may scratch the elements.
When cleaning the rearview mirror, spray cleaner on the
towel or cloth that you are using. Do not spray cleaner
directly on the mirror.
CAUTION!
Do not use alcohol and alcohol-based and/or
ketone-based cleaning products to clean leather
upholstery, as damage to the upholstery may result.
23_LA_OM_EN_USC_t.book Page 272
Page 282 of 300
280
CUSTOMER ASSISTANCE
SUGGESTIONS FOR OBTAINING SERVICE
FOR YOUR VEHICLE
PREPARE FOR THE APPOINTMENT
All work to be performed may not be covered by the
warranty. Discuss additional charges with the service
manager. Keep a maintenance log of your vehicle's
service history. This can often provide a clue to the current
problem.
PREPARE A LIST
Make a written list of your vehicle's problems or the
specific work you want done. If you've had an accident or
work done that is not on your maintenance log, let the
service advisor know.
BE REASONABLE WITH REQUESTS
If you list a number of items and you must have your
vehicle by the end of the day, discuss the situation with the
service advisor and list the items in order of priority. At
many authorized dealers, you may obtain a rental vehicle
(additional charges may apply). If you need a rental, it is
advisable to make these arrangements when you call for
an appointment.
IF YOU NEED ASSISTANCE
FCA US LLC and its authorized dealers are vitally
interested in your satisfaction. We want you to be happy
with our products and services.
Warranty service must be done by an authorized dealer.
We strongly recommend that you take the vehicle to an
authorized dealer. They know your vehicle the best, and
are most concerned that you get prompt and high quality
service. FCA US LLC's authorized dealers have the
facilities, factory-trained technicians, special tools, and
the latest information to ensure the vehicle is fixed
correctly and in a timely manner.
This is why you should always talk to an authorized
dealer’s service manager first. If for some reason you are
still not satisfied, talk to the general manager or owner of
the authorized dealer. They want to know if you need
assistance. If an authorized dealer is unable to resolve the
concern, you may contact the FCA US LLC's Customer
Assistance center.
Any communication to FCA US LLC's customer center
should include the following information:
Owner's name and address
Owner's telephone number (home, mobile, and office)
Authorized dealer name
Vehicle Identification Number (VIN)
Vehicle delivery date and mileage
ROADSIDE ASSISTANCE
Available 24 hours, 7 days a week.
Call 1-800-521-2779 or visit chrysler.rsahelp.com(USA)
Call 1-800-363-4869 or visit fca.roadsideaid.com
(Canada)
Who is Covered
You are covered by Roadside Assistance services if you
are a purchaser for use of the vehicle. Roadside
Assistance services last for five years or 60,000 miles on
the odometer, whichever occurs first, calculated from the
start date of the Basic Limited Warranty, as set forth in
your Warranty Information book.
1
1. Towing services provided through Cross Country Motor Club, Inc.
Medford, MA 02155, except in AK,CA, HI, OR, WI, and WY, where services
are provided by Cross Country Motor Club of California, Inc., Thousand
Oaks, CA 91360.
What to Do
If your vehicle requires jump start assistance, out of
gas/fuel delivery, tire service, lockout service or towing as
a result of a mechanical breakdown, dial toll-free: USA:
1-800-521-2779/Canada: 1-800-363-4869. Provide your
name, Vehicle Identification Number (VIN) required for
covered services, license plate number, and your location,
including the telephone number from which you are
calling. Briefly describe the nature of the problem and
answer a few simple questions.
23_LA_OM_EN_USC_t.book Page 280