2023 DODGE CHALLENGER tow
[x] Cancel search: towPage 221 of 300
IN CASE OF EMERGENCY219
In order to move the vehicle in cases where the
transmission will not shift out of PARK (P) (such as a
depleted battery), a Manual Park Release is available.
To use the Manual Park Release, see the following steps:
1. Firmly apply the parking brake.
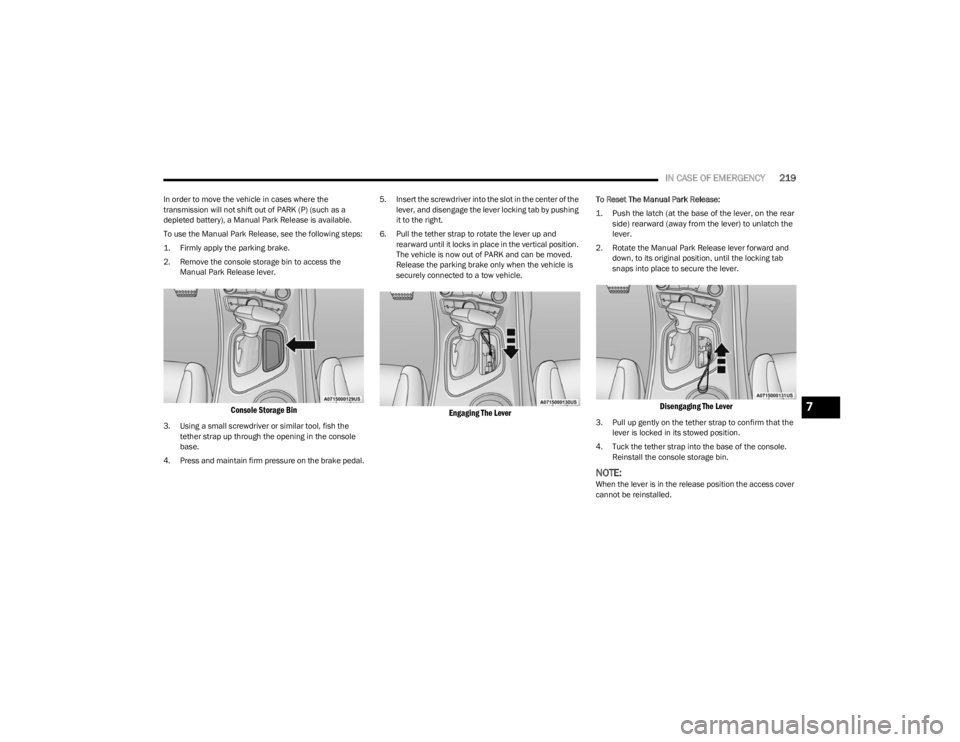
2. Remove the console storage bin to access the
Manual Park Release lever.
Console Storage Bin
3. Using a small screwdriver or similar tool, fish the tether strap up through the opening in the console
base.
4. Press and maintain firm pressure on the brake pedal. 5. Insert the screwdriver into the slot in the center of the
lever, and disengage the lever locking tab by pushing
it to the right.
6. Pull the tether strap to rotate the lever up and rearward until it locks in place in the vertical position.
The vehicle is now out of PARK and can be moved.
Release the parking brake only when the vehicle is
securely connected to a tow vehicle.
Engaging The Lever
To Reset The Manual Park Release:
1. Push the latch (at the base of the lever, on the rear side) rearward (away from the lever) to unlatch the
lever.
2. Rotate the Manual Park Release lever forward and down, to its original position, until the locking tab
snaps into place to secure the lever.
Disengaging The Lever
3. Pull up gently on the tether strap to confirm that the lever is locked in its stowed position.
4. Tuck the tether strap into the base of the console. Reinstall the console storage bin.
NOTE:When the lever is in the release position the access cover
cannot be reinstalled.
7
23_LA_OM_EN_USC_t.book Page 219
Page 223 of 300
IN CASE OF EMERGENCY221
TOWING A DISABLED VEHICLE
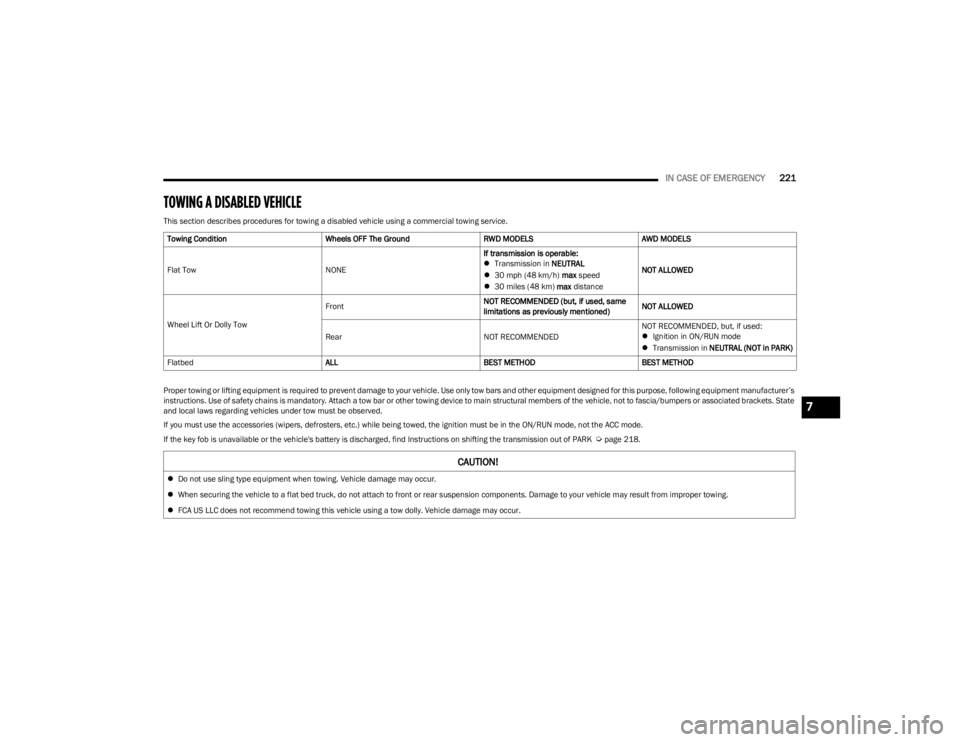
This section describes procedures for towing a disabled vehicle using a commercial towing service.
Proper towing or lifting equipment is required to prevent damage to your vehicle. Use only tow bars and other equipment designed for this purpose, following equipment manufacturer’s
instructions. Use of safety chains is mandatory. Attach a tow bar or other towing device to main structural members of the vehicle, not to fascia/bumpers or associated brackets. State
and local laws regarding vehicles under tow must be observed.
If you must use the accessories (wipers, defrosters, etc.) while being towed, the ignition must be in the ON/RUN mode, not the ACC mode.
If the key fob is unavailable or the vehicle's battery is discharged, find Instructions on shifting the transmission out of PARK
Úpage 218.
Towing Condition
Wheels OFF The GroundRWD MODELSAWD MODELS
Flat Tow NONEIf transmission is operable:
Transmission in NEUTRAL
30 mph (48 km/h) max speed
30 miles (48 km) max distance NOT ALLOWED
Wheel Lift Or Dolly Tow Front
NOT RECOMMENDED (but, if used, same
limitations as previously mentioned)NOT ALLOWED
Rear NOT RECOMMENDEDNOT RECOMMENDED, but, if used:
Ignition in ON/RUN mode
Transmission in NEUTRAL (NOT in PARK)
Flatbed ALLBEST METHODBEST METHOD
CAUTION!
Do not use sling type equipment when towing. Vehicle damage may occur.
When securing the vehicle to a flat bed truck, do not attach to front or rear suspension components. Damage to your vehicle may result from improper towing.
FCA US LLC does not recommend towing this vehicle using a tow dolly. Vehicle damage may occur.
7
23_LA_OM_EN_USC_t.book Page 221
Page 224 of 300
222IN CASE OF EMERGENCY
ALL WHEEL DRIVE (AWD) MODELS —
I
F EQUIPPED
FCA US LLC recommends towing your vehicle with all four
wheels OFF the ground using a flatbed.
If the transmission and driveline are operable, AWD
models can also be towed with the ignition in the ON/RUN
mode, the transmission in NEUTRAL (not in PARK!), and
the rear wheels OFF the ground with no limitation on
speed or distance. Since the ignition MUST be in the
ON/RUN mode to tow in this manner, AWD vehicles must
be towed with ALL FOUR wheels OFF the ground
(e.g. on a flatbed truck) if the key fob is unavailable.
REAR-WHEEL DRIVE (RWD) MODELS
FCA US LLC recommends towing your vehicle with all four
wheels OFF the ground using a flatbed.
If flatbed equipment is not available, and the transmission
is operable, the vehicle may be flat towed (with all four
wheels on the ground) under the following conditions:
The transmission must be in NEUTRAL (N). Instructions
on shifting the transmission to NEUTRAL (N) when the
engine is off
Úpage 218.
The towing distance must not exceed 30 miles
(48 km).
The towing speed must not exceed 30 mph (48 km/h).
If the transmission is not operable, or the vehicle must be
towed faster than 30 mph (48 km/h) or farther than 30 miles (48 km), then the only acceptable method of
towing is with a flatbed truck.
ENHANCED ACCIDENT RESPONSE SYSTEM
(EARS)
This vehicle is equipped with an Enhanced Accident
Response System.
This feature is a communication network that takes effect
in the event of an impact
Úpage 184.
EVENT DATA RECORDER (EDR)
This vehicle is equipped with an event data recorder
(EDR). The main purpose of an EDR is to record data that
will assist in understanding how a vehicle’s systems
performed under certain crash or near crash-like
situations, such as an air bag deployment or hitting a road
obstacle
Úpage 185.
CAUTION!
Towing this vehicle using any other method can
cause severe transmission and/or transfer case
damage.
Damage from improper towing is not covered under
the New Vehicle Limited Warranty.
CAUTION!
Towing this vehicle in violation of the previously
mentioned requirements can cause severe engine
and/or transmission damage. Damage from improper
towing is not covered under the New Vehicle Limited
Warranty.
23_LA_OM_EN_USC_t.book Page 222
Page 225 of 300

223
SERVICING AND MAINTENANCE
SCHEDULED SERVICING
3.6L AND 5.7L ENGINES
These engines are equipped with an automatic oil change
indicator system. The oil change indicator system will
remind you that it is time to take your vehicle in for
scheduled maintenance.Based on engine operation conditions, the oil change
indicator message will illuminate. This means that service
is required for the vehicle. Operating conditions such as
frequent short-trips, trailer tow, and extremely hot or cold
ambient temperatures will influence when the “Change
Oil” or “Oil Change Required” message is displayed. Have
your vehicle serviced as soon as possible, within the next
500 miles (805 km).
The “Oil Change Required” message will be displayed in
the instrument cluster and a single chime will sound,
indicating that an oil change is necessary.
An authorized dealer will reset the oil change indicator
message after completing the scheduled oil change.
NOTE:Under no circumstances should oil change intervals
exceed 10,000 miles (16,000 km), 12 months or
350 hours of engine run time, whichever comes first.
The 350 hours of engine run or idle time is generally only
a concern for fleet customers.Once A Month Or Before A Long Trip:
Check engine oil level.
Check windshield washer fluid level.
Check tire pressure and look for unusual wear or
damage. Rotate tires at the first sign of irregular wear,
even if it occurs before your next scheduled service.
Check the fluid levels of the coolant reservoir, brake
master cylinder, and power steering (if equipped) and
fill as needed.
Check function of all interior and exterior lights.
8
23_LA_OM_EN_USC_t.book Page 223
Page 228 of 300
226SERVICING AND MAINTENANCE
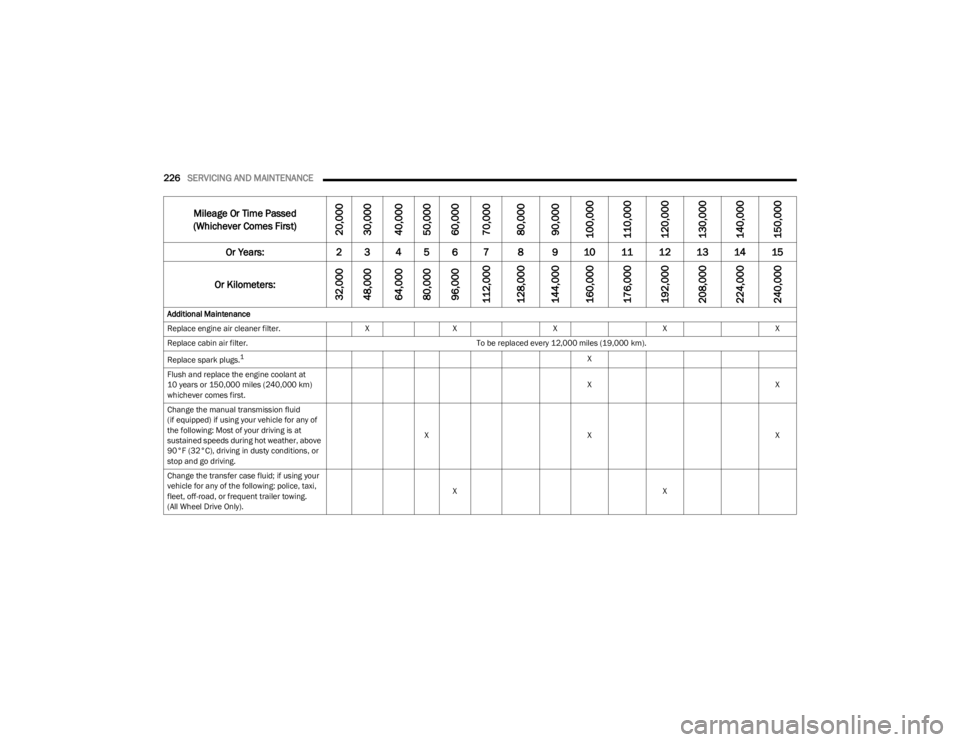
Additional Maintenance
Replace engine air cleaner filter. XX X X X
Replace cabin air filter. To be replaced every 12,000 miles (19,000 km).
Replace spark plugs.
1X
Flush and replace the engine coolant at
10 years or 150,000 miles (240,000 km)
whichever comes first. X
X
Change the manual transmission fluid
(if equipped) if using your vehicle for any of
the following: Most of your driving is at
sustained speeds during hot weather, above
90°F (32°C), driving in dusty conditions, or
stop and go driving. X
X X
Change the transfer case fluid; if using your
vehicle for any of the following: police, taxi,
fleet, off-road, or frequent trailer towing.
(All Wheel Drive Only). X
X
Mileage Or Time Passed
(Whichever Comes First)
20,000
30,000
40,000
50,000
60,000
70,000
80,000
90,000
100,000
110,000
120,000
130,000
140,000
150,000
Or Years: 2 3 4 5 6 7 8 9 10 11 12 13 14 15
Or Kilometers:
32,000
48,000
64,000
80,000
96,000
112,000
128,000
144,000
160,000
176,000
192,000
208,000
224,000
240,000
23_LA_OM_EN_USC_t.book Page 226
Page 229 of 300
SERVICING AND MAINTENANCE227
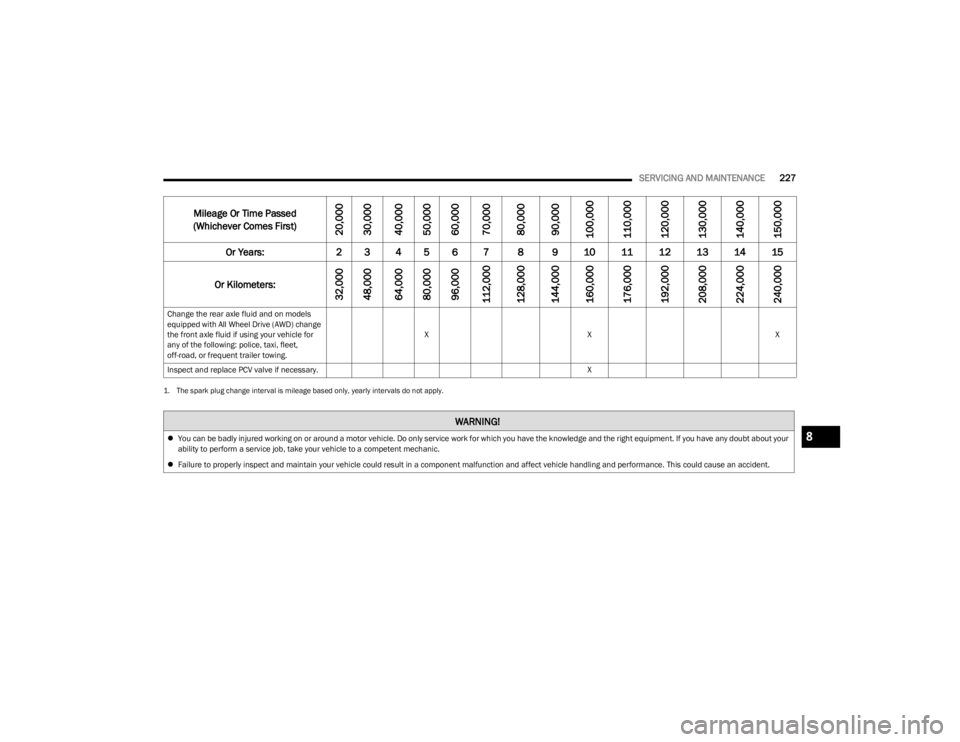
Change the rear axle fluid and on models
equipped with All Wheel Drive (AWD) change
the front axle fluid if using your vehicle for
any of the following: police, taxi, fleet,
off-road, or frequent trailer towing. X
X X
Inspect and replace PCV valve if necessary. X
1. The spark plug change interval is mileage based only, yearly intervals do not apply.
Mileage Or Time Passed
(Whichever Comes First)
20,000
30,000
40,000
50,000
60,000
70,000
80,000
90,000
100,000
110,000
120,000
130,000
140,000
150,000
Or Years: 2 3 4 5 6 7 8 9 10 11 12 13 14 15
Or Kilometers:
32,000
48,000
64,000
80,000
96,000
112,000
128,000
144,000
160,000
176,000
192,000
208,000
224,000
240,000
WARNING!
You can be badly injured working on or around a motor vehicle. Do only service work for which you have the knowledge and the right equipment. If you have any doubt about your
ability to perform a service job, take your vehicle to a competent mechanic.
Failure to properly inspect and maintain your vehicle could result in a component malfunction and affect vehicle handling and performance. This could cause an accident.8
23_LA_OM_EN_USC_t.book Page 227
Page 232 of 300
230SERVICING AND MAINTENANCE
CHECKING OIL LEVELTo ensure proper engine lubrication, the engine oil must
be maintained at the correct level. Check the oil level at
regular intervals, such as every fuel stop. The best time to
check the engine oil level is about ten minutes after a fully
warmed up engine is shut off.
Checking the oil while the vehicle is on level ground will
improve the accuracy of the oil level readings.
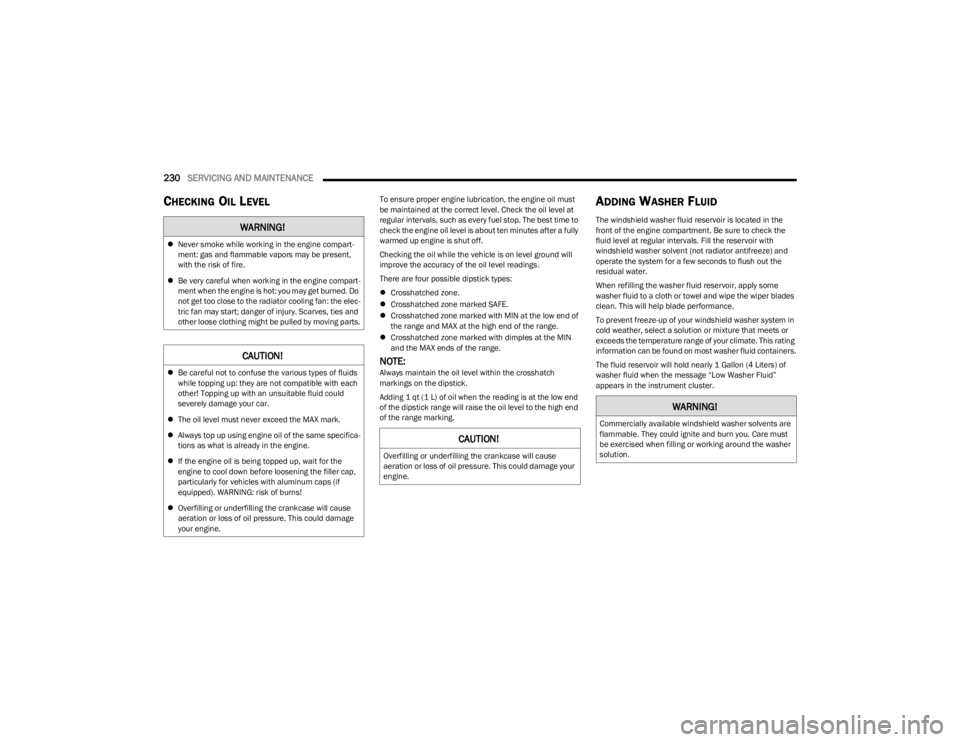
There are four possible dipstick types:
Crosshatched zone.
Crosshatched zone marked SAFE.
Crosshatched zone marked with MIN at the low end of
the range and MAX at the high end of the range.
Crosshatched zone marked with dimples at the MIN
and the MAX ends of the range.
NOTE:Always maintain the oil level within the crosshatch
markings on the dipstick.
Adding 1 qt (1 L) of oil when the reading is at the low end
of the dipstick range will raise the oil level to the high end
of the range marking.
ADDING WASHER FLUID
The windshield washer fluid reservoir is located in the
front of the engine compartment. Be sure to check the
fluid level at regular intervals. Fill the reservoir with
windshield washer solvent (not radiator antifreeze) and
operate the system for a few seconds to flush out the
residual water.
When refilling the washer fluid reservoir, apply some
washer fluid to a cloth or towel and wipe the wiper blades
clean. This will help blade performance.
To prevent freeze-up of your windshield washer system in
cold weather, select a solution or mixture that meets or
exceeds the temperature range of your climate. This rating
information can be found on most washer fluid containers.
The fluid reservoir will hold nearly 1 Gallon (4 Liters) of
washer fluid when the message “Low Washer Fluid”
appears in the instrument cluster.WARNING!
Never smoke while working in the engine compart -
ment: gas and flammable vapors may be present,
with the risk of fire.
Be very careful when working in the engine compart -
ment when the engine is hot: you may get burned. Do
not get too close to the radiator cooling fan: the elec -
tric fan may start; danger of injury. Scarves, ties and
other loose clothing might be pulled by moving parts.
CAUTION!
Be careful not to confuse the various types of fluids
while topping up: they are not compatible with each
other! Topping up with an unsuitable fluid could
severely damage your car.
The oil level must never exceed the MAX mark.
Always top up using engine oil of the same specifica -
tions as what is already in the engine.
If the engine oil is being topped up, wait for the
engine to cool down before loosening the filler cap,
particularly for vehicles with aluminum caps (if
equipped). WARNING: risk of burns!
Overfilling or underfilling the crankcase will cause
aeration or loss of oil pressure. This could damage
your engine.
CAUTION!
Overfilling or underfilling the crankcase will cause
aeration or loss of oil pressure. This could damage your
engine.
WARNING!
Commercially available windshield washer solvents are
flammable. They could ignite and burn you. Care must
be exercised when filling or working around the washer
solution.
23_LA_OM_EN_USC_t.book Page 230
Page 237 of 300
SERVICING AND MAINTENANCE235
(Continued)
3. Remove the used filter.
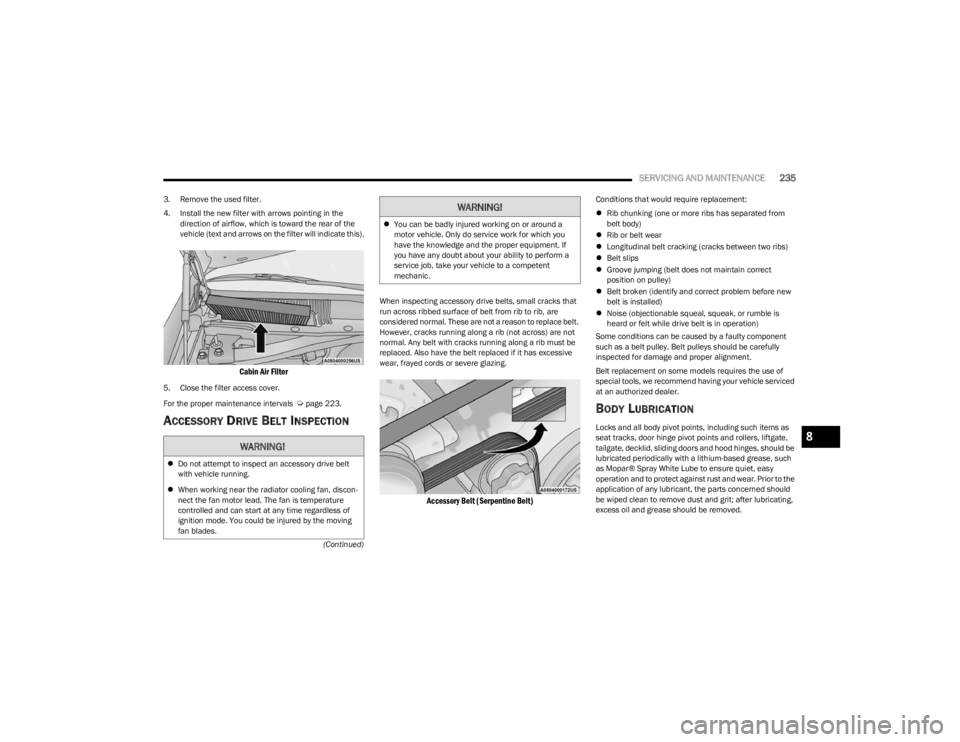
4. Install the new filter with arrows pointing in the
direction of airflow, which is toward the rear of the
vehicle (text and arrows on the filter will indicate this).
Cabin Air Filter
5. Close the filter access cover.
For the proper maintenance intervals
Úpage 223.
ACCESSORY DRIVE BELT INSPECTION
When inspecting accessory drive belts, small cracks that
run across ribbed surface of belt from rib to rib, are
considered normal. These are not a reason to replace belt.
However, cracks running along a rib (not across) are not
normal. Any belt with cracks running along a rib must be
replaced. Also have the belt replaced if it has excessive
wear, frayed cords or severe glazing.
Accessory Belt (Serpentine Belt)
Conditions that would require replacement:
Rib chunking (one or more ribs has separated from
belt body)
Rib or belt wear
Longitudinal belt cracking (cracks between two ribs)
Belt slips
Groove jumping (belt does not maintain correct
position on pulley)
Belt broken (identify and correct problem before new
belt is installed)
Noise (objectionable squeal, squeak, or rumble is
heard or felt while drive belt is in operation)
Some conditions can be caused by a faulty component
such as a belt pulley. Belt pulleys should be carefully
inspected for damage and proper alignment.
Belt replacement on some models requires the use of
special tools, we recommend having your vehicle serviced
at an authorized dealer.
BODY LUBRICATION
Locks and all body pivot points, including such items as
seat tracks, door hinge pivot points and rollers, liftgate,
tailgate, decklid, sliding doors and hood hinges, should be
lubricated periodically with a lithium-based grease, such
as Mopar® Spray White Lube to ensure quiet, easy
operation and to protect against rust and wear. Prior to the
application of any lubricant, the parts concerned should
be wiped clean to remove dust and grit; after lubricating,
excess oil and grease should be removed.
WARNING!
Do not attempt to inspect an accessory drive belt
with vehicle running.
When working near the radiator cooling fan, discon -
nect the fan motor lead. The fan is temperature
controlled and can start at any time regardless of
ignition mode. You could be injured by the moving
fan blades.
You can be badly injured working on or around a
motor vehicle. Only do service work for which you
have the knowledge and the proper equipment. If
you have any doubt about your ability to perform a
service job, take your vehicle to a competent
mechanic.
WARNING!
8
23_LA_OM_EN_USC_t.book Page 235