2023 CHRYSLER PACIFICA lock
[x] Cancel search: lockPage 148 of 328

146STARTING AND OPERATING
REFUELING THE VEHICLE
There is no fuel filler cap. Two flapper doors inside the pipe
seal the system.
1. Put the vehicle in PARK and switch the ignition OFF.
2. Push the center-rear edge of the fuel filler door
(3 o'clock position) and release to open.
Fuel Filler Door
3. Insert the fuel nozzle fully into the filler pipe; the nozzle opens and holds both flapper doors while
refueling.
4. When the fuel nozzle “clicks” or shuts off, the fuel tank is full.
5. Keep the nozzle in the filler for five seconds after the nozzle clicks to allow fuel to drain from the nozzle.
6. Remove the fuel filler nozzle.
7. To close the fuel filler door, push the center-rear edge (3 o’clock position) of the fuel filler door and then
release. The fuel filler door will latch closed.
NOTE:In certain cold conditions, ice may prevent the fuel filler
door from opening. If this occurs, lightly push on the fuel
filler door around the perimeter to break the ice buildup.
VEHICLE LOADING
CERTIFICATION LABEL
As required by National Highway Traffic Safety
Administration regulations, your vehicle has a certification
label affixed to the driver's side door or pillar.
This label contains the month and year of manufacture,
Gross Vehicle Weight Rating (GVWR), front and rear Gross
Axle Weight Rating (GAWR), and Vehicle Identification
Number (VIN). A Month-Day-Hour (MDH) number is
included on this label and indicates the Month, Day and
Hour of manufacture. The bar code that appears on the
bottom of the label is your VIN.
Gross Vehicle Weight Rating (GVWR)
The GVWR is the total permissible weight of your vehicle
including driver, passengers, vehicle, options and cargo.
The label also specifies maximum capacities of front and
rear GAWR. Total load must be limited so GVWR and front
and rear GAWR are not exceeded.
Payload
The payload of a vehicle is defined as the allowable load
weight a truck can carry, including the weight of the driver,
all passengers, options and cargo.
Gross Axle Weight Rating (GAWR)
The GAWR is the maximum permissible load on the front
and rear axles. The load must be distributed in the cargo
area so that the GAWR of each axle is not exceeded.
WARNING!
Never have any smoking materials lit in or near the
vehicle when the fuel door is open or the tank is
being filled.
Never add fuel when the engine is running. This is in
violation of most state and federal fire regulations
and may cause the Malfunction Indicator Light to
turn on.
A fire may result if fuel is pumped into a portable
container that is inside of a vehicle. You could be
burned. Always place fuel containers on the ground
while filling.
CAUTION!
To avoid fuel spillage and overfilling, do not “top off” the
fuel tank after filling.
23_RUP_OM_EN_USC_t.book Page 146
Page 153 of 328

STARTING AND OPERATING151
(Continued)
TRAILER AND TONGUE WEIGHT
Never exceed the maximum tongue weight stamped on
your fascia/bumper or trailer hitch.
Weight Distribution
Consider the following items when computing the weight
on the rear axle of the vehicle:
The tongue weight of the trailer.
The weight of any other type of cargo or equipment put
in or on your vehicle.
The weight of the driver and all passengers.
NOTE:Remember that everything put into or on the trailer adds
to the load on your vehicle. Also, additional
factory-installed options or dealer-installed options must
be considered as part of the total load on your vehicle
Úpage 288.
TOWING REQUIREMENTS
To promote proper break-in of your new vehicle drivetrain
components, the following guidelines are recommended.
Perform the maintenance listed in “Scheduled Servicing”
Úpage 259. When towing a trailer, never exceed the
GAWR or GCWR ratings.
CAUTION!
Do not tow a trailer at all during the first 500 miles
(805 km) the new vehicle is driven. The engine, axle
or other parts could be damaged.
Then, during the first 500 miles (805 km) that a
trailer is towed, do not drive over 50 mph (80 km/h)
and do not make starts at full throttle. This helps the
engine and other parts of the vehicle wear in at the
heavier loads.
WARNING!
Make certain that the load is secured in the trailer
and will not shift during travel. When trailering cargo
that is not fully secured, dynamic load shifts can
occur that may be difficult for the driver to control.
You could lose control of your vehicle and have a
collision.
When hauling cargo or towing a trailer, do not over -
load your vehicle or trailer. Overloading can cause a
loss of control, poor performance or damage to
brakes, axle, engine, transmission, steering, suspen -
sion, chassis structure or tires.
Safety chains must always be used between your
vehicle and trailer. Always connect the chains to the
hook retainers of the vehicle hitch. Cross the chains
under the trailer tongue and allow enough slack for
turning corners.
Vehicles with trailers should not be parked on a
grade. When parking, apply the parking brake on the
tow vehicle. Put the tow vehicle transmission in
PARK. For four-wheel drive vehicles, make sure the
transfer case is not in NEUTRAL. Always, block or
"chock" the trailer wheels.
GCWR must not be exceeded.
Total weight must be distributed between the tow
vehicle and the trailer such that the following four
ratings are not exceeded :
GVWR
GTW
GAWR
Tongue weight rating for the trailer hitch utilized
WARNING!
4
23_RUP_OM_EN_USC_t.book Page 151
Page 158 of 328

156STARTING AND OPERATING
DRIVING THROUGH WATER
Driving through water more than a few inches/
centimeters deep will require extra caution to ensure
safety and prevent damage to your vehicle.
Flowing/Rising Water Shallow Standing Water
Although your vehicle is capable of driving through shallow
standing water, consider the following Warnings and
Cautions before doing so.
WARNING!
Do not drive on or across a road or path where water is
flowing and/or rising (as in storm run-off). Flowing water
can wear away the road or path's surface and cause
your vehicle to sink into deeper water. Furthermore,
flowing and/or rising water can carry your vehicle away
swiftly. Failure to follow this warning may result in
injuries that are serious or fatal to you, your
passengers, and others around you.
WARNING!
Driving through standing water limits your vehicle’s
traction capabilities. Do not exceed 5 mph (8 km/h)
when driving through standing water.
Driving through standing water limits your vehicle’s
braking capabilities, which increases stopping
distances. Therefore, after driving through standing
water, drive slowly and lightly press on the brake
pedal several times to dry the brakes.
Failure to follow these warnings may result in injuries
that are serious or fatal to you, your passengers, and
others around you.
CAUTION!
Always check the depth of the standing water before
driving through it. Never drive through standing
water that is deeper than the bottom of the tire rims
mounted on the vehicle.
Determine the condition of the road or the path that
is under water and if there are any obstacles in the
way before driving through the standing water.
Do not exceed 5 mph (8 km/h) when driving through
standing water. This will minimize wave effects.
Driving through standing water may cause damage
to your vehicle’s drivetrain components. Always
inspect your vehicle’s fluids (i.e., engine oil, transmis -
sion, axle, etc.) for signs of contamination (i.e., fluid
that is milky or foamy in appearance) after driving
through standing water. Do not continue to operate
the vehicle if any fluid appears contaminated, as this
may result in further damage. Such damage is not
covered by the New Vehicle Limited Warranty.
Getting water inside your vehicle’s engine can cause
it to lock up and stall out, and cause serious internal
damage to the engine. Such damage is not covered
by the New Vehicle Limited Warranty.
23_RUP_OM_EN_USC_t.book Page 156
Page 167 of 328

MULTIMEDIA165
Clock & Date
Rear ParkSense Braking Assist This setting will turn the Rear ParkSense Braking Assist on or off.
Sliding Door Alert This setting will turn the Sliding Door Alert on and off.
Blind Spot Alert This setting will change the type of alert provided when an object is detected in a
vehicle’s blind spot. The “Off” setting will turn off Blind Spot Alert. The “Lights” setting will
activate the Blind Spot Alert lights on the outside mirrors. The “Lights + Chime” setting
will activate both the lights on the outside mirrors and an audible chime.
Hill Start Assist This setting will turn the Hill Start Assist system on or off.
KeySense This setting will access KeySense features.
Rear Seat Alert When this setting is turned on and the rear doors are opened while the engine is running,
or if the engine is turned on within 10 minutes of the door opening, a message will
appear to check the rear seat when the vehicle is powered OFF.
Setting Name
Description
After pressing the Clock & Date button on the touchscreen, the following settings will be available:
NOTE:Depending on the vehicle’s options, feature settings may vary.
Setting NameDescription
Sync Time With GPS This setting will sync the time to the GPS receiver in the system. The system will control
the time via the GPS location.
Set Time This setting will allow you to manually set the time of your clock.
Time Format This setting will allow you to set the time format (AM/PM). Sync Time With GPS must be
off for this setting to be available. The “12 hrs” setting will set the time to a 12-hour
format. The “24 hrs” setting will set the time to a 24-hour format.
Set Date This setting will allow you to set the date by day, month, and year (DD/MM/YY).
5
23_RUP_OM_EN_USC_t.book Page 165
Page 171 of 328

MULTIMEDIA169
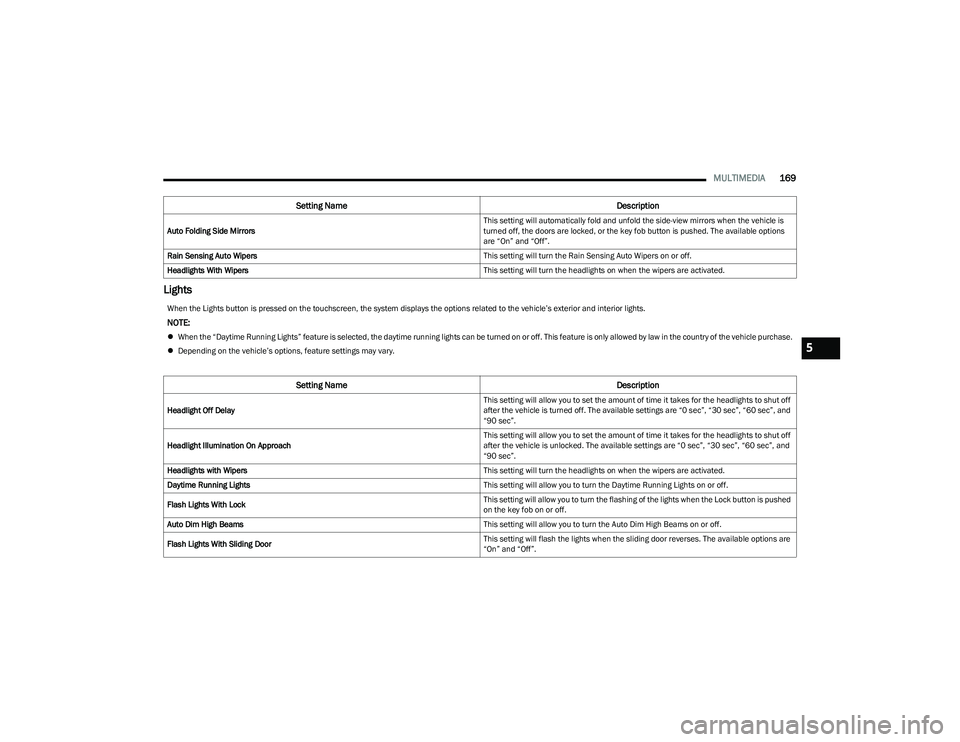
Lights
Auto Folding Side Mirrors This setting will automatically fold and unfold the side-view mirrors when the vehicle is
turned off, the doors are locked, or the key fob button is pushed. The available options
are “On” and “Off”.
Rain Sensing Auto Wipers This setting will turn the Rain Sensing Auto Wipers on or off.
Headlights With Wipers This setting will turn the headlights on when the wipers are activated.
Setting NameDescription
When the Lights button is pressed on the touchscreen, the system displays the options related to the vehicle’s exterior and interior lights.
NOTE:
When the “Daytime Running Lights” feature is selected, the daytime running lights can be turned on or off. This feature is only allowed by law in the country of the vehicle purchase.
Depending on the vehicle’s options, feature settings may vary.
Setting Name Description
Headlight Off Delay This setting will allow you to set the amount of time it takes for the headlights to shut off
after the vehicle is turned off. The available settings are “0 sec”, “30 sec”, “60 sec”, and
“90 sec”.
Headlight Illumination On Approach This setting will allow you to set the amount of time it takes for the headlights to shut off
after the vehicle is unlocked. The available settings are “0 sec”, “30 sec”, “60 sec”, and
“90 sec”.
Headlights with Wipers This setting will turn the headlights on when the wipers are activated.
Daytime Running Lights This setting will allow you to turn the Daytime Running Lights on or off.
Flash Lights With Lock This setting will allow you to turn the flashing of the lights when the Lock button is pushed
on the key fob on or off.
Auto Dim High Beams This setting will allow you to turn the Auto Dim High Beams on or off.
Flash Lights With Sliding Door This setting will flash the lights when the sliding door reverses. The available options are
“On” and “Off”.
5
23_RUP_OM_EN_USC_t.book Page 169
Page 172 of 328

170MULTIMEDIA
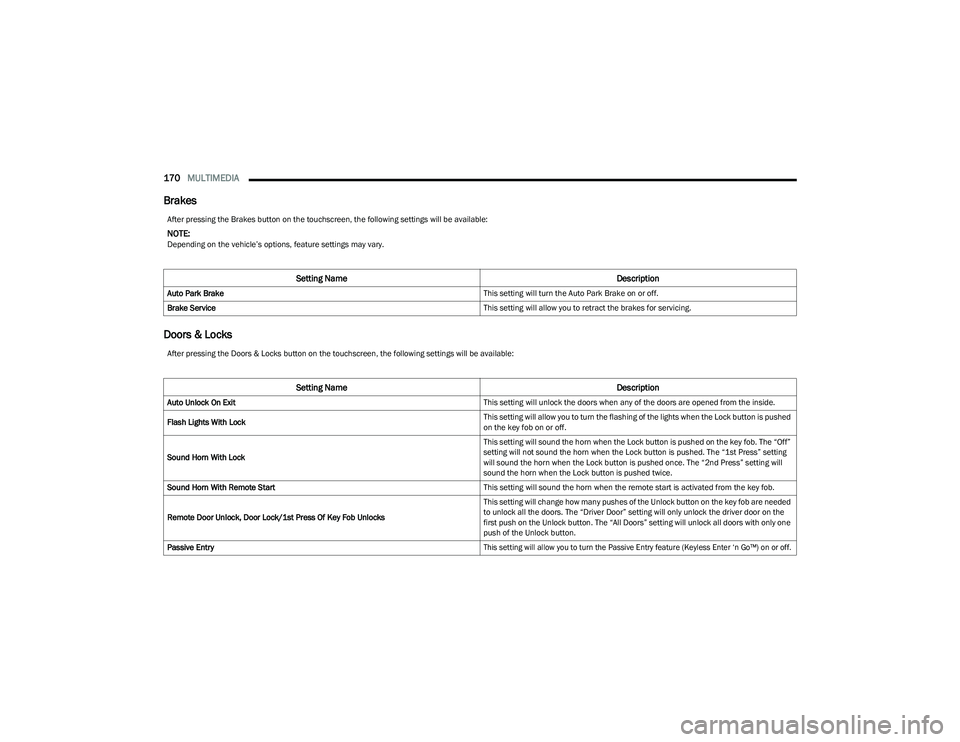
Brakes
Doors & Locks
After pressing the Brakes button on the touchscreen, the following settings will be available:
NOTE:Depending on the vehicle’s options, feature settings may vary.
Setting Name Description
Auto Park Brake This setting will turn the Auto Park Brake on or off.
Brake Service This setting will allow you to retract the brakes for servicing.
After pressing the Doors & Locks button on the touchscreen, the following settings will be available:
Setting NameDescription
Auto Unlock On Exit This setting will unlock the doors when any of the doors are opened from the inside.
Flash Lights With Lock This setting will allow you to turn the flashing of the lights when the Lock button is pushed
on the key fob on or off.
Sound Horn With Lock This setting will sound the horn when the Lock button is pushed on the key fob. The “Off”
setting will not sound the horn when the Lock button is pushed. The “1st Press” setting
will sound the horn when the Lock button is pushed once. The “2nd Press” setting will
sound the horn when the Lock button is pushed twice.
Sound Horn With Remote Start This setting will sound the horn when the remote start is activated from the key fob.
Remote Door Unlock, Door Lock/1st Press Of Key Fob Unlocks This setting will change how many pushes of the Unlock button on the key fob are needed
to unlock all the doors. The “Driver Door” setting will only unlock the driver door on the
first push on the Unlock button. The “All Doors” setting will unlock all doors with only one
push of the Unlock button.
Passive Entry
This setting will allow you to turn the Passive Entry feature (Keyless Enter ‘n Go™) on or off.
23_RUP_OM_EN_USC_t.book Page 170
Page 174 of 328

172MULTIMEDIA
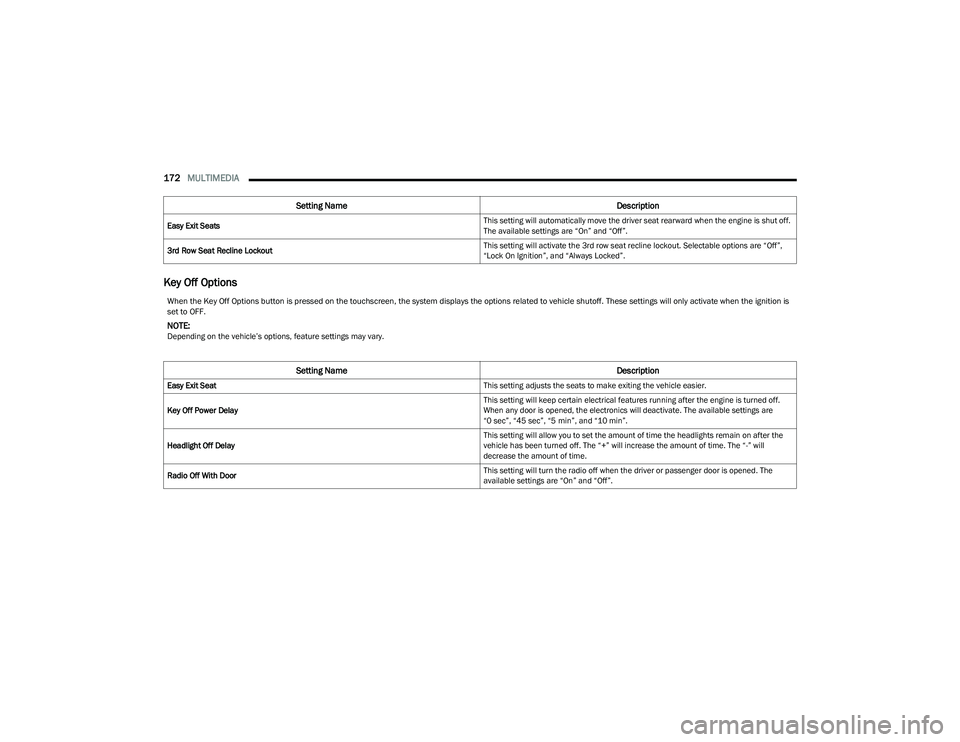
Key Off Options
Easy Exit Seats This setting will automatically move the driver seat rearward when the engine is shut off.
The available settings are “On” and “Off”.
3rd Row Seat Recline Lockout This setting will activate the 3rd row seat recline lockout. Selectable options are “Off”,
“Lock On Ignition”, and “Always Locked”.
Setting Name
Description
When the Key Off Options button is pressed on the touchscreen, the system displays the options related to vehicle shutoff. These settings will only activate when the ignition is
set to OFF.
NOTE:Depending on the vehicle’s options, feature settings may vary.
Setting NameDescription
Easy Exit Seat This setting adjusts the seats to make exiting the vehicle easier.
Key Off Power Delay This setting will keep certain electrical features running after the engine is turned off.
When any door is opened, the electronics will deactivate. The available settings are
“0 sec”, “45 sec”, “5 min”, and “10 min”.
Headlight Off Delay This setting will allow you to set the amount of time the headlights remain on after the
vehicle has been turned off. The “+” will increase the amount of time. The “-” will
decrease the amount of time.
Radio Off With Door This setting will turn the radio off when the driver or passenger door is opened. The
available settings are “On” and “Off”.
23_RUP_OM_EN_USC_t.book Page 172
Page 176 of 328

174MULTIMEDIA
Notifications
SiriusXM® Setup
When the Notifications button is pressed on the touchscreen, the system displays the options related to Notifications for the system.
NOTE:Depending on the vehicle’s options, feature settings may vary.
Setting Name Description
App Drawer Favoriting Popups This setting turns the App Favorited pop-up on or off.
App Drawer Unfavoriting Popups This setting turns the App Unfavorited pop-up on or off.
New Text Message Popups This setting turns receiving/storing a pop-up for new text messages of any connected
phone on or off.
Missed Calls Message
This setting turns receiving/storing a pop-up for missed calls of any connected phone on or off.
Navigation Popups This setting turns navigation pop-ups on or off.
SiriusXM® Travel Link Weather Alerts
The setting turns receiving notifications for SiriusXM® Travel Link Weather Alerts on or off.
When the SiriusXM® Setup button is pressed on the touchscreen, the system displays options related to SiriusXM® satellite radio. These settings can be used to skip specific radio
channels and restart favorite songs from the beginning.
NOTE:
A subscription to SiriusXM® satellite radio is required for these settings to be functional.
Depending on the vehicle’s options, feature settings may vary.
Setting Name Description
SiriusXM® Account, Profiles & Settings This setting will allow you to view your SiriusXM® account information, profiles linked to
the system, and the various settings you have saved and stored to those profiles.
Block Explicit This setting will allow you to block explicit content by turning it on or off.
23_RUP_OM_EN_USC_t.book Page 174