2023 CHRYSLER PACIFICA transmission
[x] Cancel search: transmissionPage 193 of 328

SAFETY191
(Continued)
Disabling And Enabling HSA
This feature can be turned on or turned off. To change the
current setting, proceed as follows: Úpage 157.
Towing With HSA
HSA will also provide assistance to mitigate roll back while
towing a trailer.
Rain Brake Support (RBS)
RBS may improve braking performance in wet conditions.
It will periodically apply a small amount of brake pressure
to remove any water buildup on the front brake rotors. It
functions when the windshield wipers are in LO or HI
speed. When RBS is active, there is no notification to the
driver and no driver interaction is required.
Ready Alert Braking (RAB)
RAB may reduce the time required to reach full braking
during emergency braking situations. It anticipates when
an emergency braking situation may occur by monitoring
how fast the throttle is released by the driver. The
Electronic Brake Control (EBC) system will prepare the
brake system for a panic stop.
Rear Seat Reminder Alert (RSRA)
RSRA alerts you through a visual and auditory notification
of the possible presence of an object, passenger, or pet in
the rear seats if a rear door was opened up to 10 minutes
before the ignition was placed in the ON/RUN position.
RSRA does not directly detect objects, passengers, or pets
in the rear seats. When the previous conditions are met,
RSRA displays the message “Check Rear Seat” on the
instrument cluster display and sounds an auditory alert
upon the driver placing the ignition in the OFF position to
exit the vehicle.
To enable or disable RSRA, see
Úpage 157.
Traction Control System (TCS)
The TCS monitors the amount of wheel spin of each of the
driven wheels. If wheel spin is detected, the TCS may apply
brake pressure to the spinning wheel(s) and/or reduce
vehicle power to provide enhanced acceleration and
stability. A feature of the TCS, Brake Limited Differential
(BLD) functions similarly to a limited slip differential and
controls the wheel spin across a driven axle. If one wheel
on a driven axle is spinning faster than the other, the
system will apply the brake of the spinning wheel. This will
allow more vehicle torque to be applied to the wheel that
is not spinning. BLD may remain enabled even if TCS and
the Electronic Stability Control (ESC) are in reduced
modes.
WARNING!
If you use a trailer brake controller with your trailer,
the trailer brakes may be activated and deactivated
with the brake switch. If so, there may not be enough
brake pressure to hold both the vehicle and the
trailer on a hill when the brake pedal is released. In
order to avoid rolling down an incline while resuming
acceleration, manually activate the trailer brake or
apply more vehicle brake pressure prior to releasing
the brake pedal.
HSA is not a parking brake. Always apply the parking
brake fully when exiting your vehicle. Also, be certain
to place the transmission in PARK.
Failure to follow these warnings can result in a colli -
sion or serious personal injury.
WARNING!
Before exiting a vehicle, always come to a complete
stop, then shift the automatic transmission into
PARK and apply the parking brake.
Always make sure the keyless ignition node is in the
OFF position, key fob is removed from the vehicle
and vehicle is locked.
Never leave children alone in a vehicle, or with
access to an unlocked vehicle. Leaving children in a
vehicle unattended is dangerous for a number of
reasons. A child or others could be seriously or fatally
injured. Children should be warned not to touch the
parking brake, brake pedal or the gear selector.
Do not leave children or animals inside parked vehi -
cles in hot weather. Interior heat buildup may cause
serious injury or death.
WARNING!
6
23_RUP_OM_EN_USC_t.book Page 191
Page 220 of 328

218SAFETY
(Continued)
Enhanced Accident Response System
In the event of an impact, if the communication network
remains intact, and the power remains intact, depending
on the nature of the event, the Occupant Restraint
Controller (ORC) will determine whether to have the
Enhanced Accident Response System perform the
following functions:
Cut off fuel to the engine (if equipped).
Cut off battery power to the electric motor (if equipped).
Flash hazard lights as long as the battery has power.
Turn on the interior lights, which remain on as long as
the battery has power or for 15 minutes from the inter -
vention of the Enhanced Accident Response System.
Unlock the power door locks.
Your vehicle may also be designed to perform any of these
other functions in response to the Enhanced Accident
Response System:
Turn off the Fuel Filter Heater, Turn off the HVAC Blower
Motor, Close the HVAC Circulation Door
Cut off battery power to the:
Engine
Electric Motor (if equipped)
Electric power steering
Brake booster
Electric park brake
Automatic transmission gear selector
Horn
Front wiper
Headlight washer pump (if equipped)
NOTE:After an accident, remember to cycle the ignition to the
STOP (OFF/LOCK) position and remove the key from the
ignition switch to avoid draining the battery. Carefully
check the vehicle for fuel leaks in the engine compartment
and on the ground near the engine compartment and fuel
tank before resetting the system and starting the engine.
If there are no fuel leaks or damage to the vehicle elec -
trical devices (e.g. headlights) after an accident, reset the
system by following the procedure described below. If you
have any doubt, contact an authorized dealer.
Enhanced Accident Response System
Reset Procedure
If applicable, refer to the “Hybrid Supplement” for
additional information.
In order to reset the Enhanced Accident Response System
functions after an event, the ignition switch must be
changed from ignition START or ON/RUN to ignition OFF.
Carefully check the vehicle for fuel leaks in the engine
compartment and on the ground near the engine
compartment and fuel tank before resetting the system
and starting the engine.
After an accident, if the vehicle will not start after
performing the reset procedure, the vehicle must be
towed to an authorized dealer to be inspected and to have
the Enhanced Accident Response System reset.
Maintaining Your Air Bag System
WARNING!
Modifications to any part of the air bag system could
cause it to fail when you need it. You could be injured
if the air bag system is not there to protect you. Do
not modify the components or wiring, including
adding any kind of badges or stickers to the steering
wheel hub trim cover or the upper passenger side of
the instrument panel. Do not modify the front fascia/
bumper, vehicle body structure, or add aftermarket
side steps or running boards.
23_RUP_OM_EN_USC_t.book Page 218
Page 251 of 328
IN CASE OF EMERGENCY249
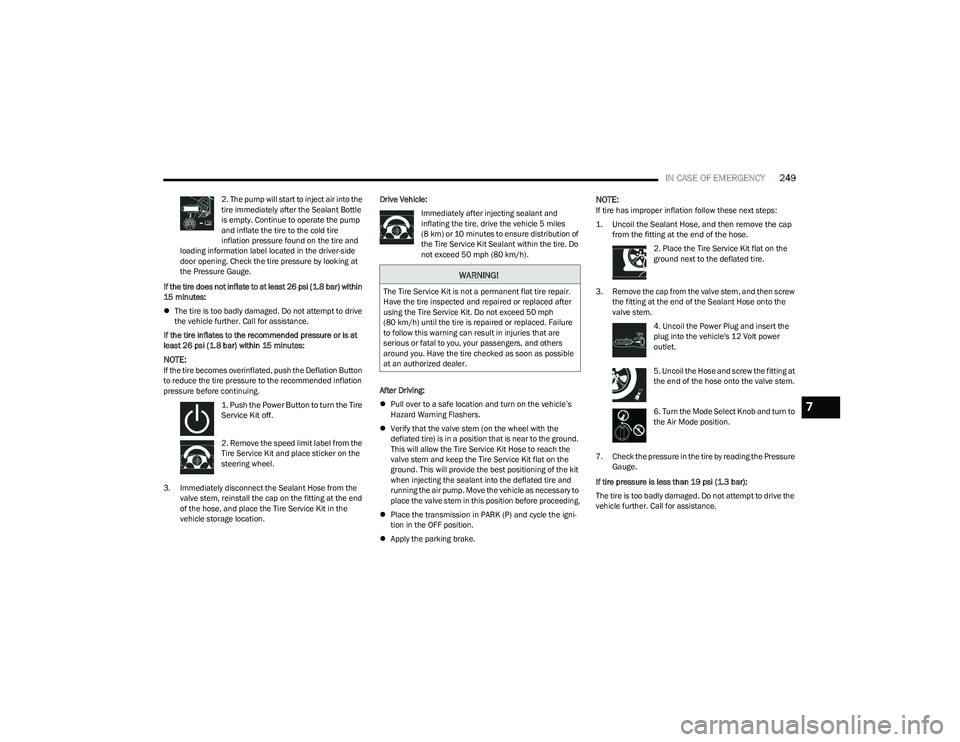
2. The pump will start to inject air into the
tire immediately after the Sealant Bottle
is empty. Continue to operate the pump
and inflate the tire to the cold tire
inflation pressure found on the tire and
loading information label located in the driver-side
door opening. Check the tire pressure by looking at
the Pressure Gauge.
If the tire does not inflate to at least 26 psi (1.8 bar) within
15 minutes:
The tire is too badly damaged. Do not attempt to drive
the vehicle further. Call for assistance.
If the tire inflates to the recommended pressure or is at
least 26 psi (1.8 bar) within 15 minutes:
NOTE:If the tire becomes overinflated, push the Deflation Button
to reduce the tire pressure to the recommended inflation
pressure before continuing.
1. Push the Power Button to turn the Tire
Service Kit off.
2. Remove the speed limit label from the
Tire Service Kit and place sticker on the
steering wheel.
3. Immediately disconnect the Sealant Hose from the valve stem, reinstall the cap on the fitting at the end
of the hose, and place the Tire Service Kit in the
vehicle storage location. Drive Vehicle:
Immediately after injecting sealant and
inflating the tire, drive the vehicle 5 miles
(8 km) or 10 minutes to ensure distribution of
the Tire Service Kit Sealant within the tire. Do
not exceed 50 mph (80 km/h).
After Driving:
Pull over to a safe location and turn on the vehicle’s
Hazard Warning Flashers.
Verify that the valve stem (on the wheel with the
deflated tire) is in a position that is near to the ground.
This will allow the Tire Service Kit Hose to reach the
valve stem and keep the Tire Service Kit flat on the
ground. This will provide the best positioning of the kit
when injecting the sealant into the deflated tire and
running the air pump. Move the vehicle as necessary to
place the valve stem in this position before proceeding.
Place the transmission in PARK (P) and cycle the igni -
tion in the OFF position.
Apply the parking brake.
NOTE:If tire has improper inflation follow these next steps:
1. Uncoil the Sealant Hose, and then remove the cap
from the fitting at the end of the hose.
2. Place the Tire Service Kit flat on the
ground next to the deflated tire.
3. Remove the cap from the valve stem, and then screw the fitting at the end of the Sealant Hose onto the
valve stem.
4. Uncoil the Power Plug and insert the
plug into the vehicle's 12 Volt power
outlet.
5. Uncoil the Hose and screw the fitting at
the end of the hose onto the valve stem.
6. Turn the Mode Select Knob and turn to
the Air Mode position.
7. Check the pressure in the tire by reading the Pressure Gauge.
If tire pressure is less than 19 psi (1.3 bar):
The tire is too badly damaged. Do not attempt to drive the
vehicle further. Call for assistance.
WARNING!
The Tire Service Kit is not a permanent flat tire repair.
Have the tire inspected and repaired or replaced after
using the Tire Service Kit. Do not exceed 50 mph
(80 km/h) until the tire is repaired or replaced. Failure
to follow this warning can result in injuries that are
serious or fatal to you, your passengers, and others
around you. Have the tire checked as soon as possible
at an authorized dealer.
7
23_RUP_OM_EN_USC_t.book Page 249
Page 253 of 328

IN CASE OF EMERGENCY251
JUMP STARTING
If your vehicle has a discharged battery it can be jump
started using a set of jumper cables and a battery in
another vehicle or by using a portable battery booster
pack. Jump starting can be dangerous if done improperly
so please follow the procedures in this section carefully.
NOTE:When using a portable battery booster pack follow the
manufacturer’s operating instructions and precautions.
PREPARATIONS FOR JUMP START
The battery in your vehicle is located on the driver’s side of
the engine compartment.
Battery Location
NOTE:
The positive battery post may be covered with a protective
cap. Lift up on the cap to gain access to the positive
battery post. Do not jump off fuses. Only jump directly off
positive post which has a positive
(+) symbol on or around
the post.
See the following steps to prepare for jump starting:
1. Apply the parking brake, shift the automatic transmission into PARK (P) and place the ignition to
OFF.
2. Turn off the heater, radio, and all electrical accessories.
3. Pull upward and remove the protective cap over the positive (+) battery post.
4. If using another vehicle to jump start the battery, park the vehicle within the jumper cable’s reach, set the
parking brake and make sure the ignition is OFF.
WARNING!
Do not attempt jump starting if the battery is frozen. It
could rupture or explode and cause personal injury.
CAUTION!
Do not use a portable battery booster pack or any other
booster source with a system voltage greater than
12 Volts or damage to the battery, starter motor,
alternator or electrical system may occur.
WARNING!
Take care to avoid the radiator cooling fan whenever
the hood is raised. It can start anytime the ignition
switch is ON. You can be injured by moving fan
blades.
Remove any metal jewelry such as rings, watch
bands and bracelets that could make an inadvertent
electrical contact. You could be seriously injured.
Batteries contain sulfuric acid that can burn your
skin or eyes and generate hydrogen gas which is
flammable and explosive. Keep open flames or
sparks away from the battery.
WARNING!
Do not allow vehicles to touch each other as this could
establish a ground connection and personal injury
could result.
7
23_RUP_OM_EN_USC_t.book Page 251
Page 256 of 328
254IN CASE OF EMERGENCY
If the temperature gauge is moving towards or close to the
HOT (H) position, you can reduce the potential for
overheating by taking the appropriate action.
On highways — slow down.
In city traffic — while stopped, place the transmission in
NEUTRAL (N), but do not increase the engine idle speed
while preventing vehicle motion with the brakes.
If your Air Conditioner (A/C) is on, turn it off. The A/C
system adds heat to the engine cooling system and
turning the A/C off can help remove this heat.
You can also turn the temperature control to maximum
heat, the mode control to floor and the blower control
to high. This allows the heater core to act as a supple -
ment to the radiator and aids in removing heat from the
engine cooling system.MANUAL PARK RELEASE
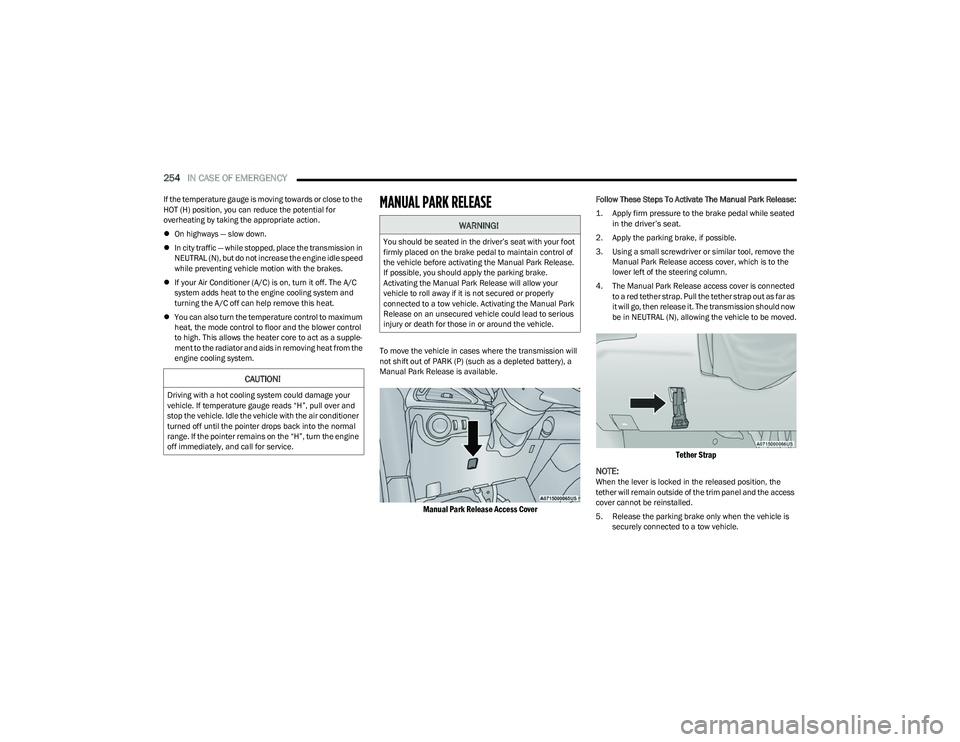
To move the vehicle in cases where the transmission will
not shift out of PARK (P) (such as a depleted battery), a
Manual Park Release is available.
Manual Park Release Access Cover
Follow These Steps To Activate The Manual Park Release:
1. Apply firm pressure to the brake pedal while seated in the driver’s seat.
2. Apply the parking brake, if possible.
3. Using a small screwdriver or similar tool, remove the Manual Park Release access cover, which is to the
lower left of the steering column.
4. The Manual Park Release access cover is connected to a red tether strap. Pull the tether strap out as far as
it will go, then release it. The transmission should now
be in NEUTRAL (N), allowing the vehicle to be moved.
Tether Strap
NOTE:
When the lever is locked in the released position, the
tether will remain outside of the trim panel and the access
cover cannot be reinstalled.
5. Release the parking brake only when the vehicle is securely connected to a tow vehicle.
CAUTION!
Driving with a hot cooling system could damage your
vehicle. If temperature gauge reads “H”, pull over and
stop the vehicle. Idle the vehicle with the air conditioner
turned off until the pointer drops back into the normal
range. If the pointer remains on the “H”, turn the engine
off immediately, and call for service.
WARNING!
You should be seated in the driver’s seat with your foot
firmly placed on the brake pedal to maintain control of
the vehicle before activating the Manual Park Release.
If possible, you should apply the parking brake.
Activating the Manual Park Release will allow your
vehicle to roll away if it is not secured or properly
connected to a tow vehicle. Activating the Manual Park
Release on an unsecured vehicle could lead to serious
injury or death for those in or around the vehicle.
23_RUP_OM_EN_USC_t.book Page 254
Page 257 of 328
IN CASE OF EMERGENCY255
To Reset The Manual Park Release:
1. Apply firm pressure to the brake pedal while seated
in the driver’s seat.
2. Pull the tether strap out again, then release it.
3. Allow the tether to retract with the lever back to its original position.
4. Verify that the transmission is in PARK (P).
5. Confirm that the tether has retracted fully and reinstall the access cover. If the access cover cannot
be reinstalled, repeat steps 1 through 4.
FREEING A STUCK VEHICLE
If your vehicle becomes stuck in mud, sand or snow, it can
often be moved using a rocking motion. Turn the steering
wheel right and left to clear the area around the front
wheels. Then shift back and forth between DRIVE (D) and
REVERSE (R) while gently pressing the accelerator.
NOTE:
Shifts between DRIVE and REVERSE can only be
achieved at wheel speeds of 5 mph (8 km/h) or less.
Whenever the transmission remains in NEUTRAL (N)
for more than two seconds, you must press the brake
pedal to engage DRIVE or REVERSE. Use the least
amount of accelerator pedal pressure that will main -
tain the rocking motion without spinning the wheels or
racing the engine.
Push the ESC OFF button to place the Electronic
Stability Control (ESC) system in “Partial Off” mode,
before rocking the vehicle
Úpage 189. Once the
vehicle has been freed, push the ESC OFF button again
to restore “ESC On” mode.
WARNING!
Fast spinning tires can be dangerous. Forces generated
by excessive wheel speeds may cause damage, or even
failure, of the axle and tires. A tire could explode and
injure someone. Do not spin your vehicle's wheels
faster than 30 mph (48 km/h) or for longer than 30
seconds continuously without stopping when you are
stuck and do not let anyone near a spinning wheel, no
matter what the speed.
CAUTION!
Racing the engine or spinning the wheels may lead to
transmission overheating and failure. Allow the
engine to idle with the transmission in NEUTRAL for
at least one minute after every five rocking-motion
cycles. This will minimize overheating and reduce the
risk of transmission failure during prolonged efforts
to free a stuck vehicle.
When “rocking” a stuck vehicle by shifting between
DRIVE and REVERSE, do not spin the wheels faster
than 15 mph (24 km/h), or drivetrain damage may
result.
Revving the engine or spinning the wheels too fast
may lead to transmission overheating and failure. It
can also damage the tires. Do not spin the wheels
above 30 mph (48 km/h) while in gear (no transmis -
sion shifting occurring).
7
23_RUP_OM_EN_USC_t.book Page 255
Page 259 of 328
IN CASE OF EMERGENCY257
(Continued)
FCA US LLC recommends towing your vehicle with all four
wheels
OFF the ground using a flatbed.
If flatbed equipment is not available, this vehicle must be
towed with the front wheels OFF the ground (using a
towing dolly, or wheel lift equipment with the front wheels
raised).
NOTE:Ensure that the Electric Park Brake is released, and
remains released, while being towed.
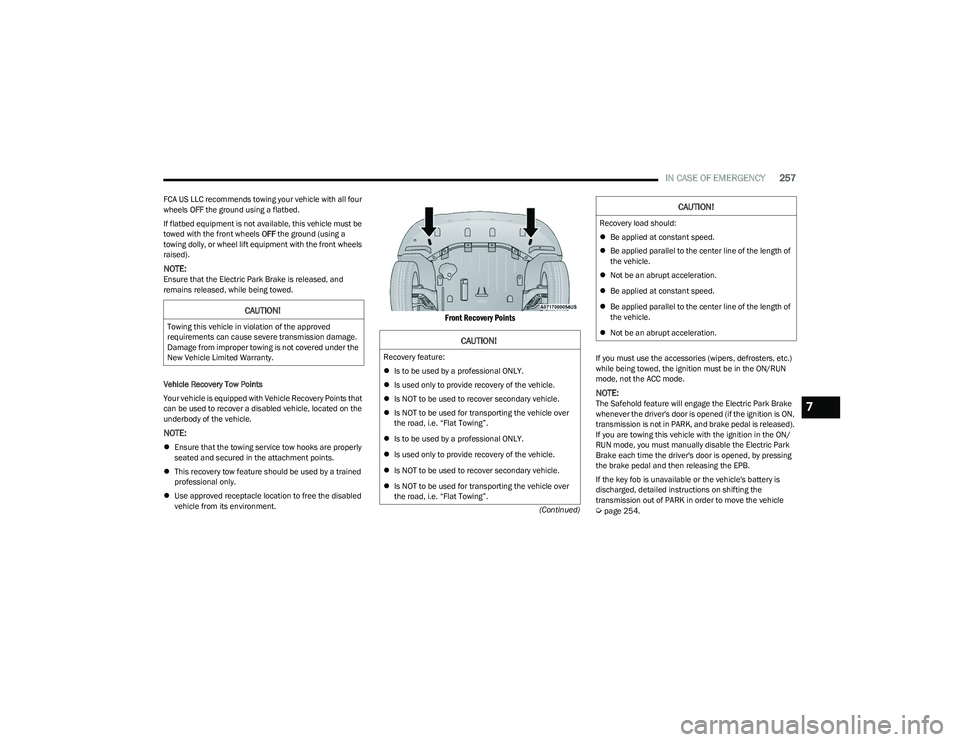
Vehicle Recovery Tow Points
Your vehicle is equipped with Vehicle Recovery Points that
can be used to recover a disabled vehicle, located on the
underbody of the vehicle.
NOTE:
Ensure that the towing service tow hooks are properly
seated and secured in the attachment points.
This recovery tow feature should be used by a trained
professional only.
Use approved receptacle location to free the disabled
vehicle from its environment.
Front Recovery Points
If you must use the accessories (wipers, defrosters, etc.)
while being towed, the ignition must be in the ON/RUN
mode, not the ACC mode.
NOTE:The Safehold feature will engage the Electric Park Brake
whenever the driver's door is opened (if the ignition is ON,
transmission is not in PARK, and brake pedal is released).
If you are towing this vehicle with the ignition in the ON/
RUN mode, you must manually disable the Electric Park
Brake each time the driver's door is opened, by pressing
the brake pedal and then releasing the EPB.
If the key fob is unavailable or the vehicle's battery is
discharged, detailed instructions on shifting the
transmission out of PARK in order to move the vehicle
Úpage 254.
CAUTION!
Towing this vehicle in violation of the approved
requirements can cause severe transmission damage.
Damage from improper towing is not covered under the
New Vehicle Limited Warranty.
CAUTION!
Recovery feature:
Is to be used by a professional ONLY.
Is used only to provide recovery of the vehicle.
Is NOT to be used to recover secondary vehicle.
Is NOT to be used for transporting the vehicle over
the road, i.e. “Flat Towing”.
Is to be used by a professional ONLY.
Is used only to provide recovery of the vehicle.
Is NOT to be used to recover secondary vehicle.
Is NOT to be used for transporting the vehicle over
the road, i.e. “Flat Towing”.
Recovery load should:
Be applied at constant speed.
Be applied parallel to the center line of the length of
the vehicle.
Not be an abrupt acceleration.
Be applied at constant speed.
Be applied parallel to the center line of the length of
the vehicle.
Not be an abrupt acceleration.
CAUTION!
7
23_RUP_OM_EN_USC_t.book Page 257
Page 260 of 328
258IN CASE OF EMERGENCY
ALL WHEEL DRIVE (AWD) MODELS
FCA US LLC recommends towing your vehicle with all four
wheels OFF the ground using a flatbed.
ENHANCED ACCIDENT RESPONSE SYSTEM
(EARS)
This vehicle is equipped with an Enhanced Accident
Response System.
This feature is a communication network that takes effect
in the event of an impact. Detailed information can be
found on
Úpage 218.
EVENT DATA RECORDER (EDR)
This vehicle is equipped with an event data recorder
(EDR). The main purpose of an EDR is to record data that
will assist in understanding how a vehicle’s systems
performed under certain crash or near crash-like
situations, such as an air bag deployment or hitting a road
obstacle. Detailed information can be found on
Úpage 219.
CAUTION!
Do not use sling-type equipment when towing.
Vehicle damage may occur.
When securing the vehicle to a flatbed truck, do not
attach to front or rear suspension components.
Damage to your vehicle may result from improper
towing.
Ensure that the Electric Park Brake is released, and
remains released, while being towed.
CAUTION!
Towing this vehicle using any other method can
cause severe transmission and/or transfer case
damage.
Damage from improper towing is not covered under
the New Vehicle Limited Warranty.
23_RUP_OM_EN_USC_t.book Page 258