2023 CHRYSLER PACIFICA transmission
[x] Cancel search: transmissionPage 145 of 328

STARTING AND OPERATING143
SURROUND VIEW CAMERA SYSTEM —
IF EQUIPPED
Your vehicle may be equipped with the Surround View
Camera system that allows you to see an on-screen image
of the surroundings and Top View of your vehicle whenever
the gear selector is put into REVERSE or a different view is
selected through the touchscreen buttons. The Top View
of the vehicle will show which doors are open. The image
will be displayed on the touchscreen display along with a
caution note “Check Entire Surroundings” across the top
of the screen. After five seconds, this note will disappear.
The Surround View Camera system is comprised of four
sequential cameras located in the front grille, rear liftgate
and side mirrors.
NOTE:The Surround View Camera system has programmable
settings that may be selected through the Uconnect
system
Úpage 157.
Press this button on the touchscreen to enter
the Surround View Camera menu in the
Uconnect system.
When the vehicle is shifted into REVERSE, the Rear View
and Top View is the default view of the system. When the vehicle is shifted out of REVERSE with camera
delay turned on, the camera image will continue to be
displayed for up to 10 seconds unless the vehicle speed
exceeds 8 mph (13 km/h), the vehicle is shifted into
PARK, or the ignition is placed in the OFF position. There is
a touchscreen X button to disable the display of the
camera image.
When the vehicle is shifted out of REVERSE with camera
delay turned off, the Surround View system is exited and
the last known screen appears again.
Whenever the Rear View Camera image is activated
through the Back Up Camera button in the Controls menu,
and the vehicle speed is greater than, or equal to, 8 mph
(13 km/h), a display timer for the image is initiated. The
image will continue to be displayed until the display timer
exceeds 10 seconds.
NOTE:
If the vehicle speed remains below 8 mph (13 km/h),
the Rear View Camera image will be displayed continu -
ously until deactivated via the touchscreen X button,
the transmission is shifted into PARK, or the ignition is
placed in the OFF position.
The touchscreen X button to disable display of the
camera image is made available ONLY when the
vehicle is not in REVERSE. When enabled, active guidelines are overlaid on the image
to illustrate the width of the vehicle, including the side
view mirrors and its projected back up path based on the
steering wheel position.
Different colored zones indicate the distance to the rear of
the vehicle.
The following table shows the approximate distances for
each zone:
Modes Of Operation
Manual activation of the Surround View system is selected
by pressing the Surround View Camera button located in
the Controls screen within the Uconnect system.
Zone
Distance To The Rear Of The
Vehicle
Red 0 - 1 ft (0 - 30 cm)
Yellow 1 ft - 6.5 ft (30 cm - 2 m)
Green 6.5 ft or greater
(2 m or greater)
4
23_RUP_OM_EN_USC_t.book Page 143
Page 151 of 328

STARTING AND OPERATING149
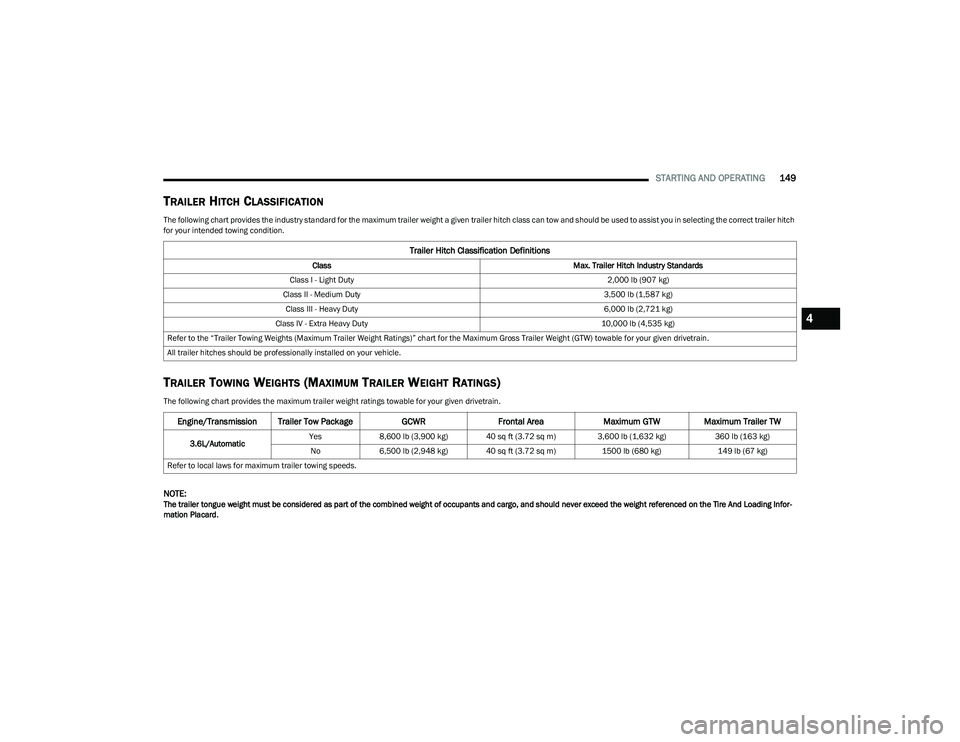
TRAILER HITCH CLASSIFICATION
The following chart provides the industry standard for the maximum trailer weight a given trailer hitch class can tow and should be used to assist you in selecting the correct trailer hitch
for your intended towing condition.
TRAILER TOWING WEIGHTS (MAXIMUM TRAILER WEIGHT RATINGS)
The following chart provides the maximum trailer weight ratings towable for your given drivetrain.
NOTE:The trailer tongue weight must be considered as part of the combined weight of occupants and cargo, and should never exceed the weight referenced on the Tire And Loading Infor -
mation Placard.
Trailer Hitch Classification Definitions
Class Max. Trailer Hitch Industry Standards
Class I - Light Duty 2,000 lb (907 kg)
Class II - Medium Duty 3,500 lb (1,587 kg)
Class III - Heavy Duty 6,000 lb (2,721 kg)
Class IV - Extra Heavy Duty 10,000 lb (4,535 kg)
Refer to the “Trailer Towing Weights (Maximum Trailer Weight Ratings)” chart for the Maximum Gross Trailer Weight (GTW) towable for your given drivetrain.
All trailer hitches should be professionally installed on your vehicle.
Engine/Transmission Trailer Tow Package GCWRFrontal Area Maximum GTW Maximum Trailer TW
3.6L/Automatic Yes
8,600 lb (3,900 kg) 40 sq ft (3.72 sq m) 3,600 lb (1,632 kg) 360 lb (163 kg)
No 6,500 lb (2,948 kg) 40 sq ft (3.72 sq m) 1500 lb (680 kg)149 lb (67 kg)
Refer to local laws for maximum trailer towing speeds.
4
23_RUP_OM_EN_USC_t.book Page 149
Page 153 of 328

STARTING AND OPERATING151
(Continued)
TRAILER AND TONGUE WEIGHT
Never exceed the maximum tongue weight stamped on
your fascia/bumper or trailer hitch.
Weight Distribution
Consider the following items when computing the weight
on the rear axle of the vehicle:
The tongue weight of the trailer.
The weight of any other type of cargo or equipment put
in or on your vehicle.
The weight of the driver and all passengers.
NOTE:Remember that everything put into or on the trailer adds
to the load on your vehicle. Also, additional
factory-installed options or dealer-installed options must
be considered as part of the total load on your vehicle
Úpage 288.
TOWING REQUIREMENTS
To promote proper break-in of your new vehicle drivetrain
components, the following guidelines are recommended.
Perform the maintenance listed in “Scheduled Servicing”
Úpage 259. When towing a trailer, never exceed the
GAWR or GCWR ratings.
CAUTION!
Do not tow a trailer at all during the first 500 miles
(805 km) the new vehicle is driven. The engine, axle
or other parts could be damaged.
Then, during the first 500 miles (805 km) that a
trailer is towed, do not drive over 50 mph (80 km/h)
and do not make starts at full throttle. This helps the
engine and other parts of the vehicle wear in at the
heavier loads.
WARNING!
Make certain that the load is secured in the trailer
and will not shift during travel. When trailering cargo
that is not fully secured, dynamic load shifts can
occur that may be difficult for the driver to control.
You could lose control of your vehicle and have a
collision.
When hauling cargo or towing a trailer, do not over -
load your vehicle or trailer. Overloading can cause a
loss of control, poor performance or damage to
brakes, axle, engine, transmission, steering, suspen -
sion, chassis structure or tires.
Safety chains must always be used between your
vehicle and trailer. Always connect the chains to the
hook retainers of the vehicle hitch. Cross the chains
under the trailer tongue and allow enough slack for
turning corners.
Vehicles with trailers should not be parked on a
grade. When parking, apply the parking brake on the
tow vehicle. Put the tow vehicle transmission in
PARK. For four-wheel drive vehicles, make sure the
transfer case is not in NEUTRAL. Always, block or
"chock" the trailer wheels.
GCWR must not be exceeded.
Total weight must be distributed between the tow
vehicle and the trailer such that the following four
ratings are not exceeded :
GVWR
GTW
GAWR
Tongue weight rating for the trailer hitch utilized
WARNING!
4
23_RUP_OM_EN_USC_t.book Page 151
Page 155 of 328

STARTING AND OPERATING153
The electrical connections are all complete to the vehicle
but you must mate the harness to a trailer connector.
Refer to the following illustrations.
NOTE:
Disconnect the trailer wiring connector from the vehicle
(or any other device plugged into vehicle’s electrical
connectors) before launching a boat into water.
Be sure to reconnect once clear from water area.
Four-Pin Connector Seven-Pin Connector
TOWING TIPS
Before towing, practice turning, stopping, and backing up
the trailer in an area located away from heavy traffic.
Automatic Transmission
Select the DRIVE range when towing. The transmission
controls include a drive strategy to avoid frequent shifting
when towing. For increased engine braking on steep
downhill grades, select the LOW range.
Cruise Control — If Equipped
Do not use on hilly terrain or with heavy loads.
When using the Cruise Control, if you experience speed
drops greater than 10 mph (16 km/h), disengage until
you can get back to cruising speed.
Use Cruise Control in flat terrain and with light loads to
maximize fuel efficiency.
1 — Ground
2 — Park
3 — Left Stop/Turn
4 — Right Stop/Turn1 — Backup Lamps
2 — Running Lamps
3 — Left Stop/Turn
4 — Ground
5 — Battery
6 — Right Stop/Turn
7 — Electric Brakes
4
23_RUP_OM_EN_USC_t.book Page 153
Page 156 of 328

154STARTING AND OPERATING
RECREATIONAL TOWING (BEHIND MOTORHOME)
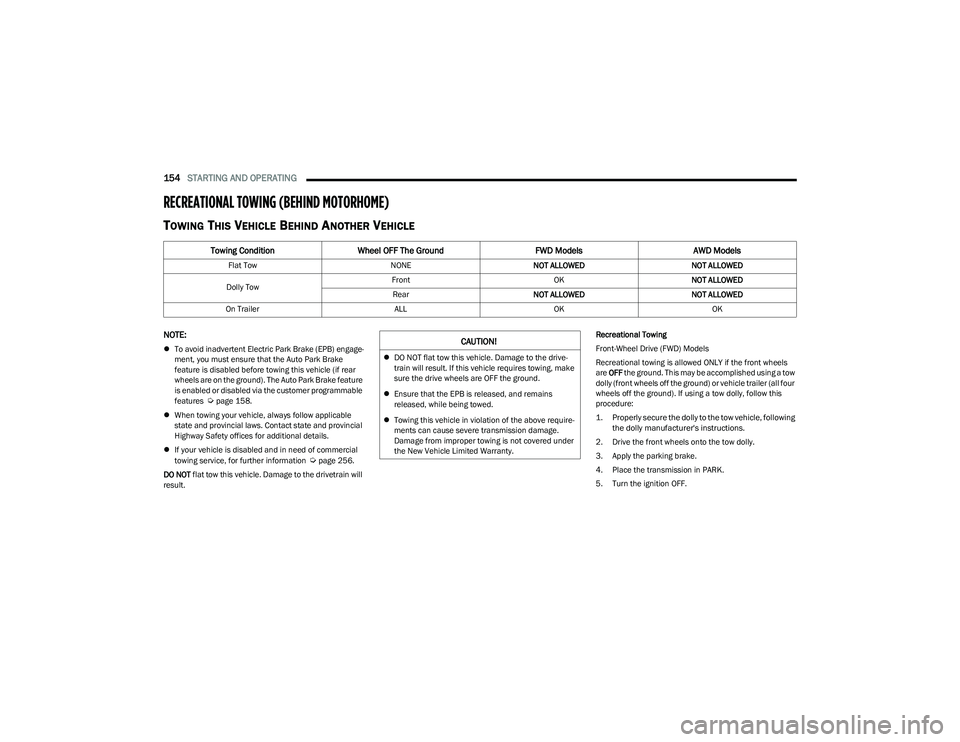
TOWING THIS VEHICLE BEHIND ANOTHER VEHICLE
NOTE:
To avoid inadvertent Electric Park Brake (EPB) engage -
ment, you must ensure that the Auto Park Brake
feature is disabled before towing this vehicle (if rear
wheels are on the ground). The Auto Park Brake feature
is enabled or disabled via the customer programmable
features
Úpage 158.
When towing your vehicle, always follow applicable
state and provincial laws. Contact state and provincial
Highway Safety offices for additional details.
If your vehicle is disabled and in need of commercial
towing service, for further information
Úpage 256.
DO NOT flat tow this vehicle. Damage to the drivetrain will
result. Recreational Towing
Front-Wheel Drive (FWD) Models
Recreational towing is allowed ONLY if the front wheels
are
OFF the ground. This may be accomplished using a tow
dolly (front wheels off the ground) or vehicle trailer (all four
wheels off the ground). If using a tow dolly, follow this
procedure:
1. Properly secure the dolly to the tow vehicle, following the dolly manufacturer's instructions.
2. Drive the front wheels onto the tow dolly.
3. Apply the parking brake.
4. Place the transmission in PARK.
5. Turn the ignition OFF.
Towing Condition Wheel OFF The Ground FWD ModelsAWD Models
Flat Tow NONENOT ALLOWED NOT ALLOWED
Dolly Tow Front
OKNOT ALLOWED
Rear NOT ALLOWED NOT ALLOWED
On Trailer ALLOKOK
CAUTION!
DO NOT flat tow this vehicle. Damage to the drive -
train will result. If this vehicle requires towing, make
sure the drive wheels are OFF the ground.
Ensure that the EPB is released, and remains
released, while being towed.
Towing this vehicle in violation of the above require -
ments can cause severe transmission damage.
Damage from improper towing is not covered under
the New Vehicle Limited Warranty.
23_RUP_OM_EN_USC_t.book Page 154
Page 157 of 328

STARTING AND OPERATING155
6. Properly secure the front wheels to the dolly, following
the dolly manufacturer's instructions.
7. Turn the ignition to the ON/RUN position, but do not start the vehicle.
8. Press and hold the brake pedal.
9. Release the parking brake.
10. Turn the ignition OFF.
11. Release the brake pedal.
All-Wheel Drive (AWD) Models
Recreational towing (with all four wheels on the ground, or
using a towing dolly) is NOT ALLOWED. The only
acceptable method for towing this vehicle (behind another
vehicle) is on a vehicle trailer with all four wheels OFF the
ground.DRIVING TIPS
DRIVING ON SLIPPERY SURFACES
Information in this section will aid in safe controlled
launches in adverse conditions.
Acceleration
Rapid acceleration on snow covered, wet, or other slippery
surfaces may cause the driving wheels to pull erratically to
the right or left. This phenomenon occurs when there is a
difference in the surface traction under the front (driving)
wheels.
Traction
When driving on wet or slushy roads, it is possible for a
wedge of water to build up between the tire and road
surface. This is hydroplaning and may cause partial or
complete loss of vehicle control and stopping ability. To
reduce this possibility, the following precautions should be
observed:
Slow down during rainstorms or when the roads are
slushy.
Slow down if the road has standing water or puddles.
Replace the tires when tread wear indicators first
become visible.
Keep tires properly inflated.
Maintain sufficient distance between your vehicle and
the vehicle in front of you to avoid a collision in a
sudden stop.
CAUTION!
Towing this vehicle with ANY of its wheels on the ground
can cause severe transmission and/or power transfer
unit damage. Damage from improper towing is not
covered under the New Vehicle Limited Warranty.
WARNING!
Rapid acceleration on slippery surfaces is dangerous.
Unequal traction can cause sudden pulling of the front
wheels. You could lose control of the vehicle and
possibly have a collision. Accelerate slowly and carefully
whenever there is likely to be poor traction (ice, snow,
wet, mud, loose sand, etc.).
4
23_RUP_OM_EN_USC_t.book Page 155
Page 170 of 328

168MULTIMEDIA
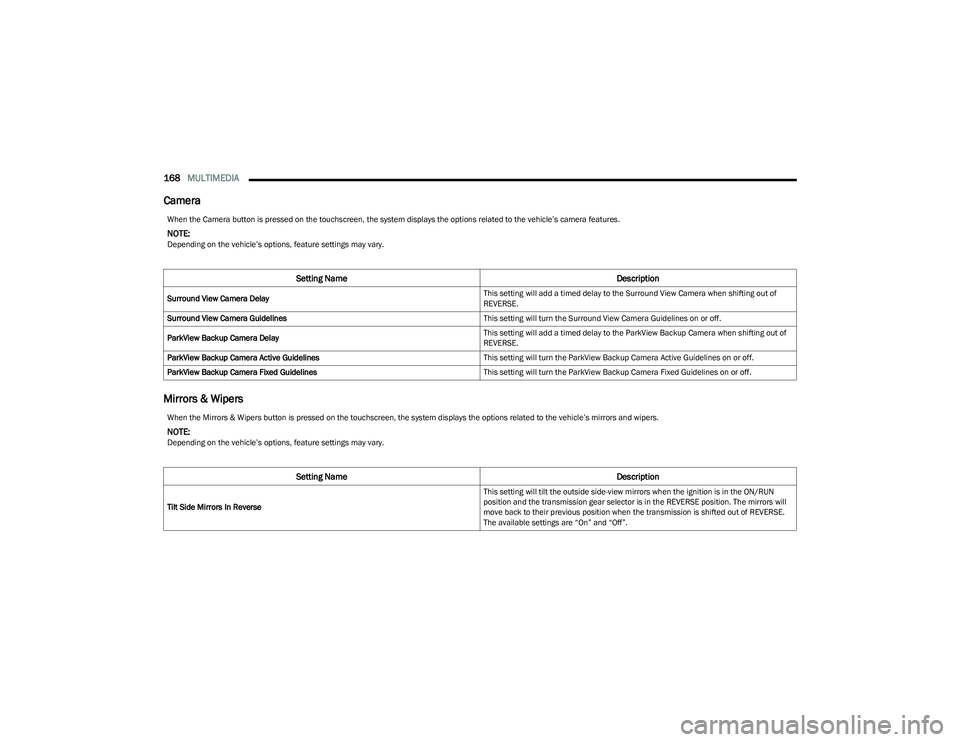
Camera
Mirrors & Wipers
When the Camera button is pressed on the touchscreen, the system displays the options related to the vehicle’s camera features.
NOTE:Depending on the vehicle’s options, feature settings may vary.
Setting Name Description
Surround View Camera Delay This setting will add a timed delay to the Surround View Camera when shifting out of
REVERSE.
Surround View Camera Guidelines This setting will turn the Surround View Camera Guidelines on or off.
ParkView Backup Camera Delay This setting will add a timed delay to the ParkView Backup Camera when shifting out of
REVERSE.
ParkView Backup Camera Active Guidelines This setting will turn the ParkView Backup Camera Active Guidelines on or off.
ParkView Backup Camera Fixed Guidelines This setting will turn the ParkView Backup Camera Fixed Guidelines on or off.
When the Mirrors & Wipers button is pressed on the touchscreen, the system displays the options related to the vehicle’s mirrors and wipers.
NOTE:Depending on the vehicle’s options, feature settings may vary.
Setting NameDescription
Tilt Side Mirrors In Reverse This setting will tilt the outside side-view mirrors when the ignition is in the ON/RUN
position and the transmission gear selector is in the REVERSE position. The mirrors will
move back to their previous position when the transmission is shifted out of REVERSE.
The available settings are “On” and “Off”.
23_RUP_OM_EN_USC_t.book Page 168
Page 192 of 328

190SAFETY
ESC Activation/Malfunction Indicator Light
And ESC OFF Indicator Light
The ESC Activation/Malfunction Indicator Light
in the instrument cluster will come on when the
ignition is placed in the ON/RUN mode. It
should go out with the engine running. If the
ESC Activation/Malfunction Indicator Light comes on
continuously with the engine running, a malfunction has
been detected in the ESC system. If this light remains on
after several ignition cycles, and the vehicle has been
driven several miles (kilometers) at speeds greater than
30 mph (48 km/h), see an authorized dealer as soon as possible to have the problem diagnosed and corrected. The ESC Activation/Malfunction Indicator Light starts to
flash as soon as the tires lose traction and the ESC system
becomes active. The ESC Activation/Malfunction Indicator
Light also flashes when TCS is active. If the ESC
Activation/Malfunction Indicator Light begins to flash
during acceleration, ease up on the accelerator and apply
as little throttle as possible. Be sure to adapt your speed
and driving to the prevailing road conditions.
The ESC OFF Indicator Light indicates that the
Electronic Stability Control (ESC) is in a reduced
mode.
NOTE:
The ESC Activation/Malfunction Indicator Light and the
ESC OFF Indicator Light come on momentarily each
time the ignition is placed in the ON/RUN position.
Each time the ignition is placed in the ON/RUN posi -
tion, the ESC system will be on even if it was turned off
previously.
The ESC system will make buzzing or clicking sounds
when it is active. This is normal; the sounds will stop
when ESC becomes inactive following the maneuver
that caused the ESC activation.
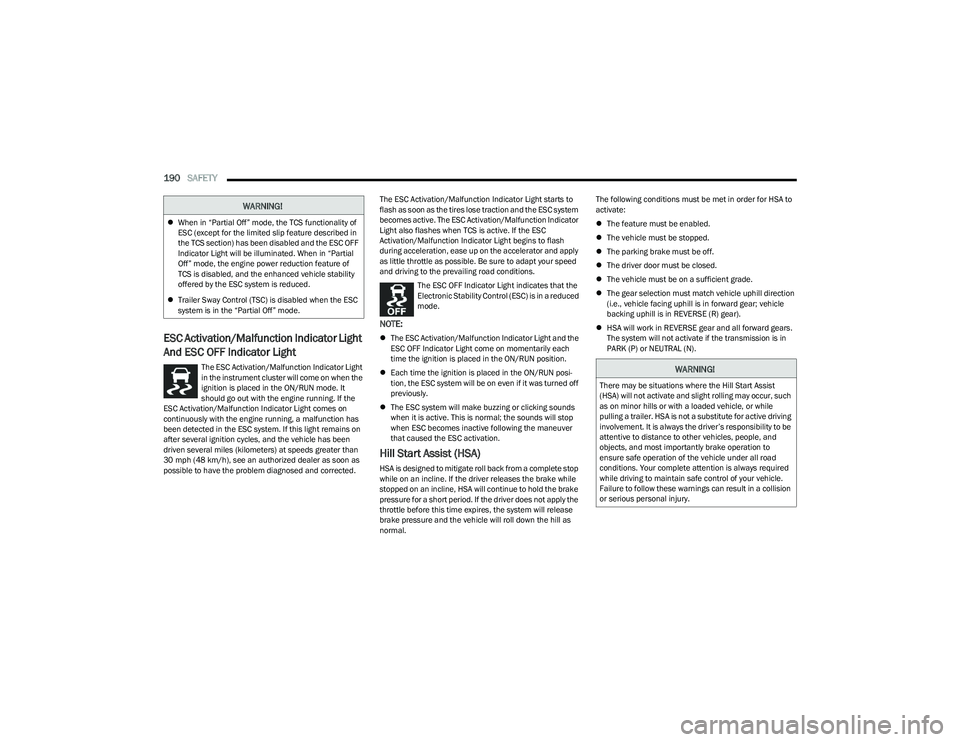
Hill Start Assist (HSA)
HSA is designed to mitigate roll back from a complete stop
while on an incline. If the driver releases the brake while
stopped on an incline, HSA will continue to hold the brake
pressure for a short period. If the driver does not apply the
throttle before this time expires, the system will release
brake pressure and the vehicle will roll down the hill as
normal. The following conditions must be met in order for HSA to
activate:
The feature must be enabled.
The vehicle must be stopped.
The parking brake must be off.
The driver door must be closed.
The vehicle must be on a sufficient grade.
The gear selection must match vehicle uphill direction
(i.e., vehicle facing uphill is in forward gear; vehicle
backing uphill is in REVERSE (R) gear).
HSA will work in REVERSE gear and all forward gears.
The system will not activate if the transmission is in
PARK (P) or NEUTRAL (N).
WARNING!
When in “Partial Off” mode, the TCS functionality of
ESC (except for the limited slip feature described in
the TCS section) has been disabled and the ESC OFF
Indicator Light will be illuminated. When in “Partial
Off” mode, the engine power reduction feature of
TCS is disabled, and the enhanced vehicle stability
offered by the ESC system is reduced.
Trailer Sway Control (TSC) is disabled when the ESC
system is in the “Partial Off” mode.
WARNING!
There may be situations where the Hill Start Assist
(HSA) will not activate and slight rolling may occur, such
as on minor hills or with a loaded vehicle, or while
pulling a trailer. HSA is not a substitute for active driving
involvement. It is always the driver’s responsibility to be
attentive to distance to other vehicles, people, and
objects, and most importantly brake operation to
ensure safe operation of the vehicle under all road
conditions. Your complete attention is always required
while driving to maintain safe control of your vehicle.
Failure to follow these warnings can result in a collision
or serious personal injury.
23_RUP_OM_EN_USC_t.book Page 190