2023 CHRYSLER PACIFICA seats
[x] Cancel search: seatsPage 71 of 328

GETTING TO KNOW YOUR VEHICLE69
BI-LEVEL MODE
Press this button on the touchscreen to change
the air distribution mode to Bi-Level Mode. In
Bi-Level Mode, air comes from the headliner
and floor outlets.
NOTE:Bi-Level Mode is designed under comfort conditions to
provide cooler air out of the panel outlets and warmer air
from the floor outlets.
FLOOR MODE
Press this button on the touchscreen to change
the air distribution mode to Floor Mode. In Floor
Mode, air comes from the floor outlets.
REAR PASSENGER CLIMATE CONTROL OFF
BUTTON
Press and release this button to turn the Rear
Climate Controls off.
Rear Manual Temperature Control (MTC)
The rear Manual Temperature Control (MTC) system has
floor air outlets at the rear right side of the third row seats
and overhead outlets at each outboard rear seating
position. The system provides heated air through the floor
outlets or cool, dehumidified air through the headliner
outlets.
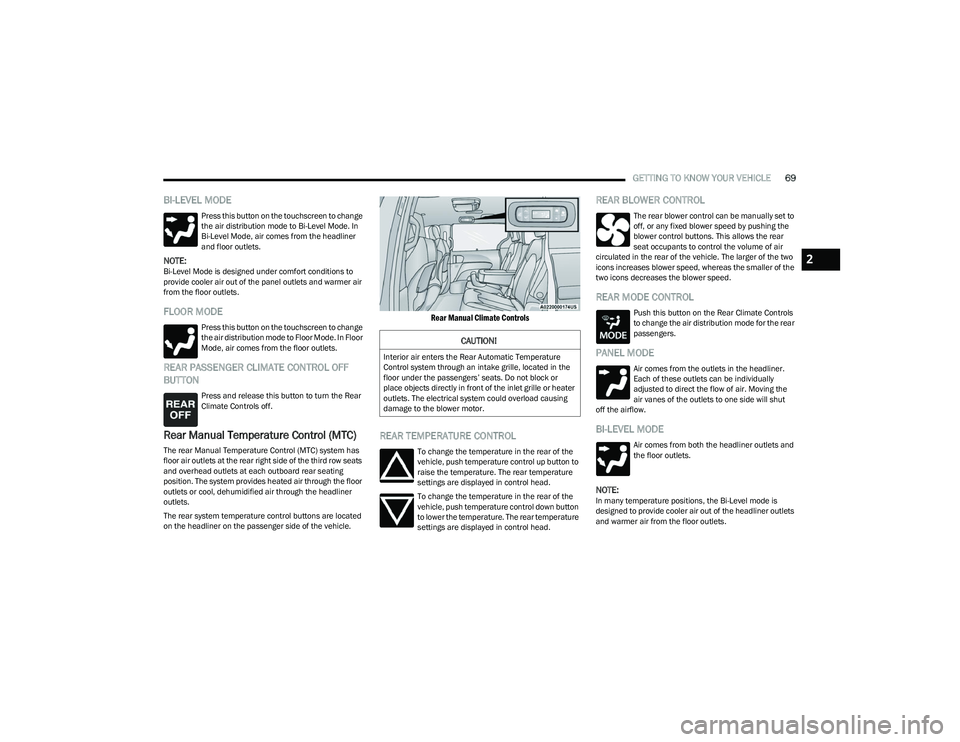
The rear system temperature control buttons are located
on the headliner on the passenger side of the vehicle.
Rear Manual Climate Controls
REAR TEMPERATURE CONTROL
To change the temperature in the rear of the
vehicle, push temperature control up button to
raise the temperature. The rear temperature
settings are displayed in control head.
To change the temperature in the rear of the
vehicle, push temperature control down button
to lower the temperature. The rear temperature
settings are displayed in control head.
REAR BLOWER CONTROL
The rear blower control can be manually set to
off, or any fixed blower speed by pushing the
blower control buttons. This allows the rear
seat occupants to control the volume of air
circulated in the rear of the vehicle. The larger of the two
icons increases blower speed, whereas the smaller of the
two icons decreases the blower speed.
REAR MODE CONTROL
Push this button on the Rear Climate Controls
to change the air distribution mode for the rear
passengers.
PANEL MODE
Air comes from the outlets in the headliner.
Each of these outlets can be individually
adjusted to direct the flow of air. Moving the
air vanes of the outlets to one side will shut
off the airflow.
BI-LEVEL MODE
Air comes from both the headliner outlets and
the floor outlets.
NOTE:In many temperature positions, the Bi-Level mode is
designed to provide cooler air out of the headliner outlets
and warmer air from the floor outlets.
CAUTION!
Interior air enters the Rear Automatic Temperature
Control system through an intake grille, located in the
floor under the passengers’ seats. Do not block or
place objects directly in front of the inlet grille or heater
outlets. The electrical system could overload causing
damage to the blower motor.
2
23_RUP_OM_EN_USC_t.book Page 69
Page 72 of 328

70GETTING TO KNOW YOUR VEHICLE
FLOOR MODE
Air comes from the floor outlets.
REAR CLIMATE CONTROL/BLOWER OFF
To manually set the rear blower controls to off,
press the Rear Climate Control/Blower Off
button.
AUTOMATIC TEMPERATURE CONTROL
(ATC) — I
F EQUIPPED
Automatic Operation
1. Push the AUTO button on the faceplate, or the AUTO
button on the touchscreen on the Automatic
Temperature Control (ATC) Panel.
2. Next, adjust the temperature you would like the system to maintain by adjusting the driver and
passenger temperature control buttons. Once the
desired temperature is displayed, the system will
achieve and automatically maintain that comfort
level.
3. When the system is set up for your comfort level, it is not necessary to change the settings. You will
experience the greatest efficiency by simply allowing
the system to function automatically.
NOTE:
It is not necessary to move the temperature settings for
cold or hot vehicles. The system automatically adjusts
the temperature, mode, and blower speed to provide
comfort as quickly as possible.
The temperature can be displayed in U.S. or Metric
units by selecting the U.S./Metric customer-program -
mable feature within the Uconnect system
Úpage 157.
To provide you with maximum comfort in the Automatic
mode during cold start-ups, the blower fan will remain on
low until the engine warms up. The blower will increase in
speed and transition into Auto mode.
Manual Operation Override
This system offers a full complement of manual override
features. The AUTO symbol in the front Automatic
Temperature Control (ATC) display will be turned off when
the system is being used in the manual mode.
CLIMATE VOICE COMMANDS
Adjust vehicle temperatures hands-free and keep
everyone comfortable while you keep moving ahead
(If vehicle is equipped with climate control).
Push the VR button on the steering wheel. After the beep,
say one of the following commands:
“Set driver temperature to 70 degrees ”
“Set passenger temperature to 70 degrees ”
Did you know : Voice Command for Climate may only be
used to adjust the interior temperature of your vehicle.
Voice Command will not work to adjust the heated seats
or steering wheel if equipped.
OPERATING TIPS
Refer to the chart at the end of this section for suggested
control settings for various weather conditions.
Summer Operation
The engine cooling system must be protected with a
high-quality antifreeze coolant to provide proper corrosion
protection and to protect against engine overheating. OAT
coolant (conforming to MS.90032) is recommended.
Winter Operation
To ensure the best possible heater and defroster
performance, make sure the engine cooling system is
functioning properly and the proper amount, type, and
concentration of coolant is used. Use of the Air
Recirculation mode during Winter months is not
recommended, because it may cause window fogging.
Vacation/Storage
For information on maintaining the Climate Control system
when the vehicle is being stored for an extended period of
time, see
Úpage 299.
Window Fogging
Vehicle windows tend to fog on the inside in mild, rainy,
and/or humid weather. To clear the windows, select
Defrost or Mix mode and increase the front blower speed.
Do not use the Recirculation mode without A/C for long
periods, as fogging may occur.
23_RUP_OM_EN_USC_t.book Page 70
Page 74 of 328

72GETTING TO KNOW YOUR VEHICLE
Storage Drawers — If Equipped
There may be a storage drawer located in the lower center
of the instrument panel, or as part of the center console.
It can be released by pushing the access button above the
drawer. The drawer is actuator assisted once the access
button is pushed. Pull drawer outward to the fully open
position.
Instrument Panel Storage Drawer
Front Seatback Storage — If Equipped
The front seatbacks have a storage pocket on some
models.
Front Seatback Storage
Second Row Floor Storage Bins
There are removable storage bins (if equipped) located in
the areas below the load floor, located in front of the
second row seats.
In Floor Storage Bin
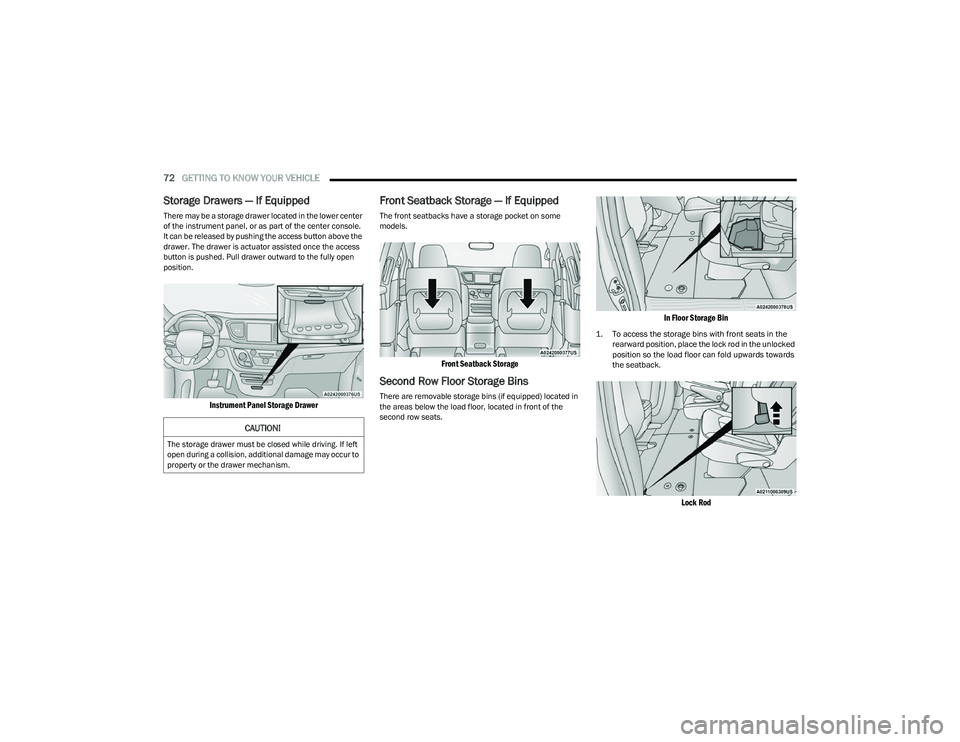
1. To access the storage bins with front seats in the
rearward position, place the lock rod in the unlocked
position so the load floor can fold upwards towards
the seatback.
Lock Rod
CAUTION!
The storage drawer must be closed while driving. If left
open during a collision, additional damage may occur to
property or the drawer mechanism.
23_RUP_OM_EN_USC_t.book Page 72
Page 76 of 328

74GETTING TO KNOW YOUR VEHICLE
LIGHTED CUPHOLDERS — IF EQUIPPED
On some vehicles, the front cupholders are equipped with
a light ring that illuminates the cupholders for the front
passengers. The light ring is controlled by the Dimmer
Controls
Úpage 58.
SUN SCREENS — IF EQUIPPED
Sun screens are available for second and third row seating
windows. The screens store in the sill trim panels, and the
tops of the windows are equipped with hooks that the sun
screens attach to when pulled out.
Gently pull up on the tab to raise the sun screen. Continue
pulling the sun screen until the tab is near the top of the
window.
Once the screen is completely to the top of the window,
extend the top bar of the sun screen over the two hooks
attached to the top of the window.
Sun Screen Extended
To lower the sun screen, gently lift the tab upward to
disengage the hooks, and feed the screen back into the
base sill.
USB/AUX CONTROL
There are numerous USB ports located throughout the
vehicle that allow an external USB device to be plugged
into the USB port.
NOTE:
If a smartphone is plugged into a video USB port, the
device will only have charging capability and allow for
files/media to be stored, if equipped with Uconnect
Theater.
Once a device is connected to the USB port, it will begin
charging and is ready for use with the system. Type C
and Type A charge-only USB ports can be used at the
same time but cannot be used simultaneously while
playing media. When both Type C and Type A
charge-only USB ports are in use they will be charged at
a reduced rate.
For example, if a device is plugged into the Type A USB port
and another device is plugged into the Type C USB port, a
message will appear and allow you to select which device
to use.
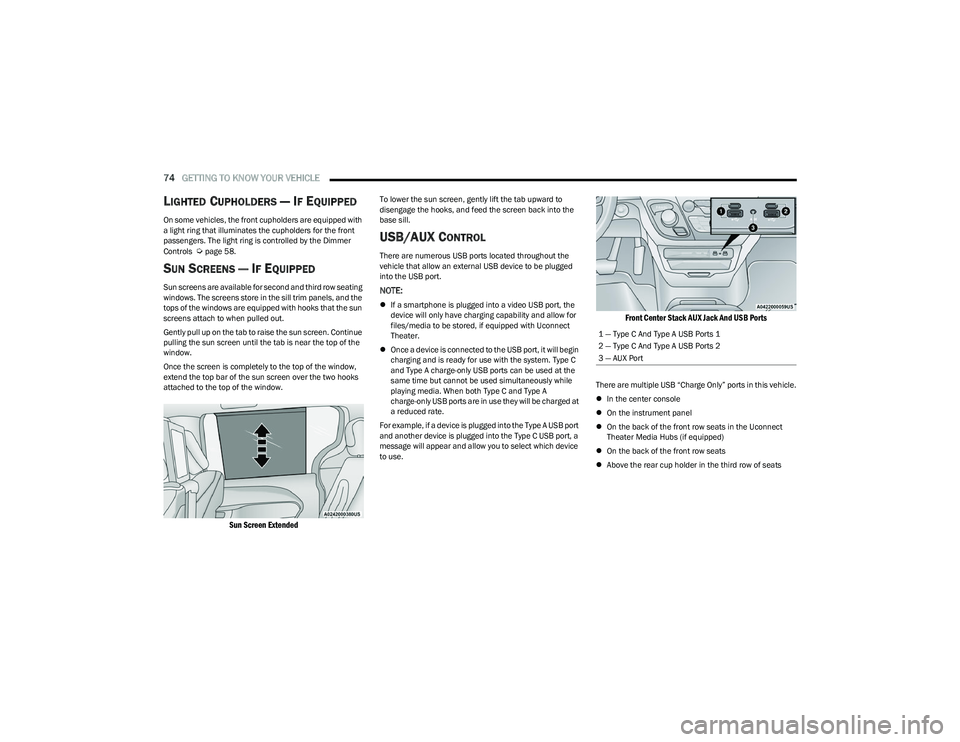
Front Center Stack AUX Jack And USB Ports
There are multiple USB “Charge Only” ports in this vehicle.
In the center console
On the instrument panel
On the back of the front row seats in the Uconnect
Theater Media Hubs (if equipped)
On the back of the front row seats
Above the rear cup holder in the third row of seats
1 — Type C And Type A USB Ports 1
2 — Type C And Type A USB Ports 2
3 — AUX Port
23_RUP_OM_EN_USC_t.book Page 74
Page 79 of 328

GETTING TO KNOW YOUR VEHICLE77
POWER INVERTER — IF EQUIPPED
There is a 115 Volt, 150 W Power Inverter outlet located
on the right side of the vehicle, before the third row of
seats to convert DC current to AC current. The Power
Inverter can power cellular phones, electronics and other
low power devices requiring up to 150 W. Certain video
game consoles will exceed this power limit, as will most
power tools.
Power Inverter
The Power Inverter turns on when the device is plugged in,
and the ignition is in ON/RUN position. It turns off when
the device is unplugged or the ignition is no longer in ON/
RUN position.
The Power Inverter is designed with built-in overload
protection. If the power rating of 150 W is exceeded, the
Power Inverter shuts down. Once the electrical device has
been removed from the Power Inverter, it resets. To avoid
overloading the circuit, check the power ratings on
electrical devices prior to using the Power Inverter.
WIRELESS CHARGING PAD —
I
F EQUIPPED
Wireless Charging Pad Location
Your vehicle may be equipped with a 15W 3A Qi wireless
charging pad located inside of the storage area below the
climate controls. This charging pad is designed to
wirelessly charge your Qi enabled mobile phone. Qi is a
standard that allows wireless charging of your mobile
phone.
Your mobile phone must be designed for Qi wireless
charging. If the phone is not equipped with Qi wireless
charging functionality, an aftermarket sleeve or a
specialized back plate can be purchased from your mobile
phone provider or a local electronics retailer. Please see
your phone’s owner’s manual for further information.
The wireless charging pad is equipped with an anti-slip
mat to hold your mobile phone in place, and an LED
indicator light.
CAUTION!
Many accessories that can be plugged in draw power
from the vehicle's battery, even when not in use (i.e.,
cellular phones, etc.). Eventually, if plugged in long
enough, the vehicle's battery will discharge suffi -
ciently to degrade battery life and/or prevent the
engine from starting.
Accessories that draw higher power (i.e., coolers,
vacuum cleaners, lights, etc.) will degrade the
battery even more quickly. Only use these intermit -
tently and with greater caution.
After the use of high power draw accessories, or long
periods of the vehicle not being started (with acces -
sories still plugged in), the vehicle must be driven a
sufficient length of time to allow the generator to
recharge the vehicle's battery.
WARNING!
To avoid serious injury or death:
Do not insert any objects into the receptacles.
Do not touch with wet hands.
Close the lid when not in use.
If this outlet is mishandled, it may cause an electric
shock and failure.
2
23_RUP_OM_EN_USC_t.book Page 77
Page 88 of 328

86GETTING TO KNOW YOUR VEHICLE
(Continued)
CARGO AREA FEATURES
Cargo Area Storage
When the third row seats are not in the stowed position,
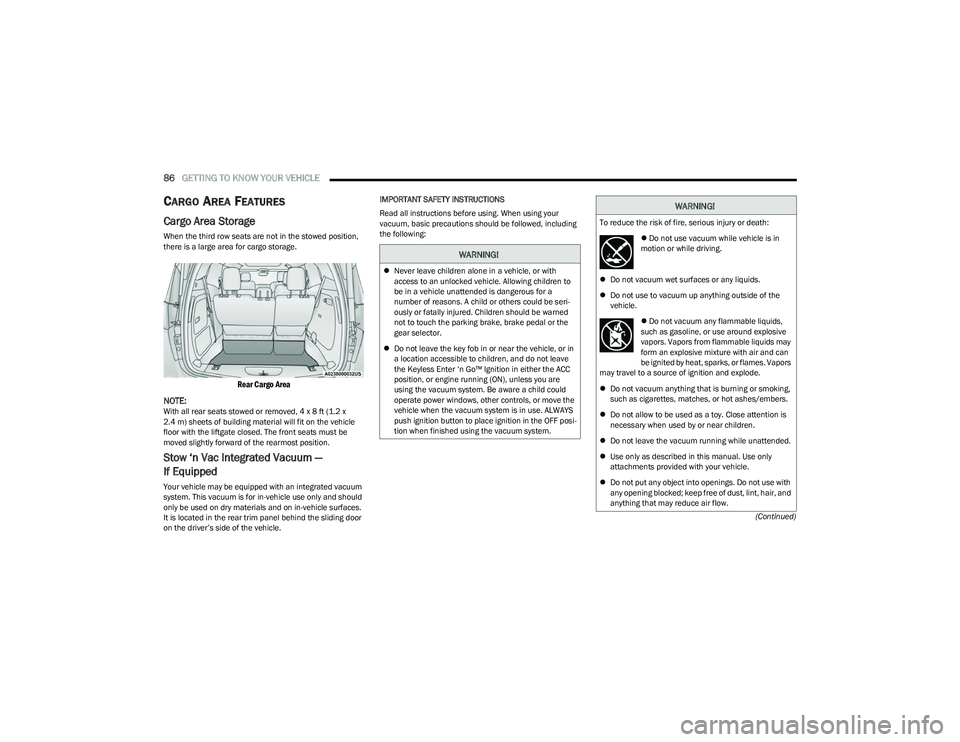
there is a large area for cargo storage.
Rear Cargo Area
NOTE:
With all rear seats stowed or removed, 4 x 8 ft (1.2 x
2.4 m) sheets of building material will fit on the vehicle
floor with the liftgate closed. The front seats must be
moved slightly forward of the rearmost position.
Stow ‘n Vac Integrated Vacuum —
If Equipped
Your vehicle may be equipped with an integrated vacuum
system. This vacuum is for in-vehicle use only and should
only be used on dry materials and on in-vehicle surfaces.
It is located in the rear trim panel behind the sliding door
on the driver’s side of the vehicle. IMPORTANT SAFETY INSTRUCTIONS
Read all instructions before using. When using your
vacuum, basic precautions should be followed, including
the following:
WARNING!
Never leave children alone in a vehicle, or with
access to an unlocked vehicle. Allowing children to
be in a vehicle unattended is dangerous for a
number of reasons. A child or others could be seri -
ously or fatally injured. Children should be warned
not to touch the parking brake, brake pedal or the
gear selector.
Do not leave the key fob in or near the vehicle, or in
a location accessible to children, and do not leave
the Keyless Enter ‘n Go™ Ignition in either the ACC
position, or engine running (ON), unless you are
using the vacuum system. Be aware a child could
operate power windows, other controls, or move the
vehicle when the vacuum system is in use. ALWAYS
push ignition button to place ignition in the OFF posi -
tion when finished using the vacuum system.
WARNING!
To reduce the risk of fire, serious injury or death:
Do not use vacuum while vehicle is in
motion or while driving.
Do not vacuum wet surfaces or any liquids.
Do not use to vacuum up anything outside of the
vehicle.
Do not vacuum any flammable liquids,
such as gasoline, or use around explosive
vapors. Vapors from flammable liquids may
form an explosive mixture with air and can
be ignited by heat, sparks, or flames. Vapors
may travel to a source of ignition and explode.
Do not vacuum anything that is burning or smoking,
such as cigarettes, matches, or hot ashes/embers.
Do not allow to be used as a toy. Close attention is
necessary when used by or near children.
Do not leave the vacuum running while unattended.
Use only as described in this manual. Use only
attachments provided with your vehicle.
Do not put any object into openings. Do not use with
any opening blocked; keep free of dust, lint, hair, and
anything that may reduce air flow.
23_RUP_OM_EN_USC_t.book Page 86
Page 90 of 328

88GETTING TO KNOW YOUR VEHICLE
(Continued)
NOTE:To access crevice or upholstery attachments, open the
front Attachment Compartment.
Crevice Tool — Able to reach into tight spaces
including the seat latches located in the floor.
Upholstery Tool — Use to agitate dirt and debris
from carpets and seats. This tool can also be used
to pick up pet hair.
Hose Extension — Use to add another 12 ft (3.6 m)
of usable length to the vacuum hose. Hose exten -
sion is provided in a bag attached to a grocery
hook behind the third row seat on the driver’s side.
4. Push the vacuum on/off button located under the vacuum nozzle storage location. Use vacuum as
needed.
NOTE:
When the vacuum is ON, the LED indicator on the
on/off button will illuminate.
When the vacuum is OFF, the LED indicator will
also be off.
After nine minutes of operation in ACC mode
(engine not running), the Low Power Indicator
Light (LOW PWR) will illuminate.
Power Buttons
1 — Low Power Indicator Light
2 — On/Off Button
WARNING!
For in vehicle use ONLY. To reduce the risk of fire,
serious injury or death:
Do not use vacuum while vehicle is in
motion or while driving.
Do not vacuum wet surfaces or any liquids.
Do not use to vacuum up anything outside of the
vehicle.
Do not vacuum any flammable liquids,
such as gasoline, or use around explosive
vapors. Vapors from flammable liquids may
form an explosive mixture with air and can
be ignited by heat, sparks, or flames. Vapors
may travel to a source of ignition and explode.
Do not vacuum anything that is burning or smoking,
such as cigarettes, matches, or hot ashes/embers.
Do not allow to be used as a toy. Close attention is
necessary when used by or near children.
Do not leave the vacuum running while unattended.
Use only as described in this manual. Use only
attachments provided with your vehicle.
Do not put any object into openings. Do not use with
any opening blocked; keep free of dust, lint, hair, and
anything that may reduce air flow.
Do not vacuum toxic material such as chlorine
bleach, ammonia, drain cleaner, etc.
Do not vacuum hard or sharp objects such as glass,
nails, screws, coins, etc.
Keep hair, loose clothing, fingers, and all parts of
body away from openings and moving parts.
Only use with filter in place. Periodically check that
the filter is in place and in good condition.
WARNING!
23_RUP_OM_EN_USC_t.book Page 88
Page 104 of 328

102GETTING TO KNOW YOUR INSTRUMENT PANEL
NOTE:
The charging system is independent from load reduc -
tion. The charging system performs a diagnostic on the
charging system continuously.
If the Battery Charge Warning Light is on it may indicate
a problem with the charging system
Úpage 103.
The electrical loads that may be switched off (if equipped),
and vehicle functions which can be effected by load
reduction:
Heated Seat/Vented Seats/Heated Wheel
Heated/Cooled Cup Holders — If Equipped
Rear Defroster And Heated Mirrors
HVAC System
115 Volts AC Power Inverter System
Audio and Telematics System
Loss of the battery charge may indicate one or more of the
following conditions:
The charging system cannot deliver enough electrical
power to the vehicle system because the electrical
loads are larger than the capability of charging system.
The charging system is still functioning properly.
Turning on all possible vehicle electrical loads (e.g.
HVAC to max settings, exterior and interior lights, over -
loaded power outlets +12 Volts, 150W, USB ports)
during certain driving conditions (city driving, towing,
frequent stopping).
Installing options like additional lights, upfitter elec -
trical accessories, audio systems, alarms and similar
devices.
Unusual driving cycles (short trips separated by long
parking periods).
The vehicle was parked for an extended period of time
(weeks, months).
The battery was recently replaced and was not charged
completely.
The battery was discharged by an electrical load left on
when the vehicle was parked.
The battery was used for an extended period with the
engine not running to supply radio, lights, chargers,
+12 Volt portable appliances like vacuum cleaners,
game consoles and similar devices.
What to do when an electrical load reduction action
message is present (“Battery Saver On” or “Battery Saver
Mode”)
During a trip:
Reduce power to unnecessary loads if possible:
Turn off redundant lights (interior or exterior)
Check what may be plugged in to power outlets
+12 Volts, 150W, USB ports
Check HVAC settings (blower, temperature)
Check the audio settings (volume)
After a trip:
Check if any aftermarket equipment was installed
(additional lights, upfitter electrical accessories, audio
systems, alarms) and review specifications if any (load
and Ignition Off Draw currents).
Evaluate the latest driving cycles (distance, driving
time and parking time).
The vehicle should have service performed if the
message is still present during consecutive trips and
the evaluation of the vehicle and driving pattern did not
help to identify the cause.
WARNING LIGHTS AND MESSAGES
The warning/indicator lights will illuminate in the
instrument panel together with a dedicated message and/
or acoustic signal when applicable. These indications are
indicative and precautionary and as such must not be
considered as exhaustive and/or alternative to the
information contained in the Owner’s Manual, which you
are advised to read carefully in all cases. Always refer to
the information in this chapter in the event of a failure
indication. All active telltales will display first if applicable.
The system check menu may appear different based upon
equipment options and current vehicle status. Some
telltales are optional and may not appear.
RED WARNING LIGHTS
Air Bag Warning Light
This warning light will illuminate to indicate a
fault with the air bag, and will turn on for four to
eight seconds as a bulb check when the ignition
is placed in the ON/RUN or ACC/ON/RUN
position. This light will illuminate with a single chime when a
fault with the air bag has been detected, it will stay on until
the fault is cleared. If the light is either not on during startup,
stays on, or turns on while driving, have the system
inspected at an authorized dealer as soon as possible.
23_RUP_OM_EN_USC_t.book Page 102