2023 CHRYSLER PACIFICA HYBRID park assist
[x] Cancel search: park assistPage 6 of 328

4
STARTING AND OPERATING
STARTING THE ENGINE ................................................... 111
Normal Starting ........................................................ 111
AutoPark .................................................................... 111Cold Weather Operation
(Below –22°F Or −30°C) ........................................ 113After Starting — Warming Up The Engine ................ 113
If Engine Fails To Start ............................................. 114
To Turn Off The Engine Using The ENGINE
START/STOP Button.................................................. 114
ENGINE BLOCK HEATER — IF EQUIPPED ..................... 114
ENGINE BREAK-IN RECOMMENDATIONS .................... 114
PARKING BRAKE ............................................................. 115 Electric Park Brake (EPB) ........................................ 115
AUTOMATIC TRANSMISSION .......................................... 117 Ignition Park Interlock............................................... 118
Brake/Transmission Shift Interlock (BTSI) System....118
9-Speed Automatic Transmission ............................ 118
Gear Ranges.............................................................. 119
ALL-WHEEL DRIVE (AWD) — IF EQUIPPED .................. 120
ACTIVE NOISE CANCELLATION....................................... 121
POWER STEERING ........................................................... 121
STOP/START SYSTEM — IF EQUIPPED.......................... 121 Autostop Mode .......................................................... 121
Possible Reasons The Engine Does Not Autostop.. 122
To Start The Engine While In Autostop .................... 122
To Manually Turn Off The Stop/Start System ......... 122
To Manually Turn On The Stop/Start System.......... 123
System Malfunction .................................................. 123 CRUISE CONTROL SYSTEMS — IF EQUIPPED ............. 123
Cruise Control ........................................................... 123
Adaptive Cruise Control (ACC).................................. 124
PARKSENSE FRONT/REAR PARK ASSIST SYSTEM —
IF EQUIPPED .................................................................... 132 ParkSense Sensors .................................................. 132ParkSense Display.................................................... 132
ParkSense Warning Display ..................................... 135
Enabling And Disabling ParkSense ......................... 135
Service The ParkSense Park Assist System............ 135
Cleaning The ParkSense System ............................. 136ParkSense System Usage Precautions ................... 136
PARKSENSE ACTIVE PARK ASSIST SYSTEM —
IF EQUIPPED ..................................................................... 137 Enabling And Disabling The ParkSense Active Park
Assist System ............................................................ 137
Parallel/Perpendicular Parking Space Assistance
Operation................................................................... 138
LANESENSE — IF EQUIPPED ......................................... 140 LaneSense Operation............................................... 140
Turning LaneSense On Or Off .................................. 140
LaneSense Warning Message ................................. 140
Changing LaneSense Status.................................... 142 PARKVIEW REAR BACK UP CAMERA ........................... 142
SURROUND VIEW CAMERA SYSTEM —
IF EQUIPPED......................................................................143
FAMCAM SYSTEM — IF EQUIPPED .................................145
REFUELING THE VEHICLE ................................................146
VEHICLE LOADING ...........................................................146 Certification Label ..................................................... 146
TRAILER TOWING .............................................................147 Common Towing Definitions..................................... 147
Trailer Hitch Classification ........................................ 149Trailer Towing Weights (Maximum Trailer
Weight Ratings) ........................................................ 149
Vehicle Loading Chart ............................................... 150Trailer And Tongue Weight ....................................... 151Towing Requirements .............................................. 151Towing Tips ............................................................... 153
RECREATIONAL TOWING (BEHIND MOTORHOME) ..... 154 Towing This Vehicle Behind Another Vehicle ........... 154
DRIVING TIPS ....................................................................155 Driving On Slippery Surfaces .................................... 155
Driving Through Water ............................................. 156
23_RUP_OM_EN_USC_t.book Page 4
Page 7 of 328

5
MULTIMEDIA
UCONNECT SYSTEMS ..................................................... 157
CYBERSECURITY ............................................................. 157
UCONNECT SETTINGS...................................................... 157Customer Programmable Features ........................ 158
REAR SEAT ENTERTAINMENT (RSE) WITH AMAZON
FIRE TV BUILT-IN — IF EQUIPPED .................................. 177 Overview .................................................................... 177Getting Started .......................................................... 177
Accessing Rear Seat Entertainment with Fire TV
built-in from the Front Radio Screen ....................... 178
Accessing Rear Seat Entertainment with Fire TV
built-in from the Rear Screens ................................. 178First Time Starting Up (Using the Rear Screens) .... 178Alexa Voice Control ................................................... 179
Listen Via Vehicle Speakers ..................................... 179
Quick Menu ............................................................... 179
Parental Controls (Using the Rear Screens)............ 179Voice Remote with Alexa Pairing (Using the Rear
Screens)..................................................................... 179Media Sources Input (Using the Front Radio and
Rear Screens)............................................................ 180
Voice Remote with Alexa .......................................... 180
Rear Seat Entertainment with Fire TV built-in streaming
(Using the Front Radio and Rear Screens) .................181
Play A Blu-ray™ or DVD —If Equipped ...................... 182
Fire TV Apps/Games (Using the Rear Screens) ...... 183 Using The Video USB Port ........................................ 183
Play Video Games ..................................................... 183
Headphones Operation ............................................ 183
Rear Climate Controls .............................................. 184
Legal & Compliance.................................................. 186
RADIO OPERATION AND MOBILE PHONES.................. 186 Regulatory And Safety Information.......................... 186
SAFETY
SAFETY FEATURES .......................................................... 187Anti-Lock Brake System (ABS) ................................ 187
Electronic Brake Control (EBC) System .................. 188
AUXILIARY DRIVING SYSTEMS ...................................... 192 Blind Spot Monitoring (BSM) — If Equipped............ 192
Forward Collision Warning (FCW) With Mitigation —
If Equipped ................................................................ 195Tire Pressure Monitoring System (TPMS) ............... 197
OCCUPANT RESTRAINT SYSTEMS ............................... 200 Occupant Restraint Systems Features ................... 200
Important Safety Precautions .................................. 200
Seat Belt Systems .................................................... 201
Supplemental Restraint Systems (SRS).................. 209
Child Restraints ........................................................ 219
SAFETY TIPS .................................................................... 233 Transporting Passengers ......................................... 233
Transporting Pets .................................................... 233
Connected Vehicles .................................................. 233Safety Checks You Should Make Inside
The Vehicle ............................................................... 233 Periodic Safety Checks You Should Make Outside
The Vehicle ................................................................ 234
Exhaust Gas ............................................................... 235
Carbon Monoxide Warnings ..................................... 235
IN CASE OF EMERGENCY
HAZARD WARNING FLASHERS ......................................236
SOS AND ASSIST MIRROR — IF EQUIPPED ..................236
JACKING AND TIRE CHANGING —IF EQUIPPED ...........239
Preparations For Jacking ......................................... 239
Jack And Spare Tire Location ................................... 240
Equipment Removal ................................................. 240
Jacking Instructions .................................................. 240
Road Tire Installation ................................................ 244
Portable Air Compressor —If Equipped .................... 244
Return Inflatable Spare Tire ..................................... 245
TIRE SERVICE KIT — IF EQUIPPED.................................. 245
JUMP STARTING ...............................................................251 Preparations For Jump Start..................................... 251
Jump Starting Procedure .......................................... 252
REFUELING IN EMERGENCY – IF EQUIPPED ................252
IF YOUR ENGINE OVERHEATS......................................... 253
MANUAL PARK RELEASE ...............................................254
FREEING A STUCK VEHICLE ........................................... 255
TOWING A DISABLED VEHICLE.......................................256 All Wheel Drive (AWD) Models .................................. 258
ENHANCED ACCIDENT RESPONSE SYSTEM (EARS) ..258
EVENT DATA RECORDER (EDR)......................................258
23_RUP_OM_EN_USC_t.book Page 5
Page 59 of 328

GETTING TO KNOW YOUR VEHICLE57
If the headlights are turned off before the ignition, they will
turn off in the normal manner.
NOTE:The headlights must be turned off within 45 seconds of
placing the ignition in the OFF position to activate this
feature.
LIGHTS-ON REMINDER
If the headlights or the parking lights are left on after the
ignition is placed in the OFF position, the vehicle will chime
when the driver's door is opened.
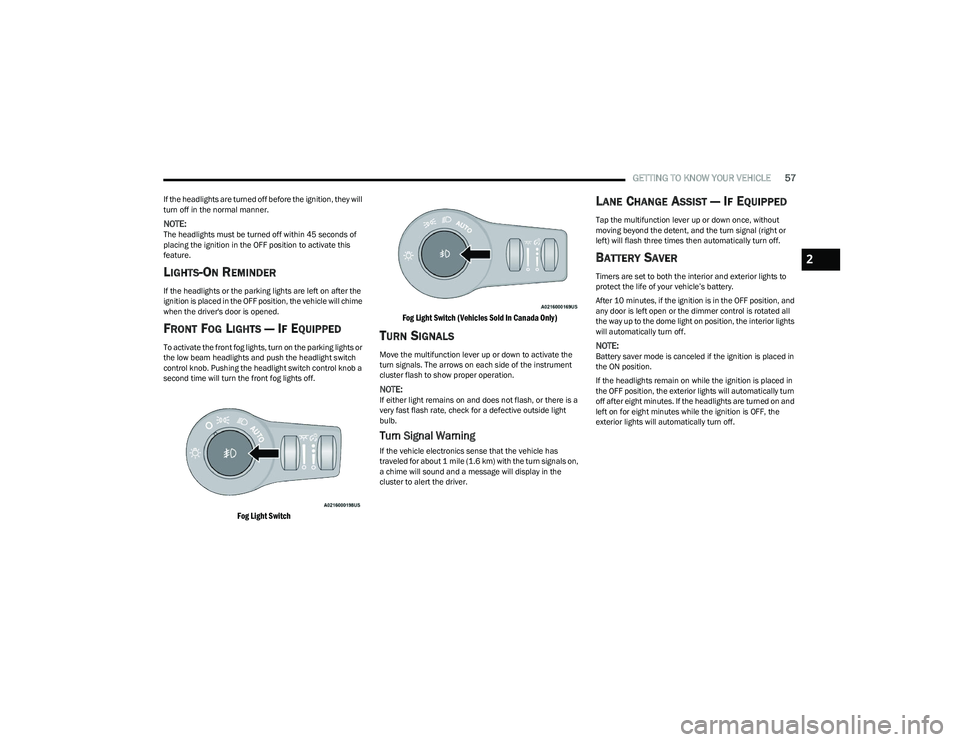
FRONT FOG LIGHTS — IF EQUIPPED
To activate the front fog lights, turn on the parking lights or
the low beam headlights and push the headlight switch
control knob. Pushing the headlight switch control knob a
second time will turn the front fog lights off.
Fog Light Switch Fog Light Switch (Vehicles Sold In Canada Only)
TURN SIGNALS
Move the multifunction lever up or down to activate the
turn signals. The arrows on each side of the instrument
cluster flash to show proper operation.
NOTE:If either light remains on and does not flash, or there is a
very fast flash rate, check for a defective outside light
bulb.
Turn Signal Warning
If the vehicle electronics sense that the vehicle has
traveled for about 1 mile (1.6 km) with the turn signals on,
a chime will sound and a message will display in the
cluster to alert the driver.
LANE CHANGE ASSIST — IF EQUIPPED
Tap the multifunction lever up or down once, without
moving beyond the detent, and the turn signal (right or
left) will flash three times then automatically turn off.
BATTERY SAVER
Timers are set to both the interior and exterior lights to
protect the life of your vehicle’s battery.
After 10 minutes, if the ignition is in the OFF position, and
any door is left open or the dimmer control is rotated all
the way up to the dome light on position, the interior lights
will automatically turn off.
NOTE:Battery saver mode is canceled if the ignition is placed in
the ON position.
If the headlights remain on while the ignition is placed in
the OFF position, the exterior lights will automatically turn
off after eight minutes. If the headlights are turned on and
left on for eight minutes while the ignition is OFF, the
exterior lights will automatically turn off.
2
23_RUP_OM_EN_USC_t.book Page 57
Page 87 of 328

GETTING TO KNOW YOUR VEHICLE85
Vehicles Equipped With A Trailer Tow Package
NOTE:If your vehicle is equipped with the Trailer Tow Package,
the hands-free activation zone(s) for the Power Liftgate
will be located on the left and right side of the receiver.
Use a straight kicking motion under either activation zone
to open the Hands-Free Liftgate.
Hands-Free Liftgate Trailer Tow Activation Zones
When a valid kicking motion is completed, the liftgate will
chime, the hazard lights will flash and the liftgate will open
after approximately one second. This assumes all options
are enabled in the Uconnect system.
NOTE:To open the Hands-Free Liftgate requires a valid Passive
Entry key fob within 5 ft (1.5 m) of the door handle. If a
valid Passive Entry key fob is not within 5 ft (1.5 m), the
liftgate will not respond to any kicks.
NOTE:
The Hands-Free Liftgate will only operate when the
transmission is in PARK.
If anything obstructs the Hands-Free Liftgate while it is
opening or closing, the liftgate will automatically
reverse to the closed position, provided it meets suffi -
cient resistance.
There are pinch sensors attached to the side of the lift -
gate opening. Light pressure anywhere along these
strips will cause the liftgate to return to the open posi -
tion.
If the power liftgate encounters multiple obstructions
within the same cycle, the system will automatically stop.
If this occurs, the liftgate must be operated manually.
The power liftgate will release, but not power open, in
temperatures below −12°F (−24°C). Be sure to
remove any buildup of snow or ice from the liftgate
before opening the liftgate.
If the liftgate is left open for an extended period of time,
the liftgate may need to be closed manually to reset
power liftgate functionality.
The Hands-Free Liftgate only works to open the liftgate. Gas props support the liftgate in the open position.
However, because the gas pressure drops with
temperature, it may be necessary to assist the props when
opening the liftgate in cold weather.
NOTE:Allow the power system to open the liftgate. Manually
pushing or pulling the liftgate may activate the liftgate
obstacle detection feature and stop the power operation
or reverse its direction.
CAUTION!
The Hands-Free Liftgate feature may be turned on or off
in Uconnect Settings. The Hands-Free Liftgate feature
should be turned off during jacking, tire changing, and
vehicle service
Úpage 157.
WARNING!
Driving with the liftgate open can allow poisonous
exhaust gases into your vehicle. You and your
passengers could be injured by these fumes. Keep
the liftgate closed when you are operating the
vehicle.
If you are required to drive with the liftgate open,
make sure that all windows are closed, and the
climate control blower switch is set at high speed. Do
not use the recirculation mode.
WARNING!
During power operation, personal injury or cargo
damage may occur. Ensure the liftgate travel path is
clear. Make sure the liftgate is closed and latched
before driving away.
2
23_RUP_OM_EN_USC_t.book Page 85
Page 105 of 328

GETTING TO KNOW YOUR INSTRUMENT PANEL103
Battery Charge Warning Light
This warning light will illuminate when the
battery is not charging properly. If it stays on
while the engine is running, there may be a
malfunction with the charging system. Contact
an authorized dealer as soon as possible.
This indicates a possible problem with the electrical
system or a related component.
Brake Warning Light
This warning light monitors various brake
functions, including brake fluid level and
parking brake application. If the brake light
turns on it may indicate that the parking brake
is applied, that the brake fluid level is low, or that there is
a problem with the Anti-Lock Brake System reservoir.
If the light remains on when the parking brake has been
disengaged, and the fluid level is at the full mark on the
master cylinder reservoir, it indicates a possible brake
hydraulic system malfunction or that a problem with the
Brake Booster has been detected by the Anti-Lock Brake
System (ABS) / Electronic Stability Control (ESC) system.
In this case, the light will remain on until the condition has
been corrected. If the problem is related to the brake
booster, the ABS pump will run when applying the brake,
and a brake pedal pulsation may be felt during each stop.
The dual brake system provides a reserve braking capacity
in the event of a failure to a portion of the hydraulic
system. A leak in either half of the dual brake system is
indicated by the Brake Warning Light, which will turn on
when the brake fluid level in the master cylinder has
dropped below a specified level. The light will remain on until the cause is corrected.
NOTE:The light may flash momentarily during sharp cornering
maneuvers, which change fluid level conditions. The
vehicle should have service performed, and the brake
fluid level checked.
If brake failure is indicated, immediate repair is necessary.
Vehicles equipped with the Anti-Lock Brake System (ABS)
are also equipped with Electronic Brake Force Distribution
(EBD). In the event of an EBD failure, the Brake Warning
Light will turn on along with the ABS Light. Immediate
repair to the ABS system is required.
Operation of the Brake Warning Light can be checked by
turning the ignition switch from the OFF position to the
ON/RUN position. The light should illuminate for
approximately two seconds. The light should then turn off
unless the parking brake is applied or a brake fault is
detected. If the light does not illuminate, have the light
inspected by an authorized dealer.
The light also will turn on when the parking brake is
applied with the ignition switch in the ON/RUN position.
NOTE:This light shows only that the parking brake is applied. It
does not show the degree of brake application.
Door Open Warning Light — If Equipped
This warning light will illuminate when a door is
ajar/open and not fully closed. This indicator
will reflect which doors are open.
NOTE:If the vehicle is moving, there will also be a single chime.
Electric Power Steering Fault Warning
Light
This warning light will turn on when there's a
fault with the Electric Power Steering (EPS)
system
Úpage 121.
WARNING!
Driving a vehicle with the red brake light on is
dangerous. Part of the brake system may have failed. It
will take longer to stop the vehicle. You could have a
collision. Have the vehicle checked immediately.
WARNING!
Continued operation with reduced assist could pose a
safety risk to yourself and others. Service should be
obtained as soon as possible.
3
23_RUP_OM_EN_USC_t.book Page 103
Page 113 of 328

111
STARTING AND OPERATING
STARTING THE ENGINE
Before starting your vehicle, adjust your seat, adjust both
inside and outside mirrors, and fasten your seat belts.Start the engine with the gear selector in the NEUTRAL (N)
or PARK (P) position. Apply the brake before shifting to any
driving range.
NORMAL STARTING
To Turn On The Engine Using the ENGINE START/STOP
Button
1. The transmission must be in PARK or NEUTRAL.
2. Press and hold the brake pedal while pushing the
ENGINE START/STOP button once.
3. The system starts the vehicle. If the vehicle fails to start, the starter will disengage automatically after 10
seconds.
4. If you wish to stop the cranking of the engine prior to the engine starting, push the button again.
ENGINE START/STOP Button Functions — With Driver’s
Foot Off The Brake Pedal (In PARK Or NEUTRAL Position)
The ENGINE START/STOP button operates similar to an
ignition switch. It has three positions; OFF, ACC, and ON/
RUN. To change the ignition positions without starting the
vehicle and to use the accessories, follow these steps:
Start with the ignition in the OFF position.
Push the ENGINE START/STOP button once to place
the ignition to the ACC position (instrument cluster will
display “ACC”).
Push the ENGINE START/STOP button a second time to
place the ignition to the ON/RUN position (instrument
cluster will display “ON/RUN”).
Push the ENGINE START/STOP button a third time to
return the ignition to the OFF position (instrument
cluster will display “OFF”).
NOTE:Only press one pedal at a time while driving the vehicle.
Torque performance of the vehicle could be reduced if
both pedals are pressed at the same time. If pressure is
detected on both pedals simultaneously, a warning
message will display in the instrument cluster
Úpage 97.
AUTOPARK
AutoPark is a supplemental feature to assist with placing
the vehicle in PARK under certain situations. It is a
back-up system and should not be relied upon as the
primary method by which the driver shifts the vehicle into
PARK.
The conditions under which AutoPark will engage are
outlined on the following pages.
WARNING!
When exiting the vehicle, always remove the key fob
from the vehicle and lock your vehicle.
Never leave children alone in a vehicle, or with
access to an unlocked vehicle.
Allowing children to be in a vehicle unattended is
dangerous for a number of reasons. A child or others
could be seriously or fatally injured. Children should
be warned not to touch the parking brake, brake
pedal or the transmission gear selector.
Do not leave the key fob in or near the vehicle, or in
a location accessible to children, and do not leave
the ignition of a vehicle equipped with Keyless
Enter ‘n Go™ in the ACC or ON/RUN position. A child
could operate power windows, other controls, or
move the vehicle.
Do not leave children or animals inside parked vehi -
cles in hot weather. Interior heat buildup may cause
serious injury or death.
4
23_RUP_OM_EN_USC_t.book Page 111
Page 123 of 328

STARTING AND OPERATING121
ACTIVE NOISE CANCELLATION
Your vehicle is equipped with an Active Noise Cancellation
system. This system is designed to address exhaust and
engine noise. The system relies on four microphones
embedded in the headliner, which monitor exhaust and
engine noise, and assists an onboard frequency
generator, which creates counteracting sound waves in
the audio system’s speakers. This helps keep the vehicle
quiet at idle and during drive.
POWER STEERING
The electric power steering system will provide increased
vehicle response and ease of maneuverability. The power
steering system adapts to different driving conditions. If the Steering icon is displayed and the “Power Steering
System Over Temp” message is displayed on the
instrument cluster screen, this indicates an over
temperature condition in the power steering system. Once
driving conditions are safe, pull over and let the vehicle
idle for a few moments until the icon and message turn off
Úpage 102.
If the “Service Power Steering" or "Power
Steering Assist Off - Service System” message
and a steering wheel icon are displayed on the
instrument cluster screen, it indicates that the
vehicle needs to be taken to an authorized dealer for
service. It is likely the vehicle has lost power steering
assistance
Úpage 102.
NOTE:
Even if the power steering assistance is no longer oper -
ational, it is still possible to steer the vehicle. Under
these conditions there will be a substantial increase in
steering effort, especially at low speeds and during
parking maneuvers.
The power steering system is fully electric; it requires
no power steering fluid.
If the condition persists, see an authorized dealer for
service.
STOP/START SYSTEM — IF EQUIPPED
The Stop/Start function is designed to reduce fuel
consumption. The system will stop the engine
automatically during a vehicle stop if the required
conditions are met. Releasing the brake pedal, pressing
the accelerator pedal or shifting out of DRIVE (D) will
automatically re-start the engine.
This vehicle has been upgraded with a heavy-duty starter,
enhanced battery, and other upgraded engine parts to
handle the additional engine starts.
AUTOSTOP MODE
The Stop/Start feature is enabled after every driver key
start. At that time, the system will go into STOP/START
READY and if all other conditions are met, can go into a
STOP/START AUTOSTOP ACTIVE.
To Activate Auto STOP/START, The Following Must Occur:
The system must be in STOP/START READY state. A
STOP/START READY message will be displayed in the
instrument cluster within the Stop/Start section
Úpage 102.
The vehicle must be completely stopped.
The gear selector must be in a forward gear and the
brake pedal pressed.
The engine will shut down, the tachometer will move to the
zero position and the Stop/Start telltale will illuminate
indicating you are in Autostop. Customer settings will be
maintained throughout the Auto Stop/Start process.
CAUTION!
All wheels must have the same size and type tires.
Unequal tire sizes must not be used. Unequal tire size
may cause premature wear of the driveline
components.
WARNING!
Continued operation with reduced assist could pose a
safety risk to yourself and others. Service should be
obtained as soon as possible.
4
23_RUP_OM_EN_USC_t.book Page 121
Page 134 of 328

132STARTING AND OPERATING
PARKSENSE FRONT/REAR PARK ASSIST
SYSTEM — IF EQUIPPED
The ParkSense Park Assist system provides visual and
audible indications of the distance between the rear, and
if equipped, the front fascia/bumper and a detected
obstacle when backing up or moving forward (e.g. during a
parking maneuver). The vehicle brakes may be
automatically applied and released when performing a
reverse parking maneuver if the system detects a possible
collision with an obstacle.
NOTE:
The driver can override the automatic braking function
by pressing the gas pedal over 90% of its capacity
during the braking event, turning ParkSense off via the
ParkSense switch, or changing the gear while the auto -
matic brakes are being applied.
Automatic brakes will not be available if ESC is not
available.
Automatic brakes will not be available if there is a
faulted condition detected with the ParkSense Park
Assist system or the Braking System Module.
The automatic braking function may not provide
enough vehicle deceleration to avoid colliding with a
detected obstacle depending on vehicle speed, road
conditions, and brake capability.
The automatic braking function may not be applied fast
enough for moving obstacles that approach the rear of
the vehicle from the left and/or right sides.
The automatic braking function can be enabled/
disabled from the Customer-Programmable Features
section of the Uconnect system.
ParkSense will retain its last known configuration state
for the automatic braking function through ignition
cycles.
The automatic braking function is intended to assist the
driver in avoiding possible collisions with detected
obstacles when backing up in REVERSE.
NOTE:
The system is designed to assist the driver and not to
substitute the driver.
The driver must stay in full control of the vehicle's
acceleration and braking and is responsible for the
vehicle's movements.
For limitations of this system and recommendations, see
Úpage 136.
ParkSense will retain the last system state (enabled or
disabled) from the last ignition cycle when the ignition is
changed to the ON/RUN position.
ParkSense can be active only when the gear selector is in
REVERSE or DRIVE. If ParkSense is enabled at one of
these gear selector positions, the system will remain
active until the vehicle speed is increased to
approximately 7 mph (11 km/h) or above. When in
REVERSE and above the system's operating speed, a
warning will appear in the instrument cluster display
indicating the vehicle speed is too fast. The system will
become active again if the vehicle speed is decreased to
less than approximately 6 mph (9 km/h).
PARKSENSE SENSORS
The six ParkSense sensors (four when vehicle is not
equipped with front sensors), located in the rear fascia/
bumper, and the six ParkSense sensors located in the
front fascia/bumper, monitor the area in front and behind
the vehicle that is within the sensors’ field of view. The
front sensors detect obstacles from approximately
12 inches (30 cm) up to 47 inches (120 cm) from the front fascia/bumper. The rear sensors can detect obstacles
from approximately 12 inches (30 cm) up to 79 inches
(200 cm) from the rear fascia/bumper. These distances
depend on the location, type and orientation of the
obstacle in the horizontal direction.
PARKSENSE DISPLAY
The warning display will turn on indicating the system
status when the vehicle is in REVERSE or when the vehicle
is in DRIVE and an obstacle has been detected.
The system will indicate a detected obstacle by showing a
single arc in the left and/or right front or rear regions
based on the object’s distance and location relative to the
vehicle.
If an object is detected in the left and/or right rear region,
the display will show a single arc in the left and/or right
rear region and the system will produce a tone. As the
vehicle moves closer to the object, the display will show
the single arc moving closer to the vehicle and the tone will
change from a single 1/2 second tone to slow, to fast, to
continuous.
23_RUP_OM_EN_USC_t.book Page 132