2023 CHRYSLER PACIFICA HYBRID key
[x] Cancel search: keyPage 91 of 328
GETTING TO KNOW YOUR VEHICLE89
5. When finished, push power button to turn vacuum off
and store vacuum hose and any attachments.
6. Before exiting the vehicle: If the ignition is in the ACC position, push the
START/STOP ignition button to place ignition in the
OFF position, remove key fob from the vehicle, and
lock the vehicle.
If the engine is running, raise all of the windows,
push the START/STOP ignition button to place igni -
tion in the OFF position, remove key fob from the
vehicle, close all of the doors and the liftgate and
lock the vehicle.
Vacuum Troubleshooting
DO NOT use with any opening blocked. If an object
becomes lodged in the hose, attempt to fully extend
the hose in a straight line while the vacuum motor is
running. If this does not dislodge the object, turn the
vacuum OFF and remove the hose from the vehicle
using the subsequent removal instructions. If the filter
is clogged, follow the emptying debris bin procedure
and lightly tap the filter on the collection bin to remove any collected debris from the filter. Both the bin and
the filter can be rinsed with water if needed. To avoid
mold and stale odors, allow both to dry completely
before reinstalling in your vehicle. If the filter has tears,
holes or other damage and needs to be replaced,
please contact an authorized dealer.
If there are any other issues with your vacuum, contact
an authorized dealer. Your vacuum has no user
serviceable parts.
Debris Bin
The debris bin is located behind the access panel behind
the third row seat on the driver’s side.
To Empty
1. Push power button to turn vacuum OFF.
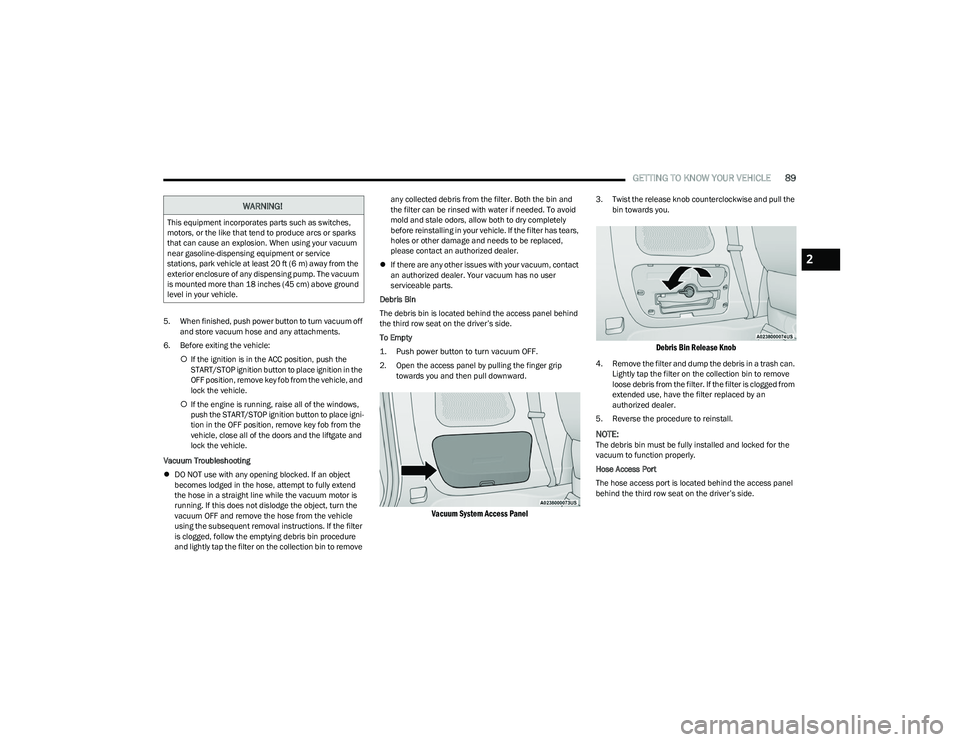
2. Open the access panel by pulling the finger grip towards you and then pull downward.
Vacuum System Access Panel
3. Twist the release knob counterclockwise and pull the bin towards you.
Debris Bin Release Knob
4. Remove the filter and dump the debris in a trash can. Lightly tap the filter on the collection bin to remove
loose debris from the filter. If the filter is clogged from
extended use, have the filter replaced by an
authorized dealer.
5. Reverse the procedure to reinstall.
NOTE:The debris bin must be fully installed and locked for the
vacuum to function properly.
Hose Access Port
The hose access port is located behind the access panel
behind the third row seat on the driver’s side.
WARNING!
This equipment incorporates parts such as switches,
motors, or the like that tend to produce arcs or sparks
that can cause an explosion. When using your vacuum
near gasoline-dispensing equipment or service
stations, park vehicle at least 20 ft (6 m) away from the
exterior enclosure of any dispensing pump. The vacuum
is mounted more than 18 inches (45 cm) above ground
level in your vehicle.
2
23_RUP_OM_EN_USC_t.book Page 89
Page 99 of 328
GETTING TO KNOW YOUR INSTRUMENT PANEL97
INSTRUMENT CLUSTER DISPLAY
Your vehicle is equipped with an instrument cluster
display, which offers useful information to the driver. With
the ignition in the OFF position (and the key removed, for
vehicles with mechanical key), opening/closing of a door
will activate the display for viewing, and display the total
miles or kilometers in the odometer. Your instrument
cluster display is designed to display important
information about your vehicle’s systems and features.
Using a driver interactive display located on the
instrument panel, your instrument cluster display can
show you how systems are working and give you warnings
when they are not. The steering wheel mounted controls
allow you to scroll through and enter the main menus and
submenus. You can access the specific information you
want and make selections and adjustments.
INSTRUMENT CLUSTER DISPLAY
L
OCATION AND CONTROLS
The vehicle’s instrument cluster is equipped with an
instrument cluster display (base or premium cluster),
which offers useful information to the driver.
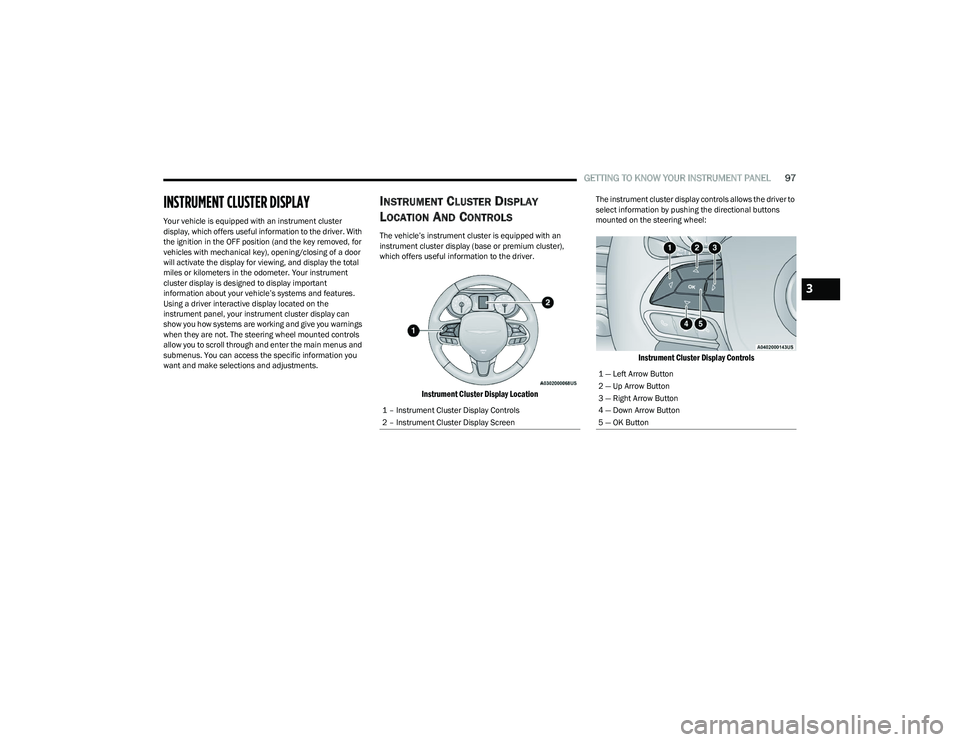
Instrument Cluster Display Location
The instrument cluster display controls allows the driver to
select information by pushing the directional buttons
mounted on the steering wheel:
Instrument Cluster Display Controls
1 – Instrument Cluster Display Controls
2 – Instrument Cluster Display Screen
1 — Left Arrow Button
2 — Up Arrow Button
3 — Right Arrow Button
4 — Down Arrow Button
5 — OK Button
3
23_RUP_OM_EN_USC_t.book Page 97
Page 100 of 328

98GETTING TO KNOW YOUR INSTRUMENT PANEL
Back / Left Arrow Button
Push and release the left arrow button to access
the information screens or submenu screens of a main
menu item.
Up Arrow Button
Push and release the up arrow button to scroll
upward through the Main Menu items.
Right Arrow Button
Push and release the right arrow button to access
the information screens or submenu screens of a main
menu item.
Down Arrow Button
Push and release the down arrow button to scroll
downward through the Main Menu items.
OK Button
Push the OK button to access/select the information
screens or submenu screens of a Main Menu item.
Push and hold the OK button for two seconds to reset
displayed/selected features that can be reset.
ENGINE OIL LIFE
Use this QR code to access your digital
experience.
Your vehicle is equipped with an
engine oil change indicator system.
The “Oil Change Required”
message will display for approxi -
mately five seconds after a single
chime has sounded, to indicate it is
time to change the engine oil. The engine oil change indicator system is duty cycle based, which means the
engine oil change interval may fluctuate, dependent
upon your personal driving style.
Unless reset, this message will continue to display
each time the ignition is cycled to the ON/RUN position.
To reset the oil change indicator after performing the
scheduled maintenance, refer to the following proce -
dure.
NOTE:This procedure should only be performed after scheduled
maintenance is completed. Resetting oil life other than
when associated with a scheduled maintenance may
result in damage due to not properly maintaining the
engine oil.
Oil Life Reset
1. Without pressing the brake pedal, push the ENGINE START/STOP button and place the ignition in the
ON/RUN position (do not start the vehicle.)
2. Push the OK button to enter the instrument cluster
display menu screen.
3. Push and release the down arrow button to
access the ”Vehicle Info” menu screen.
4. Push the left arrow button or right arrow button
to access the “Oil Life” submenu.
5. Hold the OK button to reset the “Oil Life” to 100%.
6. Push the up arrow button to exit the instrument
cluster display menu screen. Secondary Method For Oil Life Reset Procedure
1. Without pushing the brake pedal, place the ignition
in the ON/RUN position (do not start the engine).
2. Fully press the accelerator pedal, slowly, three times within 10 seconds.
3. Without pushing the brake pedal, place the ignition in the OFF position.
NOTE:If the indicator message illuminates when you start the
vehicle, the oil change indicator system did not reset. If
necessary, repeat this procedure.
KEYSENSE CLUSTER MESSAGES —
I
F EQUIPPED
When the KeySense key is in use there will be:
Continuous, dedicated telltale
Unique Display Splash Screen
With KeySense in use there will be multiple associated
messages shown in the following table:
Setting Instrument Cluster Display
Message
None – With vehicle ignition ON “KeySense in use. Max
vehicle speed set to xx MPH/or km/h”
23_RUP_OM_EN_USC_t.book Page 98
Page 101 of 328
GETTING TO KNOW YOUR INSTRUMENT PANEL99
INSTRUMENT CLUSTER DISPLAY MENU
I
TEMS
The instrument cluster display can be used to view the
main menu items for several features. Use the up and
down arrow buttons to scroll through the driver
interactive display menu options until the desired menu is
reached
Úpage 97.
NOTE:The instrument cluster display menu items display in the
center of the instrument cluster. Menu items may vary
depending on your vehicle features.
Speedometer
Push and release the up or down arrow button until
Speedometer is highlighted in the instrument cluster
display. Push and release the OK button to toggle between
MPH and km/h.
Vehicle Info
Push and release the up or down arrow button until
Vehicle Info is highlighted in the instrument cluster
display. Push the left or right arrow button to scroll
through the following information submenus: Tire Pressure
If tire pressure is
OK for all tires, a vehicle ICON is
displayed with tire pressure values in each corner of the
ICON.
If one or more tires have low pressure, “Inflate Tire To XX”
is displayed with the vehicle ICON, and the tire pressure
values in each corner of the ICON with the pressure value
of the low tire displayed in a different color than the other
tire pressure value.
If the Tire Pressure system requires service, “Service Tire
Pressure System” is displayed.
Tire PSI is an information only function and cannot be
reset
Úpage 197.
Coolant Temp
Displays the actual coolant temperature.
Transmission Temp
Displays the actual transmission temperature.
Oil Temp — If Equipped
Displays the actual oil temperature.
Oil Pressure
Displays the actual oil pressure.
Max Vehicle Speed
“Max speed reached.
KeySense in use”
supported by a chime
“Approaching max
speed xx MPH/km/h”
supported by a chime
Start Up Fuel Alert message “Range to empty xxx miles
or km”
Early Low Fuel Alert Message “Fuel Low”
ParkSense “Feature cannot be
disabled. KeySense in use”
Blind Spot “Feature cannot be
disabled. KeySense in use”
Forward Collision Warning “Feature cannot be
disabled. KeySense in use”
Setting
Instrument Cluster Display
Message
3
23_RUP_OM_EN_USC_t.book Page 99
Page 110 of 328

108GETTING TO KNOW YOUR INSTRUMENT PANEL
Front Fog Indicator Light — If Equipped
This indicator light will illuminate when the
front fog lights are on.
KeySense Indicator Light — If Equipped
The KeySense indicator is illuminated when a
KeySense key is detected upon startup of the
vehicle. The indicator will remain lit for the
entire key cycle as a reminder that the
KeySense key is in use. While the KeySense key is in use,
the vehicle will respond to settings associated with the
KeySense profile
Úpage 12.
LaneSense Indicator Light — If Equipped
The LaneSense indicator light illuminates solid
green when both lane markings have been
detected and the system is “armed” and ready
to provide visual and torque warnings if an
unintentional lane departure occurs
Úpage 140.
Parking/Headlights On Indicator Light
This indicator light will illuminate when the
parking lights or headlights are turned on.
Stop/Start Active Indicator Light —
If Equipped
This indicator light will illuminate when the
Stop/Start function is in “Autostop” mode
Úpage 121.
Turn Signal Indicator Lights
When the left or right turn signal is activated,
the turn signal indicator will flash
independently and the corresponding exterior
turn signal lamps will flash. Turn signals can be
activated when the multifunction lever is moved down
(left) or up (right).
NOTE:
A continuous chime will sound if the vehicle is driven
more than 1 mile (1.6 km) with either turn signal on.
Check for an inoperative outside light bulb if either indi -
cator flashes at a rapid rate.
WHITE INDICATOR LIGHTS
Adaptive Cruise Control (ACC) Ready
Light — If Equipped
This indicator light will illuminate when the
vehicle equipped with ACC has been turned on
but not set
Úpage 124.
Cruise Control Ready Indicator Light
This indicator light will illuminate when the
cruise control is ready, but not set Úpage 123.
LaneSense Indicator Light — If Equipped
When the LaneSense system is ON, but not
armed, the LaneSense indicator light
illuminates solid white. This occurs when only
left, right, or neither lane line has been
detected. If a single lane line is detected, the system is
ready to provide only visual warnings if an unintentional
lane departure occurs on the detected lane line
Úpage 140.
23_RUP_OM_EN_USC_t.book Page 108
Page 113 of 328
111
STARTING AND OPERATING
STARTING THE ENGINE
Before starting your vehicle, adjust your seat, adjust both
inside and outside mirrors, and fasten your seat belts.Start the engine with the gear selector in the NEUTRAL (N)
or PARK (P) position. Apply the brake before shifting to any
driving range.
NORMAL STARTING
To Turn On The Engine Using the ENGINE START/STOP
Button
1. The transmission must be in PARK or NEUTRAL.
2. Press and hold the brake pedal while pushing the
ENGINE START/STOP button once.
3. The system starts the vehicle. If the vehicle fails to start, the starter will disengage automatically after 10
seconds.
4. If you wish to stop the cranking of the engine prior to the engine starting, push the button again.
ENGINE START/STOP Button Functions — With Driver’s
Foot Off The Brake Pedal (In PARK Or NEUTRAL Position)
The ENGINE START/STOP button operates similar to an
ignition switch. It has three positions; OFF, ACC, and ON/
RUN. To change the ignition positions without starting the
vehicle and to use the accessories, follow these steps:
Start with the ignition in the OFF position.
Push the ENGINE START/STOP button once to place
the ignition to the ACC position (instrument cluster will
display “ACC”).
Push the ENGINE START/STOP button a second time to
place the ignition to the ON/RUN position (instrument
cluster will display “ON/RUN”).
Push the ENGINE START/STOP button a third time to
return the ignition to the OFF position (instrument
cluster will display “OFF”).
NOTE:Only press one pedal at a time while driving the vehicle.
Torque performance of the vehicle could be reduced if
both pedals are pressed at the same time. If pressure is
detected on both pedals simultaneously, a warning
message will display in the instrument cluster
Úpage 97.
AUTOPARK
AutoPark is a supplemental feature to assist with placing
the vehicle in PARK under certain situations. It is a
back-up system and should not be relied upon as the
primary method by which the driver shifts the vehicle into
PARK.
The conditions under which AutoPark will engage are
outlined on the following pages.
WARNING!
When exiting the vehicle, always remove the key fob
from the vehicle and lock your vehicle.
Never leave children alone in a vehicle, or with
access to an unlocked vehicle.
Allowing children to be in a vehicle unattended is
dangerous for a number of reasons. A child or others
could be seriously or fatally injured. Children should
be warned not to touch the parking brake, brake
pedal or the transmission gear selector.
Do not leave the key fob in or near the vehicle, or in
a location accessible to children, and do not leave
the ignition of a vehicle equipped with Keyless
Enter ‘n Go™ in the ACC or ON/RUN position. A child
could operate power windows, other controls, or
move the vehicle.
Do not leave children or animals inside parked vehi -
cles in hot weather. Interior heat buildup may cause
serious injury or death.
4
23_RUP_OM_EN_USC_t.book Page 111
Page 115 of 328
STARTING AND OPERATING113
(Continued)To Turn On The Engine Using ENGINE START/STOP Button
1. The transmission must be in PARK or NEUTRAL.
2. Press and hold the brake pedal while pushing the
ENGINE START/STOP button once.
To release the parking brake manually, the ignition switch
must be in the ON/RUN position. Press on the brake
pedal, then push the parking brake switch momentarily. If the driver shifts into PARK while moving, the vehicle may
Park.
PARK will engage
ONLY when vehicle speed is 1.2 mph
(1.9 km/h) or less.
The message “ Vehicle Speed Is Too High To Shift To P ” will
display in the instrument cluster display if vehicle speed is
above 1.2 mph (1.9 km/h). The gear position indicator will
blink continuously until the gear selector is returned to the
proper position, or the requested shift can be completed.
COLD WEATHER OPERATION
(B
ELOW –22°F OR −30°C)
To ensure reliable starting at these temperatures, use of
an externally powered electric engine block heater
(available from an authorized dealer) is recommended.
AFTER STARTING — WARMING UP THE
E
NGINE
The idle speed is controlled automatically and it will
decrease as the engine warms up.
It is dangerous to shift out of PARK or NEUTRAL if
the engine speed is higher than idle speed. If your
foot is not firmly pressing the brake pedal, the
vehicle could accelerate quickly forward or in
reverse. You could lose control of the vehicle and hit
someone or something. Only shift into gear when
the engine is idling normally and your foot is firmly
pressing the brake pedal.
Unintended movement of a vehicle could injure
those in or near the vehicle. As with all vehicles, you
should never exit a vehicle while the engine is
running. Before exiting a vehicle, always come to a
complete stop, then apply the parking brake, shift
the transmission into PARK, and turn the ignition
OFF. When the ignition is in the OFF position, the
transmission is locked in PARK, securing the vehicle
against unwanted movement.
When exiting the vehicle, always make sure the igni -
tion is in the OFF position, remove the key fob from
the vehicle, and lock the vehicle.
Never leave children alone in a vehicle, or with
access to an unlocked vehicle. Allowing children to
be in a vehicle unattended is dangerous for a
number of reasons. A child or others could be seri -
ously or fatally injured. Children should be warned
not to touch the parking brake, brake pedal or the
transmission gear selector.
WARNING!
Do not leave the key fob in or near the vehicle (or in
a location accessible to children), and do not leave
the ignition in the ACC or ON/RUN position. A child
could operate power windows, other controls, or
move the vehicle.
CAUTION!
Damage to the transmission may occur if the following
precautions are not observed:
Shift into or out of PARK or REVERSE only after the
vehicle has come to a complete stop.
Do not shift between PARK, REVERSE, NEUTRAL, or
DRIVE when the engine is above idle speed.
Before shifting into any gear, make sure your foot is
firmly pressing the brake pedal.
WARNING!
WARNING!
If vehicle speed is not below 1.2 mph (1.9 km/h) when
the driver shifts into PARK, the transmission will default
to NEUTRAL until the vehicle speed drops below
1.2 mph (1.9 km/h) and the conditions are met,
enabling AutoPark. A vehicle left in the NEUTRAL
position can roll. As an added precaution, always apply
the parking brake when exiting the vehicle.4
23_RUP_OM_EN_USC_t.book Page 113
Page 118 of 328

116STARTING AND OPERATING
(Continued)
NOTE:When parking on a hill, it is important to turn the front
wheels toward the curb on a downhill grade and away from
the curb on an uphill grade. Apply the parking brake before
placing the gear selector in PARK, otherwise the load on
the transmission locking mechanism may make it difficult
to move the gear selector out of PARK. The parking brake
should always be applied whenever the driver is not in the
vehicle.
If exceptional circumstances should make it necessary to
engage the parking brake while the vehicle is in motion,
push on the EPB switch for as long as engagement is
desired. The Brake Warning Light will illuminate, and a
continuous chime will sound. The rear stop lamps will also
be illuminated automatically while the vehicle remains in
motion.To disengage the parking brake while the vehicle is in
motion, release the switch. If the vehicle is brought to a
complete stop using the parking brake, when the vehicle
reaches approximately 3 mph (4.8 km/h), the parking
brake will remain engaged.
In the unlikely event of a malfunction of the EPB system, a
yellow EPB Warning Light will illuminate. This may be
accompanied by the Brake Warning Light flashing. In this
case, urgent service of the EPB system is required. Do not
rely on the parking brake to hold the vehicle stationary.
Auto Park Brake
The Electric Park Brake (EPB) can be programmed to be
applied automatically whenever the vehicle is at a
standstill and the automatic transmission is placed in
PARK. Auto Park Brake is enabled and disabled by
customer selection through the customer programmable
features
Úpage 158.
SafeHold
SafeHold is a safety feature of the Electric Park Brake
(EPB) system that will engage the parking brake
automatically if the vehicle is left unsecured. If the
automatic transmission is not in PARK, the seat belt is
unbuckled, the driver door is open, the vehicle is at a
standstill, and there is no attempt to press the brake pedal
or accelerator pedal, the parking brake will automatically
engage to prevent the vehicle from rolling.
SafeHold can be temporarily bypassed by pushing the EPB
while the driver door is open and brake pedal is pressed.
Once manually bypassed, SafeHold will be enabled again
once the vehicle reaches 12 mph (20 km/h) or the ignition
is cycled to the OFF position and back to ON again.
WARNING!
Never use the PARK position as a substitute for the
parking brake. Always apply the parking brake fully
when parked to guard against vehicle movement and
possible injury or damage.
When exiting the vehicle, always make sure the igni -
tion is in the OFF position, remove the key fob from
the vehicle, and lock your vehicle.
Never leave children alone in a vehicle, or with
access to an unlocked vehicle. Allowing children to
be in a vehicle unattended is dangerous for a
number of reasons. A child or others could be seri -
ously or fatally injured. Children should be warned
not to touch the parking brake, brake pedal or the
transmission gear selector.
Do not leave the key fob in or near the vehicle, (or in
a location accessible to children), and do not leave
the ignition in the ACC or ON/RUN position. A child
could operate power windows, other controls, or
move the vehicle.
Be sure the parking brake is fully disengaged before
driving; failure to do so can lead to brake failure and
a collision.
Always fully apply the parking brake when leaving
your vehicle, or it may roll and cause damage or
injury. Also be certain to leave the transmission in
PARK. Failure to do so may allow the vehicle to roll
and cause damage or injury.
Driving the vehicle with the parking brake engaged,
or repeated use of the parking brake to slow the
vehicle may cause serious damage to the brake
system.
CAUTION!
If the Brake System Warning Light remains on with the
parking brake released, a brake system malfunction is
indicated. Have the brake system serviced by an
authorized dealer immediately.
WARNING!
23_RUP_OM_EN_USC_t.book Page 116