2023 CHRYSLER PACIFICA HYBRID buttons
[x] Cancel search: buttonsPage 101 of 328
GETTING TO KNOW YOUR INSTRUMENT PANEL99
INSTRUMENT CLUSTER DISPLAY MENU
I
TEMS
The instrument cluster display can be used to view the
main menu items for several features. Use the up and
down arrow buttons to scroll through the driver
interactive display menu options until the desired menu is
reached
Úpage 97.
NOTE:The instrument cluster display menu items display in the
center of the instrument cluster. Menu items may vary
depending on your vehicle features.
Speedometer
Push and release the up or down arrow button until
Speedometer is highlighted in the instrument cluster
display. Push and release the OK button to toggle between
MPH and km/h.
Vehicle Info
Push and release the up or down arrow button until
Vehicle Info is highlighted in the instrument cluster
display. Push the left or right arrow button to scroll
through the following information submenus: Tire Pressure
If tire pressure is
OK for all tires, a vehicle ICON is
displayed with tire pressure values in each corner of the
ICON.
If one or more tires have low pressure, “Inflate Tire To XX”
is displayed with the vehicle ICON, and the tire pressure
values in each corner of the ICON with the pressure value
of the low tire displayed in a different color than the other
tire pressure value.
If the Tire Pressure system requires service, “Service Tire
Pressure System” is displayed.
Tire PSI is an information only function and cannot be
reset
Úpage 197.
Coolant Temp
Displays the actual coolant temperature.
Transmission Temp
Displays the actual transmission temperature.
Oil Temp — If Equipped
Displays the actual oil temperature.
Oil Pressure
Displays the actual oil pressure.
Max Vehicle Speed
“Max speed reached.
KeySense in use”
supported by a chime
“Approaching max
speed xx MPH/km/h”
supported by a chime
Start Up Fuel Alert message “Range to empty xxx miles
or km”
Early Low Fuel Alert Message “Fuel Low”
ParkSense “Feature cannot be
disabled. KeySense in use”
Blind Spot “Feature cannot be
disabled. KeySense in use”
Forward Collision Warning “Feature cannot be
disabled. KeySense in use”
Setting
Instrument Cluster Display
Message
3
23_RUP_OM_EN_USC_t.book Page 99
Page 102 of 328
100GETTING TO KNOW YOUR INSTRUMENT PANEL
Oil Life
Displays the remaining engine oil life as a percentage.
To reset the Oil Life, you must hold the OK button. The
“Hold OK to Reset” instruction will be displayed at all
times, but the following conditions will need to be met in
order to reset Oil Life:
The ignition must be in the ON/RUN position.
If the conditions are met, holding the OK button will reset
the gauge and the numeric display will return to 100%.
If the conditions are not met, a pop-up message will
display for five seconds, describing the required
conditions, and then the Oil Life screen will reappear.
Battery Voltage
Displays the actual battery voltage.
Engine Hours — If Equipped
Displays the number of hours of engine operation.
Driver Assist — If Equipped
Push and release the up or down arrow button until
the Driver Assist display icon is highlighted in the
instrument cluster display.
Adaptive Cruise Control
LaneSense
Fuel Economy
Push and release the up or down arrow button until
the Fuel Economy Menu item is highlighted in the
instrument cluster display. The Fuel Economy Menu will
display the following:
Two submenu pages that can be toggled between
using the left and right arrow buttons; one with
Current Value displayed and one without the Current
Value displayed:
Average Fuel Economy (MPG, L/100 km, or km/L)
Range To Empty (miles or km)
Current Fuel Economy (MPG, L/100 km, or km/L)
The Max and Min values will correspond to the
particular engine requirements
Hold OK to reset average fuel economy information.
Trip Info
Push and release the up or down arrow button until
the Trip Menu item is highlighted in the instrument cluster
display. Push the left or right arrow button to scroll
through the Trip A and Trip B submenus. The Trip
information will display the following:
Distance
Average Fuel Economy
Elapsed Time
Hold the OK button to reset feature information.
Stop / Start – If Equipped
Push and release the up or down arrow button until
the Stop/Start menu title is displayed in the instrument
cluster display.
Audio
Push and release the up or down arrow button until
the Audio Menu displays in the instrument cluster display.
Messages
Push and release the up or down arrow button until
Messages is highlighted in the instrument cluster display.
This feature shows the number of stored warning
messages. Pushing the right arrow button will allow you
to see what the stored messages are.
NOTE:The pop-up messages indicate the status of the system
and/or the conditions that need to be met. Messages
remain in the stored stack until condition is cleared.
Screen Setup
Push and release the up or down arrow button until
the Screen Setup Menu displays in the instrument cluster
display. Push and release the OK button to enter the
submenus. The Screen Setup feature allows you to
change what information is displayed in the instrument
cluster as well as the location that information is
displayed.
23_RUP_OM_EN_USC_t.book Page 100
Page 125 of 328
STARTING AND OPERATING123
TO MANUALLY TURN ON THE STOP/
S
TART SYSTEM
After turning off the Stop/Start system, push the Stop/
Start OFF switch again (located on the switch bank). The
light on the switch will turn off.
SYSTEM MALFUNCTION
If there is a malfunction in the Stop/Start system, the
system will not shut down the engine. A “Service STOP/
START System” message and a yellow Stop/Start telltale
will appear in the instrument cluster display
If the “Service STOP/START System” message appears in
the instrument cluster display, have the system checked
by an authorized dealer.
If a malfunction occurs during an autostop, the vehicle
may not auto start and will need a key start.
CRUISE CONTROL SYSTEMS — IF EQUIPPED
Your vehicle may be equipped with the Cruise Control
system, or the Adaptive Cruise Control (ACC) system:
Cruise Control will keep your vehicle at a constant
preset speed.
Adaptive Cruise Control (ACC) will adjust the vehicle
speed up to the preset speed to maintain a distance
with the vehicle ahead.
NOTE:
In vehicles equipped with ACC, if ACC is not enabled,
Fixed Speed Cruise Control will not detect vehicles
directly ahead of you. Always be aware of the feature
selected.
Only one Cruise Control feature can operate at a time.
For example, if Fixed Speed Cruise Control is enabled,
Adaptive Cruise Control will be unavailable, and vice
versa.
CRUISE CONTROL
When engaged, the Cruise Control takes over accelerator
operations at speeds greater than 20 mph (32 km/h).
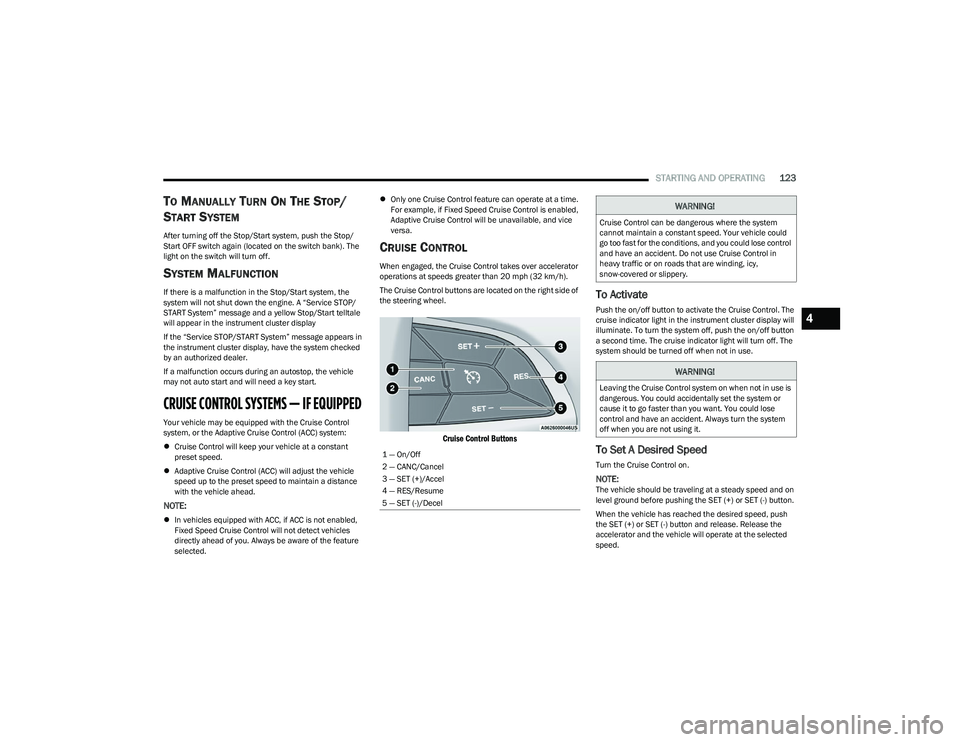
The Cruise Control buttons are located on the right side of
the steering wheel.
Cruise Control Buttons
To Activate
Push the on/off button to activate the Cruise Control. The
cruise indicator light in the instrument cluster display will
illuminate. To turn the system off, push the on/off button
a second time. The cruise indicator light will turn off. The
system should be turned off when not in use.
To Set A Desired Speed
Turn the Cruise Control on.
NOTE:The vehicle should be traveling at a steady speed and on
level ground before pushing the SET (+) or SET (-) button.
When the vehicle has reached the desired speed, push
the SET (+) or SET (-) button and release. Release the
accelerator and the vehicle will operate at the selected
speed.
1 — On/Off
2 — CANC/Cancel
3 — SET (+)/Accel
4 — RES/Resume
5 — SET (-)/Decel
WARNING!
Cruise Control can be dangerous where the system
cannot maintain a constant speed. Your vehicle could
go too fast for the conditions, and you could lose control
and have an accident. Do not use Cruise Control in
heavy traffic or on roads that are winding, icy,
snow-covered or slippery.
WARNING!
Leaving the Cruise Control system on when not in use is
dangerous. You could accidentally set the system or
cause it to go faster than you want. You could lose
control and have an accident. Always turn the system
off when you are not using it.
4
23_RUP_OM_EN_USC_t.book Page 123
Page 127 of 328
STARTING AND OPERATING125
(Continued)
Adaptive Cruise Control (ACC) Operation
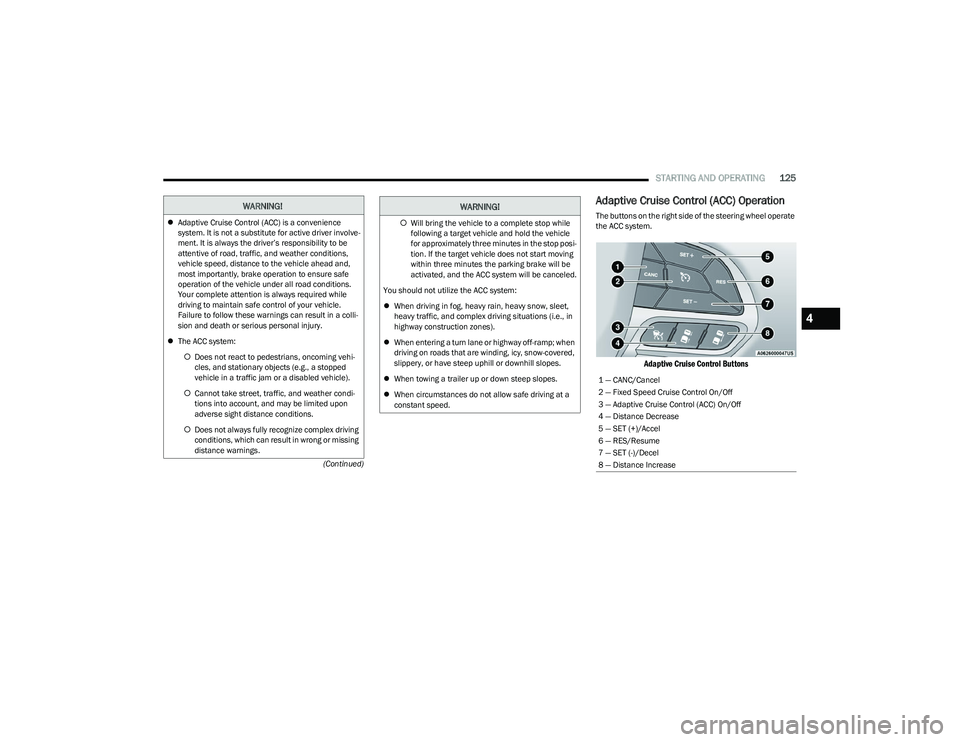
The buttons on the right side of the steering wheel operate
the ACC system.
Adaptive Cruise Control Buttons
WARNING!
Adaptive Cruise Control (ACC) is a convenience
system. It is not a substitute for active driver involve -
ment. It is always the driver’s responsibility to be
attentive of road, traffic, and weather conditions,
vehicle speed, distance to the vehicle ahead and,
most importantly, brake operation to ensure safe
operation of the vehicle under all road conditions.
Your complete attention is always required while
driving to maintain safe control of your vehicle.
Failure to follow these warnings can result in a colli -
sion and death or serious personal injury.
The ACC system:
Does not react to pedestrians, oncoming vehi -
cles, and stationary objects (e.g., a stopped
vehicle in a traffic jam or a disabled vehicle).
Cannot take street, traffic, and weather condi -
tions into account, and may be limited upon
adverse sight distance conditions.
Does not always fully recognize complex driving
conditions, which can result in wrong or missing
distance warnings.Will bring the vehicle to a complete stop while
following a target vehicle and hold the vehicle
for approximately three minutes in the stop posi -
tion. If the target vehicle does not start moving
within three minutes the parking brake will be
activated, and the ACC system will be canceled.
You should not utilize the ACC system:
When driving in fog, heavy rain, heavy snow, sleet,
heavy traffic, and complex driving situations (i.e., in
highway construction zones).
When entering a turn lane or highway off-ramp; when
driving on roads that are winding, icy, snow-covered,
slippery, or have steep uphill or downhill slopes.
When towing a trailer up or down steep slopes.
When circumstances do not allow safe driving at a
constant speed.
WARNING!
1 — CANC/Cancel
2 — Fixed Speed Cruise Control On/Off
3 — Adaptive Cruise Control (ACC) On/Off
4 — Distance Decrease
5 — SET (+)/Accel
6 — RES/Resume
7 — SET (-)/Decel
8 — Distance Increase
4
23_RUP_OM_EN_USC_t.book Page 125
Page 130 of 328

128STARTING AND OPERATING
NOTE:When you override and push the SET (+) button or SET (-)
buttons, the new set speed will be the current speed of the
vehicle.
When ACC Is Active
When you use the SET (-) button to decelerate, if the
engine’s braking power does not slow the vehicle suffi -
ciently to reach the set speed, the brake system will
automatically slow the vehicle.
The ACC system decelerates the vehicle to a full stop
when following the vehicle in front. If your vehicle
follows the vehicle in front to a standstill, after two
seconds the driver will either have to push the RES
(resume) button, or apply the accelerator pedal to reen -
gage the ACC to the existing set speed.
The ACC system maintains set speed when driving
uphill and downhill. However, a slight speed change on
moderate hills is normal. In addition, downshifting may
occur while climbing uphill or descending downhill. This
is normal operation and necessary to maintain set
speed. When driving uphill and downhill, the ACC
system will cancel if the braking temperature exceeds
normal range (overheated).
Setting The Following Distance In ACC
The specified following distance for ACC can be set by
varying the distance setting between four bars (longest),
three bars (long), two bars (medium) and one bar (short).
Using this distance setting and the vehicle speed, ACC
calculates and sets the distance to the vehicle ahead. This
distance setting displays in the instrument cluster display.
Distance Settings
To increase the distance setting, push the Distance
Increase button and release. Each time the button is
pushed, the distance setting increases by one bar (longer).
To decrease the distance setting, push the Distance
Decrease button and release. Each time the button is
pushed, the distance setting decreases by one bar
(shorter).
If there is no vehicle ahead, the vehicle will maintain the
set speed. If a slower moving vehicle is detected in the
same lane, the instrument cluster displays the ACC Set
With Target Detected Indicator Light, and the system
adjusts vehicle speed automatically to maintain the
distance setting, regardless of the set speed. The vehicle will then maintain the set distance until:
The vehicle ahead accelerates to a speed above the
set speed.
The vehicle ahead moves out of your lane or view of the
sensor.
The distance setting is changed.
The system disengages
Úpage 126.
The maximum braking applied by ACC is limited; however,
the driver can always apply the brakes manually, if
necessary.
NOTE:The brake lights will illuminate whenever the ACC system
applies the brakes.
A Proximity Warning will alert the driver if ACC predicts that
its maximum braking level is not sufficient to maintain the
set distance. If this occurs, a visual alert “BRAKE!” will
flash in the instrument cluster display and a chime will
sound while ACC continues to apply its maximum braking
capacity.
NOTE:The “BRAKE!” screen in the instrument cluster display is a
warning for the driver to take action and does not neces -
sarily mean that the Forward Collision Warning system is
applying the brakes autonomously.
Overtake Aid
When driving with Adaptive Cruise Control (ACC) engaged
and following a vehicle, the system will provide an
additional acceleration up to the ACC set speed to assist
in passing the vehicle. This additional acceleration is
triggered when the driver utilizes the left turn signal and
will only be active when passing on the left hand side.
1 — Longest Distance Setting (Four Bars)
2 — Medium Distance Setting (Two Bars)
3 — Long Distance Setting (Three Bars)
4 — Short Distance Setting (One Bar)
23_RUP_OM_EN_USC_t.book Page 128
Page 145 of 328
STARTING AND OPERATING143
SURROUND VIEW CAMERA SYSTEM —
IF EQUIPPED
Your vehicle may be equipped with the Surround View
Camera system that allows you to see an on-screen image
of the surroundings and Top View of your vehicle whenever
the gear selector is put into REVERSE or a different view is
selected through the touchscreen buttons. The Top View
of the vehicle will show which doors are open. The image
will be displayed on the touchscreen display along with a
caution note “Check Entire Surroundings” across the top
of the screen. After five seconds, this note will disappear.
The Surround View Camera system is comprised of four
sequential cameras located in the front grille, rear liftgate
and side mirrors.
NOTE:The Surround View Camera system has programmable
settings that may be selected through the Uconnect
system
Úpage 157.
Press this button on the touchscreen to enter
the Surround View Camera menu in the
Uconnect system.
When the vehicle is shifted into REVERSE, the Rear View
and Top View is the default view of the system. When the vehicle is shifted out of REVERSE with camera
delay turned on, the camera image will continue to be
displayed for up to 10 seconds unless the vehicle speed
exceeds 8 mph (13 km/h), the vehicle is shifted into
PARK, or the ignition is placed in the OFF position. There is
a touchscreen X button to disable the display of the
camera image.
When the vehicle is shifted out of REVERSE with camera
delay turned off, the Surround View system is exited and
the last known screen appears again.
Whenever the Rear View Camera image is activated
through the Back Up Camera button in the Controls menu,
and the vehicle speed is greater than, or equal to, 8 mph
(13 km/h), a display timer for the image is initiated. The
image will continue to be displayed until the display timer
exceeds 10 seconds.
NOTE:
If the vehicle speed remains below 8 mph (13 km/h),
the Rear View Camera image will be displayed continu -
ously until deactivated via the touchscreen X button,
the transmission is shifted into PARK, or the ignition is
placed in the OFF position.
The touchscreen X button to disable display of the
camera image is made available ONLY when the
vehicle is not in REVERSE. When enabled, active guidelines are overlaid on the image
to illustrate the width of the vehicle, including the side
view mirrors and its projected back up path based on the
steering wheel position.
Different colored zones indicate the distance to the rear of
the vehicle.
The following table shows the approximate distances for
each zone:
Modes Of Operation
Manual activation of the Surround View system is selected
by pressing the Surround View Camera button located in
the Controls screen within the Uconnect system.
Zone
Distance To The Rear Of The
Vehicle
Red 0 - 1 ft (0 - 30 cm)
Yellow 1 ft - 6.5 ft (30 cm - 2 m)
Green 6.5 ft or greater
(2 m or greater)
4
23_RUP_OM_EN_USC_t.book Page 143
Page 159 of 328
157
MULTIMEDIA
UCONNECT SYSTEMS
For detailed information about your Uconnect 5 With
7-inch Display or Uconnect 5/5NAV With 10.1-inch Display
system, refer to your Uconnect Radio Instruction Manual.
NOTE:Uconnect screen images are for illustration purposes only
and may not reflect exact software for your vehicle.
CYBERSECURITY
Depending on applicability, your vehicle may be able to
send or receive information from a wired or wireless
network. This information allows systems and features in
your vehicle to function properly.
Your vehicle may be equipped with certain security
features to reduce the risk of unauthorized and unlawful
access to vehicle systems and wireless communications.
Vehicle software technology continues to evolve over time
and FCA US LLC, working with its suppliers, evaluates and
takes appropriate steps as needed. As always, if you
experience unusual behavior, contact an authorized
dealer immediately,
Úpage 308, or refer to your
Uconnect Radio Instruction Manual for additional contact
information. The risk of unauthorized and unlawful access to your
vehicle systems may still exist, even if the most recent
version of vehicle software (such as Uconnect software) is
installed.
NOTE:To help further improve user experience, features,
stability, etc., and minimize the potential risk of a security
breach, vehicle owners should routinely check
www.driveuconnect.com (US Residents) or www.driveuco
-
nnect.ca (Canadian Residents) to learn about available
Uconnect software updates.
UCONNECT SETTINGS
The Uconnect system uses a combination of buttons on
the touchscreen and buttons on the faceplate located on
the center of the instrument panel. These buttons allow
you to access and change the Customer Programmable
Features. Many features can vary by vehicle.
Buttons on the faceplate are located below and/or beside
the Uconnect system in the center of the instrument
panel. In addition, there is a SCROLL/ENTER control knob
located on the right side. Turn the control knob to scroll
through menus and change settings. Push the center of
the control knob one or more times to select or change a
setting.
WARNING!
ONLY insert trusted devices/components into your
vehicle. Media of unknown origin could possibly
contain malicious software, and if installed in your
vehicle, it may increase the possibility for vehicle
systems to be breached.
As always, if you experience unusual vehicle
behavior, take your vehicle to an authorized dealer
immediately.
5
23_RUP_OM_EN_USC_t.book Page 157
Page 160 of 328
158MULTIMEDIA
Your Uconnect system may also have SCREEN OFF and
MUTE buttons on the faceplate.
Push the SCREEN OFF button on the faceplate to turn off
the Uconnect screen. Push the button again or tap the
screen to turn the screen on.
Press the Back Arrow button to exit out of a Menu or
certain option on the Uconnect system.
Push and hold the Power button on the radio’s faceplate
for a minimum of 15 seconds to reset the radio.
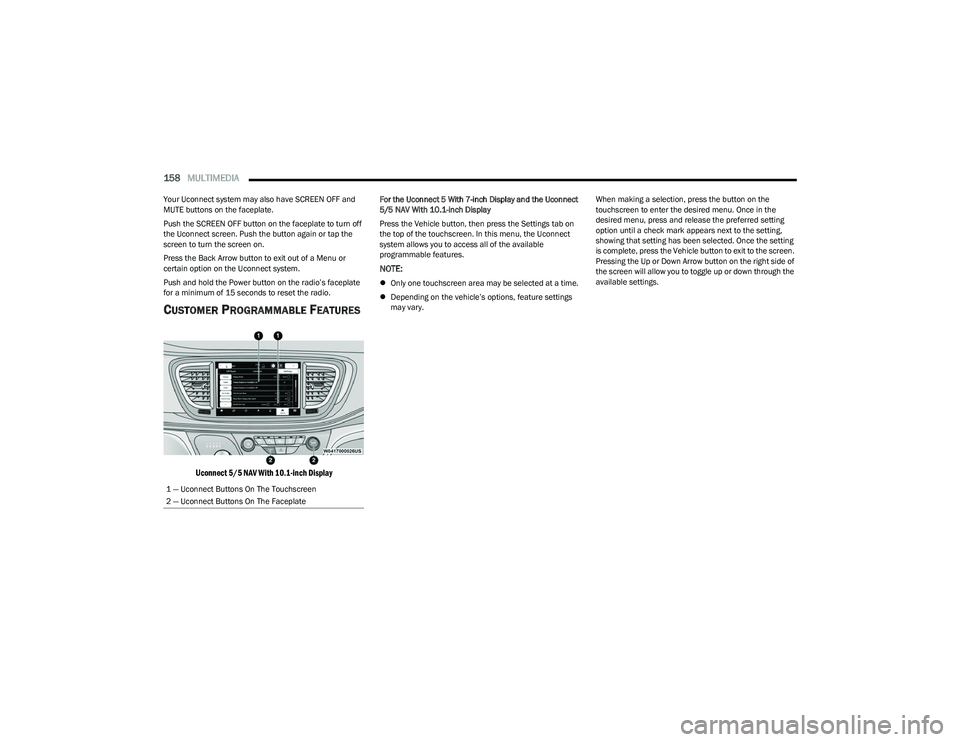
CUSTOMER PROGRAMMABLE FEATURES
Uconnect 5/5 NAV With 10.1-inch Display
For the Uconnect 5 With 7-inch Display and the Uconnect
5/5 NAV With 10.1-inch Display
Press the Vehicle button, then press the Settings tab on
the top of the touchscreen. In this menu, the Uconnect
system allows you to access all of the available
programmable features.
NOTE:
Only one touchscreen area may be selected at a time.
Depending on the vehicle’s options, feature settings
may vary. When making a selection, press the button on the
touchscreen to enter the desired menu. Once in the
desired menu, press and release the preferred setting
option until a check mark appears next to the setting,
showing that setting has been selected. Once the setting
is complete, press the Vehicle button to exit to the screen.
Pressing the Up or Down Arrow button on the right side of
the screen will allow you to toggle up or down through the
available settings.
1 — Uconnect Buttons On The Touchscreen
2 — Uconnect Buttons On The Faceplate
23_RUP_OM_EN_USC_t.book Page 158