2023 CHRYSLER PACIFICA HYBRID restrain
[x] Cancel search: restrainPage 44 of 328
42GETTING TO KNOW YOUR VEHICLE
POWER ADJUSTMENT (REAR SEATS) —
I
F EQUIPPED
Third Row Power Recline — If Equipped
The power recline feature, located on the trim panel next
to the seat, adjusts the seatback angle forward/rearward
for occupant comfort.
Reclining The Seatback
The angle of the seatback can be adjusted forward or
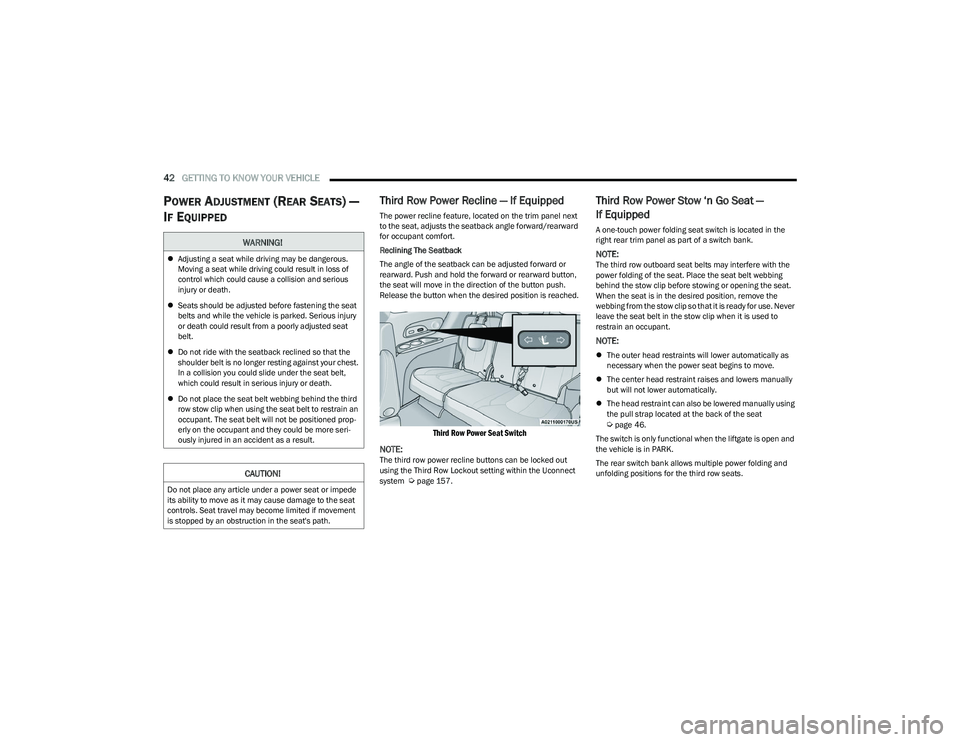
rearward. Push and hold the forward or rearward button,
the seat will move in the direction of the button push.
Release the button when the desired position is reached.
Third Row Power Seat Switch
NOTE:
The third row power recline buttons can be locked out
using the Third Row Lockout setting within the Uconnect
system
Úpage 157.
Third Row Power Stow ‘n Go Seat —
If Equipped
A one-touch power folding seat switch is located in the
right rear trim panel as part of a switch bank.
NOTE:The third row outboard seat belts may interfere with the
power folding of the seat. Place the seat belt webbing
behind the stow clip before stowing or opening the seat.
When the seat is in the desired position, remove the
webbing from the stow clip so that it is ready for use. Never
leave the seat belt in the stow clip when it is used to
restrain an occupant.
NOTE:
The outer head restraints will lower automatically as
necessary when the power seat begins to move.
The center head restraint raises and lowers manually
but will not lower automatically.
The head restraint can also be lowered manually using
the pull strap located at the back of the seat
Úpage 46.
The switch is only functional when the liftgate is open and
the vehicle is in PARK.
The rear switch bank allows multiple power folding and
unfolding positions for the third row seats.
WARNING!
Adjusting a seat while driving may be dangerous.
Moving a seat while driving could result in loss of
control which could cause a collision and serious
injury or death.
Seats should be adjusted before fastening the seat
belts and while the vehicle is parked. Serious injury
or death could result from a poorly adjusted seat
belt.
Do not ride with the seatback reclined so that the
shoulder belt is no longer resting against your chest.
In a collision you could slide under the seat belt,
which could result in serious injury or death.
Do not place the seat belt webbing behind the third
row stow clip when using the seat belt to restrain an
occupant. The seat belt will not be positioned prop -
erly on the occupant and they could be more seri -
ously injured in an accident as a result.
CAUTION!
Do not place any article under a power seat or impede
its ability to move as it may cause damage to the seat
controls. Seat travel may become limited if movement
is stopped by an obstruction in the seat's path.
23_RUP_OM_EN_USC_t.book Page 42
Page 45 of 328
GETTING TO KNOW YOUR VEHICLE43
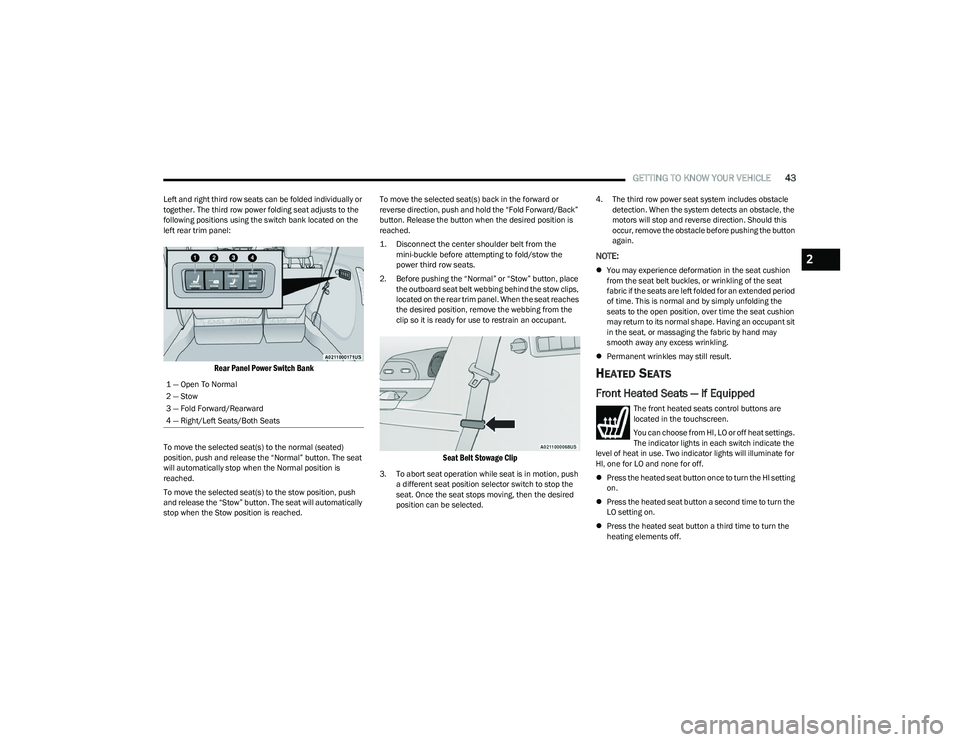
Left and right third row seats can be folded individually or
together. The third row power folding seat adjusts to the
following positions using the switch bank located on the
left rear trim panel:
Rear Panel Power Switch Bank
To move the selected seat(s) to the normal (seated)
position, push and release the “Normal” button. The seat
will automatically stop when the Normal position is
reached.
To move the selected seat(s) to the stow position, push
and release the “Stow” button. The seat will automatically
stop when the Stow position is reached. To move the selected seat(s) back in the forward or
reverse direction, push and hold the “Fold Forward/Back”
button. Release the button when the desired position is
reached.
1. Disconnect the center shoulder belt from the
mini-buckle before attempting to fold/stow the
power third row seats.
2. Before pushing the “Normal” or “Stow” button, place the outboard seat belt webbing behind the stow clips,
located on the rear trim panel. When the seat reaches
the desired position, remove the webbing from the
clip so it is ready for use to restrain an occupant.
Seat Belt Stowage Clip
3. To abort seat operation while seat is in motion, push a different seat position selector switch to stop the
seat. Once the seat stops moving, then the desired
position can be selected. 4. The third row power seat system includes obstacle
detection. When the system detects an obstacle, the
motors will stop and reverse direction. Should this
occur, remove the obstacle before pushing the button
again.
NOTE:
You may experience deformation in the seat cushion
from the seat belt buckles, or wrinkling of the seat
fabric if the seats are left folded for an extended period
of time. This is normal and by simply unfolding the
seats to the open position, over time the seat cushion
may return to its normal shape. Having an occupant sit
in the seat, or massaging the fabric by hand may
smooth away any excess wrinkling.
Permanent wrinkles may still result.
HEATED SEATS
Front Heated Seats — If Equipped
The front heated seats control buttons are
located in the touchscreen.
You can choose from HI, LO or off heat settings.
The indicator lights in each switch indicate the
level of heat in use. Two indicator lights will illuminate for
HI, one for LO and none for off.
Press the heated seat button once to turn the HI setting
on.
Press the heated seat button a second time to turn the
LO setting on.
Press the heated seat button a third time to turn the
heating elements off.
1 — Open To Normal
2 — Stow
3 — Fold Forward/Rearward
4 — Right/Left Seats/Both Seats
2
23_RUP_OM_EN_USC_t.book Page 43
Page 47 of 328
GETTING TO KNOW YOUR VEHICLE45
PLASTIC GROCERY BAG RETAINER HOOKS
Retainer hooks which will hold plastic grocery bag handles
are built into the seatbacks of the second row rear seats,
and if equipped, the backs of the front row seats. The floor
supports the partial weight of the bagged goods.
HEAD RESTRAINTS
Head restraints are designed to reduce the risk of injury by
restricting head movement in the event of a rear impact.
Head restraints should be adjusted so that the top of the
head restraint is located above the top of your ear.
Head Restraints — Front Seats
The front driver and passenger seats are equipped with
four-way head restraints.
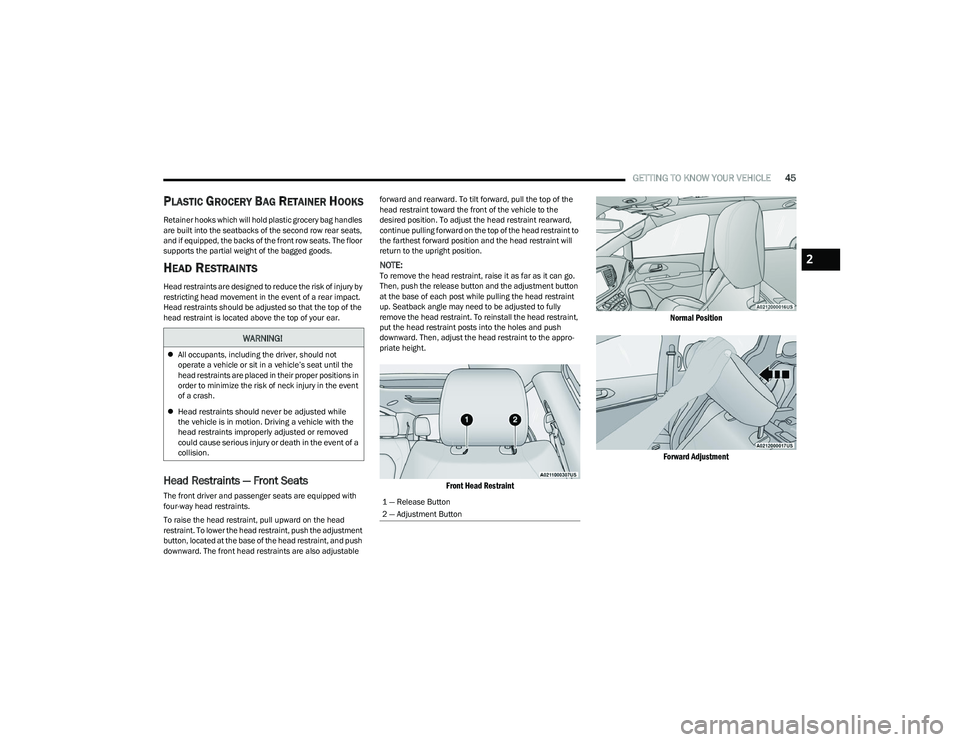
To raise the head restraint, pull upward on the head
restraint. To lower the head restraint, push the adjustment
button, located at the base of the head restraint, and push
downward. The front head restraints are also adjustable forward and rearward. To tilt forward, pull the top of the
head restraint toward the front of the vehicle to the
desired position. To adjust the head restraint rearward,
continue pulling forward on the top of the head restraint to
the farthest forward position and the head restraint will
return to the upright position.
NOTE:To remove the head restraint, raise it as far as it can go.
Then, push the release button and the adjustment button
at the base of each post while pulling the head restraint
up. Seatback angle may need to be adjusted to fully
remove the head restraint. To reinstall the head restraint,
put the head restraint posts into the holes and push
downward. Then, adjust the head restraint to the appro
-
priate height.
Front Head Restraint Normal Position
Forward Adjustment
WARNING!
All occupants, including the driver, should not
operate a vehicle or sit in a vehicle’s seat until the
head restraints are placed in their proper positions in
order to minimize the risk of neck injury in the event
of a crash.
Head restraints should never be adjusted while
the vehicle is in motion. Driving a vehicle with the
head restraints improperly adjusted or removed
could cause serious injury or death in the event of a
collision.
1 — Release Button
2 — Adjustment Button
2
23_RUP_OM_EN_USC_t.book Page 45
Page 48 of 328
46GETTING TO KNOW YOUR VEHICLE
Head Restraints — Second Row Quad
Seats
The second row outboard head restraints, as well as the
removable 8th passenger seat (if equipped), may have
adjustable head restraints.
NOTE:If equipped with Stow ‘n Go seating, the head restraints
are non-adjustable and non-removable. Do not pull on
non-adjustable head restraints when folding the seat.
To raise the head restraint, pull upward on the head
restraint. To lower the head restraint, push the adjustment
button, located at the base of the head restraint, and push
downward.
To remove the head restraint, raise it as far as it can go.
Then, push the release button and the adjustment button
at the base of each post while pulling the head restraint
up. Seatback angle may need to be adjusted to fully
remove the head restraint. To reinstall the head restraint, put the head restraint posts into the holes and push
downward. Then, adjust the head restraint to the
appropriate height.
Head Restraints — Third Row
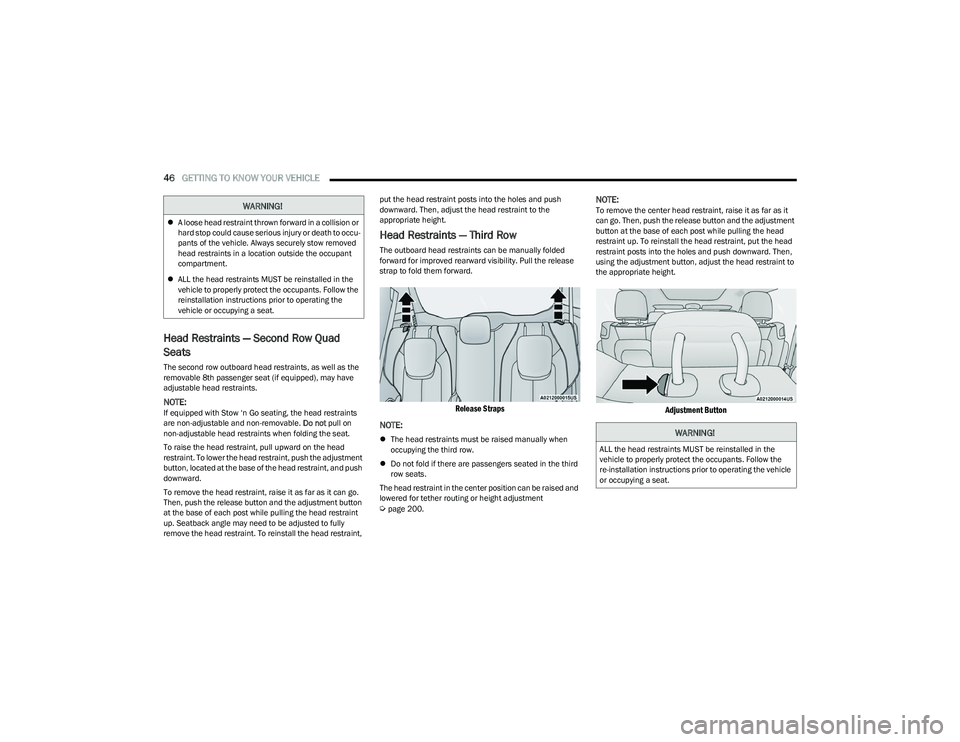
The outboard head restraints can be manually folded
forward for improved rearward visibility. Pull the release
strap to fold them forward.
Release Straps
NOTE:
The head restraints must be raised manually when
occupying the third row.
Do not fold if there are passengers seated in the third
row seats.
The head restraint in the center position can be raised and
lowered for tether routing or height adjustment
Úpage 200.
NOTE:To remove the center head restraint, raise it as far as it
can go. Then, push the release button and the adjustment
button at the base of each post while pulling the head
restraint up. To reinstall the head restraint, put the head
restraint posts into the holes and push downward. Then,
using the adjustment button, adjust the head restraint to
the appropriate height.
Adjustment Button
WARNING!
A loose head restraint thrown forward in a collision or
hard stop could cause serious injury or death to occu -
pants of the vehicle. Always securely stow removed
head restraints in a location outside the occupant
compartment.
ALL the head restraints MUST be reinstalled in the
vehicle to properly protect the occupants. Follow the
reinstallation instructions prior to operating the
vehicle or occupying a seat.
WARNING!
ALL the head restraints MUST be reinstalled in the
vehicle to properly protect the occupants. Follow the
re-installation instructions prior to operating the vehicle
or occupying a seat.
23_RUP_OM_EN_USC_t.book Page 46
Page 49 of 328

GETTING TO KNOW YOUR VEHICLE47
POWER FOLDING THIRD ROW HEAD
RESTRAINTS — IF EQUIPPED
For improved visibility, the third row outboard head
restraints can be folded using the Uconnect system.
Press Vehicle, then Controls located on the bottom of the
Uconnect display.
Press the Head Restraint Fold button to power
fold the third row head restraints.
NOTE:
The head restraints can be folded downward using the
Head Restraint button or using the manual release
strap. The head restraints must be raised manually
when occupying the third row.
Do not fold if there are passengers seated in the third
row seats.
UCONNECT VOICE RECOGNITION —
IF EQUIPPED
INTRODUCING VOICE RECOGNITION
Start using Uconnect Voice Recognition (VR) with these
helpful quick tips. It provides the key Voice Commands
and tips you need to know to control your system.
BASIC VOICE COMMANDS
The following basic Voice Commands can be given at any
point while using your Uconnect system.
Push the VR button on the steering wheel. After the beep,
say:
“Cancel ” to stop a current voice session.
“Help ” to hear a list of suggested Voice Commands.
“Repeat ” to listen to the system prompts again.
Notice the visual cues that inform you of your Voice
Recognition system’s status.
GET STARTED
The VR button is used to activate/deactivate your
Voice Recognition system.
Helpful hints for using Voice Recognition:
Reduce background noise. Wind noise and passenger
conversations are examples of noise that may impact
recognition.
Speak clearly at a normal pace and volume while facing
straight ahead.
Each time you give a Voice Command, first push the VR
button, wait until after the beep, then say your Voice
Command. You can also say the vehicle “Wake Up”
word and state your command.
NOTE:The factory default Wake Up word is set to “Hey Uconnect”
and can be reprogrammed through the Uconnect Settings.
After the beep, say:
A passenger can press the VR button shortcut on the
radio status bar to also issue a command.
You can interrupt the help message or system prompts
by pushing the VR button and saying a Voice Command
or saying the vehicle’s “Wake Up” word and saying a
command from the current category.
Uconnect Voice Command Buttons
1 — Push To Answer An Incoming Phone Call
2 — For Vehicles Equipped With Navigation: Push
The Voice Recognition Button To Begin Radio, Media,
Navigation, Climate, Start Or Answer A Phone Call, And
Send Or Receive A Text
2 — For Vehicles Not Equipped With Navigation: Push The
Phone Button To Answer An Incoming Phone Call
2
23_RUP_OM_EN_USC_t.book Page 47
Page 202 of 328

200SAFETY
Should this occur, you should stop as soon as possible
and inflate the tires with low pressure (those in a different
color in the instrument cluster graphic) to the vehicle’s
recommended cold placard pressure value as shown in
the "Inflate to XX" message. Once the system receives the
updated tire pressures, the system will automatically
update, the pressure values in the graphic display in the
instrument cluster will return to their original color, and
the TPMS Warning Light will turn off. The vehicle may need
to be driven for up to 20 minutes above 15 mph
(24 km/h) in order for the TPMS to receive this
information.
TPMS DEACTIVATION — IF EQUIPPED
The Tire Pressure Monitoring System (TPMS) can be
deactivated if replacing all four wheel and tire assemblies
(road tires) with wheel and tire assemblies that do not
have TPMS sensors, such as when installing winter wheel
and tire assemblies on your vehicle.
To deactivate the TPMS, first, replace all four wheel and
tire assemblies (road tires) with tires not equipped with
Tire Pressure Monitoring System (TPMS) sensors. Then,
drive the vehicle for 20 minutes above 15 mph (24 km/h).
The TPMS will chime, the TPMS Warning Light will flash on
and off for 75 seconds and then remain on. The
instrument cluster will display the “SERVICE TPM
SYSTEM” message and then display dashes (--) in place of
the pressure values.
Beginning with the next ignition cycle, the TPMS will no
longer chime or display the “SERVICE TPM SYSTEM” message in the instrument cluster but dashes (--) will
remain in place of the pressure values.
To reactivate the TPMS, replace all four wheel and tire
assemblies (road tires) with tires equipped with TPMS
sensors. Then, drive the vehicle for up to 20 minutes
above 15 mph (24 km/h). The TPMS will chime, the TPMS
Warning Light will flash on and off for 75 seconds and then
turn off. The instrument cluster will display the “SERVICE
TPM SYSTEM” message and then display pressure values
in place of the dashes. On the next ignition cycle the
"SERVICE TPM SYSTEM" message will no longer be
displayed as long as no system fault exists.OCCUPANT RESTRAINT SYSTEMS
Some of the most important safety features in your vehicle
are the restraint systems:
OCCUPANT RESTRAINT SYSTEMS
F
EATURES
Seat Belt Systems
Supplemental Restraint Systems (SRS) Air Bags
Child Restraints
Some of the safety features described in this section may
be standard equipment on some models, or may be
optional equipment on others. If you are not sure, ask an
authorized dealer.
IMPORTANT SAFETY PRECAUTIONS
Please pay close attention to the information in this
section. It tells you how to use your restraint system properly, to keep you and your passengers as safe as
possible.
Here are some simple steps you can take to minimize the
risk of harm from a deploying air bag:
1. Children 12 years old and under should always ride
buckled up in the rear seat of a vehicle with a rear
seat.
2. A child who is not big enough to wear the vehicle seat belt properly must be secured in the appropriate child
restraint or belt-positioning booster seat in a rear
seating position
Úpage 219.
3. If a child from 2 to 12 years old (not in a rear-facing child restraint) must ride in the front passenger seat,
move the seat as far back as possible and use the
proper child restraint
Úpage 219.
4. Never allow children to slide the shoulder belt behind them or under their arm.
5. You should read the instructions provided with your child restraint to make sure that you are using it
properly.
6. All occupants should always wear their lap and shoulder belts properly.
7. The driver and front passenger seats should be moved back as far as practical to allow the front air
bags room to inflate.
8. Do not lean against the door or window. If your vehicle has side air bags, and deployment occurs, the side air
bags will inflate forcefully into the space between
occupants and the door and occupants could be injured.
9. If the air bag system in this vehicle needs to be modified to accommodate a disabled person, see
23_RUP_OM_EN_USC_t.book Page 200
Page 203 of 328
SAFETY201
Úpage 308 for customer service contact
information.
SEAT BELT SYSTEMS
Buckle up even though you are an excellent driver, even
on short trips. Someone on the road may be a poor driver
and could cause a collision that includes you. This can
happen far away from home or on your own street.
Research has shown that seat belts save lives, and they
can reduce the seriousness of injuries in a collision. Some
of the worst injuries happen when people are thrown from
the vehicle. Seat belts reduce the possibility of ejection
and the risk of injury caused by striking the inside of the
vehicle. Everyone in a motor vehicle should be belted at all
times.
Enhanced Seat Belt Use Reminder System
(BeltAlert)
Driver And Passenger BeltAlert — If Equipped
BeltAlert is a feature intended to remind the
driver and outboard front seat passenger (if
equipped with outboard front passenger seat
BeltAlert) to buckle their seat belts. The
BeltAlert feature is active whenever the ignition switch is
in the START or ON/RUN position.
Initial Indication
If the driver is unbuckled when the ignition switch is first in
the START or ON/RUN position, a chime will signal for a
few seconds. If the driver or outboard front seat passenger
(if equipped with outboard front passenger seat BeltAlert)
is unbuckled when the ignition switch is first in the START
or ON/RUN position the Seat Belt Reminder Light will turn
on and remain on until both outboard front seat belts are
buckled. The outboard front passenger seat BeltAlert is
not active when an outboard front passenger seat is
unoccupied.
BeltAlert Warning Sequence
The BeltAlert warning sequence is activated when the
vehicle is moving above a specified vehicle speed range
and the driver or outboard front seat passenger is
unbuckled (if equipped with outboard front passenger
seat BeltAlert) (the outboard front passenger seat
BeltAlert is not active when the outboard front passenger
seat is unoccupied). The BeltAlert warning sequence
starts by blinking the Seat Belt Reminder Light and
sounding an intermittent chime. Once the BeltAlert
warning sequence has completed, the Seat Belt Reminder Light will remain on until the seat belts are buckled. The
BeltAlert warning sequence may repeat based on vehicle
speed until the driver and occupied outboard front seat
passenger seat belts are buckled. The driver should
instruct all occupants to buckle their seat belts.
Change of Status
If the driver or outboard front seat passenger (if equipped
with outboard front passenger seat BeltAlert) unbuckles
their seat belt while the vehicle is traveling, the BeltAlert
warning sequence will begin until the seat belts are
buckled again.
The outboard front passenger seat BeltAlert is not active
when the outboard front passenger seat is unoccupied.
BeltAlert may be triggered when an animal or other items
are placed on the outboard front passenger seat or when
the seat is folded flat (if equipped). It is recommended that
pets be restrained in the rear seat (if equipped) in pet
harnesses or pet carriers that are secured by seat belts,
and cargo is properly stowed.
BeltAlert can be activated or deactivated by an authorized
dealer. FCA US LLC does not recommend deactivating
BeltAlert.
NOTE:If BeltAlert has been deactivated and the driver or
outboard front seat passenger (if equipped with outboard
front passenger seat BeltAlert) is unbuckled the Seat Belt
Reminder Light will turn on and remain on until the driver
and outboard front seat passenger seat belts are buckled.
WARNING!
Never place a rear-facing child restraint in front of an
air bag. A deploying passenger front air bag can
cause death or serious injury to a child 12 years or
younger, including a child in a rear-facing child
restraint.
Never install a rear-facing child restraint in the front
seat of a vehicle. Only use a rear-facing child
restraint in the rear seat. If the vehicle does not have
a rear seat, do not transport a rear-facing child
restraint in that vehicle.
6
23_RUP_OM_EN_USC_t.book Page 201
Page 204 of 328
202SAFETY
(Continued)
(Continued)
(Continued)
Lap/Shoulder Belts
All seating positions in your vehicle are equipped with lap/
shoulder belts.
The seat belt webbing retractor will lock only during very
sudden stops or collisions. This feature allows the
shoulder part of the seat belt to move freely with you
under normal conditions. However, in a collision the seat
belt will lock and reduce your risk of striking the inside of
the vehicle or being thrown out of the vehicle.
WARNING!
Relying on the air bags alone could lead to more
severe injuries in a collision. The air bags work with
your seat belt to restrain you properly. In some colli -
sions, the air bags won’t deploy at all. Always wear
your seat belt even though you have air bags.
In a collision, you and your passengers can suffer
much greater injuries if you are not properly buckled
up. You can strike the interior of your vehicle or other
passengers, or you can be thrown out of the vehicle.
Always be sure you and others in your vehicle are
buckled up properly.
It is dangerous to ride in a cargo area, inside or
outside of a vehicle. In a collision, people riding in
these areas are more likely to be seriously injured or
killed.
Do not allow people to ride in any area of your vehicle
that is not equipped with seats and seat belts.
Be sure everyone in your vehicle is in a seat and
using a seat belt properly. Occupants, including the
driver, should always wear their seat belts whether or
not an air bag is also provided at their seating posi -
tion to minimize the risk of severe injury or death in
the event of a crash.
Wearing your seat belt incorrectly could make your
injuries in a collision much worse. You might suffer
internal injuries, or you could even slide out of the
seat belt. Follow these instructions to wear your seat
belt safely and to keep your passengers safe, too.
Two people should never be belted into a single seat
belt. People belted together can crash into one
another in a collision, hurting one another badly.
Never use a lap/shoulder belt or a lap belt for more
than one person, no matter what their size.
WARNING!
A lap belt worn too high can increase the risk of injury
in a collision. The seat belt forces won’t be at the
strong hip and pelvic bones, but across your
abdomen. Always wear the lap part of your seat belt
as low as possible and keep it snug.
A twisted seat belt may not protect you properly. In a
collision, it could even cut into you. Be sure the seat
belt is flat against your body, without twists. If you
can’t straighten a seat belt in your vehicle, take it to
an authorized dealer immediately and have it fixed.
WARNING!
A seat belt that is buckled into the wrong buckle will
not protect you properly. The lap portion could ride
too high on your body, possibly causing internal inju -
ries. Always buckle your seat belt into the buckle
nearest you.
A seat belt that is too loose will not protect you prop -
erly. In a sudden stop, you could move too far
forward, increasing the possibility of injury. Wear
your seat belt snugly.
A seat belt that is worn under your arm is dangerous.
Your body could strike the inside surfaces of the
vehicle in a collision, increasing head and neck
injury. A seat belt worn under the arm can cause
internal injuries. Ribs aren’t as strong as shoulder
bones. Wear the seat belt over your shoulder so that
your strongest bones will take the force in a collision.
A shoulder belt placed behind you will not protect you
from injury during a collision. You are more likely to
hit your head in a collision if you do not wear your
shoulder belt. The lap and shoulder belt are meant to
be used together.
WARNING!
23_RUP_OM_EN_USC_t.book Page 202