2023 CHRYSLER PACIFICA HYBRID radio
[x] Cancel search: radioPage 55 of 328

GETTING TO KNOW YOUR VEHICLE53
PROGRAMMING HOMELINK® TO A
M
ISCELLANEOUS DEVICE
The procedure on how to program HomeLink® to a
miscellaneous device follows the same procedure as
programming to a garage door opener
Úpage 52. Be sure
to determine if the device has a rolling code, or non-rolling
code before beginning the programming process.
NOTE:Canadian Radio Frequency (RF) laws require transmitter
signals to time-out (or quit) after several seconds of trans -
mission, which may not be long enough for HomeLink® to
pick up the signal during programming. Similar to this
Canadian law, some U.S. gate operators are designed to
time-out in the same manner. The procedure may need to
be performed multiple times to successfully pair the
device to your HomeLink® buttons.
REPROGRAMMING A SINGLE
H
OMELINK® BUTTON
To reprogram a single HomeLink® button that has been
previously trained, without erasing all the channels,
proceed as follows. Be sure to determine whether the new
device you want to program the HomeLink® button to has
a rolling code, or non-rolling code.
1. Place the ignition in the ON/RUN position, without
starting the engine.
2. Push and hold the desired HomeLink® button until the HomeLink® indicator light begins to flash after
20 seconds. Do not release the button.
3. Without releasing the button , proceed with Step 2 in
“Programming HomeLink® To A Garage Door
Opener” and follow all remaining steps.
CANADIAN/GATE OPERATOR
P
ROGRAMMING
For programming transmitters in Canada/United States
that require the transmitter signals to “time-out” after
several seconds of transmission:
Canadian Radio Frequency (RF) laws require transmitter
signals to time-out (or quit) after several seconds of
transmission, which may not be long enough for
HomeLink® to pick up the signal during programming.
Similar to this Canadian law, some U.S. gate operators are
designed to time-out in the same manner. It may be helpful to unplug the device during the cycling
process to prevent possible overheating of the garage
door or gate motor.
1. Place the ignition in the ON/RUN position.
NOTE:For vehicles equipped with Keyless Enter ‘n Go™, place
the ignition in the RUN position. Make sure while
programming HomeLink® with the engine on that your
vehicle is outside of your garage, or that the garage door
remains open at all times.
2. Place the hand-held transmitter 1 to 3 inches
(3 to 8 cm) away from the HomeLink® button you
wish to program while keeping the HomeLink®
indicator light in view.
3. Continue to push and hold the HomeLink® button while you push and release (cycle) your hand-held
transmitter every two seconds until HomeLink® has
successfully accepted the frequency signal. The
indicator light will flash slowly and then rapidly when
fully trained.
4. Watch for the HomeLink® indicator to change flash rates. When it changes, it is programmed. It may take
up to 30 seconds or longer in rare cases. The garage
door may open and close while you are programming.
5. Push and hold the programmed HomeLink® button and observe the indicator light.
WARNING!
Your motorized door or gate will open and close while
you are programming the universal transmitter. Do
not program the transmitter if people or pets are in
the path of the door or gate.
Do not run your vehicle in a closed garage or
confined area while programming the transmitter.
Exhaust gas from your vehicle contains carbon
monoxide (CO) which is odorless and colorless.
Carbon monoxide is poisonous when inhaled and
can cause you and others to be severely injured or
killed.
2
23_RUP_OM_EN_USC_t.book Page 53
Page 61 of 328

GETTING TO KNOW YOUR VEHICLE59
At the top detent of the instrument panel dimmer, all the
interior lights will illuminate. At the bottom most setting
(extreme bottom) interior lights are turned off (dome off),
and the cluster, radio and instrument lighting go to their
lowest dimmable setting.
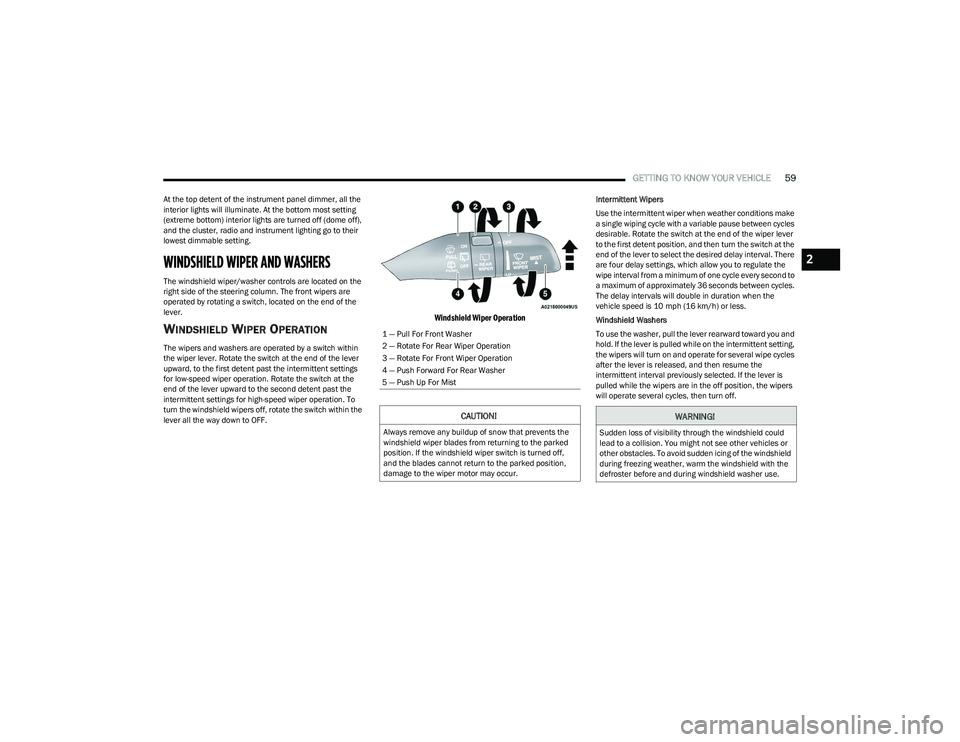
WINDSHIELD WIPER AND WASHERS
The windshield wiper/washer controls are located on the
right side of the steering column. The front wipers are
operated by rotating a switch, located on the end of the
lever.
WINDSHIELD WIPER OPERATION
The wipers and washers are operated by a switch within
the wiper lever. Rotate the switch at the end of the lever
upward, to the first detent past the intermittent settings
for low-speed wiper operation. Rotate the switch at the
end of the lever upward to the second detent past the
intermittent settings for high-speed wiper operation. To
turn the windshield wipers off, rotate the switch within the
lever all the way down to OFF.
Windshield Wiper Operation
Intermittent Wipers
Use the intermittent wiper when weather conditions make
a single wiping cycle with a variable pause between cycles
desirable. Rotate the switch at the end of the wiper lever
to the first detent position, and then turn the switch at the
end of the lever to select the desired delay interval. There
are four delay settings, which allow you to regulate the
wipe interval from a minimum of one cycle every second to
a maximum of approximately 36 seconds between cycles.
The delay intervals will double in duration when the
vehicle speed is 10 mph (16 km/h) or less.
Windshield Washers
To use the washer, pull the lever rearward toward you and
hold. If the lever is pulled while on the intermittent setting,
the wipers will turn on and operate for several wipe cycles
after the lever is released, and then resume the
intermittent interval previously selected. If the lever is
pulled while the wipers are in the off position, the wipers
will operate several cycles, then turn off.
1 — Pull For Front Washer
2 — Rotate For Rear Wiper Operation
3 — Rotate For Front Wiper Operation
4 — Push Forward For Rear Washer
5 — Push Up For Mist
CAUTION!
Always remove any buildup of snow that prevents the
windshield wiper blades from returning to the parked
position. If the windshield wiper switch is turned off,
and the blades cannot return to the parked position,
damage to the wiper motor may occur.
WARNING!
Sudden loss of visibility through the windshield could
lead to a collision. You might not see other vehicles or
other obstacles. To avoid sudden icing of the windshield
during freezing weather, warm the windshield with the
defroster before and during windshield washer use.
2
23_RUP_OM_EN_USC_t.book Page 59
Page 62 of 328

60GETTING TO KNOW YOUR VEHICLE
Mist
Push the lever upward to the MIST position and release for
a single wiping cycle.
NOTE:The Mist feature does not activate the washer pump;
therefore, no washer fluid will be sprayed on the wind -
shield. The washer function must be used in order to spray
the windshield with washer fluid.
For information on wiper care and replacement, see
Úpage 268.
RAIN SENSING WIPERS — IF EQUIPPED
This feature senses rain or snowfall on the windshield and
automatically activates the wipers. Rotate the end of the
windshield wiper lever to one of the four detent positions
to activate this feature.
The sensitivity of the system is adjustable from the
windshield wiper lever. Wiper sensitivity position 1 is the
least sensitive, and wiper sensitivity position 4 is the most
sensitive.
NOTE:
The Rain Sensing feature will not operate when the
wiper switch is in the low or high position.
The Rain Sensing feature may not function properly
when ice or dried saltwater is present on the wind -
shield.
Use of products containing wax or silicone may reduce
rain sensor performance.
The Rain Sensing feature can be turned on or off
through the Uconnect system
Úpage 157. The Rain Sensing system has protective features for the
wiper blades and arms. It will not operate under the
following conditions:
Low Temperature Wipe Inhibit — The Rain Sensing
feature will not operate when the ignition is first placed
in the ON position, when the vehicle is stationary and
the outside temperature is below 32°F (0°C), unless
the wiper control on the windshield wiper lever is
moved, the vehicle speed becomes greater than 3 mph
(5 km/h) or the outside temperature rises above
freezing.
Neutral Wipe Inhibit
— The Rain Sensing feature will
not operate when the ignition is ON, when the trans -
mission gear selector is in the NEUTRAL position and
the vehicle speed is less than 3 mph (5 km/h), unless
the wiper control on the windshield wiper lever is
moved, the vehicle speed is greater than 3 mph
(5 km/h) or the gear selector is moved out of the
NEUTRAL position.
Remote Start Mode Inhibit — On vehicles equipped with
the Remote Start system, Rain Sensing wipers are not
operational when the vehicle is in the Remote Start
mode. Once the operator is in the vehicle and has
placed the ignition switch in the ON/RUN position, rain
sensing wiper operation can resume, if it has been
selected, and no other inhibit conditions (mentioned
previously) exist.
REAR WIPER AND WASHER
The rear wiper/washer is operated by rotating a switch,
located at the middle of the lever.
Rotate the center portion of the lever upward to
the first detent for intermittent operation and to
the second detent for continuous rear wiper
operation.
Rear Window Washer Operation Pushing the windshield wiper lever forward
activates the rear window washer. If the lever is
pushed while on the intermittent setting, the
wipers will turn on and operate for several wipe
cycles after the lever is released, and then resume the
intermittent interval previously selected. If the lever is
pushed while the wipers are in the off position, the wipers
will operate several wipe cycles, then turn off.
CLIMATE CONTROLS
The Climate Control system allows you to regulate the
temperature, air flow, and direction of air circulating
throughout the vehicle. The controls are located on the
touchscreen and on the instrument panel below the radio.
23_RUP_OM_EN_USC_t.book Page 60
Page 95 of 328

GETTING TO KNOW YOUR VEHICLE93
(Continued)
NOTE:
To help control wind noise, stow the crossbars in the
side rails when they are not in use.
If any metallic object is placed over the satellite radio
antenna (if equipped), you may experience interruption
of satellite radio reception.
WARNING!
Cargo must be securely tied down before driving your
vehicle. Anything improperly secured to the roof rack,
crossbars, or the roof itself can fly off the vehicle,
particularly at high speeds, resulting in collisions,
personal injury, or property damage. Follow the roof
rack cautions when carrying anything on your roof rack.
CAUTION!
To prevent damage to the roof of your vehicle, DO
NOT carry any loads on the roof rack without the
crossbars deployed. The load should be secured and
placed on top of the crossbars, not directly on the
roof. If it is necessary to place the load on the roof,
place a blanket or other protective layer between the
load and the roof surface.
To avoid damage to the roof rack and vehicle, do not
exceed the maximum roof rack load capacity of 150
lb (68 kg). Always distribute heavy loads as evenly as
possible and appropriately secure the load and any
protective layer placed between the load and the roof
surface.Load should always be secured to cross bars first,
with tie down loops used as additional securing
points if needed. Tie loops are intended as supple -
mentary tie down points only. Do not use ratcheting
mechanisms with the tie loops. Check the straps and
thumb wheels frequently to be sure that the load
remains securely attached.
Long loads that extend over the windshield, such as
wood panels or surfboards, or loads with large frontal
area should be secured to both the front and rear of
the vehicle.
Travel at reduced speeds and turn corners carefully
when carrying large or heavy loads on the roof rack.
Wind forces, due to natural causes or nearby truck
traffic, can add sudden upward lift to a load. This is
especially true on large flat loads and may result in
damage to the cargo or your vehicle.
CAUTION!
2
23_RUP_OM_EN_USC_t.book Page 93
Page 104 of 328

102GETTING TO KNOW YOUR INSTRUMENT PANEL
NOTE:
The charging system is independent from load reduc -
tion. The charging system performs a diagnostic on the
charging system continuously.
If the Battery Charge Warning Light is on it may indicate
a problem with the charging system
Úpage 103.
The electrical loads that may be switched off (if equipped),
and vehicle functions which can be effected by load
reduction:
Heated Seat/Vented Seats/Heated Wheel
Heated/Cooled Cup Holders — If Equipped
Rear Defroster And Heated Mirrors
HVAC System
115 Volts AC Power Inverter System
Audio and Telematics System
Loss of the battery charge may indicate one or more of the
following conditions:
The charging system cannot deliver enough electrical
power to the vehicle system because the electrical
loads are larger than the capability of charging system.
The charging system is still functioning properly.
Turning on all possible vehicle electrical loads (e.g.
HVAC to max settings, exterior and interior lights, over -
loaded power outlets +12 Volts, 150W, USB ports)
during certain driving conditions (city driving, towing,
frequent stopping).
Installing options like additional lights, upfitter elec -
trical accessories, audio systems, alarms and similar
devices.
Unusual driving cycles (short trips separated by long
parking periods).
The vehicle was parked for an extended period of time
(weeks, months).
The battery was recently replaced and was not charged
completely.
The battery was discharged by an electrical load left on
when the vehicle was parked.
The battery was used for an extended period with the
engine not running to supply radio, lights, chargers,
+12 Volt portable appliances like vacuum cleaners,
game consoles and similar devices.
What to do when an electrical load reduction action
message is present (“Battery Saver On” or “Battery Saver
Mode”)
During a trip:
Reduce power to unnecessary loads if possible:
Turn off redundant lights (interior or exterior)
Check what may be plugged in to power outlets
+12 Volts, 150W, USB ports
Check HVAC settings (blower, temperature)
Check the audio settings (volume)
After a trip:
Check if any aftermarket equipment was installed
(additional lights, upfitter electrical accessories, audio
systems, alarms) and review specifications if any (load
and Ignition Off Draw currents).
Evaluate the latest driving cycles (distance, driving
time and parking time).
The vehicle should have service performed if the
message is still present during consecutive trips and
the evaluation of the vehicle and driving pattern did not
help to identify the cause.
WARNING LIGHTS AND MESSAGES
The warning/indicator lights will illuminate in the
instrument panel together with a dedicated message and/
or acoustic signal when applicable. These indications are
indicative and precautionary and as such must not be
considered as exhaustive and/or alternative to the
information contained in the Owner’s Manual, which you
are advised to read carefully in all cases. Always refer to
the information in this chapter in the event of a failure
indication. All active telltales will display first if applicable.
The system check menu may appear different based upon
equipment options and current vehicle status. Some
telltales are optional and may not appear.
RED WARNING LIGHTS
Air Bag Warning Light
This warning light will illuminate to indicate a
fault with the air bag, and will turn on for four to
eight seconds as a bulb check when the ignition
is placed in the ON/RUN or ACC/ON/RUN
position. This light will illuminate with a single chime when a
fault with the air bag has been detected, it will stay on until
the fault is cleared. If the light is either not on during startup,
stays on, or turns on while driving, have the system
inspected at an authorized dealer as soon as possible.
23_RUP_OM_EN_USC_t.book Page 102
Page 136 of 328

134STARTING AND OPERATING
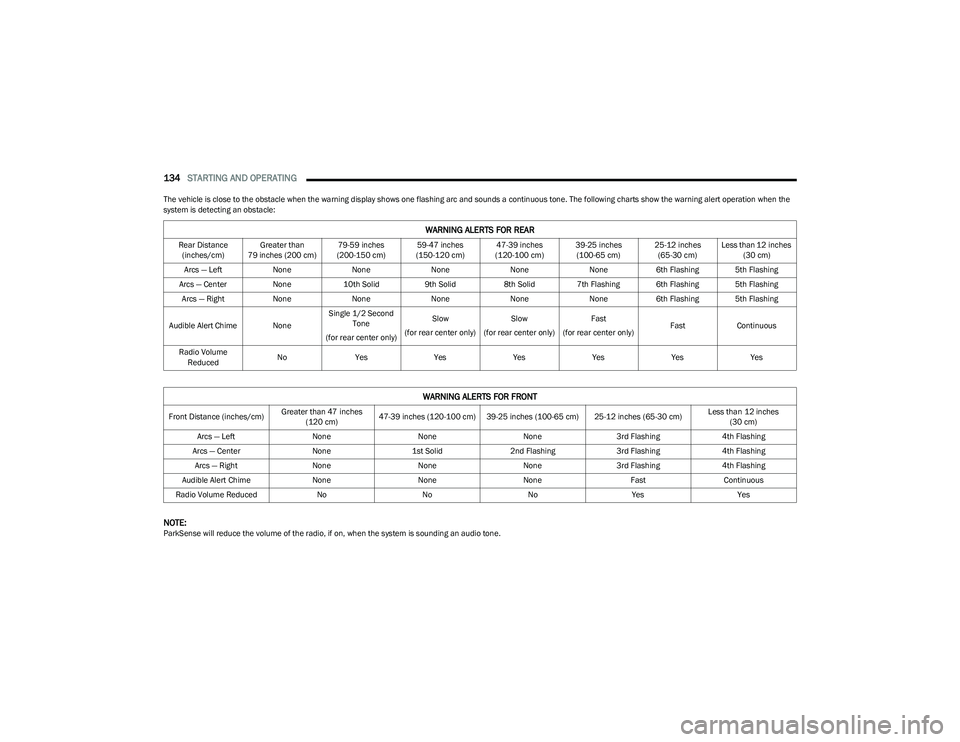
The vehicle is close to the obstacle when the warning display shows one flashing arc and sounds a continuous tone. The following charts show the warning alert operation when the
system is detecting an obstacle:
NOTE:ParkSense will reduce the volume of the radio, if on, when the system is sounding an audio tone.
WARNING ALERTS FOR REAR
Rear Distance
(inches/cm) Greater than
79 inches (200 cm) 79-59 inches
(200-150 cm) 59-47 inches
(150-120 cm) 47-39 inches
(120-100 cm) 39-25 inches
(100-65 cm) 25-12 inches
(65-30 cm) Less than 12 inches
(30 cm)
Arcs — Left NoneNoneNoneNoneNone6th Flashing 5th Flashing
Arcs — Center None10th Solid 9th Solid8th Solid7th Flashing 6th Flashing 5th Flashing
Arcs — Right NoneNoneNoneNoneNone6th Flashing 5th Flashing
Audible Alert Chime None Single 1/2 Second
Tone
(for rear center only) Slow
(for rear center only) Slow
(for rear center only) Fast
(for rear center only) Fast
Continuous
Radio Volume Reduced No
Yes YesYesYesYesYes
WARNING ALERTS FOR FRONT
Front Distance (inches/cm) Greater than 47 inches
(120 cm) 47-39 inches (120-100 cm) 39-25 inches (100-65 cm) 25-12 inches (65-30 cm) Less than 12 inches
(30 cm)
Arcs — Left NoneNoneNone3rd Flashing 4th Flashing
Arcs — Center None1st Solid2nd Flashing 3rd Flashing4th Flashing
Arcs — Right NoneNoneNone3rd Flashing 4th Flashing
Audible Alert Chime NoneNoneNone FastContinuous
Radio Volume Reduced NoNoNoYes Yes
23_RUP_OM_EN_USC_t.book Page 134
Page 138 of 328

136STARTING AND OPERATING
(Continued)
CLEANING THE PARKSENSE SYSTEM
Clean the ParkSense sensors with water, car wash soap
and a soft cloth. Do not use rough or hard cloths. Do not
scratch or poke the sensors.
PARKSENSE SYSTEM USAGE
P
RECAUTIONS
NOTE:
Ensure that the front and rear fascia/bumper are free
of snow, ice, mud, dirt, and debris to keep the
ParkSense system operating properly.
Construction equipment, large trucks, and other vibra -
tions could affect the performance of ParkSense.
When you turn ParkSense off, the instrument cluster
will display “PARKSENSE OFF.” Furthermore, once you
turn ParkSense off, it remains off until you turn it on
again, even if you cycle the ignition key.
When you move the gear selector to the REVERSE posi -
tion and ParkSense is turned off, the instrument
cluster will display “PARKSENSE OFF” for as long as the
vehicle is in REVERSE.
ParkSense, when on, will reduce the volume of the
radio when it is sounding a tone.
Clean the ParkSense sensors regularly, taking care not
to scratch or damage them. The sensors must not be
covered with ice, snow, slush, mud, dirt or debris.
Failure to do so can result in the system not working
properly. The ParkSense system might not detect an
obstacle behind or in front of the appropriate fascia/ bumper, or it could provide a false indication that an
obstacle is behind or in front of the appropriate fascia/
bumper.
Use the ParkSense switch to turn the ParkSense
system off if objects such as bicycle carriers, trailer
hitches, etc., are placed within 12 inches (30 cm) from
the rear fascia/bumper. Failure to do so can result in
the system misinterpreting a close object as a sensor
problem, causing the “PARKSENSE UNAVAILABLE
WIPE REAR SENSORS” message to be displayed in the
instrument cluster.
ParkSense should be disabled when the liftgate is in
the open position. An opened liftgate could provide a
false indication that an obstacle is behind the vehicle.
There may be a delay in the object detection rate if the
object is moving. This may cause the automatic braking
application to be delayed.
WARNING!
Drivers must be careful when backing up even when
using ParkSense. Always check carefully behind your
vehicle, look behind you, and be sure to check for
pedestrians, animals, other vehicles, obstructions,
and blind spots before backing up. You are respon -
sible for safety and must continue to pay attention to
your surroundings. Failure to do so can result in
serious injury or death.
Before using ParkSense, it is strongly recommended
that the ball mount and hitch ball assembly be
disconnected from the vehicle when the vehicle is
not used for towing. Failure to do so can result in
injury or damage to vehicles or obstacles because
the hitch ball will be much closer to the obstacle than
the rear fascia when the vehicle sounds the contin -
uous tone. Also, the sensors could detect the ball
mount and hitch ball assembly, depending on its size
and shape, giving a false indication that an obstacle
is behind the vehicle.
CAUTION!
ParkSense is only a parking aid and it is unable to
recognize every obstacle, including small obstacles.
Parking curbs might be temporarily detected or not
detected at all. Obstacles located above or below the
sensors will not be detected when they are in close
proximity.
The vehicle must be driven slowly when using
ParkSense in order to be able to stop in time when an
obstacle is detected. It is recommended that the
driver looks over his/her shoulder when using
ParkSense.
WARNING!
23_RUP_OM_EN_USC_t.book Page 136
Page 159 of 328

157
MULTIMEDIA
UCONNECT SYSTEMS
For detailed information about your Uconnect 5 With
7-inch Display or Uconnect 5/5NAV With 10.1-inch Display
system, refer to your Uconnect Radio Instruction Manual.
NOTE:Uconnect screen images are for illustration purposes only
and may not reflect exact software for your vehicle.
CYBERSECURITY
Depending on applicability, your vehicle may be able to
send or receive information from a wired or wireless
network. This information allows systems and features in
your vehicle to function properly.
Your vehicle may be equipped with certain security
features to reduce the risk of unauthorized and unlawful
access to vehicle systems and wireless communications.
Vehicle software technology continues to evolve over time
and FCA US LLC, working with its suppliers, evaluates and
takes appropriate steps as needed. As always, if you
experience unusual behavior, contact an authorized
dealer immediately,
Úpage 308, or refer to your
Uconnect Radio Instruction Manual for additional contact
information. The risk of unauthorized and unlawful access to your
vehicle systems may still exist, even if the most recent
version of vehicle software (such as Uconnect software) is
installed.
NOTE:To help further improve user experience, features,
stability, etc., and minimize the potential risk of a security
breach, vehicle owners should routinely check
www.driveuconnect.com (US Residents) or www.driveuco
-
nnect.ca (Canadian Residents) to learn about available
Uconnect software updates.
UCONNECT SETTINGS
The Uconnect system uses a combination of buttons on
the touchscreen and buttons on the faceplate located on
the center of the instrument panel. These buttons allow
you to access and change the Customer Programmable
Features. Many features can vary by vehicle.
Buttons on the faceplate are located below and/or beside
the Uconnect system in the center of the instrument
panel. In addition, there is a SCROLL/ENTER control knob
located on the right side. Turn the control knob to scroll
through menus and change settings. Push the center of
the control knob one or more times to select or change a
setting.
WARNING!
ONLY insert trusted devices/components into your
vehicle. Media of unknown origin could possibly
contain malicious software, and if installed in your
vehicle, it may increase the possibility for vehicle
systems to be breached.
As always, if you experience unusual vehicle
behavior, take your vehicle to an authorized dealer
immediately.
5
23_RUP_OM_EN_USC_t.book Page 157