2023 CHRYSLER PACIFICA HYBRID lights
[x] Cancel search: lightsPage 21 of 328
GETTING TO KNOW YOUR VEHICLE19
VEHICLE SECURITY SYSTEM — IF EQUIPPED
The Vehicle Security system monitors the vehicle doors for
unauthorized entry and the ignition switch for
unauthorized operation. When the alarm is activated, the
interior switches for door locks, power sliding doors and
power liftgate are disabled. The Vehicle Security system
provides both audible and visible signals. If something
triggers the alarm, the Vehicle Security system will provide
the following audible and visible signals: the horn will
pulse, the parking lights and/or turn signals will flash, and
the Vehicle Security Light in the instrument cluster will
flash.
TO ARM THE SYSTEM
Follow these steps to arm the Vehicle Security system:
1. Make sure the vehicle’s ignition is placed in the OFF
position.
For vehicles equipped with Keyless Enter ‘n Go™ —
Passive Entry, make sure the vehicle ignition
system is OFF.
2. Perform one of the following methods to lock the vehicle:
Push lock on the interior power door lock switch
with the driver and/or passenger door open.
Push the lock button on the exterior Passive Entry
door handle with a valid key fob available in the
same exterior zone
Úpage 21.
Push the lock button on the key fob.
3. If any doors are open, close them.
TO DISARM THE SYSTEM
The Vehicle Security system can be disarmed using any of
the following methods:
Push the unlock button on the key fob.
Grab the Passive Entry door handle (if equipped)
Úpage 21.
Hands-Free Liftgate Passive Entry activation (if
equipped).
Cycle the vehicle ignition system out of the OFF
position.
For vehicles equipped with Keyless Enter ‘n Go™ —
Passive Entry, push the START/STOP ignition
button (requires at least one valid key fob in the
vehicle).
NOTE:
The driver's door key cylinder and the liftgate button on
the key fob cannot arm or disarm the Vehicle Security
system.
The Vehicle Security system remains armed during
power liftgate entry. Pushing the liftgate button will not
disarm the Vehicle Security system. If someone enters
the vehicle through the liftgate and opens any door, the
alarm will sound.
When the Vehicle Security system is armed, the interior
power door lock switches will not unlock the doors. The Vehicle Security system is designed to protect your
vehicle. However, you can create conditions where the
system will give you a false alarm. If one of the previously
described arming sequences has occurred, the Vehicle
Security system will arm regardless of whether you are in
the vehicle or not. If you remain in the vehicle and open a
door, the alarm will sound. If this occurs, disarm the
Vehicle Security system.
If the Vehicle Security system is armed and the battery
becomes disconnected, the Vehicle Security system will
remain armed when the battery is reconnected; the
exterior lights will flash, and the horn will sound. If this
occurs, disarm the Vehicle Security system.
REARMING OF THE SYSTEM
If something triggers the alarm and no action is taken to
disarm it, the Vehicle Security system will turn the horn off
after a 29 second cycle (with five seconds between cycles
and up to 8 cycles if the trigger remains active) and then
rearm itself.
SECURITY SYSTEM MANUAL OVERRIDE
The Vehicle Security system will not arm if you lock the
doors using the manual door lock.
2
23_RUP_OM_EN_USC_t.book Page 19
Page 23 of 328

GETTING TO KNOW YOUR VEHICLE21
POWER DOOR LOCKS — IF EQUIPPED
A power door lock switch is on each front door trim panel.
Use this switch to lock or unlock the doors.
Driver Power Door Lock Switches
If you push the power door lock switch while the ignition is
in the ACC or ON/RUN position, and any front door is open,
the power locks will not operate. This prevents you from
accidentally locking your key fob in the vehicle. Placing the
ignition in the OFF position or closing the door will allow
the locks to operate. A chime will sound if the ignition is in
the ACC or ON/RUN position and a door is open, as a
reminder to place the ignition in the OFF position and
remove the key fob.
KEYLESS ENTER ‘N GO™ — PASSIVE
E
NTRY
The Passive Entry system is an enhancement to the
vehicle’s Remote Keyless Entry system. This feature
allows you to lock and unlock the vehicle’s door(s) without
having to push the key fob lock or unlock buttons.
NOTE:
Passive Entry may be programmed on/off through the
Uconnect system Úpage 157.
The key fob may not be detected by the Passive Entry
system if it is located next to a mobile phone, laptop, or
other electronic device; these devices may block the
key fob’s wireless signal and prevent the Passive Entry
handle from locking/unlocking the vehicle.
If set by the customer in the Uconnect Settings,
unlocking with Passive Entry will initiate illuminated
approach (low beams, license plate light, parking
lights) for the time 0, 30, 60 or 90 seconds. Passive
Entry also initiates two flashes of the turn signals.
If wearing gloves, if it has been raining/snowing, or
there is salt/dirt covering the Passive Entry door
handle, the unlock sensitivity can be affected, resulting
in a slower response time.
The doors may unlock when water is sprayed on the
Passive Entry door handles, if the key fob is located
outside of the vehicle within 5 ft (1.5 m) of the handle.
If the vehicle is unlocked by Passive Entry and no door
is opened within 60 seconds, the vehicle will relock and
will arm the Vehicle Security system (if equipped).
The sliding side doors can be unlocked from the
outside using the hands-free or Passive Entry system.
To Unlock From The Driver Or Passenger Side:
With a valid key fob within 5 ft (1.5 m) of the door handle,
grab the handle to unlock the vehicle. Grabbing the
driver’s door handle will unlock the driver’s side doors
(driver/sliding door) automatically. Grabbing the front
passenger door handle will unlock all four doors and the
liftgate automatically. The interior door panel lock knob
will rotate when the door is unlocked.
Grab The Door Handle To Unlock
2
23_RUP_OM_EN_USC_t.book Page 21
Page 27 of 328
GETTING TO KNOW YOUR VEHICLE25
HANDS-FREE SLIDING DOORS —
I
F EQUIPPED
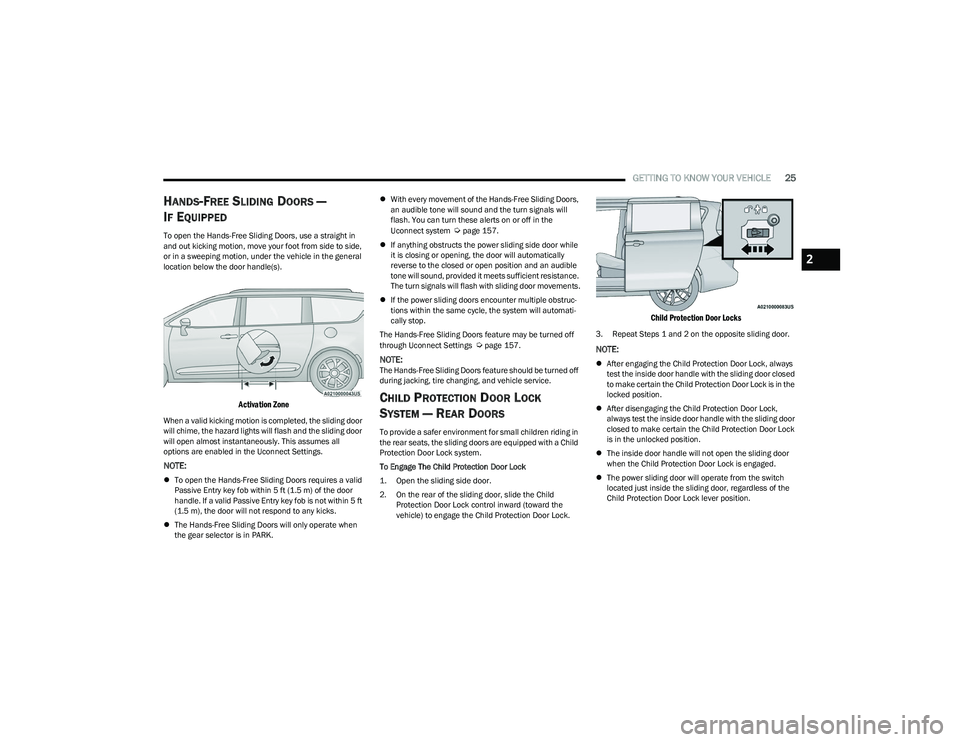
To open the Hands-Free Sliding Doors, use a straight in
and out kicking motion, move your foot from side to side,
or in a sweeping motion, under the vehicle in the general
location below the door handle(s).
Activation Zone
When a valid kicking motion is completed, the sliding door
will chime, the hazard lights will flash and the sliding door
will open almost instantaneously. This assumes all
options are enabled in the Uconnect Settings.
NOTE:
To open the Hands-Free Sliding Doors requires a valid
Passive Entry key fob within 5 ft (1.5 m) of the door
handle. If a valid Passive Entry key fob is not within 5 ft
(1.5 m), the door will not respond to any kicks.
The Hands-Free Sliding Doors will only operate when
the gear selector is in PARK.
With every movement of the Hands-Free Sliding Doors,
an audible tone will sound and the turn signals will
flash. You can turn these alerts on or off in the
Uconnect system
Úpage 157.
If anything obstructs the power sliding side door while
it is closing or opening, the door will automatically
reverse to the closed or open position and an audible
tone will sound, provided it meets sufficient resistance.
The turn signals will flash with sliding door movements.
If the power sliding doors encounter multiple obstruc -
tions within the same cycle, the system will automati -
cally stop.
The Hands-Free Sliding Doors feature may be turned off
through Uconnect Settings
Úpage 157.
NOTE:The Hands-Free Sliding Doors feature should be turned off
during jacking, tire changing, and vehicle service.
CHILD PROTECTION DOOR LOCK
S
YSTEM — REAR DOORS
To provide a safer environment for small children riding in
the rear seats, the sliding doors are equipped with a Child
Protection Door Lock system.
To Engage The Child Protection Door Lock
1. Open the sliding side door.
2. On the rear of the sliding door, slide the Child
Protection Door Lock control inward (toward the
vehicle) to engage the Child Protection Door Lock.
Child Protection Door Locks
3. Repeat Steps 1 and 2 on the opposite sliding door.
NOTE:
After engaging the Child Protection Door Lock, always
test the inside door handle with the sliding door closed
to make certain the Child Protection Door Lock is in the
locked position.
After disengaging the Child Protection Door Lock,
always test the inside door handle with the sliding door
closed to make certain the Child Protection Door Lock
is in the unlocked position.
The inside door handle will not open the sliding door
when the Child Protection Door Lock is engaged.
The power sliding door will operate from the switch
located just inside the sliding door, regardless of the
Child Protection Door Lock lever position.
2
23_RUP_OM_EN_USC_t.book Page 25
Page 45 of 328
GETTING TO KNOW YOUR VEHICLE43
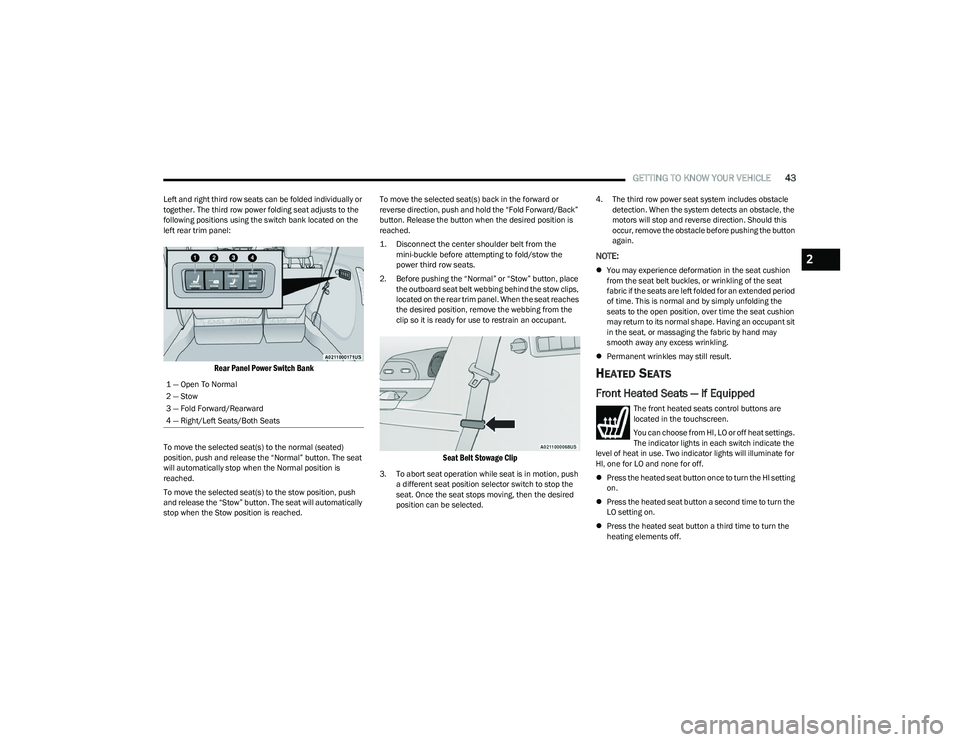
Left and right third row seats can be folded individually or
together. The third row power folding seat adjusts to the
following positions using the switch bank located on the
left rear trim panel:
Rear Panel Power Switch Bank
To move the selected seat(s) to the normal (seated)
position, push and release the “Normal” button. The seat
will automatically stop when the Normal position is
reached.
To move the selected seat(s) to the stow position, push
and release the “Stow” button. The seat will automatically
stop when the Stow position is reached. To move the selected seat(s) back in the forward or
reverse direction, push and hold the “Fold Forward/Back”
button. Release the button when the desired position is
reached.
1. Disconnect the center shoulder belt from the
mini-buckle before attempting to fold/stow the
power third row seats.
2. Before pushing the “Normal” or “Stow” button, place the outboard seat belt webbing behind the stow clips,
located on the rear trim panel. When the seat reaches
the desired position, remove the webbing from the
clip so it is ready for use to restrain an occupant.
Seat Belt Stowage Clip
3. To abort seat operation while seat is in motion, push a different seat position selector switch to stop the
seat. Once the seat stops moving, then the desired
position can be selected. 4. The third row power seat system includes obstacle
detection. When the system detects an obstacle, the
motors will stop and reverse direction. Should this
occur, remove the obstacle before pushing the button
again.
NOTE:
You may experience deformation in the seat cushion
from the seat belt buckles, or wrinkling of the seat
fabric if the seats are left folded for an extended period
of time. This is normal and by simply unfolding the
seats to the open position, over time the seat cushion
may return to its normal shape. Having an occupant sit
in the seat, or massaging the fabric by hand may
smooth away any excess wrinkling.
Permanent wrinkles may still result.
HEATED SEATS
Front Heated Seats — If Equipped
The front heated seats control buttons are
located in the touchscreen.
You can choose from HI, LO or off heat settings.
The indicator lights in each switch indicate the
level of heat in use. Two indicator lights will illuminate for
HI, one for LO and none for off.
Press the heated seat button once to turn the HI setting
on.
Press the heated seat button a second time to turn the
LO setting on.
Press the heated seat button a third time to turn the
heating elements off.
1 — Open To Normal
2 — Stow
3 — Fold Forward/Rearward
4 — Right/Left Seats/Both Seats
2
23_RUP_OM_EN_USC_t.book Page 43
Page 46 of 328
44GETTING TO KNOW YOUR VEHICLE
The level of heat selected will stay on until the operator
changes it.
NOTE:
Once a heat setting is selected, heat will be felt within
two to five minutes.
The engine must be running for the heated seats to
operate.
For information on use with the Remote Start system, see
Úpage 18.
Rear Heated Seats — If Equipped
On some models, the second row seats are equipped with
heaters. There are two heated seat switches that allow the
second row passengers to operate the seats
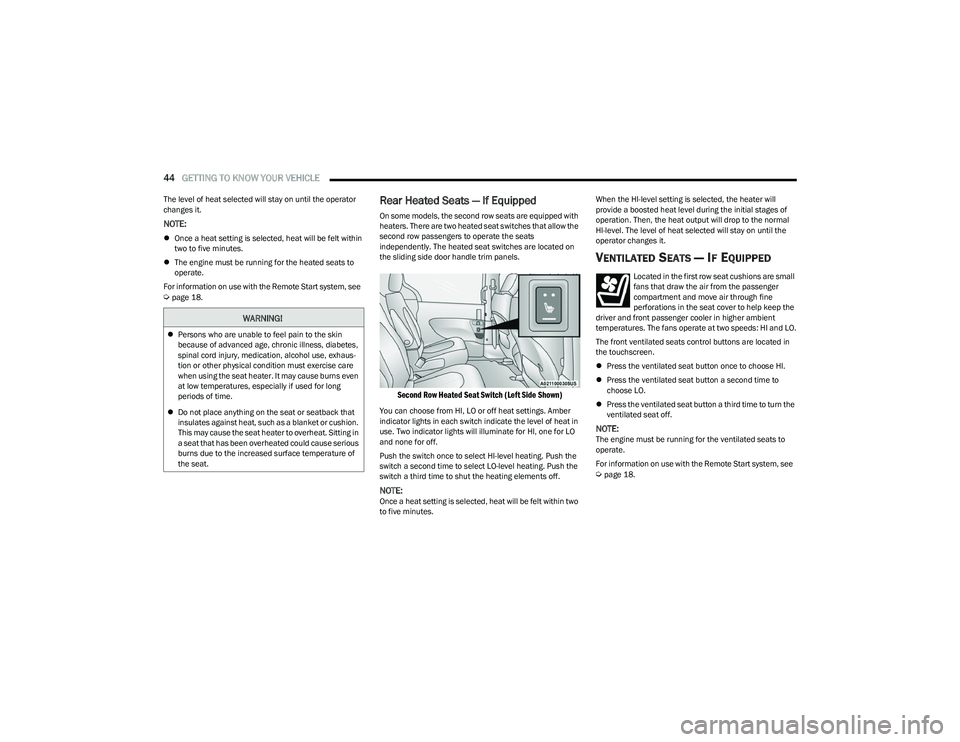
independently. The heated seat switches are located on
the sliding side door handle trim panels.
Second Row Heated Seat Switch (Left Side Shown)
You can choose from HI, LO or off heat settings. Amber
indicator lights in each switch indicate the level of heat in
use. Two indicator lights will illuminate for HI, one for LO
and none for off.
Push the switch once to select HI-level heating. Push the
switch a second time to select LO-level heating. Push the
switch a third time to shut the heating elements off.
NOTE:Once a heat setting is selected, heat will be felt within two
to five minutes. When the HI-level setting is selected, the heater will
provide a boosted heat level during the initial stages of
operation. Then, the heat output will drop to the normal
HI-level. The level of heat selected will stay on until the
operator changes it.
VENTILATED SEATS — IF EQUIPPED
Located in the first row seat cushions are small
fans that draw the air from the passenger
compartment and move air through fine
perforations in the seat cover to help keep the
driver and front passenger cooler in higher ambient
temperatures. The fans operate at two speeds: HI and LO.
The front ventilated seats control buttons are located in
the touchscreen.
Press the ventilated seat button once to choose HI.
Press the ventilated seat button a second time to
choose LO.
Press the ventilated seat button a third time to turn the
ventilated seat off.
NOTE:The engine must be running for the ventilated seats to
operate.
For information on use with the Remote Start system, see
Úpage 18.
WARNING!
Persons who are unable to feel pain to the skin
because of advanced age, chronic illness, diabetes,
spinal cord injury, medication, alcohol use, exhaus -
tion or other physical condition must exercise care
when using the seat heater. It may cause burns even
at low temperatures, especially if used for long
periods of time.
Do not place anything on the seat or seatback that
insulates against heat, such as a blanket or cushion.
This may cause the seat heater to overheat. Sitting in
a seat that has been overheated could cause serious
burns due to the increased surface temperature of
the seat.
23_RUP_OM_EN_USC_t.book Page 44
Page 51 of 328
GETTING TO KNOW YOUR VEHICLE49
OUTSIDE MIRRORS
The outside mirror(s) can be adjusted to the center of the
adjacent lane of traffic to achieve the optimal view.
OUTSIDE MIRRORS WITH TURN SIGNAL —
I
F EQUIPPED
Driver and passenger outside mirrors with turn signal
lighting contain LEDs, which are located in the upper outer
corner of each mirror.
The LEDs are turn signal indicators, which flash with the
corresponding turn signal lights in the front and rear of the
vehicle. Turning on the Hazard Warning flashers will also
activate these LEDs.
DRIVER'S OUTSIDE AUTOMATIC
D
IMMING MIRROR — IF EQUIPPED
The driver’s outside mirror will automatically adjust for
glare from vehicles behind you. This feature is controlled
by the inside automatic dimming mirror and will
automatically adjust for headlight glare when the inside
mirror adjusts.
CONVERSATION MIRROR
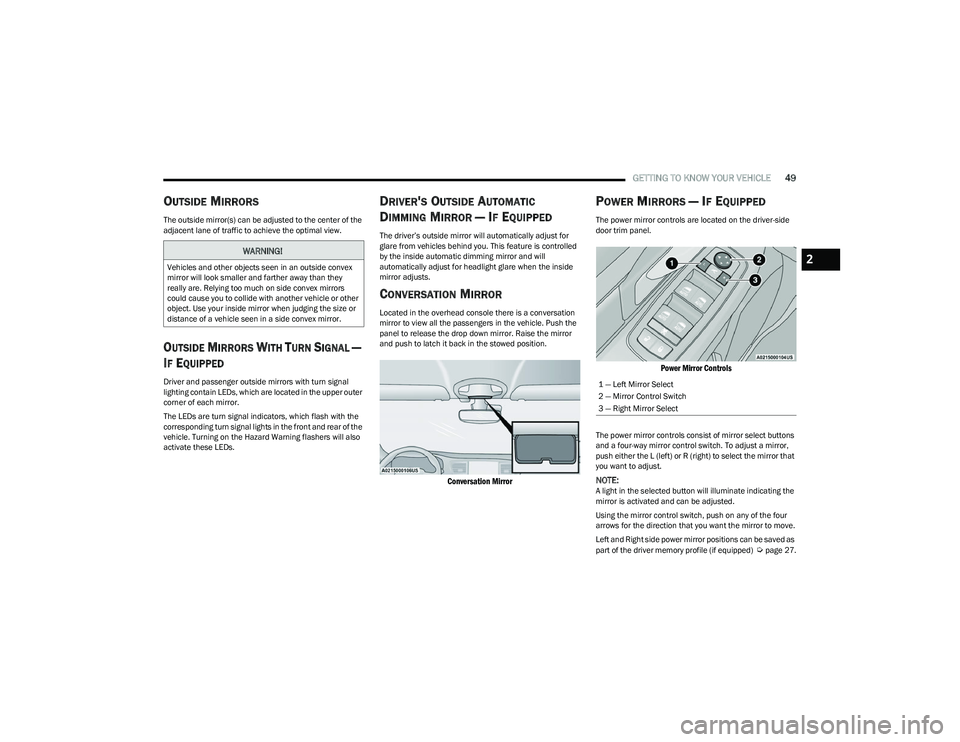
Located in the overhead console there is a conversation
mirror to view all the passengers in the vehicle. Push the
panel to release the drop down mirror. Raise the mirror
and push to latch it back in the stowed position.
Conversation Mirror
POWER MIRRORS — IF EQUIPPED
The power mirror controls are located on the driver-side
door trim panel.
Power Mirror Controls
The power mirror controls consist of mirror select buttons
and a four-way mirror control switch. To adjust a mirror,
push either the L (left) or R (right) to select the mirror that
you want to adjust.
NOTE:A light in the selected button will illuminate indicating the
mirror is activated and can be adjusted.
Using the mirror control switch, push on any of the four
arrows for the direction that you want the mirror to move.
Left and Right side power mirror positions can be saved as
part of the driver memory profile (if equipped)
Úpage 27.
WARNING!
Vehicles and other objects seen in an outside convex
mirror will look smaller and farther away than they
really are. Relying too much on side convex mirrors
could cause you to collide with another vehicle or other
object. Use your inside mirror when judging the size or
distance of a vehicle seen in a side convex mirror.
1 — Left Mirror Select
2 — Mirror Control Switch
3 — Right Mirror Select
2
23_RUP_OM_EN_USC_t.book Page 49
Page 56 of 328
54GETTING TO KNOW YOUR VEHICLE
(Continued)
NOTE:
If the indicator light stays on constantly, program -
ming is complete and the garage door/device
should activate when the HomeLink® button is
pushed.
To program the two remaining HomeLink®
buttons, repeat each step for each remaining
button. DO NOT erase the channels.
If you unplugged the garage door opener/device for
programming, plug it back in at this time.
Reprogramming A Single HomeLink® Button (Canadian/
Gate Operator)
To reprogram a channel that has been previously trained,
follow these steps:
1. Place the ignition in the ON/RUN position.
2. Press and hold the desired HomeLink® button until the indicator light begins to flash after 20 seconds.
Do not release the button.
3. Without releasing the button, proceed with “Canadian/Gate Operator Programming” Step 2 and
follow all remaining steps.SECURITY
It is advised to erase all channels before you sell or turn in
your vehicle.
To do this, push and hold the two outside buttons for 20
seconds until the indicator flashes. Note that all channels
will be erased. Individual channels cannot be erased.
The HomeLink® Universal Transceiver is disabled when
the Vehicle Security system is active.
TROUBLESHOOTING TIPS
If you are having trouble programming HomeLink®, here
are some of the most common solutions:
Replace the battery in the garage door opener
hand-held transmitter.
Push the LEARN button on the garage door opener to
complete the training for a rolling code.
Did you unplug the device for programming and
remember to plug it back in?
If you have any problems, or require assistance, please
call toll-free 1-800-355-3515 or, on the Internet at
HomeLink.com for information or assistance.EXTERIOR LIGHTS
MULTIFUNCTION LEVER
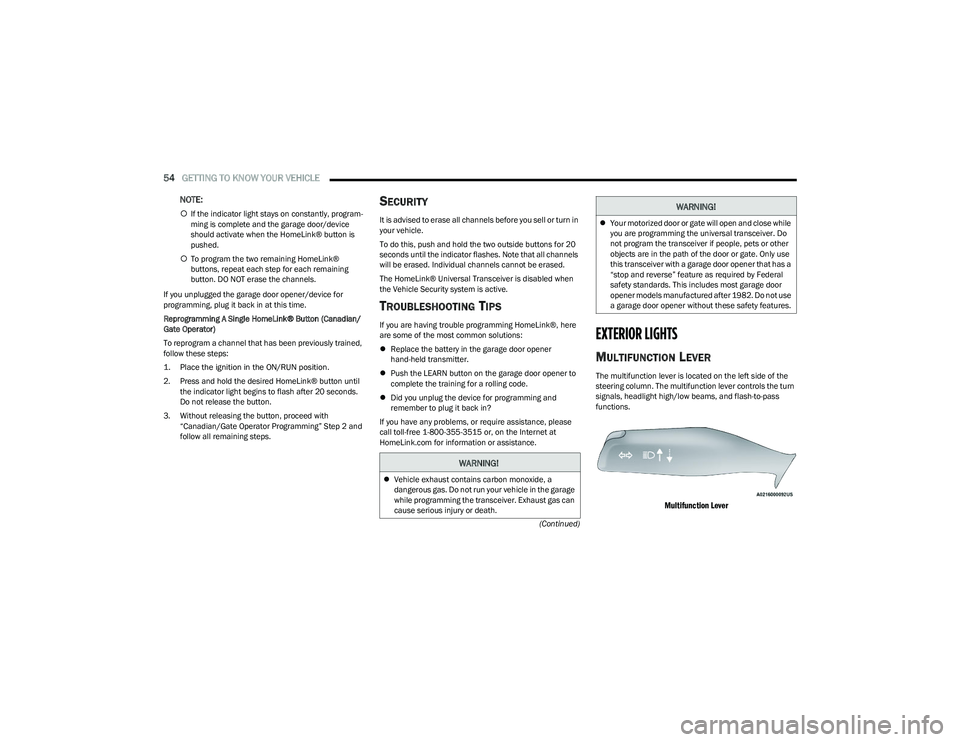
The multifunction lever is located on the left side of the
steering column. The multifunction lever controls the turn
signals, headlight high/low beams, and flash-to-pass
functions.
Multifunction Lever
WARNING!
Vehicle exhaust contains carbon monoxide, a
dangerous gas. Do not run your vehicle in the garage
while programming the transceiver. Exhaust gas can
cause serious injury or death.
Your motorized door or gate will open and close while
you are programming the universal transceiver. Do
not program the transceiver if people, pets or other
objects are in the path of the door or gate. Only use
this transceiver with a garage door opener that has a
“stop and reverse” feature as required by Federal
safety standards. This includes most garage door
opener models manufactured after 1982. Do not use
a garage door opener without these safety features.
WARNING!
23_RUP_OM_EN_USC_t.book Page 54
Page 57 of 328
GETTING TO KNOW YOUR VEHICLE55
HEADLIGHT SWITCH
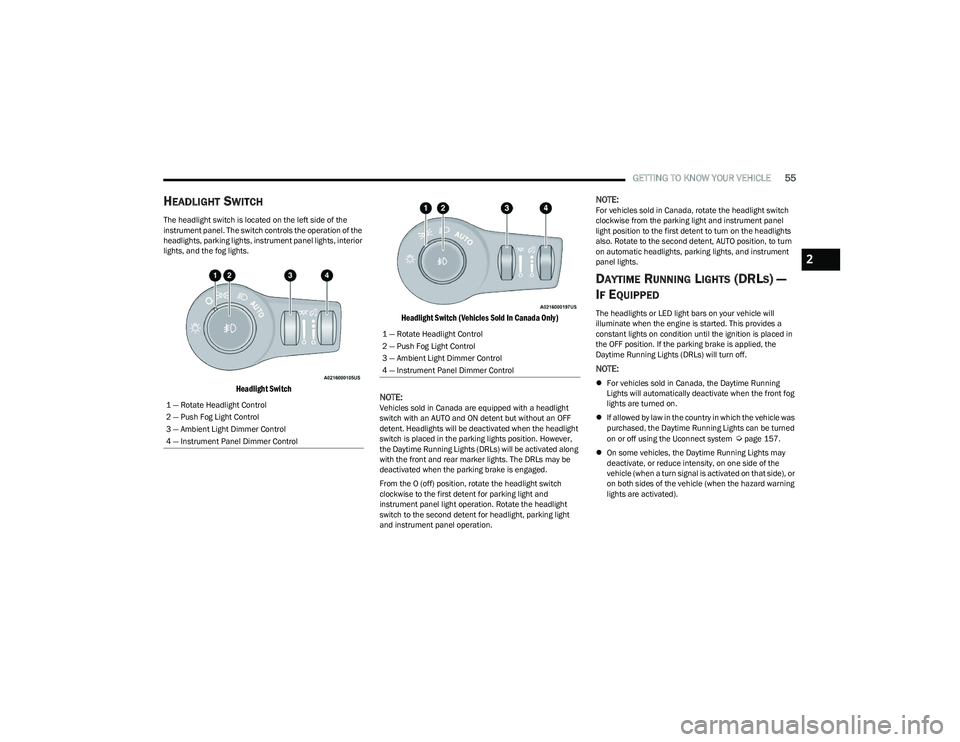
The headlight switch is located on the left side of the
instrument panel. The switch controls the operation of the
headlights, parking lights, instrument panel lights, interior
lights, and the fog lights.
Headlight Switch Headlight Switch (Vehicles Sold In Canada Only)
NOTE:
Vehicles sold in Canada are equipped with a headlight
switch with an AUTO and ON detent but without an OFF
detent. Headlights will be deactivated when the headlight
switch is placed in the parking lights position. However,
the Daytime Running Lights (DRLs) will be activated along
with the front and rear marker lights. The DRLs may be
deactivated when the parking brake is engaged.
From the O (off) position, rotate the headlight switch
clockwise to the first detent for parking light and
instrument panel light operation. Rotate the headlight
switch to the second detent for headlight, parking light
and instrument panel operation.
NOTE:For vehicles sold in Canada, rotate the headlight switch
clockwise from the parking light and instrument panel
light position to the first detent to turn on the headlights
also. Rotate to the second detent, AUTO position, to turn
on automatic headlights, parking lights, and instrument
panel lights.
DAYTIME RUNNING LIGHTS (DRLS) —
I
F EQUIPPED
The headlights or LED light bars on your vehicle will
illuminate when the engine is started. This provides a
constant lights on condition until the ignition is placed in
the OFF position. If the parking brake is applied, the
Daytime Running Lights (DRLs) will turn off.
NOTE:
For vehicles sold in Canada, the Daytime Running
Lights will automatically deactivate when the front fog
lights are turned on.
If allowed by law in the country in which the vehicle was
purchased, the Daytime Running Lights can be turned
on or off using the Uconnect system
Úpage 157.
On some vehicles, the Daytime Running Lights may
deactivate, or reduce intensity, on one side of the
vehicle (when a turn signal is activated on that side), or
on both sides of the vehicle (when the hazard warning
lights are activated).
1 — Rotate Headlight Control
2 — Push Fog Light Control
3 — Ambient Light Dimmer Control
4 — Instrument Panel Dimmer Control
1 — Rotate Headlight Control
2 — Push Fog Light Control
3 — Ambient Light Dimmer Control
4 — Instrument Panel Dimmer Control
2
23_RUP_OM_EN_USC_t.book Page 55