2023 CHEVROLET TAHOE STEPS
[x] Cancel search: STEPSPage 8 of 443

Chevrolet Tahoe/Suburban Owner Manual (GMNA-Localizing-U.S./Canada/
Mexico-16416971) - 2023 - CRC - 4/25/22
Keys, Doors, and Windows 7
Keys, Doors, and
Windows
Keys and Locks
Keys . . . . . . . . . . . . . . . . . . . . . . . . . . . . . . . . . . . . . 7
Remote Key . . . . . . . . . . . . . . . . . . . . . . . . . . . . . 8
Remote Key Operation . . . . . . . . . . . . . . . . . . 8
Remote Vehicle Start . . . . . . . . . . . . . . . . . . . 14
Door Locks . . . . . . . . . . . . . . . . . . . . . . . . . . . . . . 15
Power Door Locks . . . . . . . . . . . . . . . . . . . . . . . 15
Delayed Locking . . . . . . . . . . . . . . . . . . . . . . . . 16
Automatic Door Locks . . . . . . . . . . . . . . . . . . 16
Lockout Protection . . . . . . . . . . . . . . . . . . . . . . 17
Safety Locks . . . . . . . . . . . . . . . . . . . . . . . . . . . . 17
Doors
Liftgate . . . . . . . . . . . . . . . . . . . . . . . . . . . . . . . . . 18
Power Assist Steps . . . . . . . . . . . . . . . . . . . . . 24
Vehicle Security
Vehicle Security . . . . . . . . . . . . . . . . . . . . . . . . 24
Vehicle Alarm System . . . . . . . . . . . . . . . . . . 24
Steering Column Lock . . . . . . . . . . . . . . . . . . . 25
Immobilizer . . . . . . . . . . . . . . . . . . . . . . . . . . . . 26
Immobilizer Operation . . . . . . . . . . . . . . . . . . 26
Exterior Mirrors
Convex Mirrors . . . . . . . . . . . . . . . . . . . . . . . . . 26
Power Mirrors . . . . . . . . . . . . . . . . . . . . . . . . . . 27
Folding Mirrors . . . . . . . . . . . . . . . . . . . . . . . . . 27Heated Mirrors . . . . . . . . . . . . . . . . . . . . . . . . . 28
Automatic Dimming Mirror . . . . . . . . . . . . . 28
Reverse Tilt Mirrors . . . . . . . . . . . . . . . . . . . . . 28
Interior Mirrors
Interior Rearview Mirrors . . . . . . . . . . . . . . . 28
Manual Rearview Mirror . . . . . . . . . . . . . . . . 29
Automatic Dimming Rearview Mirror . . . 29
Rear Camera Mirror . . . . . . . . . . . . . . . . . . . . 29
Windows
Windows . . . . . . . . . . . . . . . . . . . . . . . . . . . . . . . 31
Power Windows . . . . . . . . . . . . . . . . . . . . . . . . 31
Sun Visors . . . . . . . . . . . . . . . . . . . . . . . . . . . . . . 33
Roof
Sunroof . . . . . . . . . . . . . . . . . . . . . . . . . . . . . . . . . 33
Keys and Locks
Keys
{Warning
Leaving children in a vehicle with a
remote key is dangerous and children or
others could be seriously injured or killed.
They could operate the power windows
or other controls or make the vehicle
move. The windows will function with
the remote key in the vehicle, and
children or others could be caught in the
path of a closing window. Do not leave
children in a vehicle with a remote key.
Page 14 of 443

Chevrolet Tahoe/Suburban Owner Manual (GMNA-Localizing-U.S./Canada/
Mexico-16416971) - 2023 - CRC - 4/25/22
Keys, Doors, and Windows 13
Caution (Continued)
a risk of battery explosion. Dispose of
used batteries according to instructions
and local laws. Do not attempt to burn,
crush, or cut the used battery, and avoid
exposing the battery to environments
with extremely low air pressures or high
temperatures.
Caution
If the remote key is not reassembled
properly, liquids could enter the housing
and damage the circuitry, resulting in a
remote key malfunction and/or failure. To
prevent damage, always follow the steps
for remote key reassembly in this manual
to ensure the remote key is sealed
properly whenever the remote key is
opened.
Replace the battery in the remote key soon
if the DIC displays REPLACE BATTERY IN
REMOTE KEY.
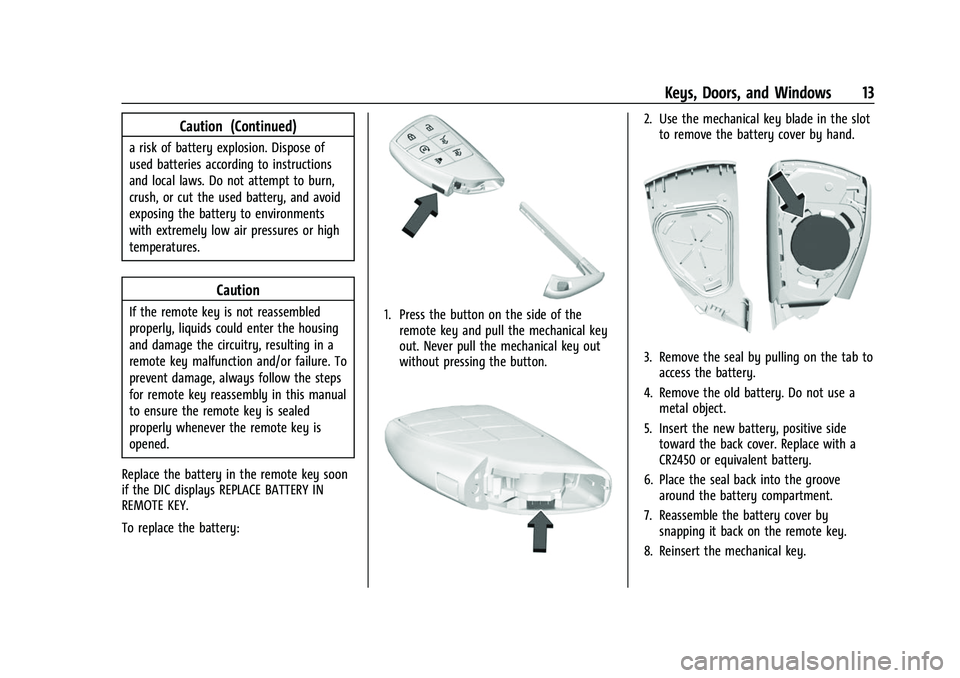
To replace the battery:1. Press the button on the side of the remote key and pull the mechanical key
out. Never pull the mechanical key out
without pressing the button.
2. Use the mechanical key blade in the slotto remove the battery cover by hand.
3. Remove the seal by pulling on the tab toaccess the battery.
4. Remove the old battery. Do not use a metal object.
5. Insert the new battery, positive side toward the back cover. Replace with a
CR2450 or equivalent battery.
6. Place the seal back into the groove around the battery compartment.
7. Reassemble the battery cover by snapping it back on the remote key.
8. Reinsert the mechanical key.
Page 25 of 443

Chevrolet Tahoe/Suburban Owner Manual (GMNA-Localizing-U.S./Canada/
Mexico-16416971) - 2023 - CRC - 4/25/22
24 Keys, Doors, and Windows
Power Assist Steps
{Warning
To avoid personal injury or property
damage, before entering or exiting the
vehicle, be sure the power assist step is
fully extended. Do not step on the power
assist step while it is moving. Never place
hands or other body parts between the
extended power assist step and the
vehicle.
If equipped, the power assist steps will
deploy when the door is opened and
automatically retract three seconds after the
door is closed. The power assist steps will
retract immediately if the vehicle starts
moving.
Disable the power assist steps before jacking
or placing any object under the vehicle. Too
much ice buildup may prevent deployment
of the power assist steps. Check the step
position before exiting the vehicle. If this
happens, disable the power assist steps,
clear the ice, then enable the assist steps
and confirm normal function prior to use. Keep hands, children, pets, objects, and
clothing clear of the power assist steps
when in motion. The steps will reverse
direction if they encounter an obstruction
when opening or closing. Remove the
obstruction, then open and close the door
on the same side to complete the motion of
the assist steps. If the obstruction is not
cleared, the assist steps remain extended
while driving.
Both power assist steps can extend or
retract for cleaning. To view available
settings from the infotainment screen, touch
Settings > Vehicle > Remote Lock, Unlock,
Start.
Enable/Disable
To view available settings from the
infotainment screen, touch Settings >
Vehicle > Remote Lock, Unlock, Start.
Vehicle Security
This vehicle has theft-deterrent features;
however, they do not make the vehicle
impossible to steal.
Vehicle Alarm System
The indicator light, on the driver door near
the window, indicates the status of the
system. See
Power Door Locks 015
Arming the Alarm System
1. Turn off the vehicle.
2. Lock the vehicle in one of three ways:
.Use the remote key.
.Use the Keyless Access system.
.With a door open, pressQon the
interior of the door.
3. After 30 seconds the alarm system will arm, and the indicator light will begin to
slowly flash. Pressing
Qon the remote
Page 41 of 443

Chevrolet Tahoe/Suburban Owner Manual (GMNA-Localizing-U.S./Canada/
Mexico-16416971) - 2023 - CRC - 4/25/22
40 Seats and Restraints
Memory Seats
Overview
If equipped, the memory seat feature allows
drivers to save their unique driving positions
and a shared exit position. See“Saving
Seating Positions” later in this section. The
saved positions can be recalled manually by
all drivers, see “Manually Recalling Seating
Positions” later in this section, and drivers
with remote key 1 and 2 can also recall
them automatically. See “Auto Seat Entry
Memory Recall” or“Auto Seat Exit Memory
Recall” later in this section. To enable
automatic recalls, turn on Seat Entry
Memory and/or Seat Exit Memory. See
“Enabling Automatic Recalls” later in thissection. The memory recalls may be
canceled at any time during the recall. See
“Cancel Memory Seating Recalls”
later in this
section.
Identifying Driver Number
The vehicle identifies the current driver by
their remote key number 1–8. The current
remote key number may be identified by
Driver Information Center (DIC) welcome
message, “You are driver x for memory
recalls.” This message is displayed the first
few times the vehicle is turned on when a
different remote key is used. For Seat Entry
Memory to work properly, save positions to
the 1 or 2 memory button matching the
driver number of this welcome message. To
aid in identifying remote key IDs, it is
recommended to only carry one remote key
when entering the vehicle. Perform the
following if the welcome message is not
displayed:
1. Move all keys and remote keys away from the vehicle.
2. Start the vehicle with another remote key. A DIC welcome message should
display indicating the driver number of
the other remote key. Turn the vehicle
off and remove the other key or remote
key from the vehicle. 3. Start the vehicle with the initial key or
remote key. The DIC welcome message
should display the driver number of the
initial remote key.
Saving Seating Positions
Read these instructions completely before
saving memory positions.
To save preferred driving positions to
1 and 2: 1. Turn the vehicle on or to accessory mode. A DIC welcome message may
indicate the driver number of the current
remote key. See “Identifying Driver
Number” previously in this section.
2. Adjust all available memory features to the desired driving position.
3. Press and release SET; a beep will sound.
4. Immediately upon releasing SET, press and hold memory button 1 or 2 matching
the current Driver’s remote key number
until two beeps sound. If too much time
passes between releasing SET and
pressing 1 or 2, the two beeps will not
sound indicating memory position were
not saved. Repeat Steps 3 and 4 to try
again.
Page 42 of 443

Chevrolet Tahoe/Suburban Owner Manual (GMNA-Localizing-U.S./Canada/
Mexico-16416971) - 2023 - CRC - 4/25/22
Seats and Restraints 41
5. Repeat Steps 1–4 for the other remotekey 1 or 2 using the other 1 or 2 memory
button.
It is recommended to save the preferred
driving positions to both 1 and 2 if you are
the only driver.
To save the common exit seating position to
Bthat is used by all drivers for Manually
Recalling Seating Positions and Auto Seat
Exit Memory Recall features, repeat Steps 1–
4 using
B, the exit button.
Manually Recalling Seating Positions
Press and hold 1, 2, or
Bbutton until the
recall is complete, to recall the positions
previously saved to that button.
Manual Memory recall movement for 1, 2 or
Bbuttons may be initiated and will
complete to the saved memory position if
the vehicle is in or out of P (Park).
Enabling Automatic Recalls
.Seat Entry Memory moves the driver seat
to the selected 1 or 2 position when the
vehicle is started. Select Settings > Vehicle
> Seating Position > Seat Entry Memory >
ON or OFF. See “Auto Seat Entry Memory
Recall” later in this section.
.Seat Exit Memory moves the driver seat
to the preferred exit position of the
B
button when the vehicle is turned off and
the door is opened. Select Settings >
Vehicle > Seating Position > Seat Exit
Memory > ON or OFF. See “Auto Seat Exit
Memory Recall” later in this section.
Auto Seat Entry Memory Recall
Seat Entry Memory will automatically begin
movement to the seating positions of the 1
or 2 button corresponding to the driver’s
remote key number 1 or 2 detected by the
vehicle when:
.The vehicle is turned ON.
.Seating positions have been previously
saved to the same 1 or 2 button. See
“Saving Seating Positions” previously in
this section.
.Seat Entry Memory is enabled. See
“Enabling Automatic Recalls” previously in
this section.
.The vehicle is in P (Park).
Seat Entry Memory Recall will continue if
the vehicle is shifted out of P (Park) prior to
reaching the saved memory position. If the saved memory seat position does not
automatically recall, verify the recall is
enabled. See
“Enabling Automatic Recalls”
previously in this section.
If the memory seat recalls to the wrong
position, the driver’s remote key number 1
or 2 may not match the memory button
number positions they were saved to. Try
the other remote key or try saving the
positions to the other 1 or 2 memory
button. See “Saving Seating Positions”
previously in this section.
Automatic Seat Entry Memory recalls are
only available for driver’s remote key
numbers 1 and 2. Remote keys 3–8 will not
provide Seat Entry Memory recalls.
Auto Seat Exit Memory Recall
Seat Exit Memory will begin movement to
the seating position of the
B
button when:
.The vehicle is turned off and the driver
door is open or opened within a
short time.
.A seating position has been previously
been saved to the
Bmemory button.
See “Saving Seating Positions” previously
in this section.
Page 50 of 443

Chevrolet Tahoe/Suburban Owner Manual (GMNA-Localizing-U.S./Canada/
Mexico-16416971) - 2023 - CRC - 4/25/22
Seats and Restraints 49
5. Stow the mini-latch in the holder in theheadliner.
6. Stow the seat belt in the beltstowage clip.
Repeat the steps to fold the other
seatback, if desired.
Power Seatback Folding (If Equipped)
The vehicle must be in P (Park) for this
feature to work.
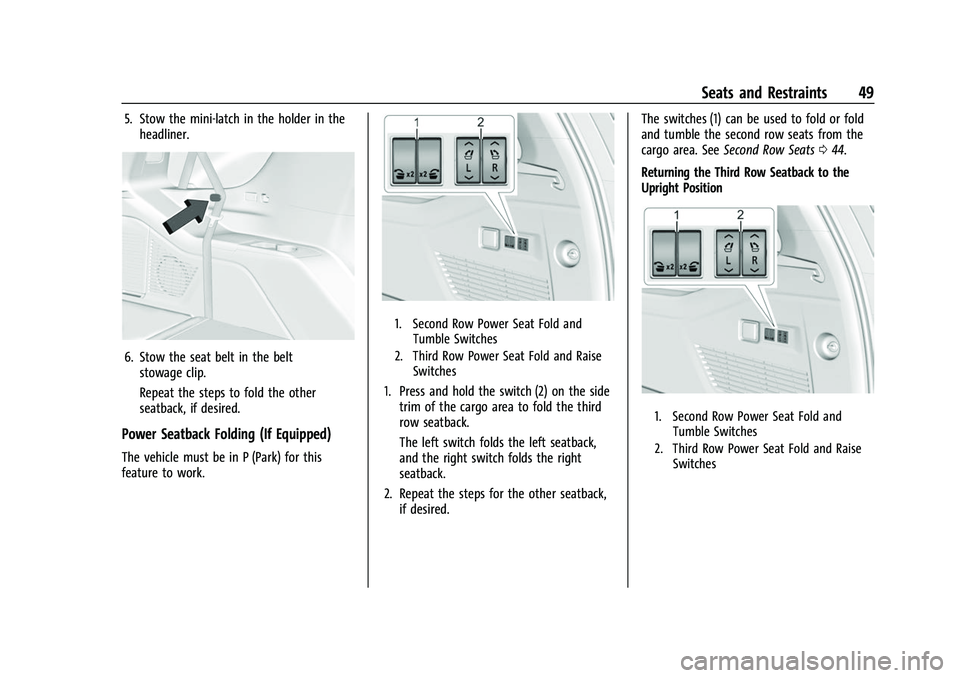
1. Second Row Power Seat Fold and Tumble Switches
2. Third Row Power Seat Fold and Raise Switches
1. Press and hold the switch (2) on the sidetrim of the cargo area to fold the third
row seatback.
The left switch folds the left seatback,
and the right switch folds the right
seatback.
2. Repeat the steps for the other seatback, if desired. The switches (1) can be used to fold or fold
and tumble the second row seats from the
cargo area. See
Second Row Seats 044.
Returning the Third Row Seatback to the
Upright Position
1. Second Row Power Seat Fold and Tumble Switches
2. Third Row Power Seat Fold and Raise Switches
Page 51 of 443

Chevrolet Tahoe/Suburban Owner Manual (GMNA-Localizing-U.S./Canada/
Mexico-16416971) - 2023 - CRC - 4/25/22
50 Seats and Restraints
To return the third row seatback to the
upright position:
1. Ensure the seat belt is in the beltstowage clip.
2. Open the liftgate to access the controls for the seat.
3. Press and hold the switch (2) on the side trim of the cargo area to raise the third
row seatback.
The left switch raises the left seatback,
and the right switch raises the right
seatback.
{Warning
A seat belt that is improperly routed, not
properly attached, or twisted will not
provide the protection needed in a crash.
The person wearing the belt could be
seriously injured. After raising the rear
seatback, always check to be sure that
the seat belts are properly routed and
attached, and are not twisted.
4. Reconnect the center seat belt mini-latch to the mini-buckle. Do not let it twist.
5. Pull on the seat belt to be sure the mini-latch is secure.
6. Repeat the steps for the other seatback, if desired.
Manual Seatback Folding (If Equipped)
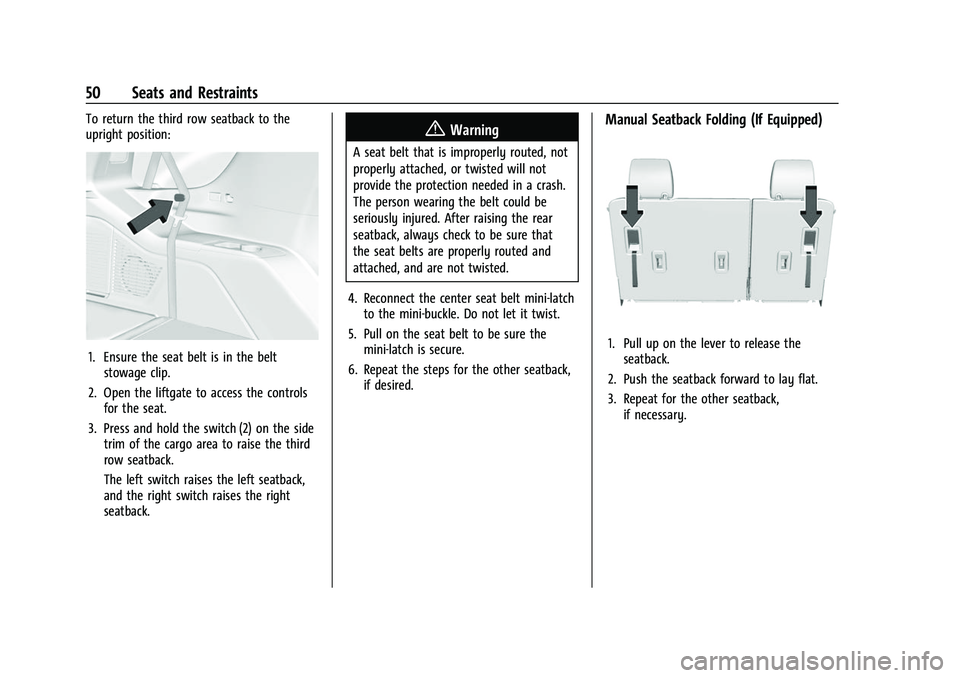
1. Pull up on the lever to release theseatback.
2. Push the seatback forward to lay flat.
3. Repeat for the other seatback, if necessary.
Page 52 of 443

Chevrolet Tahoe/Suburban Owner Manual (GMNA-Localizing-U.S./Canada/
Mexico-16416971) - 2023 - CRC - 4/25/22
Seats and Restraints 51
Returning the Third Row Seatback to the
Upright Position
1. Ensure the seat belt is in the beltstowage clip.
2. From the rear of the vehicle, raise the seatback to the upright position using
the pull strap on the back of the third
row seat, or lift the seatback and push it
into place from inside the vehicle.
{Warning
If either seatback is not locked, it could
move forward in a sudden stop or crash.
That could cause injury to the person
sitting there. Always push and pull on
the seatbacks to be sure they are locked.
3. Push and pull on the seatback to make sure it is locked in place.
{Warning
A seat belt that is improperly routed, not
properly attached, or twisted will not
provide the protection needed in a crash.
The person wearing the belt could be
seriously injured. After raising the rear
seatback, always check to be sure that
the seat belts are properly routed and
attached, and are not twisted.
4. Reconnect the center seat belt mini-latch to the mini-buckle. Do not let it twist.
5. Pull on the seat belt to be sure the mini-latch is secure. Folding the Third Row Seats from the
Overhead Console
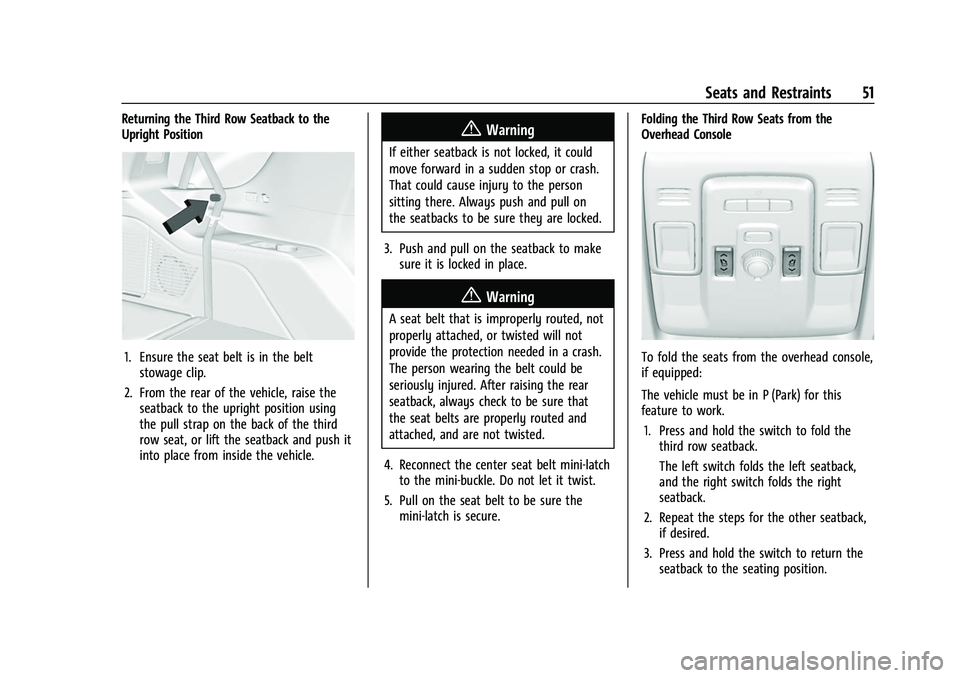
To fold the seats from the overhead console,
if equipped:
The vehicle must be in P (Park) for this
feature to work.
1. Press and hold the switch to fold the third row seatback.
The left switch folds the left seatback,
and the right switch folds the right
seatback.
2. Repeat the steps for the other seatback, if desired.
3. Press and hold the switch to return the seatback to the seating position.