2023 CHEVROLET TAHOE ECU
[x] Cancel search: ECUPage 374 of 443

Chevrolet Tahoe/Suburban Owner Manual (GMNA-Localizing-U.S./Canada/
Mexico-16416971) - 2023 - CRC - 4/26/22
Vehicle Care 373
Removing the Spare Tire and Tools
The equipment needed to change a flat tire
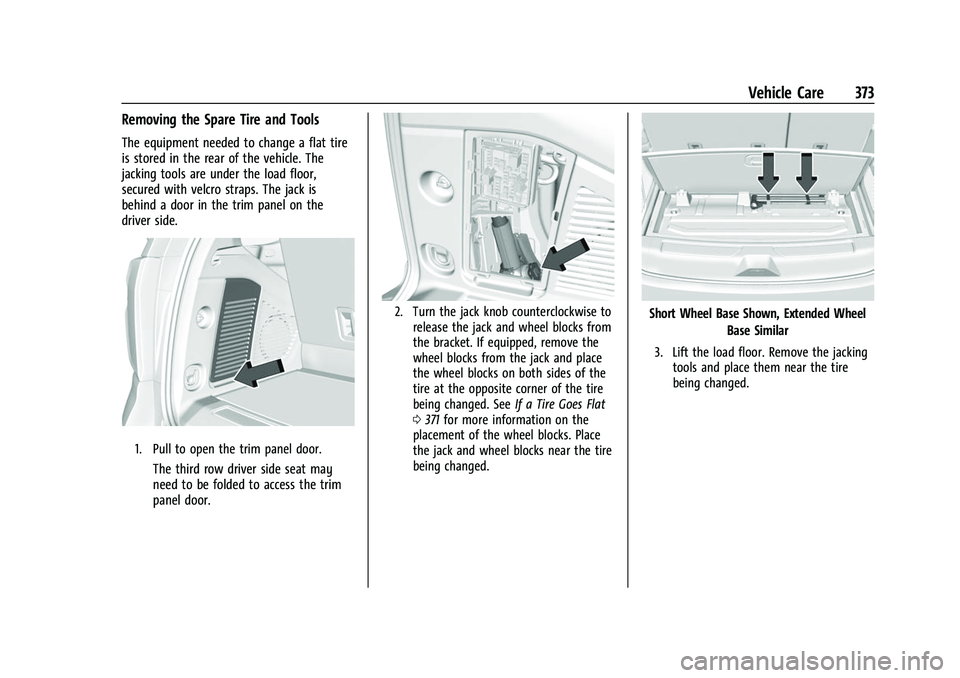
is stored in the rear of the vehicle. The
jacking tools are under the load floor,
secured with velcro straps. The jack is
behind a door in the trim panel on the
driver side.
1. Pull to open the trim panel door.
The third row driver side seat may
need to be folded to access the trim
panel door.
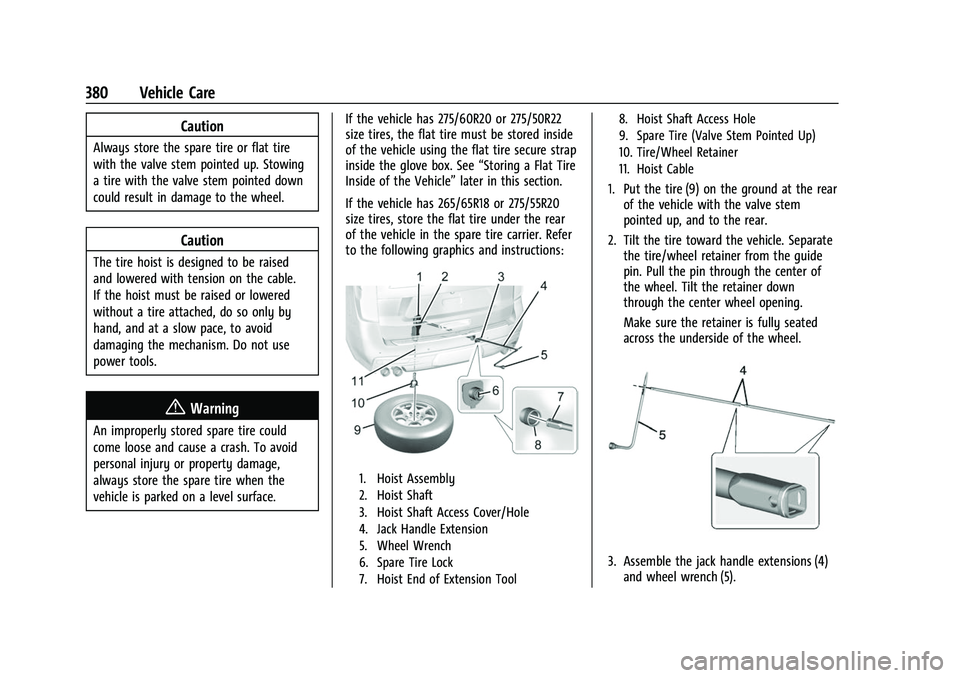
2. Turn the jack knob counterclockwise torelease the jack and wheel blocks from
the bracket. If equipped, remove the
wheel blocks from the jack and place
the wheel blocks on both sides of the
tire at the opposite corner of the tire
being changed. See If a Tire Goes Flat
0 371 for more information on the
placement of the wheel blocks. Place
the jack and wheel blocks near the tire
being changed.Short Wheel Base Shown, Extended Wheel
Base Similar
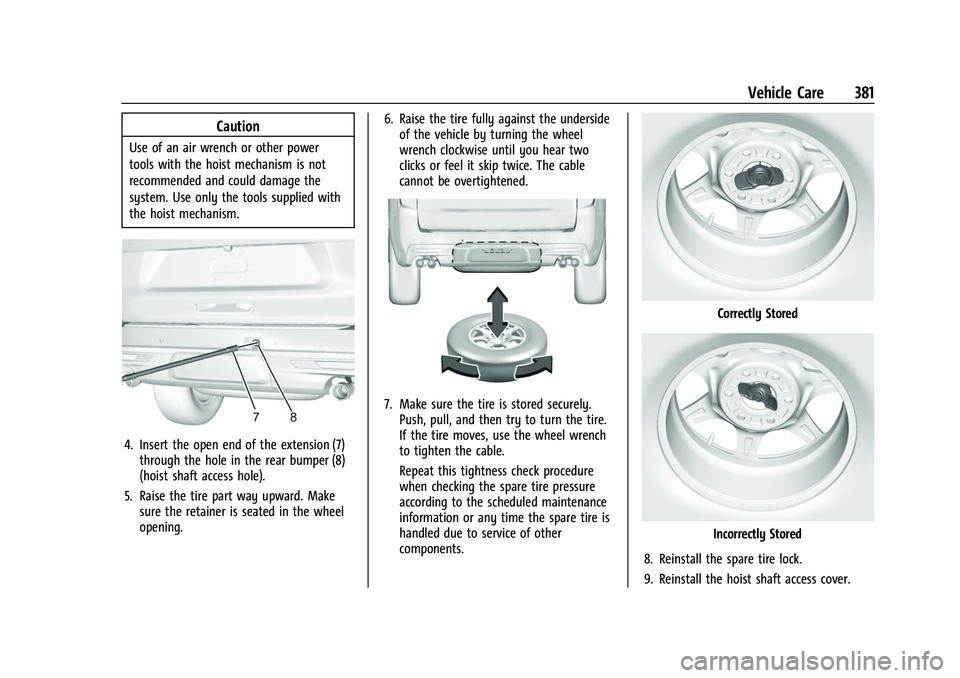
3. Lift the load floor. Remove the jackingtools and place them near the tire
being changed.
Page 380 of 443

Chevrolet Tahoe/Suburban Owner Manual (GMNA-Localizing-U.S./Canada/
Mexico-16416971) - 2023 - CRC - 4/26/22
Vehicle Care 379
12. Tighten the nuts firmly in a crisscrosssequence as shown by turning the wheel
wrench clockwise.
{Warning
Wheel nuts that are improperly or
incorrectly tightened can cause the
wheels to become loose or come off. The
wheel nuts should be tightened with a
torque wrench to the proper torque
specification after replacing. Follow the
torque specification supplied by the
aftermarket manufacturer when using
(Continued)
Warning (Continued)
accessory locking wheel nuts. See
Capacities and Specifications0408 for
original equipment wheel nut torque
specifications.
Caution
Improperly tightened wheel nuts can lead
to brake pulsation and rotor damage. To
avoid expensive brake repairs, evenly
tighten the wheel nuts in the proper
sequence and to the proper torque
specification. See Capacities and
Specifications 0408 for the wheel nut
torque specification.
When reinstalling the regular wheel and tire,
also reinstall either the center cap or the
bolt-on hub cap, depending on which one
the vehicle has.
.For center caps, line up the tab on the
center cap with the slot in the wheel. The
cap only goes in one way. Place the cap
on the wheel and press until it snaps into
place.
.For bolt-on hub caps, line up the plastic
nut caps with the wheel nuts and tighten
clockwise by hand to get them started.
Then tighten with the wheel wrench
until snug.
Storing a Flat or Spare Tire and Tools
{Warning
Storing a jack, a tire, or other equipment
in the passenger compartment of the
vehicle could cause injury. In a sudden
stop or collision, loose equipment could
strike someone. Store all these in the
proper place.
{Warning
Failure to follow these tire storage
instructions carefully could result in
personal injury or property damage if the
hoist cable fails or if the tire comes loose.
Make sure the tire is stored securely
before driving.
Page 381 of 443

Chevrolet Tahoe/Suburban Owner Manual (GMNA-Localizing-U.S./Canada/
Mexico-16416971) - 2023 - CRC - 4/26/22
380 Vehicle Care
Caution
Always store the spare tire or flat tire
with the valve stem pointed up. Stowing
a tire with the valve stem pointed down
could result in damage to the wheel.
Caution
The tire hoist is designed to be raised
and lowered with tension on the cable.
If the hoist must be raised or lowered
without a tire attached, do so only by
hand, and at a slow pace, to avoid
damaging the mechanism. Do not use
power tools.
{Warning
An improperly stored spare tire could
come loose and cause a crash. To avoid
personal injury or property damage,
always store the spare tire when the
vehicle is parked on a level surface.If the vehicle has 275/60R20 or 275/50R22
size tires, the flat tire must be stored inside
of the vehicle using the flat tire secure strap
inside the glove box. See
“Storing a Flat Tire
Inside of the Vehicle” later in this section.
If the vehicle has 265/65R18 or 275/55R20
size tires, store the flat tire under the rear
of the vehicle in the spare tire carrier. Refer
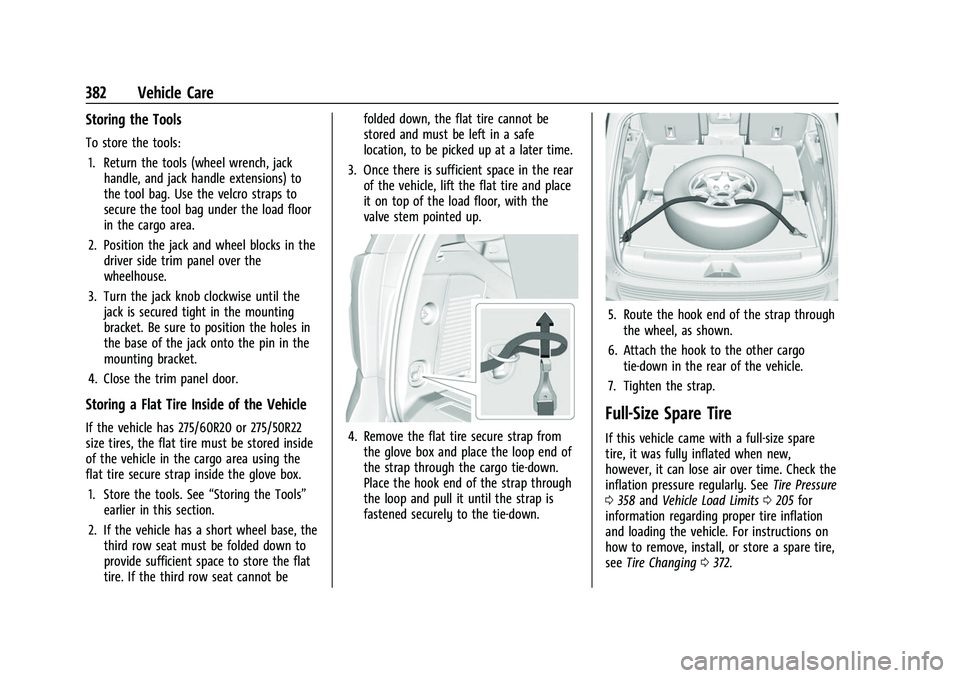
to the following graphics and instructions:
1. Hoist Assembly
2. Hoist Shaft
3. Hoist Shaft Access Cover/Hole
4. Jack Handle Extension
5. Wheel Wrench
6. Spare Tire Lock
7. Hoist End of Extension Tool 8. Hoist Shaft Access Hole
9. Spare Tire (Valve Stem Pointed Up)
10. Tire/Wheel Retainer
11. Hoist Cable
1. Put the tire (9) on the ground at the rear
of the vehicle with the valve stem
pointed up, and to the rear.
2. Tilt the tire toward the vehicle. Separate the tire/wheel retainer from the guide
pin. Pull the pin through the center of
the wheel. Tilt the retainer down
through the center wheel opening.
Make sure the retainer is fully seated
across the underside of the wheel.
3. Assemble the jack handle extensions (4)and wheel wrench (5).
Page 382 of 443

Chevrolet Tahoe/Suburban Owner Manual (GMNA-Localizing-U.S./Canada/
Mexico-16416971) - 2023 - CRC - 4/26/22
Vehicle Care 381
Caution
Use of an air wrench or other power
tools with the hoist mechanism is not
recommended and could damage the
system. Use only the tools supplied with
the hoist mechanism.
4. Insert the open end of the extension (7)through the hole in the rear bumper (8)
(hoist shaft access hole).
5. Raise the tire part way upward. Make sure the retainer is seated in the wheel
opening. 6. Raise the tire fully against the underside
of the vehicle by turning the wheel
wrench clockwise until you hear two
clicks or feel it skip twice. The cable
cannot be overtightened.
7. Make sure the tire is stored securely.Push, pull, and then try to turn the tire.
If the tire moves, use the wheel wrench
to tighten the cable.
Repeat this tightness check procedure
when checking the spare tire pressure
according to the scheduled maintenance
information or any time the spare tire is
handled due to service of other
components.
Correctly Stored
Incorrectly Stored
8. Reinstall the spare tire lock.
9. Reinstall the hoist shaft access cover.
Page 383 of 443

Chevrolet Tahoe/Suburban Owner Manual (GMNA-Localizing-U.S./Canada/
Mexico-16416971) - 2023 - CRC - 4/26/22
382 Vehicle Care
Storing the Tools
To store the tools:1. Return the tools (wheel wrench, jack handle, and jack handle extensions) to
the tool bag. Use the velcro straps to
secure the tool bag under the load floor
in the cargo area.
2. Position the jack and wheel blocks in the driver side trim panel over the
wheelhouse.
3. Turn the jack knob clockwise until the jack is secured tight in the mounting
bracket. Be sure to position the holes in
the base of the jack onto the pin in the
mounting bracket.
4. Close the trim panel door.
Storing a Flat Tire Inside of the Vehicle
If the vehicle has 275/60R20 or 275/50R22
size tires, the flat tire must be stored inside
of the vehicle in the cargo area using the
flat tire secure strap inside the glove box. 1. Store the tools. See “Storing the Tools”
earlier in this section.
2. If the vehicle has a short wheel base, the third row seat must be folded down to
provide sufficient space to store the flat
tire. If the third row seat cannot be folded down, the flat tire cannot be
stored and must be left in a safe
location, to be picked up at a later time.
3. Once there is sufficient space in the rear of the vehicle, lift the flat tire and place
it on top of the load floor, with the
valve stem pointed up.4. Remove the flat tire secure strap from
the glove box and place the loop end of
the strap through the cargo tie-down.
Place the hook end of the strap through
the loop and pull it until the strap is
fastened securely to the tie-down.
5. Route the hook end of the strap throughthe wheel, as shown.
6. Attach the hook to the other cargo tie-down in the rear of the vehicle.
7. Tighten the strap.
Full-Size Spare Tire
If this vehicle came with a full-size spare
tire, it was fully inflated when new,
however, it can lose air over time. Check the
inflation pressure regularly. See Tire Pressure
0 358 and Vehicle Load Limits 0205 for
information regarding proper tire inflation
and loading the vehicle. For instructions on
how to remove, install, or store a spare tire,
see Tire Changing 0372.
Page 387 of 443

Chevrolet Tahoe/Suburban Owner Manual (GMNA-Localizing-U.S./Canada/
Mexico-16416971) - 2023 - CRC - 4/26/22
386 Vehicle Care
Do not connect positive (+) to negative
(−) or you will get a short that would
damage the battery and maybe other
parts too. And do not connect the
negative (−) cable to the negative (−)
terminal on the dead battery because
this can cause sparks.
7. Connect one end of the red positive (+) cable to the discharged battery
positive (+) terminal.
8. Do not let the other end touch metal. Connect it to the good battery
positive (+) terminal. Use a remote
positive (+) terminal if the vehicle
has one.
9. Connect one end of the black negative (−) cable to the good battery negative
(−) terminal. Use a remote negative (−)
terminal if the vehicle has one.
Do not let the other end touch anything
until the next step.
10. Connect the other end of the negative (−) cable to the discharged battery
negative (−) grounding point.
11. Start the vehicle with the good battery and run the engine for a while. 12. Try to start the vehicle that had the
dead battery. If it will not start after a
few tries, it probably needs service.
Jumper Cable Removal
Reverse the sequence exactly when
removing the jumper cables.
After starting the disabled vehicle and
removing the jumper cables, allow it to idle
for several minutes.
Towing the Vehicle
Transporting a Disabled Vehicle
Caution
Incorrectly transporting a disabled vehicle
may cause damage to the vehicle. Use
proper tire straps to secure the vehicle to
the flatbed tow truck. Do not strap or
hook to any frame, underbody,
or suspension component not specified
below. Do not move vehicles with drive
axle tires on the ground. Damage is not
covered by the vehicle warranty.
Caution
The vehicle may be equipped with an
electric parking brake and/or an
electronic shifter. In the event of a loss of
12-volt battery power, the electric parking
brake cannot be released, and the vehicle
cannot be shifted to N (Neutral). Tire
skates or dollies must be used under the
non-rolling tires to prevent damage while
loading/unloading the vehicle. Dragging
the vehicle will cause damage not
covered by the vehicle warranty.
Caution
The vehicle may be equipped with a tow
eye. Improper use of the tow eye may
cause damage to the vehicle and is not
covered by the vehicle warranty.
If equipped, use the tow eye to load the
vehicle onto a flatbed tow truck from a
flat road surface, or to move the vehicle
a very short distance at a walking pace.
The tow eye is not designed for off-road
recovery. The vehicle must be in
N (Neutral) with the electric parking
brake released when using the tow eye.
Page 389 of 443

Chevrolet Tahoe/Suburban Owner Manual (GMNA-Localizing-U.S./Canada/
Mexico-16416971) - 2023 - CRC - 4/26/22
388 Vehicle Care
.Is the vehicle ready to be towed? Just as
preparing the vehicle for a long trip,
make sure the vehicle is prepared to be
towed.
Caution
Use of a shield mounted in front of the
vehicle grille could restrict airflow and
cause damage to the transmission. The
repairs would not be covered by the
vehicle warranty. If using a shield, only
use one that attaches to the towing
vehicle.
Dinghy Towing
Two-Wheel-Drive Vehicles
Caution
If the two-wheel-drive vehicle is towed
with all four wheels on the ground, the
drivetrain components could be damaged.
The repairs would not be covered by the
vehicle warranty.
Two-wheel-drive vehicles should not be
towed with all four wheels on the ground.
Four-Wheel-Drive Vehicles
Only dinghy tow four-wheel-drive vehicles
with a two speed transfer case that has an
N (Neutral) and a 4
nsetting.
{Warning
Shifting a four-wheel-drive vehicle's
transfer case into N (Neutral) can cause
the vehicle to roll even if the
transmission is in P (Park). You or others
could be injured. Set the parking brake
before shifting the transfer case to
N (Neutral).
To dinghy tow: 1. Position the vehicle being towed behind the tow vehicle, facing forward and on a
level surface.
2. Securely attach the vehicle being towed to the tow vehicle.
3. Apply the parking brake and start the engine.
4. Shift the transfer case to N (Neutral). See “Shifting into N (Neutral)” under
Four-Wheel Drive 0219 for the proper
procedure. Check that the vehicle is in
N (Neutral) by shifting the transmission
to R (Reverse) and then to D (Drive).
There should be no movement of the
vehicle while shifting.
5. Shift the transmission to P (Park).
Page 390 of 443

Chevrolet Tahoe/Suburban Owner Manual (GMNA-Localizing-U.S./Canada/
Mexico-16416971) - 2023 - CRC - 4/26/22
Vehicle Care 389
Caution
Failure to tow the vehicle with the
transmission in P (Park) can cause
damage to the transmission.
6. Turn off the engine.
7. Place the vehicle in accessory mode by pressing the start button without
stepping on the brake pedal.
8. Release the parking brake only when you are confident it is secured to tow vehicle
and will not roll.
Before going on to the next step, be
sure to take the mechanical key with
you. It will be needed to re-enter the
vehicle after the power is disconnected.
See “Drive Door Key Lock Cylinder
Access” underDoor Locks 015.
9. Disconnect the negative battery cable at the battery and secure the nut and bolt.
Cover the negative battery post with a
non-conductive material to prevent any
contact with the negative battery
terminal.
Caution
Failure to disconnect the negative battery
cable or to have it contact the terminals
can cause damage to the vehicle.
10. Move the steering wheel to make sure the steering column is unlocked.
Caution
If the steering column is locked, vehicle
damage may occur.
11. Rock the vehicle to make sure the parking brake is not set and transfer case
is in N (Neutral).
Caution
Towing the vehicle with the parking
brake set can damage it. Always release
the parking brake prior to towing the
vehicle.
Disconnecting the Towed Vehicle
Before disconnecting the towed vehicle: 1. Park on a level surface.
2. Connect the battery.
3. Apply the brake pedal.
{Warning
The vehicle can roll when the brake pedal
is released. Always apply and hold the
brake pedal when setting the parking
brake. Make sure the parking brake is
fully engaged before releasing the brake
pedal.
4. Start the engine and shift the transfer case out of N (Neutral) to 2
m. See
“Shifting out of N (Neutral)” under
Four-Wheel Drive 0219. See your dealer
if the transfer case cannot be shifted out
of N (Neutral).
5. Check that the vehicle is in 2
mby
shifting the transmission to R (Reverse)
and then to D (Drive). There should be
movement of the vehicle while shifting.
6. Shift the transmission to P (Park) and turn off the vehicle.
7. Set the parking brake.
8. Release the parking brake.
9. Disconnect the vehicle from the tow vehicle.