2023 CHEVROLET SILVERADO 2500 Battery
[x] Cancel search: BatteryPage 232 of 441

Chevrolet Silverado 2500 HD/3500 HD Owner Manual (GMNA-Localizing-U.
S./Canada/Mexico-15546003) - 2022 - CRC - 5/5/21
Driving and Operating 231
Starting Procedure
1. For Key Access vehicles, turn the ignitionkey to Start. When the engine starts, let
go of the key. For Keyless Access
vehicles, the RKE transmitter must be in
the vehicle. Press ENGINE START/STOP
with the brake pedal applied. When the
engine begins cranking, let go of the
button.
The driver may observe a minor, and
temporary, brake pedal kickback when
starting the vehicle. This is normal.
The idle speed will go down as the
engine gets warm. Do not race the
engine immediately after starting it.
Operate the engine and transmission
gently to allow the oil to warm up and
lubricate all moving parts.
When the low fuel warning light is on
and the FUEL LEVEL LOW message is
displayed in the Driver Information
Center (DIC), hold the ignition switch in
the START position to continue engine
cranking.Caution
Cranking the engine for long periods of
time, by returning the ignition to the
START position immediately after
cranking has ended, can overheat and
damage the cranking motor, and drain
the battery. Wait at least 15 seconds
between each try, to let the cranking
motor cool down.
2. If the engine does not start after five to 10 seconds, especially in very cold
weather (below −18 °C or 0 °F), it could
be flooded with too much gasoline. Try
pushing the accelerator pedal all the way
to the floor and holding it there while
holding the key in START or ENGINE
START/STOP for up to a maximum of
15 seconds. Wait at least 15 seconds
between each try, to allow the cranking
motor to cool down. When the engine
starts, let go of the key or button and
accelerator. If the vehicle starts briefly
but then stops again, do the same thing.
This clears the extra gasoline from the
engine. Do not race the engine
immediately after starting it. Operate the engine and transmission gently until
the oil warms up and lubricates all
moving parts.
Engine Heater
If equipped, the engine heater can provide
easier starting and better fuel economy
during engine warm-up in cold weather
conditions at or below
−18 °C (0 °F). Vehicles
with an engine heater should be plugged in
at least four hours before starting. An
internal thermostat in the plug-end of the
cord may exist, which will prevent engine
heater operation at temperatures above
−18 °C (0 °F).
{Warning
Do not plug in the engine block heater
while the vehicle is parked in a garage or
under a carport. Property damage or
personal injury may result. Always park
the vehicle in a clear open area away
from buildings or structures.
Page 235 of 441
Chevrolet Silverado 2500 HD/3500 HD Owner Manual (GMNA-Localizing-U.
S./Canada/Mexico-15546003) - 2022 - CRC - 5/5/21
234 Driving and Operating
Torque Lock
If you are parking on a hill and you do not
shift the transmission into P (Park) properly,
the weight of the vehicle may put too much
force on the parking pawl in the
transmission. You may find it difficult to pull
the shift lever out of P (Park). This is called
torque lock. To prevent torque lock, set the
parking brake and then shift into P (Park)
properly before you leave the driver seat.
When you are ready to drive, move the
shift lever out of P (Park) before you release
the parking brake.
If torque lock does occur, you may need to
have another vehicle push yours a little
uphill to take some of the pressure from the
parking pawl in the transmission. You will
then be able to pull the shift lever out of
P (Park).
Shifting out of Park
This vehicle is equipped with an electronic
shift lock release system. The system is
designed to prevent movement of the shift
lever out of P (Park), unless the brake pedal
is applied and the ignition is on or in
Service Mode.The shift lock release is always functional
except in the case of an uncharged or low
voltage
–less than 9 volt –battery.
If the vehicle has an uncharged or low
voltage battery, try charging or jump
starting the battery. See Jump Starting -
North America 0374.
To shift out of P (Park): 1. Apply the brake pedal.
2. Release the parking brake if it is applied. See Electric Parking Brake 0245.
3. Pull the shift lever toward you, then move it to the desired position, and
release.
If the vehicle still cannot be shifted out of
P (Park): 1. Ease the pressure on, or release the shift lever.
2. While holding the brake pedal, push the shift lever all the way into P (Park).
3. Pull the shift lever toward you, then move it to the desired position, and
release.
If there is still a problem shifting, have the
vehicle serviced soon.
Parking over Things That Burn
{Warning
Things that can burn could touch hot
exhaust parts under the vehicle and
ignite. Do not park over papers, leaves,
dry grass, or other things that can burn.
Extended Parking
It is best not to park with the vehicle
running. If the vehicle is left running, be
sure it will not move and there is adequate
ventilation.
See Shifting Into Park 0233 and
Engine Exhaust 0235.
If the vehicle is left parked and running with
the RKE transmitter outside the vehicle, it
will continue to run for up to 15 minutes.
If the vehicle is left parked and running with
the RKE transmitter inside the vehicle, it will
continue to run for up to 30 minutes.
The vehicle could turn off sooner if it is
parked on a hill, due to lack of
available fuel.
The timer will reset if the vehicle is taken
out of P (Park) while it is running.
Page 246 of 441
Chevrolet Silverado 2500 HD/3500 HD Owner Manual (GMNA-Localizing-U.
S./Canada/Mexico-15546003) - 2022 - CRC - 5/5/21
Driving and Operating 245
If there is a problem with ABS, this warning
light stays on. SeeAntilock Brake System
(ABS) Warning Light 0118.
ABS does not change the time needed to
get a foot on the brake pedal and does not
always decrease stopping distance. If you
get too close to the vehicle ahead, there will
not be enough time to apply the brakes if
that vehicle suddenly slows or stops. Always
leave enough room ahead to stop, even
with ABS.
Using ABS
Do not pump the brakes. Just hold the brake
pedal down firmly. Hearing or feeling ABS
operate is normal.
Braking in Emergencies
ABS allows steering and braking at the same
time. In many emergencies, steering can
help even more than braking.
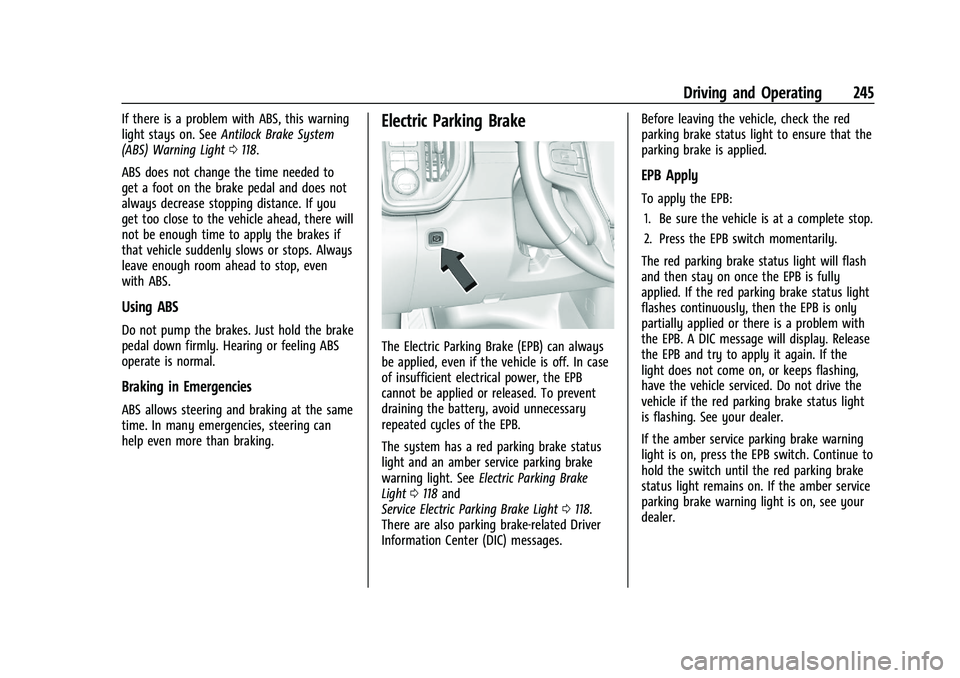
Electric Parking Brake
The Electric Parking Brake (EPB) can always
be applied, even if the vehicle is off. In case
of insufficient electrical power, the EPB
cannot be applied or released. To prevent
draining the battery, avoid unnecessary
repeated cycles of the EPB.
The system has a red parking brake status
light and an amber service parking brake
warning light. See Electric Parking Brake
Light 0118 and
Service Electric Parking Brake Light 0118.
There are also parking brake-related Driver
Information Center (DIC) messages. Before leaving the vehicle, check the red
parking brake status light to ensure that the
parking brake is applied.
EPB Apply
To apply the EPB:
1. Be sure the vehicle is at a complete stop.
2. Press the EPB switch momentarily.
The red parking brake status light will flash
and then stay on once the EPB is fully
applied. If the red parking brake status light
flashes continuously, then the EPB is only
partially applied or there is a problem with
the EPB. A DIC message will display. Release
the EPB and try to apply it again. If the
light does not come on, or keeps flashing,
have the vehicle serviced. Do not drive the
vehicle if the red parking brake status light
is flashing. See your dealer.
If the amber service parking brake warning
light is on, press the EPB switch. Continue to
hold the switch until the red parking brake
status light remains on. If the amber service
parking brake warning light is on, see your
dealer.
Page 286 of 441
Chevrolet Silverado 2500 HD/3500 HD Owner Manual (GMNA-Localizing-U.
S./Canada/Mexico-15546003) - 2022 - CRC - 5/5/21
Driving and Operating 285
to the attaching points on the bumper;
otherwise, safety chains should be attached
to holes on the trailer hitch.
Cross the safety chains under the tongue of
the trailer to help prevent the tongue from
contacting the road if it becomes separated
from the hitch. Always leave enough slack in
the safety chains to allow the combination
to turn. Never allow safety chains to drag
on the ground.
Trailer Brakes
Loaded trailers over 900 kg (2,000 lb) must
be equipped with brake systems and with
brakes for each axle. Trailer braking
equipment conforming to Canadian
Standards Association (CSA) requirement
CAN3-D313, or its equivalent, is
recommended.
State or local regulations may require
trailers to have their own braking system if
the loaded weight of the trailer exceeds
certain minimums that can vary from state
to state. Read and follow the instructions for
the trailer brakes so they are installed,
adjusted, and maintained properly. Never
attempt to tap into your vehicle's hydraulicbrake system. If you do, both the vehicle
antilock brakes and the trailer brakes may
not function, which could result in a crash.
Auxiliary Battery
If equipped, the vehicle's auxiliary battery
can be used to supply electrical power to
additional equipment that may be added,
such as a slide-in camper.
Locate the auxiliary battery connector under
the hood on the driver side of the vehicle,
next to the engine compartment fuse block.
Follow the proper installation instructions
included with any electrical equipment that
is installed.
Caution
To prevent draining the auxiliary battery,
always turn off electrical equipment
when not in use and do not use any
equipment that may exceed the
maximum amperage rating of 30 amps.
Trailer Wiring Harness
Basic Trailer Wiring
If the vehicle is not equipped with a trailer
connector on the rear bumper, a 7-wire
trailering harness is tied to the vehiclesframe. The harness requires the installation
of a trailer connector, which is available
through your dealer.
Use only a round, seven-wire connector with
flat blade terminals meeting SAE J2863
specifications for proper electrical
connectivity.
The seven-wire harness contains the
following trailer circuits:
Stop/Turn
Signal Left Yellow/Blue
Stop/Turn Signal
Right Green/Violet
Tail/Parking Lamps Gray/Brown
Reverse Lamps White/Green
Battery Feed Red/Green
Ground White
Electric Trailer Brake Blue
Heavy-Duty Trailer Wiring Harness Package
If equipped, the trailer wiring harness, with
a 7-pin connector and a 4-pin connector, is
mounted on the vehicle's rear bumper.
Page 287 of 441
Chevrolet Silverado 2500 HD/3500 HD Owner Manual (GMNA-Localizing-U.
S./Canada/Mexico-15546003) - 2022 - CRC - 5/5/21
286 Driving and Operating
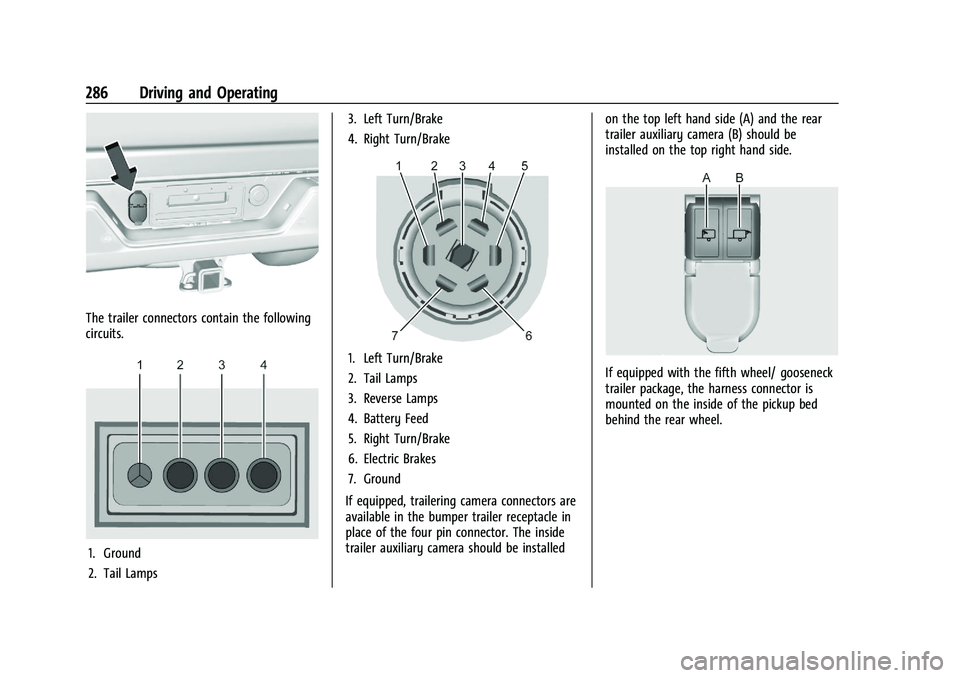
The trailer connectors contain the following
circuits.
1. Ground
2. Tail Lamps3. Left Turn/Brake
4. Right Turn/Brake
1. Left Turn/Brake
2. Tail Lamps
3. Reverse Lamps
4. Battery Feed
5. Right Turn/Brake
6. Electric Brakes
7. Ground
If equipped, trailering camera connectors are
available in the bumper trailer receptacle in
place of the four pin connector. The inside
trailer auxiliary camera should be installed on the top left hand side (A) and the rear
trailer auxiliary camera (B) should be
installed on the top right hand side.If equipped with the fifth wheel/ gooseneck
trailer package, the harness connector is
mounted on the inside of the pickup bed
behind the rear wheel.
Page 288 of 441
Chevrolet Silverado 2500 HD/3500 HD Owner Manual (GMNA-Localizing-U.
S./Canada/Mexico-15546003) - 2022 - CRC - 5/5/21
Driving and Operating 287
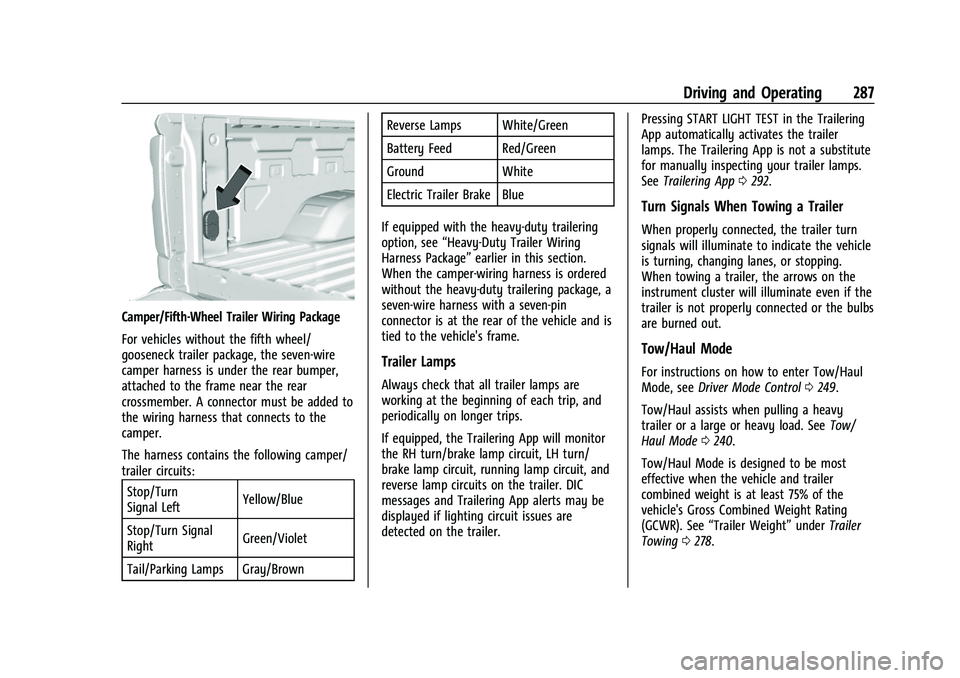
Camper/Fifth-Wheel Trailer Wiring Package
For vehicles without the fifth wheel/
gooseneck trailer package, the seven-wire
camper harness is under the rear bumper,
attached to the frame near the rear
crossmember. A connector must be added to
the wiring harness that connects to the
camper.
The harness contains the following camper/
trailer circuits:Stop/Turn
Signal Left Yellow/Blue
Stop/Turn Signal
Right Green/Violet
Tail/Parking Lamps Gray/Brown Reverse Lamps White/Green
Battery Feed Red/Green
Ground White
Electric Trailer Brake Blue
If equipped with the heavy-duty trailering
option, see “Heavy-Duty Trailer Wiring
Harness Package” earlier in this section.
When the camper-wiring harness is ordered
without the heavy-duty trailering package, a
seven-wire harness with a seven-pin
connector is at the rear of the vehicle and is
tied to the vehicle's frame.
Trailer Lamps
Always check that all trailer lamps are
working at the beginning of each trip, and
periodically on longer trips.
If equipped, the Trailering App will monitor
the RH turn/brake lamp circuit, LH turn/
brake lamp circuit, running lamp circuit, and
reverse lamp circuits on the trailer. DIC
messages and Trailering App alerts may be
displayed if lighting circuit issues are
detected on the trailer. Pressing START LIGHT TEST in the Trailering
App automatically activates the trailer
lamps. The Trailering App is not a substitute
for manually inspecting your trailer lamps.
See
Trailering App 0292.
Turn Signals When Towing a Trailer
When properly connected, the trailer turn
signals will illuminate to indicate the vehicle
is turning, changing lanes, or stopping.
When towing a trailer, the arrows on the
instrument cluster will illuminate even if the
trailer is not properly connected or the bulbs
are burned out.
Tow/Haul Mode
For instructions on how to enter Tow/Haul
Mode, see Driver Mode Control 0249.
Tow/Haul assists when pulling a heavy
trailer or a large or heavy load. See Tow/
Haul Mode 0240.
Tow/Haul Mode is designed to be most
effective when the vehicle and trailer
combined weight is at least 75% of the
vehicle's Gross Combined Weight Rating
(GCWR). See “Trailer Weight” underTrailer
Towing 0278.
Page 298 of 441
Chevrolet Silverado 2500 HD/3500 HD Owner Manual (GMNA-Localizing-U.
S./Canada/Mexico-15546003) - 2022 - CRC - 5/5/21
Driving and Operating 297
trailer is connected. When a trailer is
connected and the ignition is off, the
Trailering App System will periodically pulse
the lighting circuits of the trailer to verify it
is still connected. The trailer lights may
periodically flash as a result of this trailer
connection detection. These flashes may be
more visible in dark ambient light
environments. The flashing or flickering
lights are a normal condition and the
Trailering App System has built-in
protections to prevent the battery from
draining. When Theft Alert is also enabled
the frequency and pattern of this flashing
will change.
Connection Problem
If any of the trailer connections are lost, a
message about the connection issue will
appear on the Driver Information Center
(DIC). The infotainment display will also
show the connection issue in the Connection
Status view.
If a trailer connection is not detected, the
Trailering App will not display the
Connection Status screen.Connection Trailer Lighting Faults Detected
The Trailering App System monitors for
electrical faults on the trailer lights.
A message about the lighting issue will
appear on the DIC. The infotainment display
will also show the lighting issue in the
Connection Status view. Repair your trailer
lights if needed. A trailer lighting issue is
not covered by your GM warranty.
Diagnose View
Touch Diagnose to see more information
about the connection problem.
This view will display the names of the
trailer connector pins, a graphic of the trailer
connector, and a graphic of the back of the
trailer.
Any connector pin that failed will be amber
color, and the location of the corresponding
connection will be highlighted on the
graphic of the back of the trailer.
The Running Lights connection may not
detect partial outages. Activate the light test
to check all trailer lamps. See
“Light Test”
following. Light Test
Touch Start Light Test to cycle the trailer
lights on and off to determine if they are
working. The test follows this sequence:
1. The running lights turn on first and remain on throughout the sequence.
2. The brake lights turn on for about two seconds.
3. The left turn signal light flashes three times.
4. The right turn signal light flashes three times.
5. The reverse lights turn on for about two seconds.
6. Steps 2–5 repeat for approximately one minute and 45 seconds, or until the
test deactivates.
Touch Stop to stop the test. The test will
automatically end after one minute and
45 seconds.
The sequence also deactivates when any of
the following occur:
.The ignition is turned off.
.The transmission is shifted out of P (Park).
.The brake pedal is pressed.
.The turn signal is activated.
Page 304 of 441
Chevrolet Silverado 2500 HD/3500 HD Owner Manual (GMNA-Localizing-U.
S./Canada/Mexico-15546003) - 2022 - CRC - 5/5/21
Driving and Operating 303
If Tow/Haul Mode is off and this setting is
on for a Trailer Profile, each time the
ignition is turned on a reminder will appear
to turn on Tow/Haul Mode when the Trailer
Profile is active.
If Tow/Haul Mode is on and this setting is
on for a Trailer Profile, the reminder will not
appear when the Trailer Profile is active.
Trailer Length Indicator
Touch Trailer Length Indicator to view the
Trailer Length Indicator settings page. If this
setting is ON a guideline is displayed in the
side mirror camera view to indicate the rear
of the attached trailer. If this setting is OFF
the guideline will not be displayed.
This setting will default to OFF if the trailer
length indicator feature is not set up. See
"Towing Assistance" for details on the setup.
Conversions and Add-Ons
Add-On Electrical Equipment
{Warning
The Data Link Connector (DLC) is used for
vehicle service and Emission Inspection/
Maintenance testing. SeeMalfunction
Indicator Lamp (Check Engine Light) 0116.
A device connected to the DLC —such as
an aftermarket fleet or driver-behavior
tracking device —may interfere with
vehicle systems. This could affect vehicle
operation and cause a crash. Such devices
may also access information stored in the
vehicle’s systems.
Caution
Some electrical equipment can damage
the vehicle or cause components to not
work and would not be covered by the
vehicle warranty. Always check with your
dealer before adding electrical equipment.
Add-on equipment can drain the vehicle's
12-volt battery, even if the vehicle is not
operating. The vehicle has an airbag system. Before
attempting to add anything electrical to the
vehicle, see
Servicing the Airbag-Equipped
Vehicle 071 and
Adding Equipment to the Airbag-Equipped
Vehicle 071.
For information on wiring auxiliary switches,
see www.gmupfitter.com or contact your
dealer.
Adding a Snow Plow or Similar
Equipment
Caution
Do not exceed 72 km/h (45 mph) with a
snow plow mounted to the vehicle. The
vehicle could overheat and be damaged.
Before installing a snow plow on the vehicle,
follow these guidelines:
Caution
If the vehicle does not have the snow
plow prep package, RPO VYU, adding a
plow can damage the vehicle, and the
repairs would not be covered by the
vehicle warranty. Unless the vehicle was
built to carry a snow plow, do not add
(Continued)