2023 CHEVROLET SILVERADO 2500 instrument panel
[x] Cancel search: instrument panelPage 220 of 441
Chevrolet Silverado 2500 HD/3500 HD Owner Manual (GMNA-Localizing-U.
S./Canada/Mexico-15546003) - 2022 - CRC - 5/5/21
Driving and Operating 219
.Allow greater following distance and
watch for slippery spots. Icy patches can
occur on otherwise clear roads in shaded
areas. The surface of a curve or an
overpass can remain icy when the
surrounding roads are clear. Avoid sudden
steering maneuvers and braking while
on ice.
.Turn off cruise control.
Blizzard Conditions
Stop the vehicle in a safe place and signal
for help. Stay with the vehicle unless there
is help nearby. If possible, use Roadside
Assistance. SeeRoadside Assistance Program
0 412. To get help and keep everyone in the
vehicle safe:
.Turn on the hazard warning flashers.
.Tie a red cloth to an outside mirror.
{Warning
Snow can trap engine exhaust under the
vehicle. This may cause exhaust gases to
get inside. Engine exhaust contains
carbon monoxide (CO), which cannot be
seen or smelled. It can cause
unconsciousness and even death.
(Continued)
Warning (Continued)
If the vehicle is stuck in snow:
.Clear snow from the base of the
vehicle, especially any blocking the
exhaust pipe.
.Open a window about 5 cm (2 in) on
the vehicle side that is away from the
wind, to bring in fresh air.
.Fully open the air outlets on or under
the instrument panel.
.Adjust the climate control system to
circulate the air inside the vehicle and
set the fan speed to the highest
setting. See“Climate Control Systems.”
For more information about CO, see
Engine Exhaust 0235.
To save fuel, run the engine for short
periods to warm the vehicle and then shut
the engine off and partially close the
window. Moving about to keep warm also
helps.
If it takes time for help to arrive, when
running the engine, push the accelerator
pedal slightly so the engine runs faster than
the idle speed. This keeps the battery charged to restart the vehicle and to signal
for help with the headlamps. Do this as
little as possible, to save fuel.
If the Vehicle Is Stuck
Slowly and cautiously spin the wheels to
free the vehicle when stuck in sand, mud,
ice, or snow. See
“Rocking the Vehicle to Get
It Out” later in this section.
The Traction Control/Electronic Stability
Control can often help to free a stuck
vehicle. See Traction Control/Electronic
Stability Control 0247. If TC/ESC cannot free
the vehicle, see “Rocking the Vehicle to Get
it Out” following.
{Warning
If the vehicle's tires spin at high speed,
they can explode, and you or others
could be injured. The vehicle can
overheat, causing an engine compartment
fire or other damage. Spin the wheels as
little as possible and avoid going above
56 km/h (35 mph).
For information about using tire chains on
the vehicle, see Tire Chains0362.
Page 276 of 441

Chevrolet Silverado 2500 HD/3500 HD Owner Manual (GMNA-Localizing-U.
S./Canada/Mexico-15546003) - 2022 - CRC - 5/5/21
Driving and Operating 275
{Warning
To prevent serious injury or death from
carbon monoxide (CO), when towing a
trailer:
.Do not drive with the liftgate, trunk/
hatch, or rear-most window open.
.Fully open the air outlets on or under
the instrument panel.
.Adjust the climate control system to a
setting that brings in only outside air.
See“Climate Control Systems” in the
Index.
For more information about carbon
monoxide, see Engine Exhaust 0235.
Towing a trailer requires experience. The
combination of the vehicle and trailer is
longer and not as responsive as the vehicle
itself. Get used to the handling and braking
of the combination by driving on a level
road surface before driving on public roads.
The trailer structure, the tires, and the
brakes must all be rated to carry the
intended cargo. Inadequate trailer
equipment can cause the combination to
operate in an unexpected or unsafe manner.
Before driving, inspect all trailer hitch parts and attachments, safety chains, electrical
connectors, lamps, tires, and mirrors. See
Towing Equipment
0281. If the trailer has
electric brakes, start the combination
moving and then manually apply the trailer
brake controller to check that the trailer
brakes work. During the trip, occasionally
check that the cargo and trailer are secure
and that the lamps and any trailer brakes
are working.Towing with a Stability Control System
When towing, the stability control system
might be heard. The system reacts to
vehicle movement caused by the trailer,
which mainly occurs during cornering. This is
normal when towing heavier trailers.
Following Distance
Stay at least twice as far behind the vehicle
ahead as you would when driving without a
trailer. This can help to avoid heavy braking
and sudden turns.
Passing
More passing distance is needed when
towing a trailer. The combination of the
vehicle and trailer will not accelerate as
quickly and is much longer than the vehicle
alone. It is necessary to go much farther beyond the passed vehicle before returning
to the lane. Pass on level roadways. Avoid
passing on hills if possible.
Backing Up
Hold the bottom of the steering wheel with
one hand. To move the trailer to the left,
move that hand to the left. To move the
trailer to the right, move that hand to the
right. Always back up slowly and, if possible,
have someone guide you.
Making Turns
Caution
Turn more slowly and make wider arcs
when towing a trailer to prevent damage
to your vehicle. Making very sharp turns
could cause the trailer to contact the
vehicle.
Make wider turns than normal when towing,
so the trailer will not go over soft shoulders,
over curbs, or strike road signs, trees,
or other objects. Always signal turns well in
advance. Do not steer or brake suddenly.
Page 290 of 441
Chevrolet Silverado 2500 HD/3500 HD Owner Manual (GMNA-Localizing-U.
S./Canada/Mexico-15546003) - 2022 - CRC - 5/5/21
Driving and Operating 289
The trailer symbol on the control panel will
light amber when a trailer with electric
brakes is connected.
The ITBC control panel is on the center
stack. SeeInstrument Panel Overview 04.
The control panel allows adjustment to the
amount of output, referred to as Trailer
Gain, available to the trailer brakes and
allows manual application of the trailer
brakes. Use the ITBC control panel and the
DIC trailer brake display page to adjust and
display power output to the trailer brakes.
Trailer Brake DIC Display Page
The ITBC display page indicates:
.Trailer Gain setting
.Output to the trailer brakes
.Trailer connection
.System operational status
To display:
.Scroll through the DIC menu pages
.Press a Trailer Gain (+) or (−) button
.Activate the Manual Trailer Brake Apply
Lever
TRAILER GAIN: Press a Trailer Gain button to
recall the current Trailer Gain setting. Each
press and release of the gain buttons will
then change the Trailer Gain setting. Press the Trailer Gain (+) or (-) to adjust. Press and
hold to continuously adjust the Trailer Gain.
To turn the output to the trailer off, adjust
the Trailer Gain setting to 0.0. This setting
can be adjusted from 0.0 to 10.0 with a
trailer connected or disconnected.
TRAILER OUTPUT: This displays anytime a
trailer with electric brakes is connected.
Output to the trailer brakes is based on the
amount of vehicle braking present and
relative to the Trailer Gain setting. Output is
displayed from 0 to 100% for each gain
setting.
The Trailer Output will indicate
“- - - - - -”on
the Trailer Brake Display Page whenever the
following occur:
.No trailer is connected.
.A trailer without electric brakes is
connected. No DIC message displays.
.A trailer with electric brakes has become
disconnected. A CHECK TRAILER WIRING
message displays on the DIC.
.There is a fault present in the wiring to
the trailer brakes. A CHECK TRAILER
WIRING message displays on the DIC.
.The ITBC system is not working due to a
fault. A SERVICE TRAILER BRAKE SYSTEM
message displays in the DIC.
Manual Trailer Brake Apply Lever
Slide this lever right to apply the trailer’s
electric brakes independent of the vehicle’s
brakes. Use this lever to adjust the Trailer
Gain to achieve proper power output to the
trailer brakes. Under certain circumstances,
this lever can also be used to apply
additional trailer braking. The trailer and
vehicle brake lamps will come on when
either the vehicle brakes or trailer brakes are
applied and properly connected.
Trailer Gain Adjustment Procedure
Trailer Gain should be set for a specific
trailering condition and it must be
readjusted anytime vehicle loading, trailer
loading, or road surface conditions change.
{Warning
Trailer brakes that are over-gained or
under-gained may not stop the vehicle
and the trailer as intended and can result
in a crash. Always follow the instructions
to set the Trailer Gain for the proper
trailer stopping performance.
Page 307 of 441
Chevrolet Silverado 2500 HD/3500 HD Owner Manual (GMNA-Localizing-U.
S./Canada/Mexico-15546003) - 2022 - CRC - 5/5/21
306 Vehicle Care
Vehicle Care
General Information
General Information . . . . . . . . . . . . . . . . . . . 307
California Perchlorate MaterialsRequirements . . . . . . . . . . . . . . . . . . . . . . . . 307
Accessories and Modifications . . . . . . . . . 307
Vehicle Checks
Doing Your Own Service Work . . . . . . . . 308
Hood . . . . . . . . . . . . . . . . . . . . . . . . . . . . . . . . . . 308
Engine Compartment Overview . . . . . . . . 310
Engine Oil . . . . . . . . . . . . . . . . . . . . . . . . . . . . . . 311
Engine Oil Life System . . . . . . . . . . . . . . . . . 313
Automatic Transmission Fluid . . . . . . . . . . 314
Engine Air Filter Life System . . . . . . . . . . . 314
Engine Air Cleaner/Filter . . . . . . . . . . . . . . . 315
Cooling System . . . . . . . . . . . . . . . . . . . . . . . . 316
Engine Overheating . . . . . . . . . . . . . . . . . . . . 318
Overheated Engine Protection Operating Mode . . . . . . . . . . . . . . . . . . . . . 320
Engine Fan . . . . . . . . . . . . . . . . . . . . . . . . . . . . 320
Power Steering Fluid . . . . . . . . . . . . . . . . . . 320
Washer Fluid . . . . . . . . . . . . . . . . . . . . . . . . . . 321
Brakes . . . . . . . . . . . . . . . . . . . . . . . . . . . . . . . . . 322
Brake Pad Life System . . . . . . . . . . . . . . . . . 322
Brake Fluid . . . . . . . . . . . . . . . . . . . . . . . . . . . . 323
Battery - North America . . . . . . . . . . . . . . . 324
Four-Wheel Drive . . . . . . . . . . . . . . . . . . . . . . 326
Front Axle . . . . . . . . . . . . . . . . . . . . . . . . . . . . . 326 Rear Axle . . . . . . . . . . . . . . . . . . . . . . . . . . . . . . 326
Noise Control System . . . . . . . . . . . . . . . . . 326
Starter Switch Check . . . . . . . . . . . . . . . . . . . 327
Automatic Transmission Shift Lock
Control Function Check . . . . . . . . . . . . . . 328
Ignition Transmission Lock Check . . . . . . 328
Park Brake and P (Park) Mechanism Check . . . . . . . . . . . . . . . . . . . . . . . . . . . . . . . . 328
Wiper Blade Replacement . . . . . . . . . . . . . 328
Glass Replacement . . . . . . . . . . . . . . . . . . . . 329
Windshield Replacement . . . . . . . . . . . . . . 329
Gas Strut(s) . . . . . . . . . . . . . . . . . . . . . . . . . . . 329
Headlamp Aiming
Front Headlamp Aiming . . . . . . . . . . . . . . . 330
Bulb Replacement
Bulb Replacement . . . . . . . . . . . . . . . . . . . . . 330
Halogen Bulbs . . . . . . . . . . . . . . . . . . . . . . . . . 331
LED Lighting . . . . . . . . . . . . . . . . . . . . . . . . . . . 331
Headlamps, Front Turn Signal, Sidemarker, and Parking Lamps . . . . . . 331
Taillamps, Turn Signal, Stoplamps, and Back-Up Lamps . . . . . . . . . . . . . . . . . . . . . . . 332
Center High-Mounted Stoplamp (CHMSL) and Cargo Lamp . . . . . . . . . . . . 333
License Plate Lamp . . . . . . . . . . . . . . . . . . . . 334
Electrical System
Electrical System Overload . . . . . . . . . . . . 334
Fuses and Circuit Breakers . . . . . . . . . . . . . 336 Engine Compartment Fuse Block . . . . . . 336
Instrument Panel Fuse Block (Left) . . . . 339
Instrument Panel Fuse Block (Right) . . . 341
Wheels and Tires
Tires . . . . . . . . . . . . . . . . . . . . . . . . . . . . . . . . . . 344
All-Season Tires . . . . . . . . . . . . . . . . . . . . . . . 344
Winter Tires . . . . . . . . . . . . . . . . . . . . . . . . . . . 345
All-Terrain Tires . . . . . . . . . . . . . . . . . . . . . . . . 345
Tire Sidewall Labeling . . . . . . . . . . . . . . . . . 345
Tire Designations . . . . . . . . . . . . . . . . . . . . . . 346
Tire Terminology and Definitions . . . . . . 347
Tire Pressure . . . . . . . . . . . . . . . . . . . . . . . . . . 349
Tire Pressure Monitor System . . . . . . . . . 350
Tire Pressure Monitor Operation . . . . . . . 351
Tire Inspection . . . . . . . . . . . . . . . . . . . . . . . . . 355
Tire Rotation . . . . . . . . . . . . . . . . . . . . . . . . . . 356
When It Is Time for New Tires . . . . . . . . 358
Buying New Tires . . . . . . . . . . . . . . . . . . . . . 359
Different Size Tires and Wheels . . . . . . . 360
Uniform Tire Quality Grading . . . . . . . . . 360
Wheel Alignment and Tire Balance . . . . 361
Wheel Replacement . . . . . . . . . . . . . . . . . . . 361
Tire Chains . . . . . . . . . . . . . . . . . . . . . . . . . . . . 362
If a Tire Goes Flat . . . . . . . . . . . . . . . . . . . . . 363
Tire Changing . . . . . . . . . . . . . . . . . . . . . . . . . 364
Full-Size Spare Tire . . . . . . . . . . . . . . . . . . . . 374
Jump Starting
Jump Starting - North America . . . . . . . . 374
Page 310 of 441
Chevrolet Silverado 2500 HD/3500 HD Owner Manual (GMNA-Localizing-U.
S./Canada/Mexico-15546003) - 2022 - CRC - 5/5/21
Vehicle Care 309
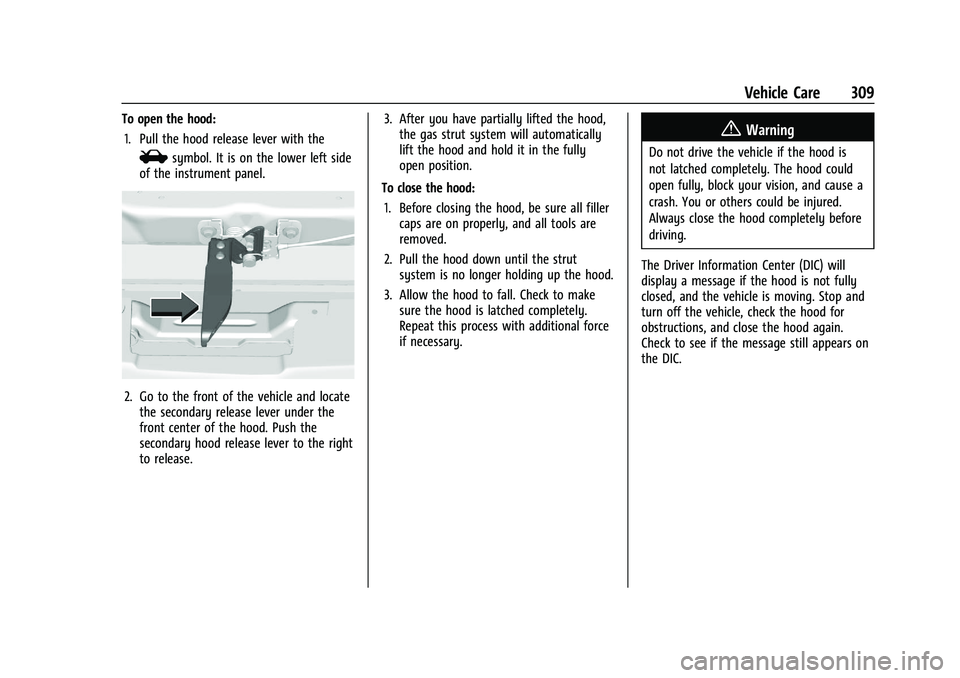
To open the hood:1. Pull the hood release lever with the
isymbol. It is on the lower left side
of the instrument panel.
2. Go to the front of the vehicle and locate the secondary release lever under the
front center of the hood. Push the
secondary hood release lever to the right
to release. 3. After you have partially lifted the hood,
the gas strut system will automatically
lift the hood and hold it in the fully
open position.
To close the hood: 1. Before closing the hood, be sure all filler caps are on properly, and all tools are
removed.
2. Pull the hood down until the strut system is no longer holding up the hood.
3. Allow the hood to fall. Check to make sure the hood is latched completely.
Repeat this process with additional force
if necessary.
{Warning
Do not drive the vehicle if the hood is
not latched completely. The hood could
open fully, block your vision, and cause a
crash. You or others could be injured.
Always close the hood completely before
driving.
The Driver Information Center (DIC) will
display a message if the hood is not fully
closed, and the vehicle is moving. Stop and
turn off the vehicle, check the hood for
obstructions, and close the hood again.
Check to see if the message still appears on
the DIC.
Page 336 of 441
Chevrolet Silverado 2500 HD/3500 HD Owner Manual (GMNA-Localizing-U.
S./Canada/Mexico-15546003) - 2022 - CRC - 5/5/21
Vehicle Care 335
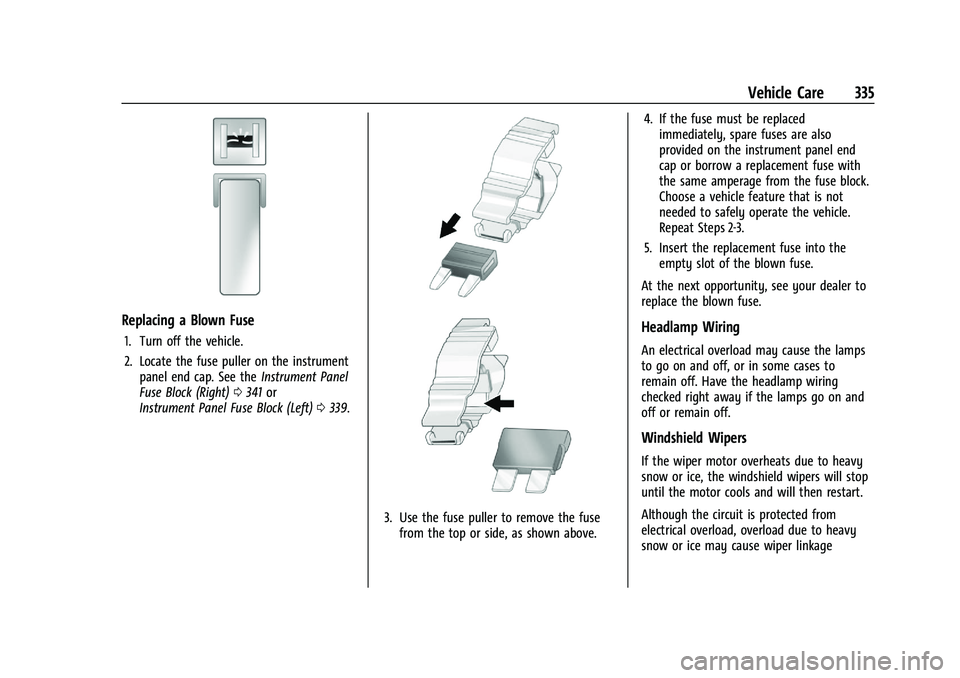
Replacing a Blown Fuse
1. Turn off the vehicle.
2. Locate the fuse puller on the instrumentpanel end cap. See the Instrument Panel
Fuse Block (Right) 0341 or
Instrument Panel Fuse Block (Left) 0339.
3. Use the fuse puller to remove the fuse
from the top or side, as shown above. 4. If the fuse must be replaced
immediately, spare fuses are also
provided on the instrument panel end
cap or borrow a replacement fuse with
the same amperage from the fuse block.
Choose a vehicle feature that is not
needed to safely operate the vehicle.
Repeat Steps 2-3.
5. Insert the replacement fuse into the empty slot of the blown fuse.
At the next opportunity, see your dealer to
replace the blown fuse.
Headlamp Wiring
An electrical overload may cause the lamps
to go on and off, or in some cases to
remain off. Have the headlamp wiring
checked right away if the lamps go on and
off or remain off.
Windshield Wipers
If the wiper motor overheats due to heavy
snow or ice, the windshield wipers will stop
until the motor cools and will then restart.
Although the circuit is protected from
electrical overload, overload due to heavy
snow or ice may cause wiper linkage
Page 337 of 441

Chevrolet Silverado 2500 HD/3500 HD Owner Manual (GMNA-Localizing-U.
S./Canada/Mexico-15546003) - 2022 - CRC - 5/5/21
336 Vehicle Care
damage. Always clear ice and heavy snow
from the windshield before using the
windshield wipers.
If the overload is caused by an electrical
problem and not snow or ice, be sure to get
it fixed.
Fuses and Circuit Breakers
The wiring circuits in the vehicle are
protected from short circuits by a
combination of fuses and circuit breakers.
This greatly reduces the chance of damage
caused by electrical problems.
{Danger
Fuses and circuit breakers are marked
with their ampere rating. Do not exceed
the specified amperage rating when
replacing fuses and circuit breakers. Use
of an oversized fuse or circuit breaker can
result in a vehicle fire. You and others
could be seriously injured or killed.
{Warning
Installation or use of fuses that do not
meet GM’s original fuse specifications is
dangerous. The fuses could fail, and result
in a fire. You or others could be injured
or killed, and the vehicle could be
damaged.
See Accessories and Modifications 0307 and
General Information 0307.
To check or replace a blown fuse, see
Electrical System Overload 0334.
Engine Compartment Fuse Block
If the vehicle has a diesel engine, see the
Duramax diesel supplement.
The engine compartment fuse block is in the
engine compartment on the driver side of
vehicle.
Lift the cover to access the fuse block.
Caution
Spilling liquid on any electrical
component on the vehicle may damage
it. Always keep the covers on any
electrical component.
A fuse puller is available in the left
instrument panel end cap.
The vehicle may not be equipped with all of
the fuses, relays, and features shown.
Page 340 of 441

Chevrolet Silverado 2500 HD/3500 HD Owner Manual (GMNA-Localizing-U.
S./Canada/Mexico-15546003) - 2022 - CRC - 5/5/21
Vehicle Care 339
FusesUsage
82 Trailer Interface Module 2
83 FTZM
84 Trailer brake 85 ENG
86 Engine control module 87 Injector B even
88 O2 B sensor
89 O2 A sensor
90 Injector A odd 91 Engine control module throttle control
92 Cool fan clutch/ Aeroshutter Relays
Usage
5 Headlamp
18 DC/AC inverter
23 Rear window defogger
35 Parking lamp
36 Run/Crank
43 –
59 A/C clutch
64 Starter Motor (LD & HD DSL)
70 Starter Pinion (LD) / Starter Motor (HD Gas)
77 PowertrainInstrument Panel Fuse Block (Left)
The left instrument panel fuse block access
door is on the driver side edge of the
instrument panel.
The vehicle may not be equipped with all of
the fuses, relays, and features shown.
Pull off the cover to access the fuse block.
A fuse puller is available on the left
instrument panel end cap.