2023 CHEVROLET SILVERADO 2500 remote control
[x] Cancel search: remote controlPage 4 of 441
Chevrolet Silverado 2500 HD/3500 HD Owner Manual (GMNA-Localizing-U.
S./Canada/Mexico-15546003) - 2022 - CRC - 5/12/21
Introduction 3
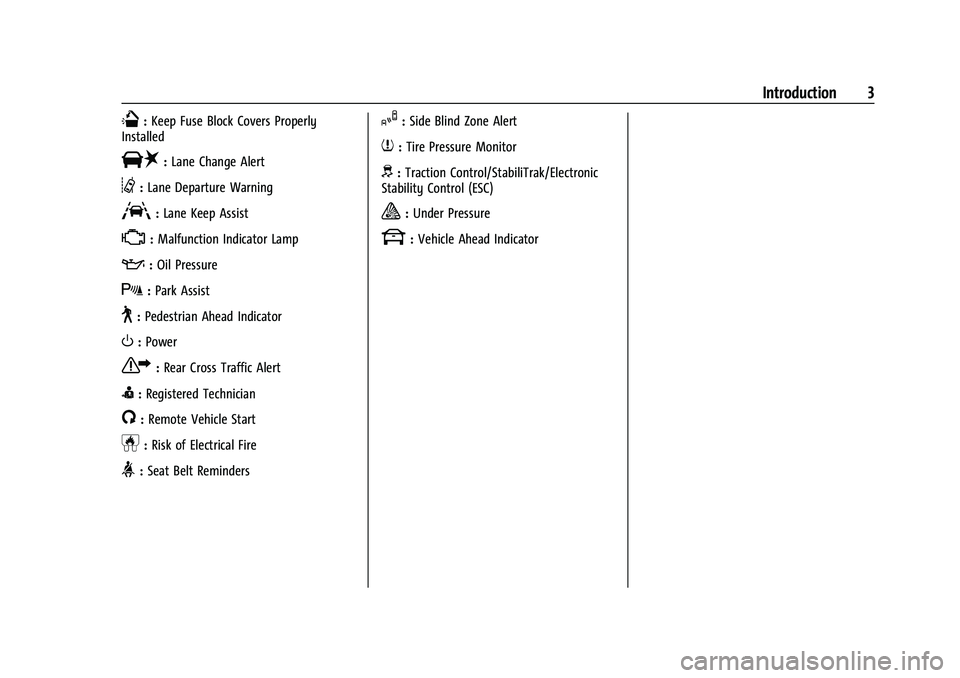
Q:Keep Fuse Block Covers Properly
Installed
|: Lane Change Alert
@:Lane Departure Warning
A:Lane Keep Assist
*: Malfunction Indicator Lamp
::Oil Pressure
X:Park Assist
~:Pedestrian Ahead Indicator
O:Power
7:Rear Cross Traffic Alert
I:Registered Technician
/:Remote Vehicle Start
h:Risk of Electrical Fire
>:Seat Belt Reminders
I:Side Blind Zone Alert
7:Tire Pressure Monitor
d:Traction Control/StabiliTrak/Electronic
Stability Control (ESC)
a: Under Pressure
k: Vehicle Ahead Indicator
Page 8 of 441

Chevrolet Silverado 2500 HD/3500 HD Owner Manual (GMNA-Localizing-U.
S./Canada/Mexico-15546003) - 2022 - CRC - 5/12/21
Keys, Doors, and Windows 7
Keys, Doors, and
Windows
Keys and Locks
Keys (Key Access) . . . . . . . . . . . . . . . . . . . . . . . . 7
Keys (Keyless Access) . . . . . . . . . . . . . . . . . . . . 9
Remote Keyless Entry (RKE) System . . . . 10
Remote Keyless Entry (RKE) SystemOperation (Key Access) . . . . . . . . . . . . . . . 10
Remote Keyless Entry (RKE) System Operation (Keyless Access) . . . . . . . . . . . . 13
Remote Vehicle Start . . . . . . . . . . . . . . . . . . . 20
Door Locks . . . . . . . . . . . . . . . . . . . . . . . . . . . . . . 21
Power Door Locks . . . . . . . . . . . . . . . . . . . . . . . 22
Delayed Locking . . . . . . . . . . . . . . . . . . . . . . . . 22
Automatic Door Locks . . . . . . . . . . . . . . . . . . 22
Lockout Protection . . . . . . . . . . . . . . . . . . . . . . 22
Safety Locks . . . . . . . . . . . . . . . . . . . . . . . . . . . . 23
Doors
Tailgate . . . . . . . . . . . . . . . . . . . . . . . . . . . . . . . . . 23
Transporting Items That Can Catch Fire . . . . . . . . . . . . . . . . . . . . . . . . . . . . 30
Power Assist Steps . . . . . . . . . . . . . . . . . . . . . . 31
Vehicle Security
Vehicle Security . . . . . . . . . . . . . . . . . . . . . . . . . 31
Vehicle Alarm System . . . . . . . . . . . . . . . . . . . 31
Steering Column Lock . . . . . . . . . . . . . . . . . . . 32 Immobilizer . . . . . . . . . . . . . . . . . . . . . . . . . . . . . 33
Immobilizer Operation . . . . . . . . . . . . . . . . . . 33
Exterior Mirrors
Convex Mirrors . . . . . . . . . . . . . . . . . . . . . . . . . 34
Manual Mirrors . . . . . . . . . . . . . . . . . . . . . . . . . 34
Trailer-Tow Mirrors . . . . . . . . . . . . . . . . . . . . . 34
Power Mirrors . . . . . . . . . . . . . . . . . . . . . . . . . . 36
Folding Mirrors . . . . . . . . . . . . . . . . . . . . . . . . . 36
Heated Mirrors . . . . . . . . . . . . . . . . . . . . . . . . . 37
Automatic Dimming Mirror . . . . . . . . . . . . . 37
Blind Spot Mirrors . . . . . . . . . . . . . . . . . . . . . . 37
Reverse Tilt Mirrors . . . . . . . . . . . . . . . . . . . . . 38
Interior Mirrors
Interior Rearview Mirrors . . . . . . . . . . . . . . . 38
Manual Rearview Mirror . . . . . . . . . . . . . . . . 38
Automatic Dimming Rearview Mirror . . . 38
Rear Camera Mirror . . . . . . . . . . . . . . . . . . . . 38
Truck Bed Camera Rearview Mirror . . . . . 41
Windows
Windows . . . . . . . . . . . . . . . . . . . . . . . . . . . . . . . 41
Manual Windows . . . . . . . . . . . . . . . . . . . . . . . 42
Power Windows . . . . . . . . . . . . . . . . . . . . . . . . 42
Rear Windows . . . . . . . . . . . . . . . . . . . . . . . . . . 44
Sun Visors . . . . . . . . . . . . . . . . . . . . . . . . . . . . . . 44
Roof
Sunroof . . . . . . . . . . . . . . . . . . . . . . . . . . . . . . . . 44
Keys and Locks
Keys (Key Access)
{Warning
Leaving children in a vehicle with the
ignition key is dangerous and children or
others could be seriously injured or killed.
They could operate the power windows
or other controls or make the vehicle
move. The windows will function with
the keys in the ignition, and children or
others could be caught in the path of a
closing window. Do not leave children in
a vehicle with the ignition key.
Page 10 of 441
Chevrolet Silverado 2500 HD/3500 HD Owner Manual (GMNA-Localizing-U.
S./Canada/Mexico-15546003) - 2022 - CRC - 5/12/21
Keys, Doors, and Windows 9
Programming with Two Recognized Keys
To program a new key:1. Insert the original, already programmed key in the ignition and turn the
ignition on.
2. Turn the ignition off, and remove the key.
3. Quickly, within five seconds, insert the second original already programmed key
in the ignition and turn the ignition on.
4. Turn the ignition off, and remove the key.
5. Insert the key to be programmed and turn the ignition on within five seconds.
6. After a few seconds, the security light will turn off once the key has been
programmed.
7. Repeat Steps 1–5 if additional keys are to be programmed.
If a key is lost or damaged, see your dealer
to have a new key made.
Programming without Recognized Keys
Program a new key to the vehicle when a
recognized key is not available. Canadian
regulations require that owners see their
dealer. If two currently recognized keys are not
available, follow this procedure to program
the first key.
This procedure will take approximately
30 minutes to complete for the first key.
The vehicle must be off and all of the keys
you wish to program must be with you.
1. Insert the new vehicle key into the ignition.
2. Turn the ignition on. The security light will come on.
3. Wait 10 minutes until the security light turns off.
4. Turn the ignition off.
5. Repeat Steps 2–4 two more times. After the third time, turn the ignition on; the
key is learned and all previously known
keys will no longer work with the
vehicle.
6. To learn a second key, turn the ignition off, insert the second key to be learned,
and turn the ignition on.
After two keys are learned, the remaining
keys can be learned by following the
procedure in “Programming with Two
Recognized Keys.” The key has a bar-coded key tag that the
dealer or qualified locksmith can use to
make new keys. Store this information in a
safe place, not in the vehicle.
See your dealer if a replacement key or
additional key is needed.
If it becomes difficult to turn a key, inspect
the key blade for debris. Periodically clean
with a brush or pick.
If locked out of the vehicle, see
Roadside
Assistance Program 0412.
With an active OnStar or connected service
plan, an OnStar Advisor may remotely
unlock the vehicle. See OnStar Overview
0 420.
Keys (Keyless Access)
{Warning
Leaving children in a vehicle with an
ignition key or Remote Keyless Entry
(RKE) transmitter is dangerous and
children or others could be seriously
injured or killed. They could operate the
power window or other controls or make
the vehicle move. The windows will
function with the key in the ignition or
(Continued)
Page 21 of 441
Chevrolet Silverado 2500 HD/3500 HD Owner Manual (GMNA-Localizing-U.
S./Canada/Mexico-15546003) - 2022 - CRC - 5/12/21
20 Keys, Doors, and Windows
4. Remove the battery.
5. Insert the new battery, positive sidetoward the back cover. Replace with a
CR2032 or equivalent battery.
6. Ensure that the silicone mat is correctly positioned with no gaps or wrinkles.
7. Set transmitter button side down on a hard surface and press the other half
straight down to force the halves
together.
8. Insert the key back into the RKE transmitter.
Remote Vehicle Start
If equipped with the remote start feature,
the climate control system will come on
when the vehicle is started remotely,
depending on the outside temperature.
The rear defog and heated and ventilated
seats, if equipped, may also come on. See
Heated and Ventilated Front Seats 053 and
Vehicle Personalization 0131.
If equipped, the automatic heated steering
wheel may also come on. See Heated
Steering Wheel 0101. Laws in some communities may restrict the
use of remote starters. Check local
regulations for any requirements on remote
starting of vehicles.
Do not use remote start if the vehicle is low
on fuel. The vehicle may run out of fuel.
The vehicle cannot be remote started if:
.The RKE transmitter is inside the vehicle
or if the key is in the ignition.
.The hood is not closed.
.There is an emission control system
malfunction and the lamp is on.
.The ignition is in any mode other
than off.
.The hazard warning flashers are on.
.Two remote starts or a remote start with
an extension have been used.
.The vehicle is not in P (Park).
The engine will turn off during a remote
vehicle start if:
.The coolant temperature gets too high.
.The oil pressure gets low.
The RKE transmitter range may be reduced
while the vehicle is running. Other conditions can affect the performance
of the transmitter. See
Remote Keyless Entry
(RKE) System 010.
Starting the Engine Using Remote Start
1. Press and release
Q.
2. Immediately press and hold
/until the
turn signal lamps flash or for at least
four seconds.
When the vehicle starts, the parking
lamps will turn on. The doors will be
locked and the climate control system
may come on.
The engine will continue to run for
15 minutes. After 30 seconds, repeat
Steps 1 and 2 for a 15-minute time
extension.
Turn the ignition on to operate the vehicle.
Extending Engine Run Time
The engine run time can be extended by
15 minutes, for a total of 30 minutes,
if during the first 15 minutes Steps 1 and 2
are repeated while the engine is still
running. An extension can be requested
30 seconds after starting.
A maximum of two remote starts, or a
single start with an extension, is allowed
between ignition cycles.
Page 34 of 441
Chevrolet Silverado 2500 HD/3500 HD Owner Manual (GMNA-Localizing-U.
S./Canada/Mexico-15546003) - 2022 - CRC - 5/12/21
Keys, Doors, and Windows 33
pedal is pressed and the vehicle is started.
No message will display during a remote
start.
.A message that the steering wheel must
be turned and the vehicle must be started
again indicates that the column lock
mechanism is bound, the column locking
device was unable to unlock the steering
column, and the vehicle did not start.
If this happens, immediately turn the
steering wheel from side to side to
unbind the column lock. If this does not
unlock the steering column, turn the
vehicle off and open the driver door to
reset the system. Then turn the vehicle
on and immediately turn the steering
wheel side to side for about 15 seconds.
In some cases, it may take significant
force to unbind the column.
To keep the steering column from binding,
straighten the front wheels before turning
off the vehicle.
Immobilizer
See Radio Frequency Statement 0417.
Immobilizer Operation
This vehicle has a passive theft-deterrent
system.
The system does not have to be manually
armed or disarmed.
The vehicle is automatically immobilized
when the vehicle is turned off.
The system is automatically disarmed when
the ignition is turned from off to on.
The security light, in the instrument cluster,
comes on if there is a problem with arming
or disarming the theft-deterrent system.
The system has one or more RKE
transmitters matched to an immobilizer
control unit in your vehicle. Only a correctly
matched RKE transmitter will start the
vehicle. If the transmitter is ever damaged,
you may not be able to start your vehicle. When trying to start the vehicle, the
security light may come on briefly when the
ignition is turned on. If the engine does not
start and the security light stays on, there is
a problem with the system. Turn the
ignition off and try again.
If the vehicle will not change ignition modes
(ACC/ACCESSORY, on, off), and the RKE
transmitter appears to be undamaged, try
another transmitter. Or, you may try placing
the transmitter in the transmitter pocket
located in the center console. See
Remote
Keyless Entry (RKE) System Operation (Key
Access) 010 or
Remote Keyless Entry (RKE) System
Operation (Keyless Access) 013.
If the ignition mode will not change with
the other transmitter or with the
transmitter in the transmitter pocket, your
vehicle needs service. If the ignition does
change modes, the first transmitter may be
faulty. See your dealer who can service the
theft-deterrent system and have a new RKE
transmitter programmed to the vehicle.
It is possible for the immobilizer system to
learn new or replacement RKE transmitters.
Up to eight transmitters can be
programmed for the vehicle. To program
additional transmitters, see "Programming
Page 38 of 441
Chevrolet Silverado 2500 HD/3500 HD Owner Manual (GMNA-Localizing-U.
S./Canada/Mexico-15546003) - 2022 - CRC - 5/12/21
Keys, Doors, and Windows 37
Resetting the Power Folding Mirrors
Reset the power folding mirrors if:
.The mirrors are accidentally obstructed
while folding.
.The mirrors are accidentally manually
folded/unfolded.
.The mirrors will not stay in the unfolded
position.
.The mirrors vibrate at normal driving
speeds.
Fold and unfold the mirrors one time using
the mirror controls to reset them to their
normal position. A noise may be heard
during the resetting of the power folding
mirrors. This sound is normal after a manual
folding operation.
Remote Mirror Folding
If equipped, press and holdQon the RKE
transmitter for approximately one second to
remotely fold the exterior mirrors. Press and
hold
Kon the RKE transmitter for
approximately one second to unfold. See
Remote Keyless Entry (RKE) System
Operation (Key Access) 010 or
Remote Keyless Entry (RKE) System
Operation (Keyless Access) 013. This feature can be turned on or off. See
Vehicle Personalization
0131.
Heated Mirrors
1REAR : If equipped, the rear window
defogger also heats the outside mirrors.
W: If equipped, press to turn the heated
outside mirrors on or off.
See “Rear Window Defogger” underClimate
Control Systems 0202 or
Dual Automatic Climate Control System
0 204.
Automatic Dimming Mirror
If equipped, the driver outside mirror
automatically adjusts for the glare of the
headlamps from behind. This feature comes
on when the vehicle is started.
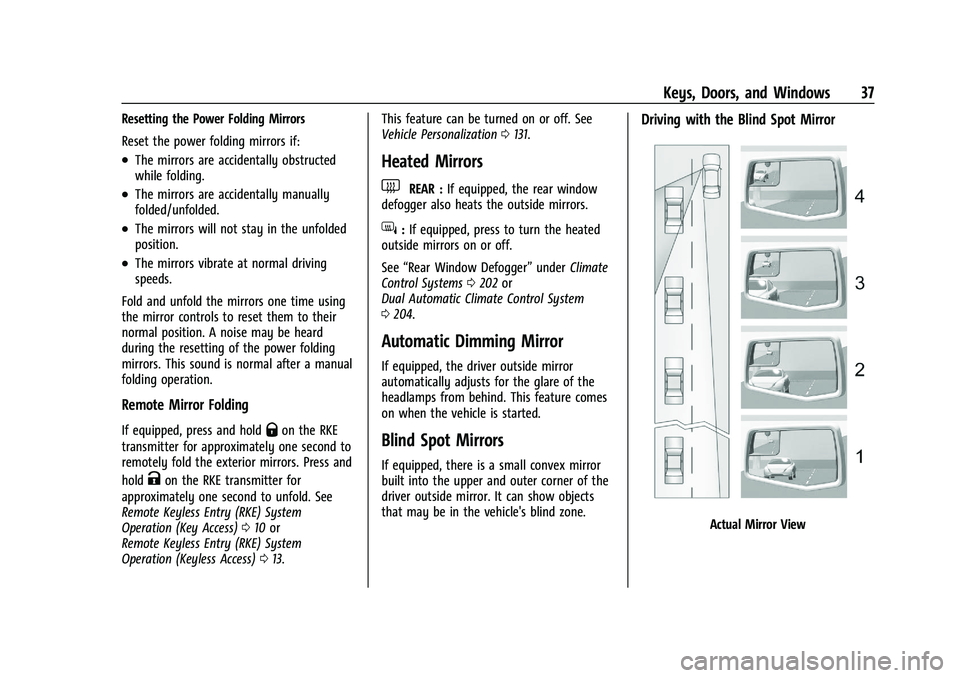
Blind Spot Mirrors
If equipped, there is a small convex mirror
built into the upper and outer corner of the
driver outside mirror. It can show objects
that may be in the vehicle's blind zone.
Driving with the Blind Spot Mirror
Actual Mirror View
Page 101 of 441
Chevrolet Silverado 2500 HD/3500 HD Owner Manual (GMNA-Localizing-U.
S./Canada/Mexico-15546003) - 2022 - CRC - 5/12/21
100 Instruments and Controls
Instruments and Controls
Controls
Steering Wheel Adjustment . . . . . . . . . . . . 101
Steering Wheel Controls . . . . . . . . . . . . . . . 101
Heated Steering Wheel . . . . . . . . . . . . . . . . 101
Horn . . . . . . . . . . . . . . . . . . . . . . . . . . . . . . . . . . 102
Windshield Wiper/Washer . . . . . . . . . . . . . 102
Compass . . . . . . . . . . . . . . . . . . . . . . . . . . . . . . . 103
Clock . . . . . . . . . . . . . . . . . . . . . . . . . . . . . . . . . . 103
Power Outlets . . . . . . . . . . . . . . . . . . . . . . . . . 103
Wireless Charging . . . . . . . . . . . . . . . . . . . . . 104
Warning Lights, Gauges, and Indicators
Warning Lights, Gauges, andIndicators . . . . . . . . . . . . . . . . . . . . . . . . . . . . 107
Instrument Cluster . . . . . . . . . . . . . . . . . . . . . 107
Speedometer . . . . . . . . . . . . . . . . . . . . . . . . . . . 111
Odometer . . . . . . . . . . . . . . . . . . . . . . . . . . . . . . 111
Trip Odometer . . . . . . . . . . . . . . . . . . . . . . . . . 111
Tachometer . . . . . . . . . . . . . . . . . . . . . . . . . . . . 111
Fuel Gauge . . . . . . . . . . . . . . . . . . . . . . . . . . . . . 111
Engine Oil Pressure Gauge . . . . . . . . . . . . . 112
Engine Coolant Temperature Gauge . . . . 113
Voltmeter Gauge . . . . . . . . . . . . . . . . . . . . . . . 113
Seat Belt Reminders . . . . . . . . . . . . . . . . . . . 114
Airbag Readiness Light . . . . . . . . . . . . . . . . . 114
Passenger Airbag Status Indicator . . . . . . 115
Charging System Light . . . . . . . . . . . . . . . . . 116 Malfunction Indicator Lamp (Check
Engine Light) . . . . . . . . . . . . . . . . . . . . . . . . . 116
Brake System Warning Light . . . . . . . . . . . 117
Electric Parking Brake Light . . . . . . . . . . . . 118
Service Electric Parking Brake Light . . . . 118
Antilock Brake System (ABS) Warning Light . . . . . . . . . . . . . . . . . . . . . . . . . . . . . . . . . 118
Four-Wheel-Drive Light . . . . . . . . . . . . . . . . . 119
Hill Descent Control Light . . . . . . . . . . . . . . 119
Lane Departure Warning (LDW) Light . . . . . . . . . . . . . . . . . . . . . . . . . . . . . . . . . 119
Vehicle Ahead Indicator . . . . . . . . . . . . . . . . 119
Traction Off Light . . . . . . . . . . . . . . . . . . . . . . 120
Traction Control System (TCS)/Electronic Stability Control Light . . . . . . . . . . . . . . . 120
Electronic Stability Control (ESC) Off Light . . . . . . . . . . . . . . . . . . . . . . . . . . . . . . . . . 120
Engine Coolant Temperature Warning Light . . . . . . . . . . . . . . . . . . . . . . . . . . . . . . . . . 121
Driver Mode Control Light . . . . . . . . . . . . . 121
Tire Pressure Light . . . . . . . . . . . . . . . . . . . . . 121
Engine Oil Pressure Light (Uplevel Cluster) . . . . . . . . . . . . . . . . . . . . . . . . . . . . . . 122
Low Fuel Warning Light . . . . . . . . . . . . . . . . 122
Security Light . . . . . . . . . . . . . . . . . . . . . . . . . . 122
High-Beam On Light . . . . . . . . . . . . . . . . . . . 123
Front Fog Lamp Light . . . . . . . . . . . . . . . . . . 123
Lamps On Reminder . . . . . . . . . . . . . . . . . . . 123
Cruise Control Light . . . . . . . . . . . . . . . . . . . . 123
Door Ajar Light . . . . . . . . . . . . . . . . . . . . . . . . 123
Information Displays
Driver Information Center (DIC) (Base Level) . . . . . . . . . . . . . . . . . . . . . . . . . . . . . . . . 124
Driver Information Center (DIC) (Midlevel and Uplevel) . . . . . . . . . . . . . . . 125
Head-Up Display (HUD) . . . . . . . . . . . . . . . . 127
Vehicle Messages
Vehicle Messages . . . . . . . . . . . . . . . . . . . . . . 130
Engine Power Messages . . . . . . . . . . . . . . . 130
Vehicle Speed Messages . . . . . . . . . . . . . . . 131
Vehicle Personalization
Vehicle Personalization . . . . . . . . . . . . . . . . . 131
Universal Remote System
Universal Remote System . . . . . . . . . . . . . . 135
Universal Remote System
Programming . . . . . . . . . . . . . . . . . . . . . . . . 135
Universal Remote System Operation . . . 137
Page 102 of 441
Chevrolet Silverado 2500 HD/3500 HD Owner Manual (GMNA-Localizing-U.
S./Canada/Mexico-15546003) - 2022 - CRC - 5/12/21
Instruments and Controls 101
Controls
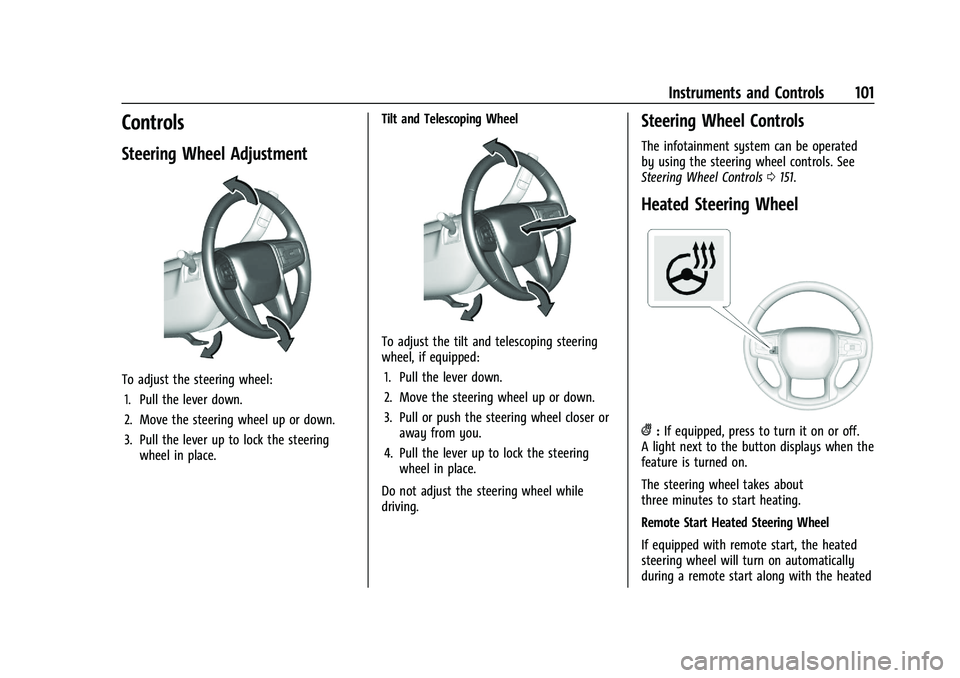
Steering Wheel Adjustment
To adjust the steering wheel:1. Pull the lever down.
2. Move the steering wheel up or down.
3. Pull the lever up to lock the steering wheel in place. Tilt and Telescoping Wheel
To adjust the tilt and telescoping steering
wheel, if equipped:
1. Pull the lever down.
2. Move the steering wheel up or down.
3. Pull or push the steering wheel closer or away from you.
4. Pull the lever up to lock the steering wheel in place.
Do not adjust the steering wheel while
driving.
Steering Wheel Controls
The infotainment system can be operated
by using the steering wheel controls. See
Steering Wheel Controls 0151.
Heated Steering Wheel
(:If equipped, press to turn it on or off.
A light next to the button displays when the
feature is turned on.
The steering wheel takes about
three minutes to start heating.
Remote Start Heated Steering Wheel
If equipped with remote start, the heated
steering wheel will turn on automatically
during a remote start along with the heated