2023 CHEVROLET SILVERADO 1500 start stop button
[x] Cancel search: start stop buttonPage 7 of 463
Chevrolet Silverado 1500 Owner Manual (GMNA-Localizing-U.S./Canada/
Mexico/Paraguay-16515119) - 2023 - CRC - 6/2/22
6 Introduction
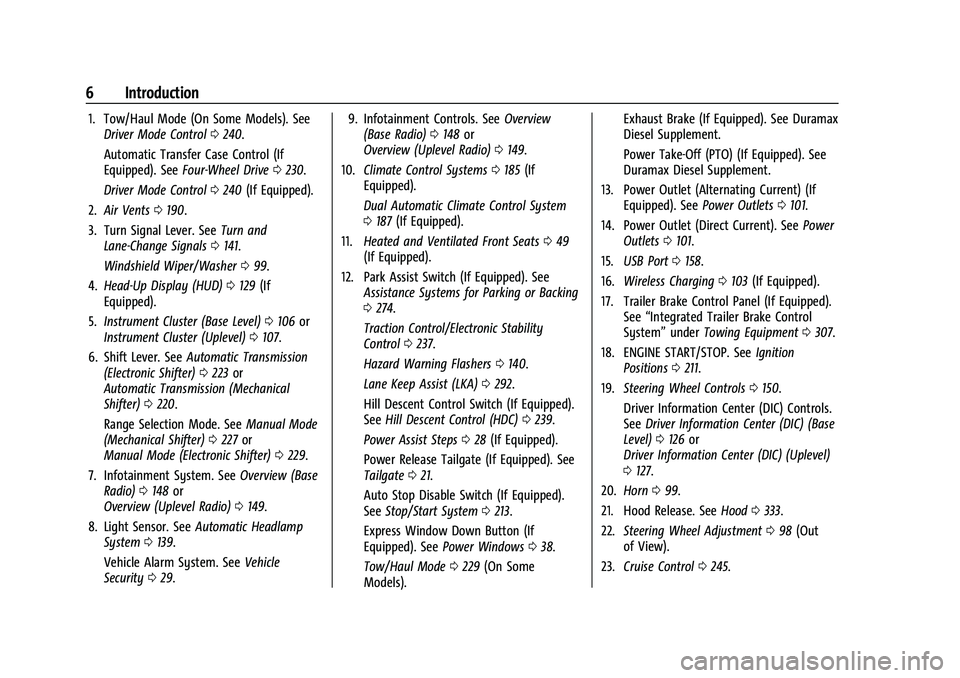
1. Tow/Haul Mode (On Some Models). SeeDriver Mode Control 0240.
Automatic Transfer Case Control (If
Equipped). See Four-Wheel Drive 0230.
Driver Mode Control 0240 (If Equipped).
2. Air Vents 0190.
3. Turn Signal Lever. See Turn and
Lane-Change Signals 0141.
Windshield Wiper/Washer 099.
4. Head-Up Display (HUD) 0129 (If
Equipped).
5. Instrument Cluster (Base Level) 0106 or
Instrument Cluster (Uplevel) 0107.
6. Shift Lever. See Automatic Transmission
(Electronic Shifter) 0223 or
Automatic Transmission (Mechanical
Shifter) 0220.
Range Selection Mode. See Manual Mode
(Mechanical Shifter) 0227 or
Manual Mode (Electronic Shifter) 0229.
7. Infotainment System. See Overview (Base
Radio) 0148 or
Overview (Uplevel Radio) 0149.
8. Light Sensor. See Automatic Headlamp
System 0139.
Vehicle Alarm System. See Vehicle
Security 029. 9. Infotainment Controls. See
Overview
(Base Radio) 0148 or
Overview (Uplevel Radio) 0149.
10. Climate Control Systems 0185 (If
Equipped).
Dual Automatic Climate Control System
0 187 (If Equipped).
11. Heated and Ventilated Front Seats 049
(If Equipped).
12. Park Assist Switch (If Equipped). See Assistance Systems for Parking or Backing
0274.
Traction Control/Electronic Stability
Control 0237.
Hazard Warning Flashers 0140.
Lane Keep Assist (LKA) 0292.
Hill Descent Control Switch (If Equipped).
See Hill Descent Control (HDC) 0239.
Power Assist Steps 028 (If Equipped).
Power Release Tailgate (If Equipped). See
Tailgate 021.
Auto Stop Disable Switch (If Equipped).
See Stop/Start System 0213.
Express Window Down Button (If
Equipped). See Power Windows 038.
Tow/Haul Mode 0229 (On Some
Models). Exhaust Brake (If Equipped). See Duramax
Diesel Supplement.
Power Take-Off (PTO) (If Equipped). See
Duramax Diesel Supplement.
13. Power Outlet (Alternating Current) (If Equipped). See Power Outlets0101.
14. Power Outlet (Direct Current). See Power
Outlets 0101.
15. USB Port 0158.
16. Wireless Charging 0103 (If Equipped).
17. Trailer Brake Control Panel (If Equipped). See“Integrated Trailer Brake Control
System” underTowing Equipment 0307.
18. ENGINE START/STOP. See Ignition
Positions 0211.
19. Steering Wheel Controls 0150.
Driver Information Center (DIC) Controls.
See Driver Information Center (DIC) (Base
Level) 0126 or
Driver Information Center (DIC) (Uplevel)
0 127.
20. Horn 099.
21. Hood Release. See Hood0333.
22. Steering Wheel Adjustment 098 (Out
of View).
23. Cruise Control 0245.
Page 10 of 463
Chevrolet Silverado 1500 Owner Manual (GMNA-Localizing-U.S./Canada/
Mexico/Paraguay-16515119) - 2023 - CRC - 6/2/22
Introduction 9
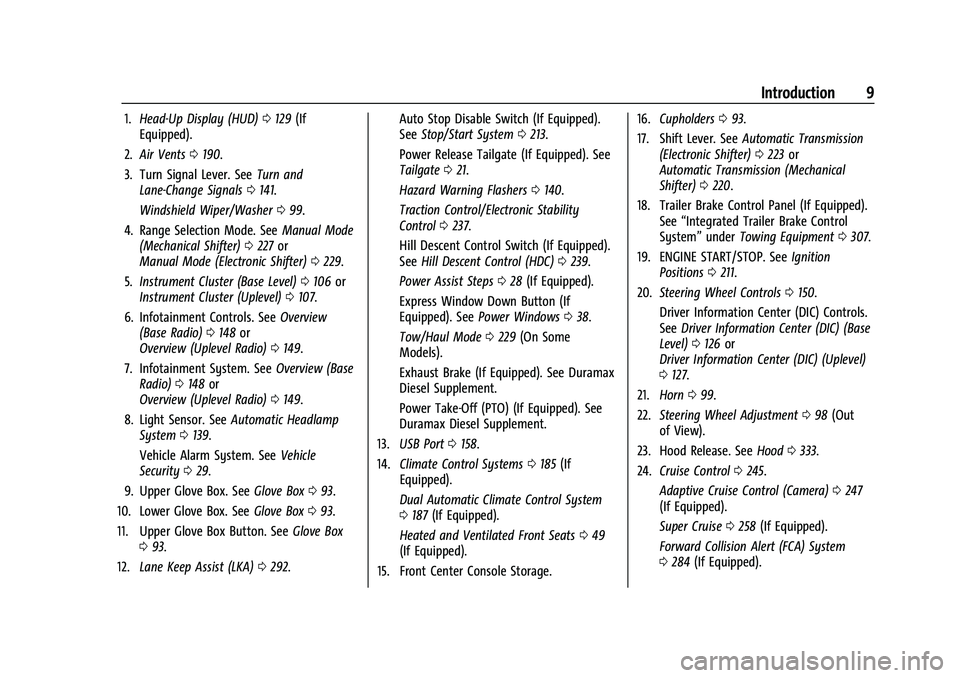
1.Head-Up Display (HUD) 0129 (If
Equipped).
2. Air Vents 0190.
3. Turn Signal Lever. See Turn and
Lane-Change Signals 0141.
Windshield Wiper/Washer 099.
4. Range Selection Mode. See Manual Mode
(Mechanical Shifter) 0227 or
Manual Mode (Electronic Shifter) 0229.
5. Instrument Cluster (Base Level) 0106 or
Instrument Cluster (Uplevel) 0107.
6. Infotainment Controls. See Overview
(Base Radio) 0148 or
Overview (Uplevel Radio) 0149.
7. Infotainment System. See Overview (Base
Radio) 0148 or
Overview (Uplevel Radio) 0149.
8. Light Sensor. See Automatic Headlamp
System 0139.
Vehicle Alarm System. See Vehicle
Security 029.
9. Upper Glove Box. See Glove Box093.
10. Lower Glove Box. See Glove Box093.
11. Upper Glove Box Button. See Glove Box
0 93.
12. Lane Keep Assist (LKA) 0292. Auto Stop Disable Switch (If Equipped).
See
Stop/Start System 0213.
Power Release Tailgate (If Equipped). See
Tailgate 021.
Hazard Warning Flashers 0140.
Traction Control/Electronic Stability
Control 0237.
Hill Descent Control Switch (If Equipped).
See Hill Descent Control (HDC) 0239.
Power Assist Steps 028 (If Equipped).
Express Window Down Button (If
Equipped). See Power Windows 038.
Tow/Haul Mode 0229 (On Some
Models).
Exhaust Brake (If Equipped). See Duramax
Diesel Supplement.
Power Take-Off (PTO) (If Equipped). See
Duramax Diesel Supplement.
13. USB Port 0158.
14. Climate Control Systems 0185 (If
Equipped).
Dual Automatic Climate Control System
0 187 (If Equipped).
Heated and Ventilated Front Seats 049
(If Equipped).
15. Front Center Console Storage. 16.
Cupholders 093.
17. Shift Lever. See Automatic Transmission
(Electronic Shifter) 0223 or
Automatic Transmission (Mechanical
Shifter) 0220.
18. Trailer Brake Control Panel (If Equipped). See“Integrated Trailer Brake Control
System” underTowing Equipment 0307.
19. ENGINE START/STOP. See Ignition
Positions 0211.
20. Steering Wheel Controls 0150.
Driver Information Center (DIC) Controls.
See Driver Information Center (DIC) (Base
Level) 0126 or
Driver Information Center (DIC) (Uplevel)
0 127.
21. Horn 099.
22. Steering Wheel Adjustment 098 (Out
of View).
23. Hood Release. See Hood0333.
24. Cruise Control 0245.
Adaptive Cruise Control (Camera) 0247
(If Equipped).
Super Cruise 0258 (If Equipped).
Forward Collision Alert (FCA) System
0 284 (If Equipped).
Page 53 of 463
Chevrolet Silverado 1500 Owner Manual (GMNA-Localizing-U.S./Canada/
Mexico/Paraguay-16515119) - 2023 - CRC - 6/2/22
52 Seats and Restraints
This feature turns on at the highest setting.
With each press of the button, the heated
seat changes to the next lower setting, and
then the off setting. Three lights indicate
the highest setting, and one light indicates
the lowest. If the heated seats are on high,
the level may automatically be lowered
after approximately 30 minutes.
Remote Start Heated Seats
If equipped, the heated seats will turn on
automatically during a remote start if it is
cold outside. The heated seat indicators may
come on during this operation. The heated
seats may cancel when the vehicle is
started. These features can be manually
selected with the heated seat buttons after
the vehicle is turned on.
The temperature performance of an
unoccupied seat may be reduced. This is
normal.
To enable or disable remote start heated
seats, select Settings > Vehicle > Remote
Lock, Unlock, and Start > Remote Start Auto
Heat Seats > ON or OFF. SeeRemote Vehicle
Start 018.Seat Belts
This section describes how to use seat belts
properly, and some things not to do.
{Warning
Do not let anyone ride where a seat belt
cannot be worn properly. In a crash,
if you or your passenger(s) are not
wearing seat belts, injuries can be much
worse than if you are wearing seat belts.
You can be seriously injured or killed by
hitting things inside the vehicle harder or
by being ejected from the vehicle. In
addition, anyone who is not buckled up
can strike other passengers in the vehicle.
It is extremely dangerous to ride in a
cargo area, inside or outside of a vehicle.
In a collision, passengers riding in these
areas are more likely to be seriously
injured or killed. Do not allow passengers
to ride in any area of the vehicle that is
not equipped with seats and seat belts.
Always wear a seat belt, and check that
all passenger(s) are restrained
properly too. This vehicle has indicators as a reminder to
buckle the seat belts. See
Seat Belt
Reminders 0114.
Why Seat Belts Work
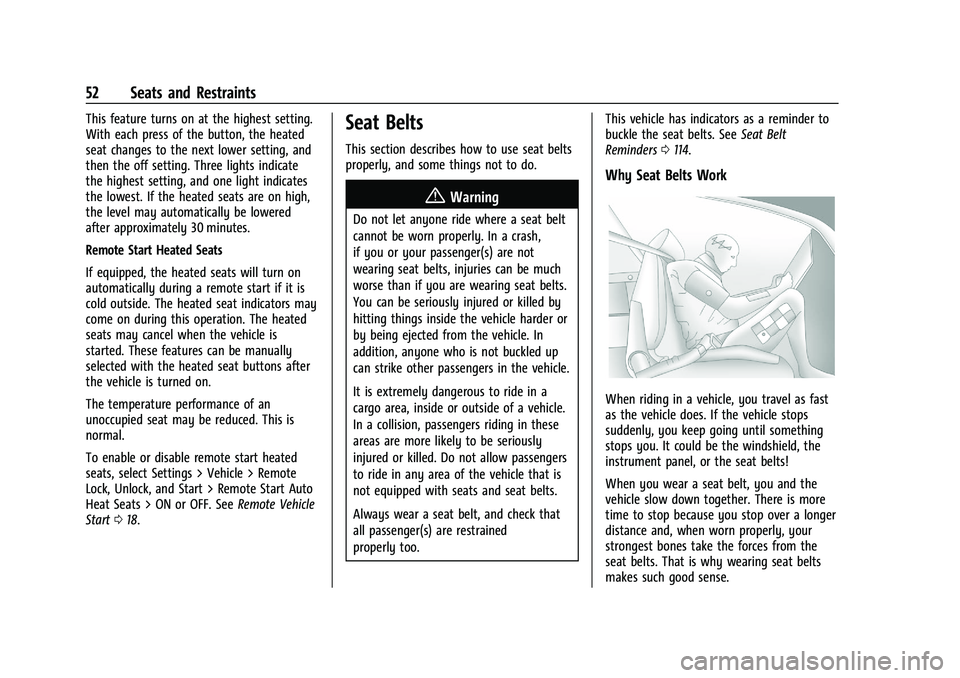
When riding in a vehicle, you travel as fast
as the vehicle does. If the vehicle stops
suddenly, you keep going until something
stops you. It could be the windshield, the
instrument panel, or the seat belts!
When you wear a seat belt, you and the
vehicle slow down together. There is more
time to stop because you stop over a longer
distance and, when worn properly, your
strongest bones take the forces from the
seat belts. That is why wearing seat belts
makes such good sense.
Page 135 of 463
Chevrolet Silverado 1500 Owner Manual (GMNA-Localizing-U.S./Canada/
Mexico/Paraguay-16515119) - 2023 - CRC - 6/2/22
134 Instruments and Controls
message stays on, or displays repeatedly,
the vehicle should be taken to your dealer
for service as soon as possible.
Under certain operating conditions,
propulsion will be disabled. Try restarting
after the ignition has been off for
two minutes.
Vehicle Speed Messages
SPEED LIMITED TO XXX KM/H (MPH)
This message shows that the vehicle speed
has been limited to the speed displayed. The
limited speed is a protection for various
propulsion and vehicle systems, such as
lubrication, thermal, brakes, suspension,
Teen Driver if equipped, or tires.
(If equipped with a diesel engine, see the
Duramax Diesel supplement.)–For Diesel
Universal Remote System
See Radio Frequency Statement 0438.
Universal Remote System
Programming
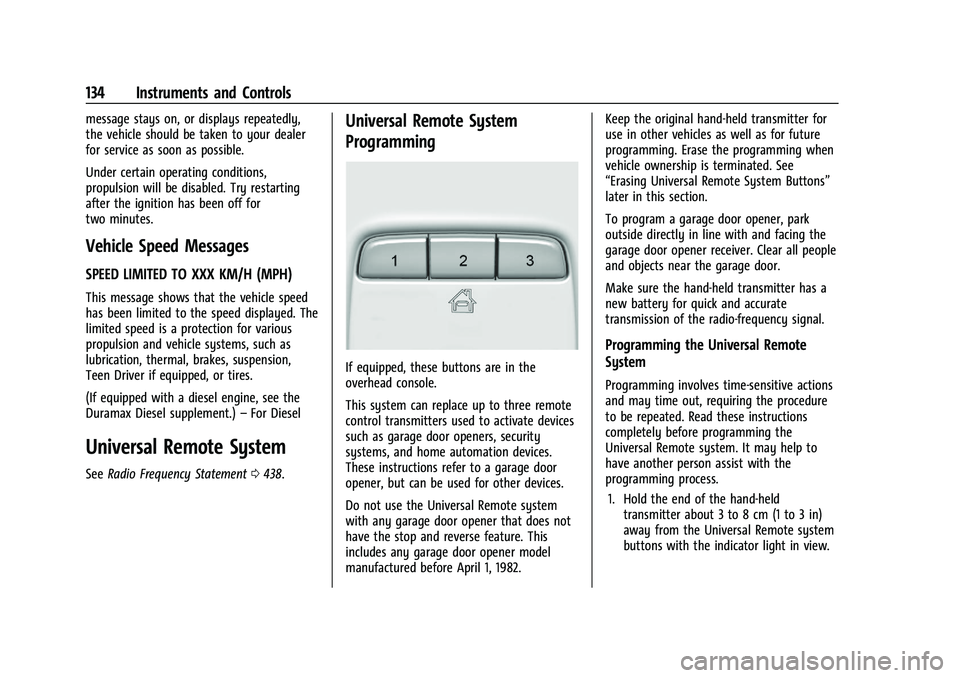
If equipped, these buttons are in the
overhead console.
This system can replace up to three remote
control transmitters used to activate devices
such as garage door openers, security
systems, and home automation devices.
These instructions refer to a garage door
opener, but can be used for other devices.
Do not use the Universal Remote system
with any garage door opener that does not
have the stop and reverse feature. This
includes any garage door opener model
manufactured before April 1, 1982. Keep the original hand-held transmitter for
use in other vehicles as well as for future
programming. Erase the programming when
vehicle ownership is terminated. See
“Erasing Universal Remote System Buttons”
later in this section.
To program a garage door opener, park
outside directly in line with and facing the
garage door opener receiver. Clear all people
and objects near the garage door.
Make sure the hand-held transmitter has a
new battery for quick and accurate
transmission of the radio-frequency signal.
Programming the Universal Remote
System
Programming involves time-sensitive actions
and may time out, requiring the procedure
to be repeated. Read these instructions
completely before programming the
Universal Remote system. It may help to
have another person assist with the
programming process.
1. Hold the end of the hand-held transmitter about 3 to 8 cm (1 to 3 in)
away from the Universal Remote system
buttons with the indicator light in view.
Page 180 of 463
Chevrolet Silverado 1500 Owner Manual (GMNA-Localizing-U.S./Canada/
Mexico/Paraguay-16515119) - 2023 - CRC - 6/2/22
Infotainment System 179
Legal Information
Touch to view legal and license information.
Updates
This menu allows adjustment of the vehicle
update settings.
Google
This menu allows adjustment of the Google
settings.
Teen Driver
If equipped, this allows multiple keys to be
registered for beginner drivers to encourage
safe driving habits. When the vehicle is
started with a Teen Driver key, it will
automatically activate certain safety
systems, allow setting of some features, and
limit the use of others. The Report Card will
record vehicle data about driving behavior
that can be viewed later. When the vehicle
is started with a registered key, the Driver
Information Center (DIC) displays a message
that Teen Driver is active.
To access:1. Touch Settings on the Home Page, then touch Vehicle, and then Teen Driver. 2. Create a Personal Identification Number
(PIN) by choosing a four-digit PIN.
Re-enter the PIN to confirm. To change
the PIN, touch Change PIN.
The PIN is required to:
.Set up/Add or remove keys.
.Change Teen Driver settings.
.Change or clear the Teen Driver PIN.
.Access or delete Report Card data.
Set up/Add keys to activate Teen Driver and
assign restrictions to the key:
Any vehicle key can be registered, up to a
maximum of eight keys. Label the key to
tell it apart from the other keys.
For a pushbutton start system: 1. Start the vehicle.
2. For automatic transmissions, the vehicle must be in P (Park). For manual
transmissions, the vehicle must be
stopped with the parking brake set.
3. From the Settings menu, touch Vehicle and then Teen Driver.
4. Enter the PIN.
5. Place the remote key you wish to register in the transmitter pocket. The
key does not need to be the one that started the vehicle. See
Remote Key
Operation 012 for transmitter pocket
location.
6. From the Teen Driver menu, touch Setup Keys or Add/Remove Teen Driver Keys.
.If the remote key has not previously
been registered, the option to add
the key displays. Touch Add and a
confirmation message displays. Teen
Driver restrictions will be applied
whenever this remote key is used to
operate the vehicle.
.If the remote key has already been
registered, the option to remove the
key displays. If Remove is touched,
the remote key is no longer
registered. A confirmation message
displays, and Teen Driver restrictions
will not be applied if this remote key
is used to operate the vehicle.
In vehicles with a pushbutton start system,
if a Teen Driver and a non-Teen Driver key
are both present at start up, the vehicle will
recognize the non-Teen Driver key to start
the vehicle. The Teen Driver settings will not
be active.
For a keyed ignition system: 1. Start the vehicle.
Page 212 of 463
Chevrolet Silverado 1500 Owner Manual (GMNA-Localizing-U.S./Canada/
Mexico/Paraguay-16515119) - 2023 - CRC - 6/2/22
Driving and Operating 211
Caution (Continued)
.Do not drive at any one constant
speed, fast or slow, for the first
800 km (500 mi). Do not make
full-throttle starts. Avoid downshifting
to brake or slow the vehicle.
.Avoid making hard stops for the first
300 km (200 mi) or so. During this
time the new brake linings are not yet
broken in. Hard stops with new linings
can mean premature wear and earlier
replacement. Follow this breaking-in
guideline every time you get new
brake linings.
.Do not tow a trailer during break-in.
SeeTrailer Towing 0302 for the
trailer towing capabilities of the
vehicle and more information.
Following break-in, engine speed and load
can be gradually increased.
On new vehicles, the various mechanical and
electrical systems experience a “break-in”
period during the first 6 400 km (4,000 mi)
of routine driving. As the vehicle is driven,
the mechanical systems adjust to provide
optimal fuel economy and transmission shift
performance. Electrical systems will adapt and calibrate
during the break-in period. A one-time
occurrence of clicks and similar vehicle
noises is normal during this process.
Normal driving charges the vehicle’s battery
to achieve the best operation of the vehicle,
including fuel economy and the Stop/Start
System. See
Stop/Start System 0213.
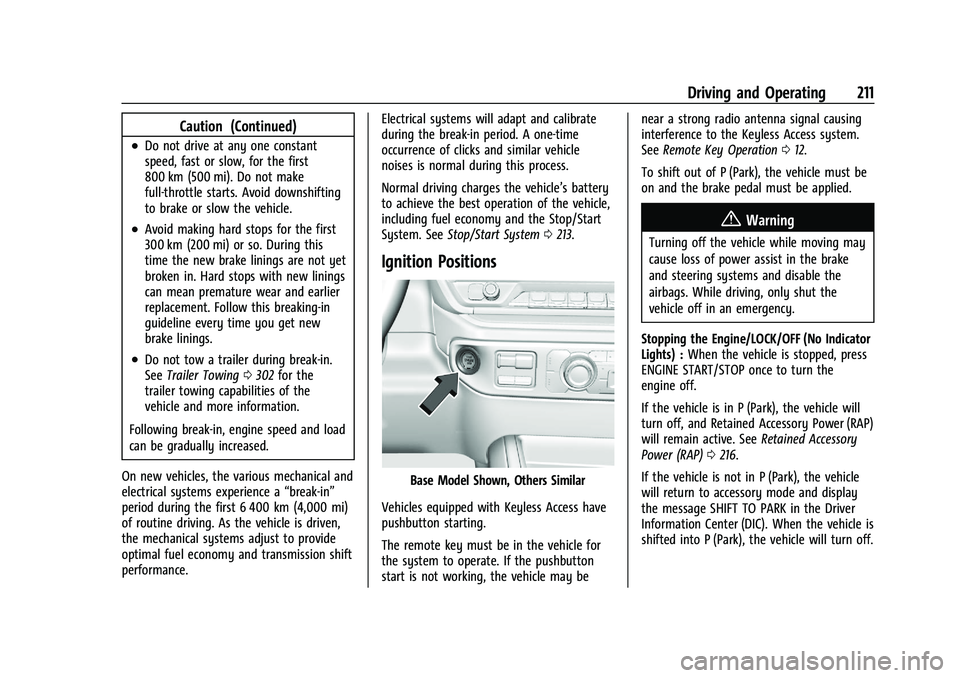
Ignition Positions
Base Model Shown, Others Similar
Vehicles equipped with Keyless Access have
pushbutton starting.
The remote key must be in the vehicle for
the system to operate. If the pushbutton
start is not working, the vehicle may be near a strong radio antenna signal causing
interference to the Keyless Access system.
See
Remote Key Operation 012.
To shift out of P (Park), the vehicle must be
on and the brake pedal must be applied.
{Warning
Turning off the vehicle while moving may
cause loss of power assist in the brake
and steering systems and disable the
airbags. While driving, only shut the
vehicle off in an emergency.
Stopping the Engine/LOCK/OFF (No Indicator
Lights) : When the vehicle is stopped, press
ENGINE START/STOP once to turn the
engine off.
If the vehicle is in P (Park), the vehicle will
turn off, and Retained Accessory Power (RAP)
will remain active. See Retained Accessory
Power (RAP) 0216.
If the vehicle is not in P (Park), the vehicle
will return to accessory mode and display
the message SHIFT TO PARK in the Driver
Information Center (DIC). When the vehicle is
shifted into P (Park), the vehicle will turn off.
Page 213 of 463
Chevrolet Silverado 1500 Owner Manual (GMNA-Localizing-U.S./Canada/
Mexico/Paraguay-16515119) - 2023 - CRC - 6/2/22
212 Driving and Operating
The vehicle may have an electric steering
column lock. The lock is activated when the
ignition is turned off and driver door is
opened. A sound may be heard as the lock
actuates or releases. The steering column
lock may not release with the wheels turned
off center. If this happens, the vehicle may
not start. Move the steering wheel from left
to right while attempting to start the
vehicle. If this does not work, the vehicle
needs service.
Unless an emergency exists, do not turn the
engine off when the vehicle is moving. This
will cause a loss of power assist in the brake
and steering systems and disable the
airbags.
If the vehicle must be shut off in an
emergency:1. If the vehicle cannot be pulled over, and must be shut off while driving, press and
hold ENGINE START/STOP button for
longer than two seconds, or press twice
in five seconds.
2. Brake using a firm and steady pressure. Do not pump the brakes repeatedly. This
may deplete power assist, requiring
increased brake pedal force. 3. Shift the vehicle to N (Neutral). This can
be done while the vehicle is moving.
After shifting to N (Neutral), firmly apply
the brakes and steer the vehicle to a
safe location.
4. Come to a complete stop, shift to P (Park), and make sure engine is off.
The shift lever must be in P (Park) to
turn the vehicle off.
5. Set the parking brake. See Electric
Parking Brake 0235.
{Warning
Turning off the vehicle while moving may
cause loss of power assist in the brake
and steering systems and disable the
airbags. While driving, only shut the
vehicle off in an emergency.
Accessory Mode (Amber Indicator Light) :
This mode allows some electrical accessories
to be used when the engine is off.
With the vehicle off, pressing the ENGINE
START/STOP button one time without the
brake pedal applied will place the vehicle in
accessory mode. The vehicle will switch from accessory mode
to off after five minutes to prevent battery
rundown.
ON/RUN/START (Green Indicator Light) :
This
mode is for driving and starting. With the
vehicle off, and the brake pedal applied,
pressing ENGINE START/STOP button once
will turn the ignition on. Once engine
cranking begins, release the button. Engine
cranking will continue until the engine
starts. See Starting the Engine 0213.
Service Mode
This power mode is available for service and
diagnostics, and to verify the proper
operation of the malfunction indicator lamp
as may be required for emission inspection
purposes. With the vehicle off, and the
brake pedal not applied, pressing and
holding the ENGINE START/STOP button for
more than five seconds will place the vehicle
in Service Mode. The instruments and audio
systems will operate as they do when the
vehicle is on, but the vehicle will not be able
to be driven. The engine will not start in
Service Mode. Press the ENGINE START/STOP
button again to turn the vehicle off.
Page 214 of 463
Chevrolet Silverado 1500 Owner Manual (GMNA-Localizing-U.S./Canada/
Mexico/Paraguay-16515119) - 2023 - CRC - 6/2/22
Driving and Operating 213
Starting the Engine
If the vehicle has a diesel engine, see the
Duramax diesel supplement.
Caution
If you add electrical parts or accessories,
you could change the way the engine
operates. Any resulting damage would
not be covered by the vehicle warranty.
SeeAdd-On Electrical Equipment 0328.
Move the shift lever to P (Park) or
N (Neutral). To restart the engine when the
vehicle is already moving, use
N (Neutral) only.
Caution
Do not try to shift to P (Park) if the
vehicle is moving. If you do, you could
damage the transmission. Shift to P (Park)
only when the vehicle is stopped.
Starting Procedure
1. The remote key must be in the vehicle. Press ENGINE START/STOP with the brake
pedal applied. When the engine begins
cranking, let go of the button. The driver may observe a minor, and
temporary, brake pedal kickback when
starting the vehicle. This is normal.
The idle speed will go down as the
engine gets warm. Do not race the
engine immediately after starting it.
Operate the engine and transmission
gently to allow the oil to warm up and
lubricate all moving parts.
When the low fuel warning light is on
and the FUEL LEVEL LOW message is
displayed in the Driver Information
Center (DIC), press ENGINE START/STOP
to continue engine cranking.
Caution
Cranking the engine for long periods of
time, by returning the ignition to the
START position immediately after
cranking has ended, can overheat and
damage the cranking motor, and drain
the battery. Wait at least 15 seconds
between each try, to let the cranking
motor cool down.
2. If the engine does not start after five to 10 seconds, especially in very cold
weather (below −18 °C or 0 °F), it could
be flooded with too much gasoline. Try pushing the accelerator pedal all the way
to the floor and holding it there while
pressing ENGINE START/STOP for up to a
maximum of 15 seconds. Wait at least
15 seconds between each try, to allow
the cranking motor to cool down. When
the engine starts, let go of the button
and accelerator. If the vehicle starts
briefly but then stops again, do the
same thing. This clears the extra gasoline
from the engine. Do not race the engine
immediately after starting it. Operate
the engine and transmission gently until
the oil warms up and lubricates all
moving parts.Stop/Start System
If equipped and enabled, the Stop/Start
system will shut off the engine to help
conserve fuel. It has components designed
for the increased number of starts.
{Warning
The automatic engine Stop/Start feature
causes the engine to shut off while the
vehicle is still on. Do not exit the vehicle
before shifting to P (Park). The vehicle
(Continued)