2023 CHEVROLET SILVERADO 1500 Outside mirrors
[x] Cancel search: Outside mirrorsPage 188 of 463
Chevrolet Silverado 1500 Owner Manual (GMNA-Localizing-U.S./Canada/
Mexico/Paraguay-16515119) - 2023 - CRC - 6/2/22
Climate Controls 187
A/C :Press to turn the air conditioning on
or off. An indicator light comes on to show
that the air conditioning is enabled. If the
fan is turned off, the air conditioner will not
run. The A/C light will stay on even if the
outside temperatures are below freezing.
Rear Window Defogger
1REAR : If equipped, press to turn the
rear window defogger on or off. An indicator
light on the button comes on to show that
the rear window defogger is on.
The rear window defogger only works when
the engine is running. The defogger turns
off if the vehicle is turned off or to
accessory mode.
If equipped with heated outside mirrors,
press
fto turn them on or off. See Heated
Mirrors 034.
Caution
Using a razor blade or sharp object to
clear the inside rear window can damage
the rear window defogger. Repairs would
not be covered by the vehicle warranty.
Do not clear the inside rear window with
sharp objects.
Dual Automatic Climate Control System
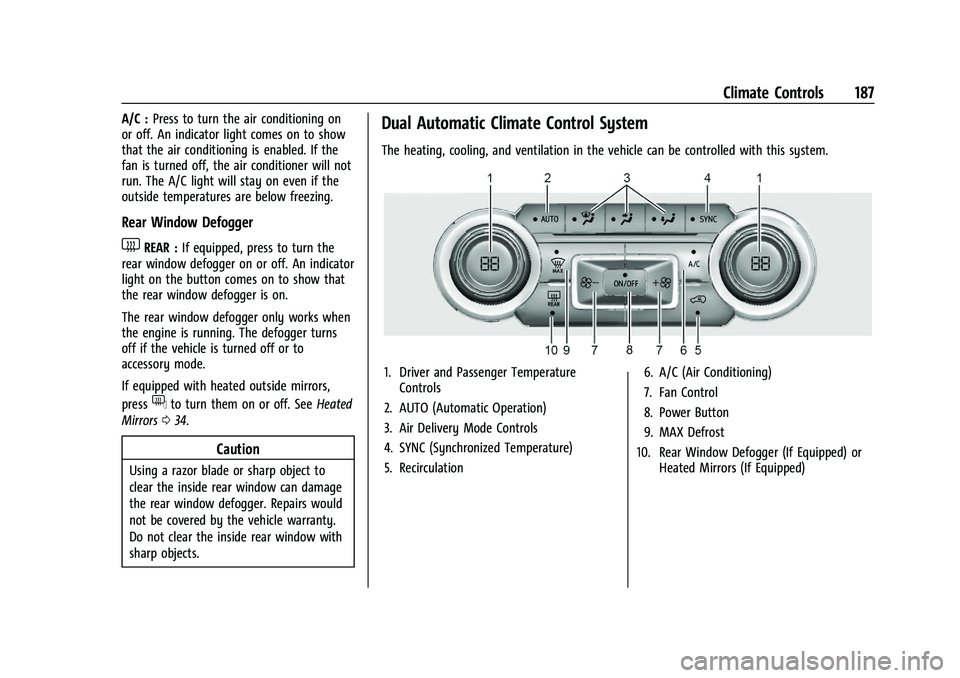
The heating, cooling, and ventilation in the vehicle can be controlled with this system.
1. Driver and Passenger Temperature
Controls
2. AUTO (Automatic Operation)
3. Air Delivery Mode Controls
4. SYNC (Synchronized Temperature)
5. Recirculation 6. A/C (Air Conditioning)
7. Fan Control
8. Power Button
9. MAX Defrost
10. Rear Window Defogger (If Equipped) or Heated Mirrors (If Equipped)
Page 190 of 463
Chevrolet Silverado 1500 Owner Manual (GMNA-Localizing-U.S./Canada/
Mexico/Paraguay-16515119) - 2023 - CRC - 6/2/22
Climate Controls 189
Driver and Passenger Temperature Control :
The temperature can be adjusted separately
for the driver and passenger.
Turn the knob clockwise or counterclockwise
to increase or decrease the driver or
passenger temperature setting. The driver
side or passenger side temperature display
shows the temperature setting increasing or
decreasing.
SYNC :Press to link the passenger
temperature setting to the driver setting.
The SYNC indicator light will turn on. When
the passenger setting is adjusted, the SYNC
indicator light will turn off.
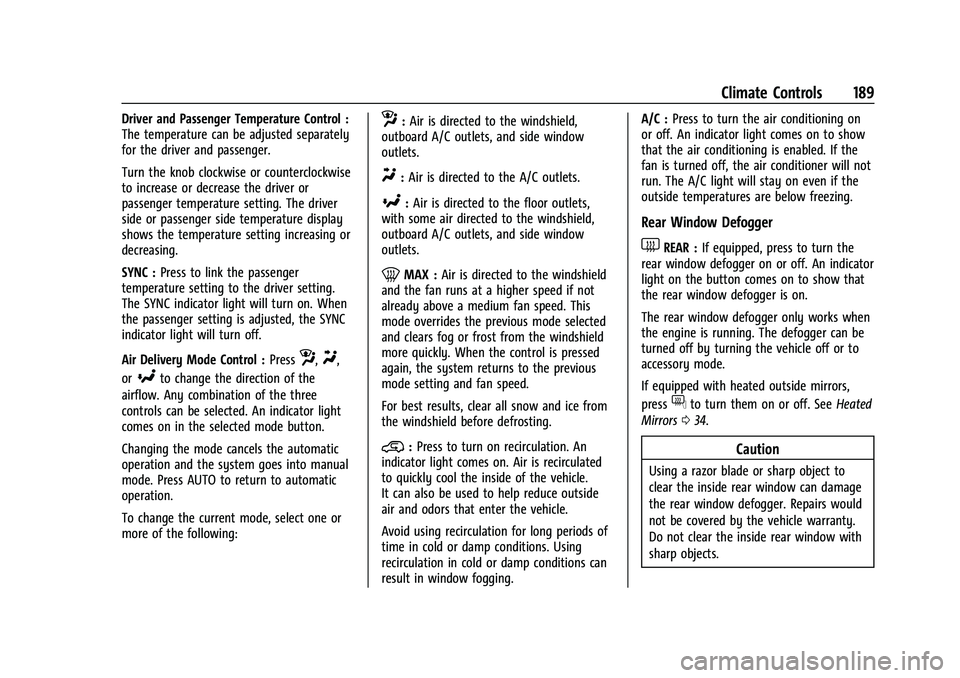
Air Delivery Mode Control : Press
z,Y,
or
[to change the direction of the
airflow. Any combination of the three
controls can be selected. An indicator light
comes on in the selected mode button.
Changing the mode cancels the automatic
operation and the system goes into manual
mode. Press AUTO to return to automatic
operation.
To change the current mode, select one or
more of the following:
z: Air is directed to the windshield,
outboard A/C outlets, and side window
outlets.
Y: Air is directed to the A/C outlets.
[:Air is directed to the floor outlets,
with some air directed to the windshield,
outboard A/C outlets, and side window
outlets.
0MAX : Air is directed to the windshield
and the fan runs at a higher speed if not
already above a medium fan speed. This
mode overrides the previous mode selected
and clears fog or frost from the windshield
more quickly. When the control is pressed
again, the system returns to the previous
mode setting and fan speed.
For best results, clear all snow and ice from
the windshield before defrosting.
@: Press to turn on recirculation. An
indicator light comes on. Air is recirculated
to quickly cool the inside of the vehicle.
It can also be used to help reduce outside
air and odors that enter the vehicle.
Avoid using recirculation for long periods of
time in cold or damp conditions. Using
recirculation in cold or damp conditions can
result in window fogging. A/C :
Press to turn the air conditioning on
or off. An indicator light comes on to show
that the air conditioning is enabled. If the
fan is turned off, the air conditioner will not
run. The A/C light will stay on even if the
outside temperatures are below freezing.
Rear Window Defogger
1REAR : If equipped, press to turn the
rear window defogger on or off. An indicator
light on the button comes on to show that
the rear window defogger is on.
The rear window defogger only works when
the engine is running. The defogger can be
turned off by turning the vehicle off or to
accessory mode.
If equipped with heated outside mirrors,
press
fto turn them on or off. See Heated
Mirrors 034.
Caution
Using a razor blade or sharp object to
clear the inside rear window can damage
the rear window defogger. Repairs would
not be covered by the vehicle warranty.
Do not clear the inside rear window with
sharp objects.
Page 275 of 463
Chevrolet Silverado 1500 Owner Manual (GMNA-Localizing-U.S./Canada/
Mexico/Paraguay-16515119) - 2023 - CRC - 6/2/22
274 Driving and Operating
.Front side and rear side panels
.Outside of the windshield in front of the
rearview mirror
.Side camera lens on the bottom of the
outside mirrors
.Rear side corner bumpers
.Rear Vision Camera in the tailgate handle
.Rear Camera Mirror and Cargo View
Camera in the Center High-Mounted
Stoplamp
Radio Frequency
This vehicle may be equipped with driver
assistance systems that operate using radio
frequency. See Radio Frequency Statement
0 438.
Assistance Systems for Parking or
Backing
If equipped, the Rear Vision Camera (RVC),
Surround Vision, Rear Park Assist (RPA),
Front Park Assist (FPA), and Rear Cross
Traffic Alert (RCTA) may help the driver park
or avoid objects. Always check around the
vehicle when parking or backing.
The RVC, RPA, and Surround Vision will not
work properly if the tailgate is down. If the
tailgate is down, do not use these systems.
Rear Vision Camera (RVC)
When the vehicle is shifted into R (Reverse),
the RVC displays an image of the area
behind the vehicle in the infotainment
display. The previous screen displays when
the vehicle is shifted out of R (Reverse) after
a short delay. To return to the previous
screen sooner, press any button on the
infotainment system, shift into P (Park), or,
while in D (Drive), reach a vehicle speed of
approximately 12 km/h (8 mph). The rear
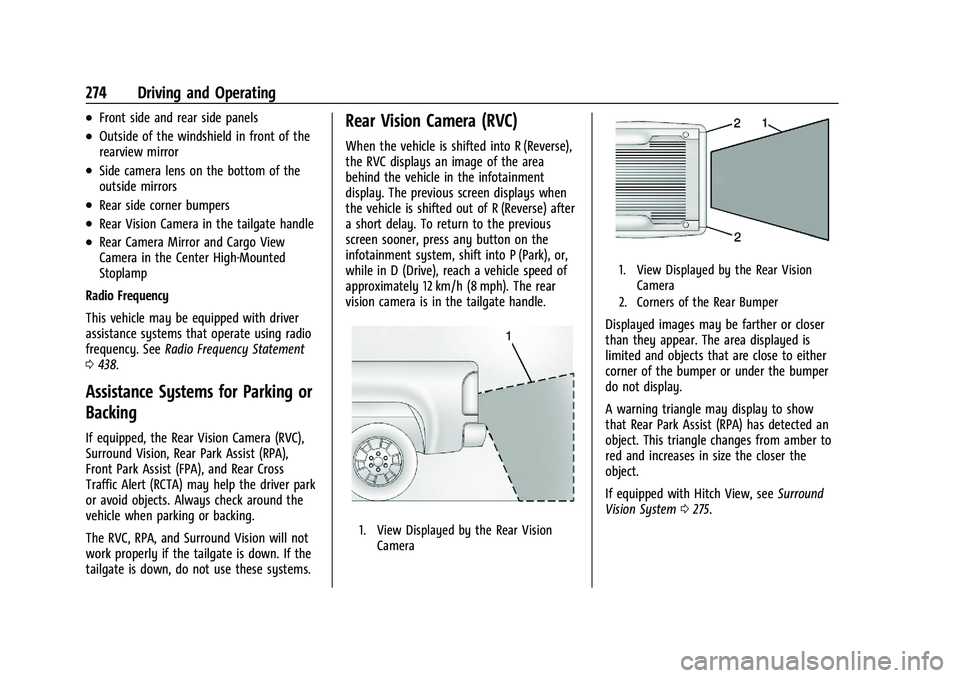
vision camera is in the tailgate handle.
1. View Displayed by the Rear Vision
Camera
1. View Displayed by the Rear VisionCamera
2. Corners of the Rear Bumper
Displayed images may be farther or closer
than they appear. The area displayed is
limited and objects that are close to either
corner of the bumper or under the bumper
do not display.
A warning triangle may display to show
that Rear Park Assist (RPA) has detected an
object. This triangle changes from amber to
red and increases in size the closer the
object.
If equipped with Hitch View, see Surround
Vision System 0275.
Page 276 of 463
Chevrolet Silverado 1500 Owner Manual (GMNA-Localizing-U.S./Canada/
Mexico/Paraguay-16515119) - 2023 - CRC - 6/2/22
Driving and Operating 275
{Warning
The camera(s) do not display children,
pedestrians, bicyclists, crossing traffic,
animals, or any other object outside of
the cameras’field of view, below the
bumper, or under the vehicle. Shown
distances may be different from actual
distances. Do not drive or park the
vehicle using only these camera(s).
Always check behind and around the
vehicle before driving. Failure to use
proper care may result in injury, death,
or vehicle damage.
Surround Vision System
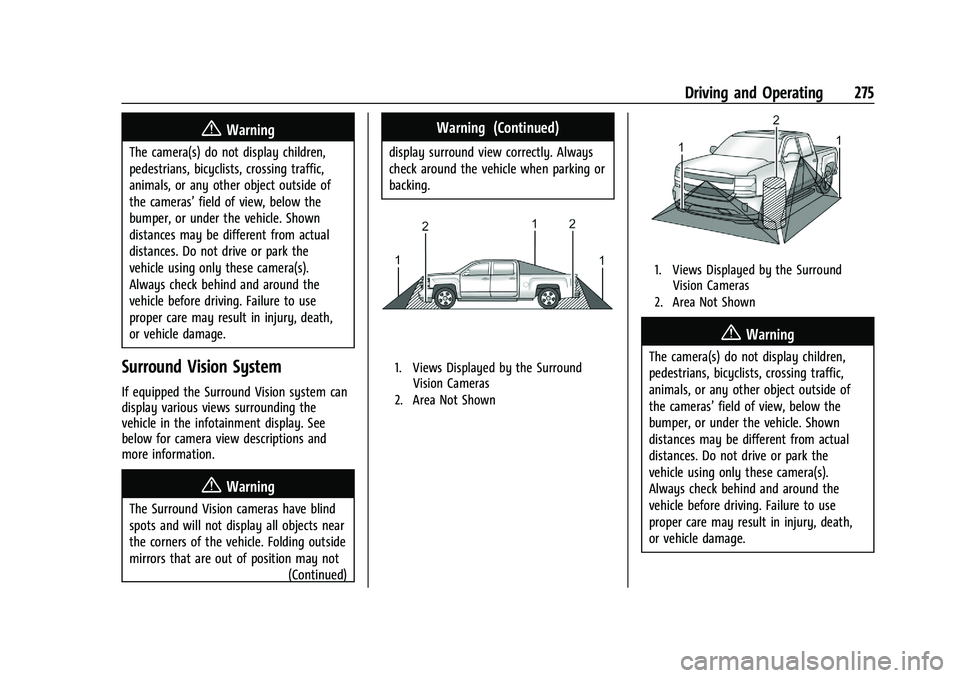
If equipped the Surround Vision system can
display various views surrounding the
vehicle in the infotainment display. See
below for camera view descriptions and
more information.
{Warning
The Surround Vision cameras have blind
spots and will not display all objects near
the corners of the vehicle. Folding outside
mirrors that are out of position may not (Continued)
Warning (Continued)
display surround view correctly. Always
check around the vehicle when parking or
backing.
1. Views Displayed by the SurroundVision Cameras
2. Area Not Shown
1. Views Displayed by the Surround Vision Cameras
2. Area Not Shown
{Warning
The camera(s) do not display children,
pedestrians, bicyclists, crossing traffic,
animals, or any other object outside of
the cameras’ field of view, below the
bumper, or under the vehicle. Shown
distances may be different from actual
distances. Do not drive or park the
vehicle using only these camera(s).
Always check behind and around the
vehicle before driving. Failure to use
proper care may result in injury, death,
or vehicle damage.
Page 281 of 463
Chevrolet Silverado 1500 Owner Manual (GMNA-Localizing-U.S./Canada/
Mexico/Paraguay-16515119) - 2023 - CRC - 6/2/22
280 Driving and Operating
The vehicle may be equipped with a
Trailer Angle Indicator. The Trailer Angle
Indicator gives the driver a visual
representation of the trailer’s position
relative to the vehicle. (Available only in
Reverse, Guidelines On, Rear Trailering
Views).
{Warning
Use Hitch Guidance only to help back the
vehicle to a trailer hitch or, when
traveling above 12 km/h (8 mph), to
briefly check the status of your trailer. Do
not use for any other purpose, such as
making lane change decisions. Before
making a lane change, always check the
mirrors and glance over your shoulder.
Improper use could result in serious
injury to you or others.
HD Surround Vision with Trailer Camera
Provisions
If equipped, this feature provides additional
views to aid in trailering/towing. The
system shows multiple views in the
infotainment display using five cameras
mounted around the vehicle and up to two
additional accessory cameras that can be
mounted on or in a trailer. The front camera is in the grille under the front emblem, the
side cameras are on the bottom of the
outside mirrors, the rear camera is in the
tailgate handle and the bed camera is
mounted on the rear of the cab.
Additionally, up to two accessory cameras
can be mounted to the rear and/or interior
of the trailer. See your dealer for accessory
trailer cameras. To access, touch CAMERA on
the infotainment display or shift to
R (Reverse). To return to the previous screen
when not in reverse, touch the Home or
Back buttons on the infotainment display.
Certain trailer views require a compatible
trailer profile be configured and selected.
A compatible trailer is a box type trailer
(cargo, camper, etc.) with a conventional
hitch.
Available camera views:
.Front/Rear Standard View
.Front/Rear Top-Down View
.Rear Bowl View
.Front/Rear Side View
.Hitch View
.Bed View
.Rear trailer View
.Rear Side view with a available
articulation functionality
.Picture-in-Picture Side View
.Interior Trailer View
.Transparent trailer View
.Surround View
.Guidance Lines
.Hitch Guidance
Surround Vision (360 Degrees)
If equipped, the Surround Vision system can
display various views surrounding the
vehicle in the infotainment display using
four cameras mounted around the vehicle.
The front camera is in the grille under the
front emblem, the side cameras are on the
bottom of the outside mirrors, and the rear
camera is in the tailgate handle.
The Surround Vision system can be accessed
by selecting CAMERA in the infotainment
display or when the vehicle is shifted into
R (Reverse). To return to the previous screen
sooner, when not in R (Reverse), press the
Home or Back button on the infotainment
system, shift into P (Park), or, while in D
(Drive), reach a vehicle speed of
approximately 12 km/h (8 mph).
Available camera views:
.Front/Rear Standard View
.Front/Rear Top-Down View
Page 291 of 463
Chevrolet Silverado 1500 Owner Manual (GMNA-Localizing-U.S./Canada/
Mexico/Paraguay-16515119) - 2023 - CRC - 6/2/22
290 Driving and Operating
Lane Change Alert (LCA)
If equipped, the Lane Change Alert (LCA)
system is a lane-changing aid that can assist
drivers with avoiding lane change crashes
with moving vehicles in the side blind zone,
or blind spot areas or with vehicles rapidly
approaching these areas from behind. When
a vehicle is detected in the blind zone, the
LCA warning display will light up in the
corresponding side mirror and will flash if
the turn signal is on. The Side Blind Zone
Alert (SBZA) system is included as part of
the LCA system.
{Warning
LCA does not alert the driver to vehicles
outside of the system detection zones,
pedestrians, bicyclists, or animals. It may
not provide alerts when changing lanes
under all driving conditions. Failure to use
proper care when changing lanes may
result in injury, death, or vehicle damage.
Before making a lane change, always
check mirrors, glance over your shoulder,
and use the turn signals.LCA Detection Zones
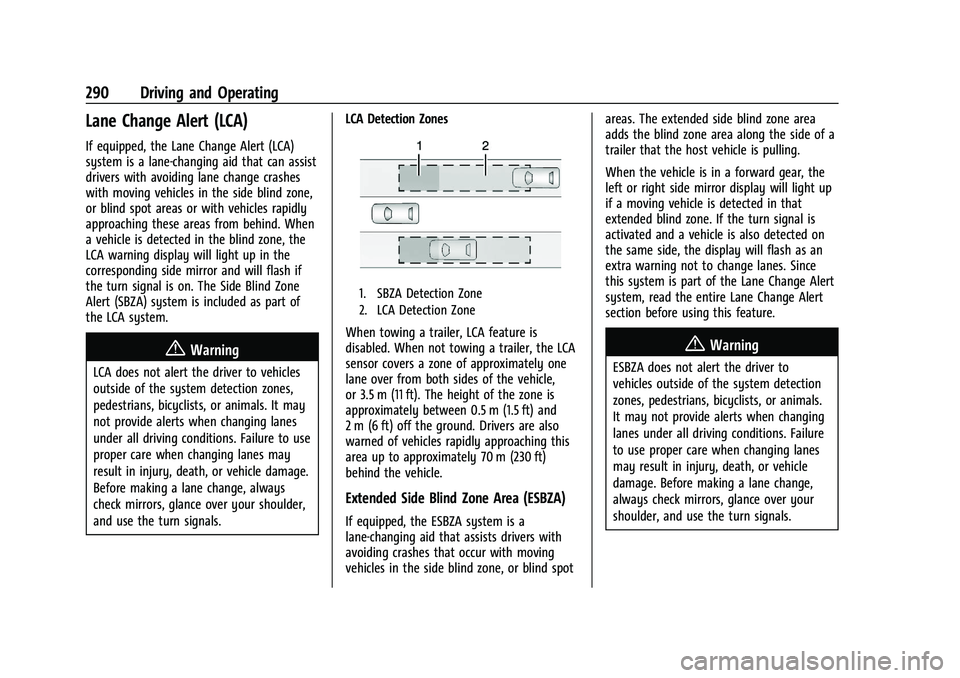
1. SBZA Detection Zone
2. LCA Detection Zone
When towing a trailer, LCA feature is
disabled. When not towing a trailer, the LCA
sensor covers a zone of approximately one
lane over from both sides of the vehicle,
or 3.5 m (11 ft). The height of the zone is
approximately between 0.5 m (1.5 ft) and
2 m (6 ft) off the ground. Drivers are also
warned of vehicles rapidly approaching this
area up to approximately 70 m (230 ft)
behind the vehicle.
Extended Side Blind Zone Area (ESBZA)
If equipped, the ESBZA system is a
lane-changing aid that assists drivers with
avoiding crashes that occur with moving
vehicles in the side blind zone, or blind spot areas. The extended side blind zone area
adds the blind zone area along the side of a
trailer that the host vehicle is pulling.
When the vehicle is in a forward gear, the
left or right side mirror display will light up
if a moving vehicle is detected in that
extended blind zone. If the turn signal is
activated and a vehicle is also detected on
the same side, the display will flash as an
extra warning not to change lanes. Since
this system is part of the Lane Change Alert
system, read the entire Lane Change Alert
section before using this feature.
{Warning
ESBZA does not alert the driver to
vehicles outside of the system detection
zones, pedestrians, bicyclists, or animals.
It may not provide alerts when changing
lanes under all driving conditions. Failure
to use proper care when changing lanes
may result in injury, death, or vehicle
damage. Before making a lane change,
always check mirrors, glance over your
shoulder, and use the turn signals.
Page 292 of 463
Chevrolet Silverado 1500 Owner Manual (GMNA-Localizing-U.S./Canada/
Mexico/Paraguay-16515119) - 2023 - CRC - 6/2/22
Driving and Operating 291
ESBZA Detection Zones
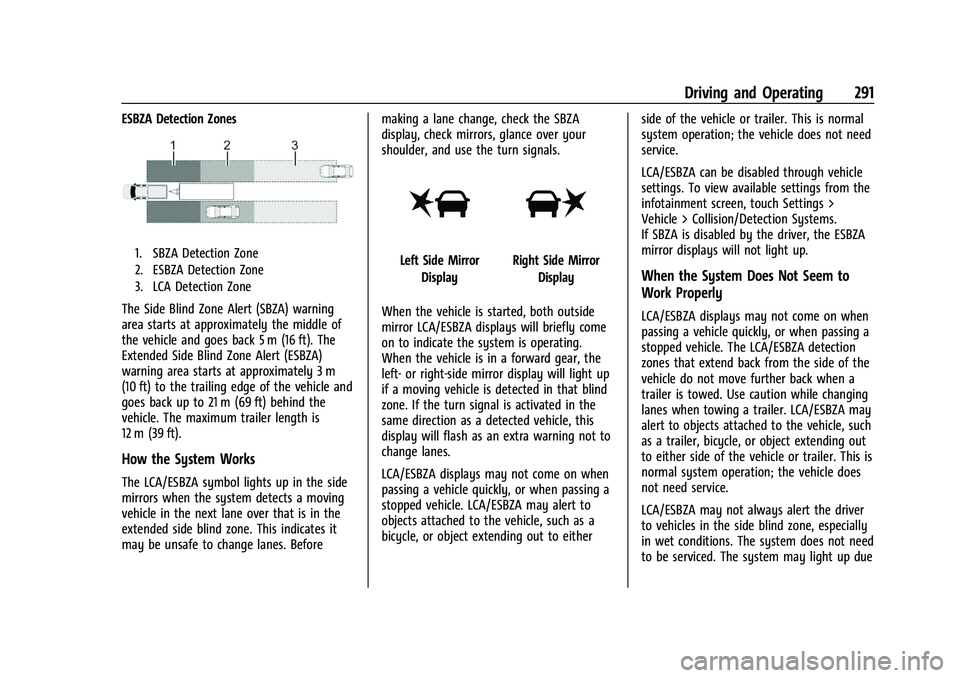
1. SBZA Detection Zone
2. ESBZA Detection Zone
3. LCA Detection Zone
The Side Blind Zone Alert (SBZA) warning
area starts at approximately the middle of
the vehicle and goes back 5 m (16 ft). The
Extended Side Blind Zone Alert (ESBZA)
warning area starts at approximately 3 m
(10 ft) to the trailing edge of the vehicle and
goes back up to 21 m (69 ft) behind the
vehicle. The maximum trailer length is
12 m (39 ft).
How the System Works
The LCA/ESBZA symbol lights up in the side
mirrors when the system detects a moving
vehicle in the next lane over that is in the
extended side blind zone. This indicates it
may be unsafe to change lanes. Beforemaking a lane change, check the SBZA
display, check mirrors, glance over your
shoulder, and use the turn signals.
Left Side Mirror
DisplayRight Side Mirror Display
When the vehicle is started, both outside
mirror LCA/ESBZA displays will briefly come
on to indicate the system is operating.
When the vehicle is in a forward gear, the
left- or right-side mirror display will light up
if a moving vehicle is detected in that blind
zone. If the turn signal is activated in the
same direction as a detected vehicle, this
display will flash as an extra warning not to
change lanes.
LCA/ESBZA displays may not come on when
passing a vehicle quickly, or when passing a
stopped vehicle. LCA/ESBZA may alert to
objects attached to the vehicle, such as a
bicycle, or object extending out to either side of the vehicle or trailer. This is normal
system operation; the vehicle does not need
service.
LCA/ESBZA can be disabled through vehicle
settings. To view available settings from the
infotainment screen, touch Settings >
Vehicle > Collision/Detection Systems.
If SBZA is disabled by the driver, the ESBZA
mirror displays will not light up.When the System Does Not Seem to
Work Properly
LCA/ESBZA displays may not come on when
passing a vehicle quickly, or when passing a
stopped vehicle. The LCA/ESBZA detection
zones that extend back from the side of the
vehicle do not move further back when a
trailer is towed. Use caution while changing
lanes when towing a trailer. LCA/ESBZA may
alert to objects attached to the vehicle, such
as a trailer, bicycle, or object extending out
to either side of the vehicle or trailer. This is
normal system operation; the vehicle does
not need service.
LCA/ESBZA may not always alert the driver
to vehicles in the side blind zone, especially
in wet conditions. The system does not need
to be serviced. The system may light up due
Page 301 of 463
Chevrolet Silverado 1500 Owner Manual (GMNA-Localizing-U.S./Canada/
Mexico/Paraguay-16515119) - 2023 - CRC - 6/2/22
300 Driving and Operating
{Warning
To prevent serious injury or death from
carbon monoxide (CO), when towing a
trailer:
.Do not drive with the liftgate, trunk/
hatch, or rear-most window open.
.Fully open the air outlets on or under
the instrument panel.
.Adjust the climate control system to a
setting that brings in only outside air.
See“Climate Control Systems” in the
Index.
For more information about carbon
monoxide, see Engine Exhaust 0220.
Towing a trailer requires experience. The
combination of the vehicle and trailer is
longer and not as responsive as the vehicle
itself. Get used to the handling and braking
of the combination by driving on a level
road surface before driving on public roads.
The trailer structure, the tires, and the
brakes must all be rated to carry the
intended cargo. Inadequate trailer
equipment can cause the combination to
operate in an unexpected or unsafe manner.
Before driving, inspect all trailer hitch parts and attachments, safety chains, electrical
connectors, lamps, tires, and mirrors. See
Towing Equipment
0307. If the trailer has
electric brakes, start the combination
moving and then manually apply the trailer
brake controller to check that the trailer
brakes work. During the trip, occasionally
check that the cargo and trailer are secure
and that the lamps and any trailer brakes
are working.Towing with a Stability Control System
When towing, the stability control system
might be heard. The system reacts to
vehicle movement caused by the trailer,
which mainly occurs during cornering. This is
normal when towing heavier trailers.
Following Distance
Stay at least twice as far behind the vehicle
ahead as you would when driving without a
trailer. This can help to avoid heavy braking
and sudden turns.
Passing
More passing distance is needed when
towing a trailer. The combination of the
vehicle and trailer will not accelerate as
quickly and is much longer than the vehicle
alone. It is necessary to go much farther beyond the passed vehicle before returning
to the lane. Pass on level roadways. Avoid
passing on hills if possible.
Backing Up
Hold the bottom of the steering wheel with
one hand. To move the trailer to the left,
move that hand to the left. To move the
trailer to the right, move that hand to the
right. Always back up slowly and, if possible,
have someone guide you.
Making Turns
Caution
Turn more slowly and make wider arcs
when towing a trailer to prevent damage
to your vehicle. Making very sharp turns
could cause the trailer to contact the
vehicle.
Make wider turns than normal when towing,
so the trailer will not go over soft shoulders,
over curbs, or strike road signs, trees,
or other objects. Always signal turns well in
advance. Do not steer or brake suddenly.