2023 CHEVROLET SILVERADO 1500 light
[x] Cancel search: lightPage 343 of 463
Chevrolet Silverado 1500 Owner Manual (GMNA-Localizing-U.S./Canada/
Mexico/Paraguay-16515119) - 2023 - CRC - 6/2/22
342 Vehicle Care
Inspect the engine air cleaner/filter for
damage; replace if damaged. Do not clean
the engine air cleaner/filter or components
with water or compressed air.
To inspect or replace the engine air cleaner/
filter:
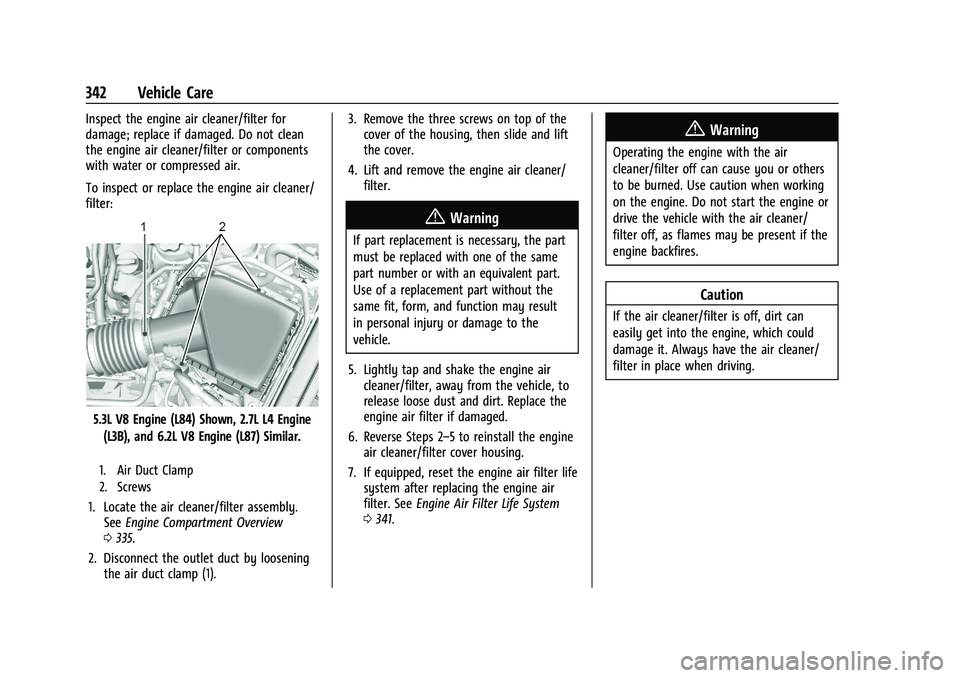
5.3L V8 Engine (L84) Shown, 2.7L L4 Engine(L3B), and 6.2L V8 Engine (L87) Similar.
1. Air Duct Clamp
2. Screws
1. Locate the air cleaner/filter assembly. See Engine Compartment Overview
0 335.
2. Disconnect the outlet duct by loosening the air duct clamp (1). 3. Remove the three screws on top of the
cover of the housing, then slide and lift
the cover.
4. Lift and remove the engine air cleaner/ filter.
{Warning
If part replacement is necessary, the part
must be replaced with one of the same
part number or with an equivalent part.
Use of a replacement part without the
same fit, form, and function may result
in personal injury or damage to the
vehicle.
5. Lightly tap and shake the engine air cleaner/filter, away from the vehicle, to
release loose dust and dirt. Replace the
engine air filter if damaged.
6. Reverse Steps 2–5 to reinstall the engine air cleaner/filter cover housing.
7. If equipped, reset the engine air filter life system after replacing the engine air
filter. See Engine Air Filter Life System
0 341.
{Warning
Operating the engine with the air
cleaner/filter off can cause you or others
to be burned. Use caution when working
on the engine. Do not start the engine or
drive the vehicle with the air cleaner/
filter off, as flames may be present if the
engine backfires.
Caution
If the air cleaner/filter is off, dirt can
easily get into the engine, which could
damage it. Always have the air cleaner/
filter in place when driving.
Page 352 of 463
Chevrolet Silverado 1500 Owner Manual (GMNA-Localizing-U.S./Canada/
Mexico/Paraguay-16515119) - 2023 - CRC - 6/2/22
Vehicle Care 351
Always clean the brake fluid reservoir cap
and the area around the cap before
removing it.
Do not top off the brake fluid. Adding fluid
does not correct a leak. If fluid is added
when the linings are worn, there will be too
much fluid when new brake linings are
installed. Add or remove fluid, as necessary,
only when work is done on the brake
hydraulic system.
{Warning
If too much brake fluid is added, it can
spill on the engine and burn, if the
engine is hot enough. You or others could
be burned, and the vehicle could be
damaged. Add brake fluid only when
work is done on the brake hydraulic
system.
When the brake fluid falls to a low level,
the brake warning light comes on. See Brake
System Warning Light 0118.
Brake fluid absorbs water over time which
degrades the effectiveness of the brake fluid.
Replace brake fluid at the specified intervals
to prevent increased stopping distance. See
Maintenance Schedule 0417. What to Add
Use only GM approved DOT 4 brake fluid
from a clean, sealed container. See
Recommended Fluids and Lubricants
0421.
{Warning
The wrong or contaminated brake fluid
could result in damage to the brake
system. This could result in the loss of
braking leading to a possible injury.
Always use the proper GM approved
brake fluid.
Caution
If brake fluid is spilled on the vehicle's
painted surfaces, the paint finish can be
damaged. Immediately wash off any
painted surface.
Battery - North America
The original equipment battery is
maintenance free. Do not remove the cap
and do not add fluid.
Refer to the replacement number shown on
the original battery label when a new
battery is needed. See Engine Compartment
Overview 0335 for battery location. Stop/Start System
Vehicles equipped with a 2.7L L3B, , 5.3L L84
or 6.2L L87 are equipped with a Stop/Start
system to shut off the engine to help
conserve fuel. See
Stop/Start System 0213.
Vehicles with the Stop/Start system have an
Absorbed Glass Mat (AGM) 12-volt battery.
Installation of a standard 12-volt battery will
result in reduced 12-volt battery life. When
using a 12-volt battery charger on the 12-volt
AGM battery, some chargers have an AGM
battery setting on the charger. If available,
use the AGM setting on the charger to limit
charge voltage to 14.8 volts. Follow the
charger manufacturer’s instructions.
{Warning
WARNING: Battery posts, terminals and
related accessories can expose you to
chemicals including lead and lead
compounds, which are known to the
State of California to cause cancer and
birth defects or other reproductive harm.
Wash hands after handling. For more
information go to
www.P65Warnings.ca.gov.
See California Proposition 65 Warning 01.
Page 358 of 463
Chevrolet Silverado 1500 Owner Manual (GMNA-Localizing-U.S./Canada/
Mexico/Paraguay-16515119) - 2023 - CRC - 6/2/22
Vehicle Care 357
Bulb Replacement
For the proper type of replacement bulbs,
or any bulb changing procedure not listed in
this section, contact your dealer.
Caution
Do not replace incandescent bulbs with
aftermarket LED replacement bulbs. This
can cause damage to the vehicle electrical
system.
Halogen Bulbs
{Warning
Halogen bulbs have pressurized gas inside
and can burst if you drop or scratch the
bulb. You or others could be injured. Be
sure to read and follow the instructions
on the bulb package.
LED Lighting
This vehicle has several LED lamps. For
replacement of any LED lighting assembly,
contact your dealer.
Headlamps, Front Turn Signal,
Sidemarker, and Parking Lamps
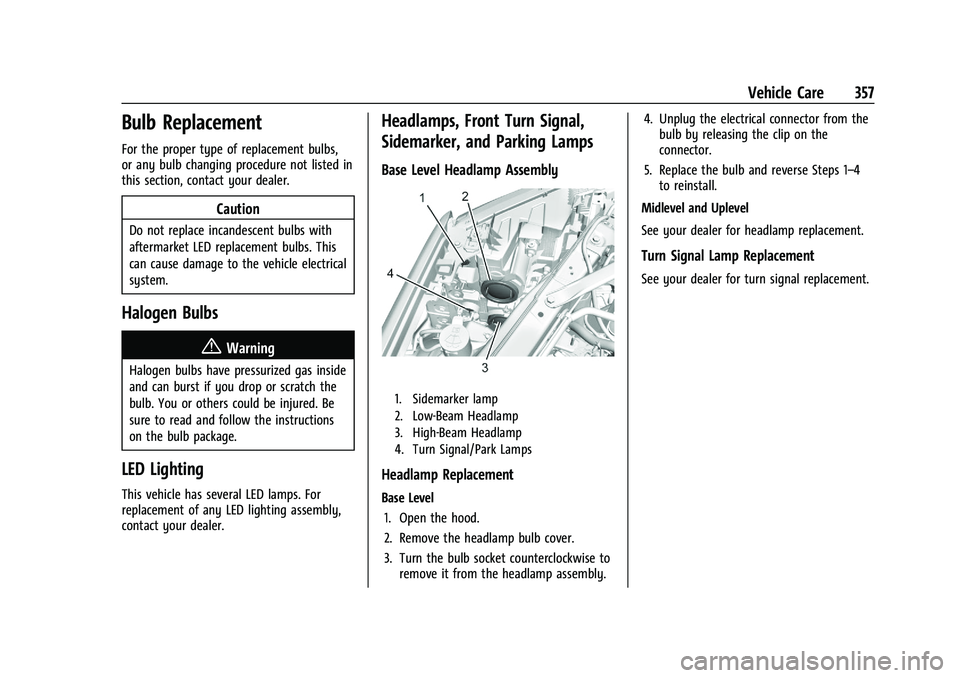
Base Level Headlamp Assembly
1. Sidemarker lamp
2. Low-Beam Headlamp
3. High-Beam Headlamp
4. Turn Signal/Park Lamps
Headlamp Replacement
Base Level1. Open the hood.
2. Remove the headlamp bulb cover.
3. Turn the bulb socket counterclockwise to remove it from the headlamp assembly. 4. Unplug the electrical connector from the
bulb by releasing the clip on the
connector.
5. Replace the bulb and reverse Steps 1–4 to reinstall.
Midlevel and Uplevel
See your dealer for headlamp replacement.
Turn Signal Lamp Replacement
See your dealer for turn signal replacement.
Page 364 of 463
Chevrolet Silverado 1500 Owner Manual (GMNA-Localizing-U.S./Canada/
Mexico/Paraguay-16515119) - 2023 - CRC - 6/2/22
Vehicle Care 363
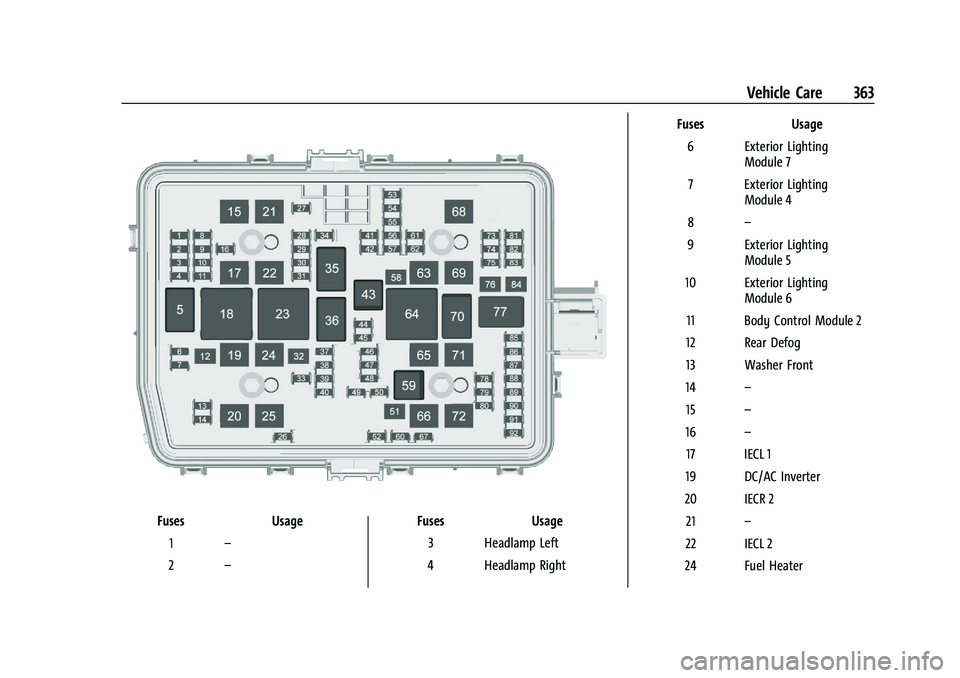
FusesUsage
1 –
2 – Fuses
Usage
3 Headlamp Left
4 Headlamp Right Fuses
Usage
6 Exterior Lighting Module 7
7 Exterior Lighting Module 4
8 –
9 Exterior Lighting Module 5
10 Exterior Lighting Module 6
11 Body Control Module 2
12 Rear Defog
13 Washer Front
14 –
15 –
16 –
17 IECL 1
19 DC/AC Inverter
20 IECR 2 21 –
22 IECL 2
24 Fuel Heater
Page 365 of 463

Chevrolet Silverado 1500 Owner Manual (GMNA-Localizing-U.S./Canada/
Mexico/Paraguay-16515119) - 2023 - CRC - 6/2/22
364 Vehicle Care
FusesUsage
25 EBCM –Electronic Brake
Control Module
26 –
27 Horn
28 Park Lamp Mirror/Grill
29 –
30 Exterior Lighting Module 3
31 Exterior Lighting Module 1
32 –
33 NOT R/C
34 Radars 37 MISC IP Headline Ignition
38 Seat Fan Ignition
39 –
40 MISC Body Ignition 41 Trailer Parking Lamp
42 – Fuses
Usage
44 Trailer Integration Module/DEFC/ICCM
Ignition
45 Secondary Axle Motor
46 Engine Control Module/ Transmission Control
Module/Integrated
Chassis Control Ignition
47 –
48 –
49 Transmission Auxiliary Oil Pump
50 A/C Clutch 51 Transfer Case Control Module
52 Front Wiper
53 Center High-Mounted Stoplamp
54 –
55 Trailer Back-up Lamp
56 SADS –Semi Active
Damping System Fuses
Usage
57 TTPM/SBZA –Side Blind
Zone Alert
58 Starter Motor
60 PWR/TRN Sensors 2 61 –
62 DEFC Battery 1/Canister Vent Solenoid
63 Trailer Brake Control Module
65 –
66 Cooling Fan Motor Left 67 –
68 DEFC Battery 2
69 Starter Pinion 71 Cooling Fan
72 Cooling Fan Right/Lower
73 Trailer Stop/Turn Lamp Left
74 Trailer Interface Module 2
75 Integrated Chassis Control Module
Page 369 of 463
Chevrolet Silverado 1500 Owner Manual (GMNA-Localizing-U.S./Canada/
Mexico/Paraguay-16515119) - 2023 - CRC - 6/2/22
368 Vehicle Care
Back
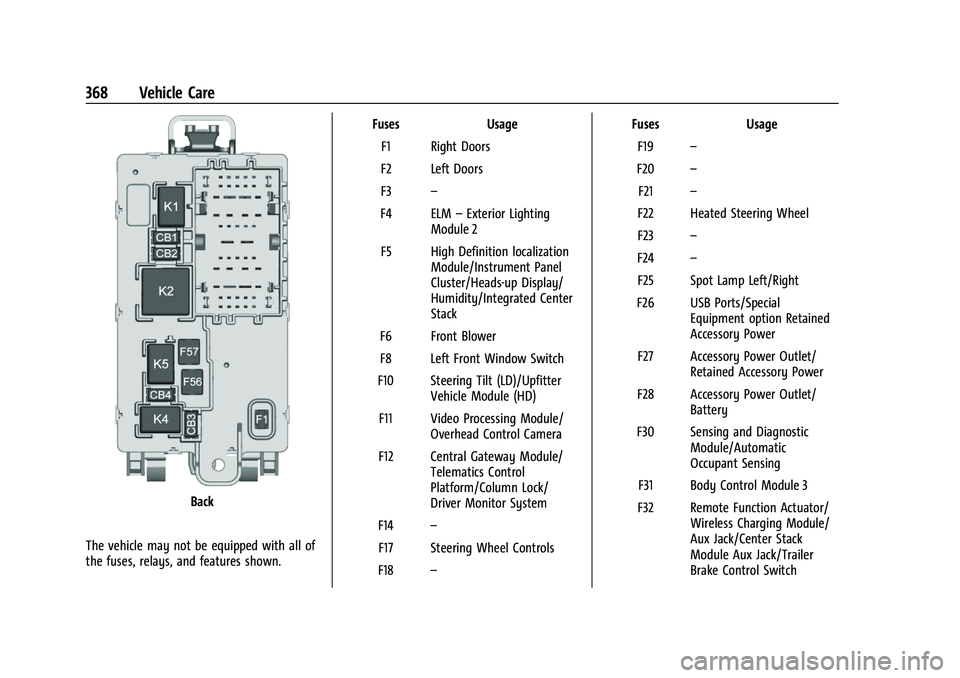
The vehicle may not be equipped with all of
the fuses, relays, and features shown. Fuses Usage
F1 Right Doors
F2 Left Doors
F3 –
F4 ELM –Exterior Lighting
Module 2
F5 High Definition localization Module/Instrument Panel
Cluster/Heads-up Display/
Humidity/Integrated Center
Stack
F6 Front Blower
F8 Left Front Window Switch
F10 Steering Tilt (LD)/Upfitter Vehicle Module (HD)
F11 Video Processing Module/ Overhead Control Camera
F12 Central Gateway Module/ Telematics Control
Platform/Column Lock/
Driver Monitor System
F14 –
F17 Steering Wheel Controls
F18 – Fuses Usage
F19 –
F20 –
F21 –
F22 Heated Steering Wheel
F23 –
F24 –
F25 Spot Lamp Left/Right
F26 USB Ports/Special Equipment option Retained
Accessory Power
F27 Accessory Power Outlet/ Retained Accessory Power
F28 Accessory Power Outlet/ Battery
F30 Sensing and Diagnostic Module/Automatic
Occupant Sensing
F31 Body Control Module 3
F32 Remote Function Actuator/ Wireless Charging Module/
Aux Jack/Center Stack
Module Aux Jack/Trailer
Brake Control Switch
Page 372 of 463
Chevrolet Silverado 1500 Owner Manual (GMNA-Localizing-U.S./Canada/
Mexico/Paraguay-16515119) - 2023 - CRC - 6/2/22
Vehicle Care 371
Tire Sidewall Labeling
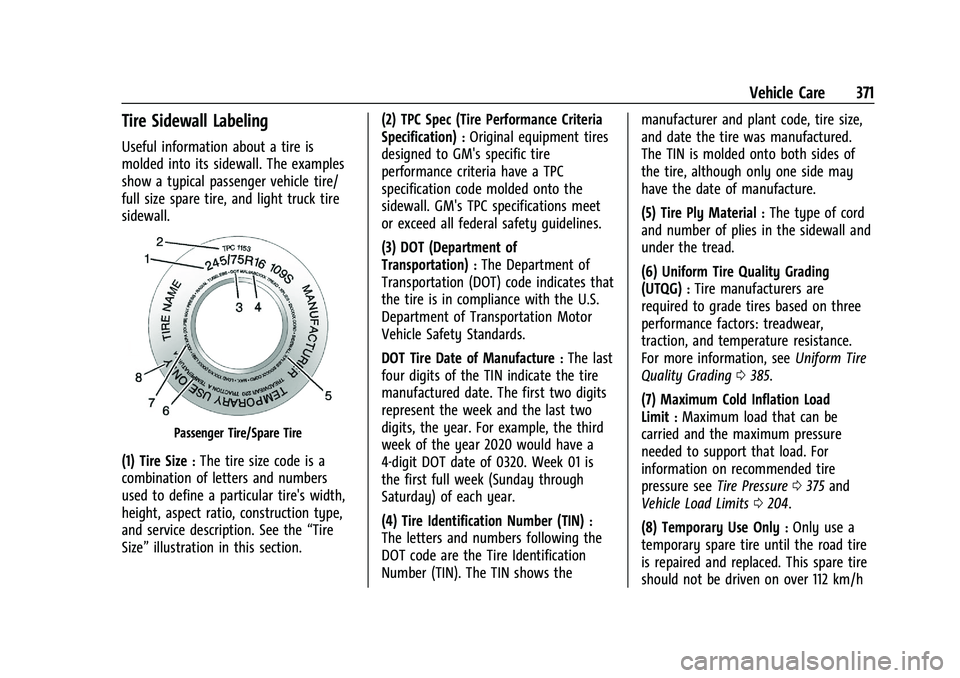
Useful information about a tire is
molded into its sidewall. The examples
show a typical passenger vehicle tire/
full size spare tire, and light truck tire
sidewall.
Passenger Tire/Spare Tire
(1) Tire Size:The tire size code is a
combination of letters and numbers
used to define a particular tire's width,
height, aspect ratio, construction type,
and service description. See the “Tire
Size” illustration in this section. (2) TPC Spec (Tire Performance Criteria
Specification)
:Original equipment tires
designed to GM's specific tire
performance criteria have a TPC
specification code molded onto the
sidewall. GM's TPC specifications meet
or exceed all federal safety guidelines.
(3) DOT (Department of
Transportation)
:The Department of
Transportation (DOT) code indicates that
the tire is in compliance with the U.S.
Department of Transportation Motor
Vehicle Safety Standards.
DOT Tire Date of Manufacture
:The last
four digits of the TIN indicate the tire
manufactured date. The first two digits
represent the week and the last two
digits, the year. For example, the third
week of the year 2020 would have a
4-digit DOT date of 0320. Week 01 is
the first full week (Sunday through
Saturday) of each year.
(4) Tire Identification Number (TIN)
:
The letters and numbers following the
DOT code are the Tire Identification
Number (TIN). The TIN shows the manufacturer and plant code, tire size,
and date the tire was manufactured.
The TIN is molded onto both sides of
the tire, although only one side may
have the date of manufacture.
(5) Tire Ply Material
:The type of cord
and number of plies in the sidewall and
under the tread.
(6) Uniform Tire Quality Grading
(UTQG)
:Tire manufacturers are
required to grade tires based on three
performance factors: treadwear,
traction, and temperature resistance.
For more information, see Uniform Tire
Quality Grading 0385.
(7) Maximum Cold Inflation Load
Limit
:Maximum load that can be
carried and the maximum pressure
needed to support that load. For
information on recommended tire
pressure see Tire Pressure 0375 and
Vehicle Load Limits 0204.
(8) Temporary Use Only
:Only use a
temporary spare tire until the road tire
is repaired and replaced. This spare tire
should not be driven on over 112 km/h
Page 373 of 463
Chevrolet Silverado 1500 Owner Manual (GMNA-Localizing-U.S./Canada/
Mexico/Paraguay-16515119) - 2023 - CRC - 6/2/22
372 Vehicle Care
(70 mph), or 88 km/h (55 mph) when
pulling a trailer, with the proper
inflation pressure. SeeFull-Size Spare
Tire 0399.
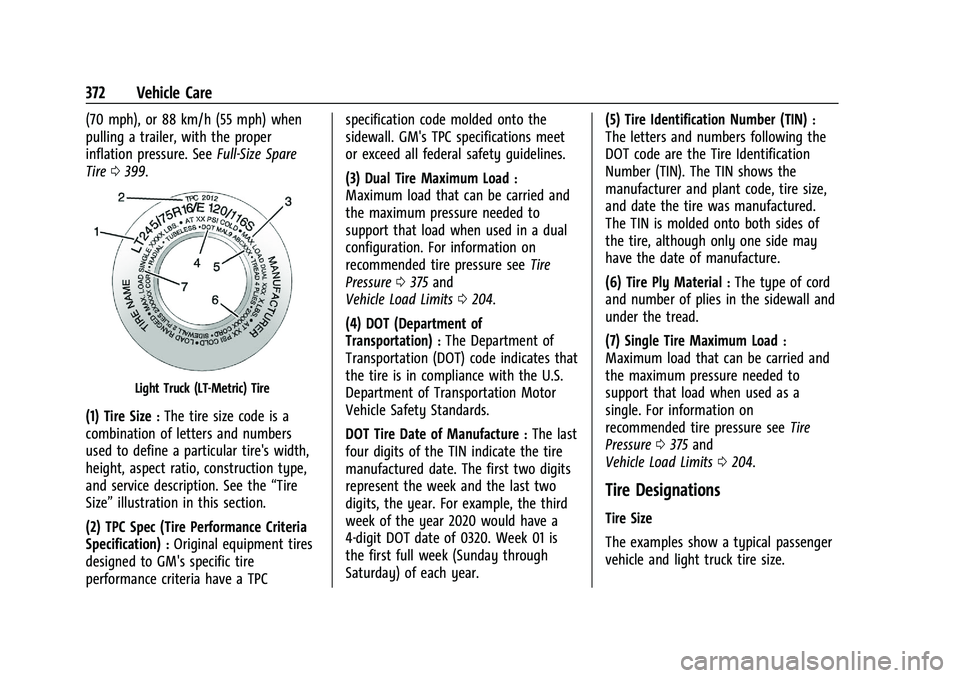
Light Truck (LT-Metric) Tire
(1) Tire Size:The tire size code is a
combination of letters and numbers
used to define a particular tire's width,
height, aspect ratio, construction type,
and service description. See the “Tire
Size” illustration in this section.
(2) TPC Spec (Tire Performance Criteria
Specification)
:Original equipment tires
designed to GM's specific tire
performance criteria have a TPC specification code molded onto the
sidewall. GM's TPC specifications meet
or exceed all federal safety guidelines.
(3) Dual Tire Maximum Load
:
Maximum load that can be carried and
the maximum pressure needed to
support that load when used in a dual
configuration. For information on
recommended tire pressure see
Tire
Pressure 0375 and
Vehicle Load Limits 0204.
(4) DOT (Department of
Transportation)
:The Department of
Transportation (DOT) code indicates that
the tire is in compliance with the U.S.
Department of Transportation Motor
Vehicle Safety Standards.
DOT Tire Date of Manufacture
:The last
four digits of the TIN indicate the tire
manufactured date. The first two digits
represent the week and the last two
digits, the year. For example, the third
week of the year 2020 would have a
4-digit DOT date of 0320. Week 01 is
the first full week (Sunday through
Saturday) of each year. (5) Tire Identification Number (TIN)
:
The letters and numbers following the
DOT code are the Tire Identification
Number (TIN). The TIN shows the
manufacturer and plant code, tire size,
and date the tire was manufactured.
The TIN is molded onto both sides of
the tire, although only one side may
have the date of manufacture.
(6) Tire Ply Material
:The type of cord
and number of plies in the sidewall and
under the tread.
(7) Single Tire Maximum Load
:
Maximum load that can be carried and
the maximum pressure needed to
support that load when used as a
single. For information on
recommended tire pressure see Tire
Pressure 0375 and
Vehicle Load Limits 0204.
Tire Designations
Tire Size
The examples show a typical passenger
vehicle and light truck tire size.