2023 CHEVROLET SILVERADO 1500 display
[x] Cancel search: displayPage 178 of 463
Chevrolet Silverado 1500 Owner Manual (GMNA-Localizing-U.S./Canada/
Mexico/Paraguay-16515119) - 2023 - CRC - 6/2/22
Infotainment System 177
Trailering
Adjusts different trailering settings.
Teen Driver
SeeTeen Driver 0179.
Valet Mode
This will lock the infotainment system and
steering wheel controls. It may also limit
access to vehicle storage locations,
if equipped.
To enable valet mode: 1. Enter a four-digit code on the keypad.
2. Select Enter to go to the confirmation screen.
3. Re-enter the four-digit code.
Touch Lock or Unlock to lock or unlock the
system. Touch Back to go back to the
previous menu.
Settings (Uplevel Radio)
To access the Settings menus: 1. Touch Settings on the Home Page on the infotainment display.
2. Touch the desired category to display a list of available options. 3. Touch to select the desired feature
setting.
4. Touch the options on the infotainment display to disable or enable a feature.
5. Touch
Sto go back.
The Settings menu may contain the
following:
Connections
The menu may contain the following:
Phones
Allows connecting to a different cell phone
or mobile device source, disconnect a cell
phone or media device, or delete a cell
phone or media device.
Wi-Fi Networks
Shows connected and available Wi-Fi
networks.
Wi-Fi Hotspot
Allows adjustment of different Wi-Fi
features.
Vehicle-to-Phone Sharing
Vehicle
The menu may contain the following: Teen Driver
See
Teen Driver 0179.
Rear Seat Reminder
Allows for a chime and a message when the
rear door has been opened before or during
operation of the vehicle.
Buckle to Drive
This feature can prevent shifting out of Park
when the driver, and if applicable the front
passenger, seat belt is not buckled. See
Buckle To Drive 053.
Climate and Air Quality
Adjusts different climate settings.
Collision/Detection Systems
Adjusts different driver assistance system
settings.
Comfort and Convenience
Adjusts different comfort and convenience
settings.
Lighting
Adjusts different lighting settings.
Power Door Locks
Adjusts different door lock settings.
Page 179 of 463
Chevrolet Silverado 1500 Owner Manual (GMNA-Localizing-U.S./Canada/
Mexico/Paraguay-16515119) - 2023 - CRC - 6/2/22
178 Infotainment System
Remote Lock, Unlock, and Start
Adjusts different remote lock settings.
Ride Height
Adjusts different ride height settings.
Power Assist Steps
Adjusts different running board settings.
Seating Position
Adjusts different seating position settings.
Suspension
Adjusts different suspension settings.
Trailering
Adjusts different trailering settings.
Apps and Notifications
Shows a list of installed apps and the
permissions used.
Date / Time
Allows setting of the clock.
Display
Allows adjustment of the infotainment
display.
Sounds
Allows adjustment of the infotainment
system sounds.
Users
Modifies the infotainment system’s users.
Accounts
Allows adding or adjusting of the user
accounts.
Privacy
The menu may contain the following:
Location Services
Touch to view the Location Services screen.
App permissions
Touch to view the Permission manager
screen.
GM Privacy Statement
Touch to view the GM Privacy Statement
screen.
Google legal
Touch to view the Google legal screen.
Storage
This menu shows the storage info on the
infotainment system.
Security
This menu allows adjustment of the
infotainment security settings.
System
The menu may contain the following:
Language
This will set the display language used on
the infotainment display.
Keyboard & speech
Touch to change keyboard and speech
settings.
Units
Touch to change units settings.
Reset Options
Touch to change reset settings.
About
Touch to view the infotainment system
software information.
Page 180 of 463
Chevrolet Silverado 1500 Owner Manual (GMNA-Localizing-U.S./Canada/
Mexico/Paraguay-16515119) - 2023 - CRC - 6/2/22
Infotainment System 179
Legal Information
Touch to view legal and license information.
Updates
This menu allows adjustment of the vehicle
update settings.
Google
This menu allows adjustment of the Google
settings.
Teen Driver
If equipped, this allows multiple keys to be
registered for beginner drivers to encourage
safe driving habits. When the vehicle is
started with a Teen Driver key, it will
automatically activate certain safety
systems, allow setting of some features, and
limit the use of others. The Report Card will
record vehicle data about driving behavior
that can be viewed later. When the vehicle
is started with a registered key, the Driver
Information Center (DIC) displays a message
that Teen Driver is active.
To access:1. Touch Settings on the Home Page, then touch Vehicle, and then Teen Driver. 2. Create a Personal Identification Number
(PIN) by choosing a four-digit PIN.
Re-enter the PIN to confirm. To change
the PIN, touch Change PIN.
The PIN is required to:
.Set up/Add or remove keys.
.Change Teen Driver settings.
.Change or clear the Teen Driver PIN.
.Access or delete Report Card data.
Set up/Add keys to activate Teen Driver and
assign restrictions to the key:
Any vehicle key can be registered, up to a
maximum of eight keys. Label the key to
tell it apart from the other keys.
For a pushbutton start system: 1. Start the vehicle.
2. For automatic transmissions, the vehicle must be in P (Park). For manual
transmissions, the vehicle must be
stopped with the parking brake set.
3. From the Settings menu, touch Vehicle and then Teen Driver.
4. Enter the PIN.
5. Place the remote key you wish to register in the transmitter pocket. The
key does not need to be the one that started the vehicle. See
Remote Key
Operation 012 for transmitter pocket
location.
6. From the Teen Driver menu, touch Setup Keys or Add/Remove Teen Driver Keys.
.If the remote key has not previously
been registered, the option to add
the key displays. Touch Add and a
confirmation message displays. Teen
Driver restrictions will be applied
whenever this remote key is used to
operate the vehicle.
.If the remote key has already been
registered, the option to remove the
key displays. If Remove is touched,
the remote key is no longer
registered. A confirmation message
displays, and Teen Driver restrictions
will not be applied if this remote key
is used to operate the vehicle.
In vehicles with a pushbutton start system,
if a Teen Driver and a non-Teen Driver key
are both present at start up, the vehicle will
recognize the non-Teen Driver key to start
the vehicle. The Teen Driver settings will not
be active.
For a keyed ignition system: 1. Start the vehicle.
Page 181 of 463
Chevrolet Silverado 1500 Owner Manual (GMNA-Localizing-U.S./Canada/
Mexico/Paraguay-16515119) - 2023 - CRC - 6/2/22
180 Infotainment System
2. For automatic transmissions, the vehiclemust be in P (Park). For manual
transmissions, the vehicle must be
stopped with the parking brake set.
3. From the Settings menu, touch Vehicle and then Teen Driver.
4. Enter the PIN.
5. Touch Setup Keys or Add/Remove Teen Driver Keys. The system displays
instructions for registering or
unregistering a key. A confirmation
message displays.
Manage Settings or Teen Driver Settings
Depending on the options of your vehicle,
the following menu items may be displayed:
Buckle to Drive : When turned ON, Buckle to
Drive prevents the driver from shifting out
of P (Park) for a period of time after the
brake pedal is pressed if the driver, or on
some vehicles the detected passenger, has
not buckled their seat belt. On some
vehicles, Buckle to Drive is always ON when
Teen Driver is active and is not configurable.
See Buckle To Drive 053.
Audio Volume Limit : Allows a maximum
audio volume to be set. Turn the audio
volume limit on or off. Use the arrows to
choose the maximum allowable level for the audio volume. On some infotainment
systems, touch Set Audio Volume Limit to
choose the maximum allowable audio
volume level.
Set Audio Volume Limit :
Use the arrows to
choose the maximum allowable level for the
audio volume.
Teen Driver Speed Limiter : Limits the
maximum speed of the vehicle. When the
speed limiter is turned on and the vehicle is
started with a Teen Driver key, the DIC
displays a message that the top speed is
limited.
On certain vehicles, when the Speed Limiter
is turned ON, the vehicle’s maximum
acceleration will be limited. The DIC will
display a message that the acceleration is
limited.
Teen Driver Speed Warning : Displays a
warning in the DIC when exceeding a
selectable speed. Turn the speed warning on
or off and choose the desired speed warning
level. The speed warning does not limit the
speed of the vehicle. On some infotainment
systems, touch Set Teen Driver Speed
Warning to set the warning speed. Set Teen Driver Speed Warning :
Choose the
desired speed warning level. The speed
warning does not limit the speed of the
vehicle.
SiriusXM Explicit Content Filter : Allows the
SiriusXM Explicit Content Filter to be turned
ON or OFF. When ON, the teen driver will
not be able to listen to SiriusXM stations
that contain explicit content, and the Explicit
Content Filter selection in the Audio Settings
will be unavailable for change.
When Teen Driver is Active:
.If equipped, the radio will mute when the
driver seat belt, and in some vehicles the
front passenger seat belt, is not buckled.
The audio from any device paired to the
vehicle will also be muted.
.An object placed on the front passenger
seat, such as a briefcase, handbag,
grocery bag, laptop, or other electronic
device, could cause the passenger sensing
system to falsely sense an unbuckled
front passenger and mute the radio.
If this happens, remove the object from
the seat. See Passenger Sensing System
0 64.
.Some safety systems, such as Automatic
Emergency Braking, if equipped, cannot
be turned off.
Page 182 of 463
Chevrolet Silverado 1500 Owner Manual (GMNA-Localizing-U.S./Canada/
Mexico/Paraguay-16515119) - 2023 - CRC - 6/2/22
Infotainment System 181
.The gap setting for Adaptive Cruise
Control and alert timing for Forward
Collision Alert, if equipped, cannot be
changed.
.When trying to change a safety feature
that is not configurable in Teen Driver,
the feature may be grayed out or
removed from the infotainment menu,
or the DIC will display a message
indicating that Teen Driver is active and
the action is not available.
.Super Cruise, if equipped, is not available.
.Enhanced Low Fuel Warning (if equipped)
–When the vehicle is low on fuel, the
low fuel light on the instrument cluster
flashes and the DIC low fuel warning
cannot be dismissed.
.Do not tow a trailer if equipped with
Automatic Emergency Braking.
Report Card
The vehicle owner must secure the driver’s
consent to record certain vehicle data when
the vehicle is driven with a registered Teen
Driver key. There is one Report Card per
vehicle. Data is only recorded when a
registered Teen Driver key is used to
operate the vehicle. The Report Card data is collected from the
time Teen Driver is activated or the last
time the Report Card was reset. The
following items may be recorded:
.Distance Driven
–the total distance
driven.
.Maximum Speed –the maximum vehicle
speed detected.
.Overspeed Warnings –the number of
times the speed warning setting was
exceeded.
.Wide Open Throttle –the number of
times the accelerator pedal was pressed
nearly all the way down.
.Forward Collision Alerts (if equipped) –
the number of times the driver was
notified when approaching a vehicle
ahead too quickly and at potential risk for
a crash.
.Forward Automatic Braking, also called
Automatic Emergency Braking (if
equipped) –the number of times the
vehicle detected that a forward collision
was imminent and applied the brakes.
.Reverse Automatic Braking (if equipped) –
the number of times the vehicle detected
that a rearward collision was imminent
and applied the brakes.
.Traction Control –the number of times
the Traction Control System activated to
reduce wheel spin or loss of traction.
.Stability Control –the number of events
which required the use of electronic
stability control.
.Antilock Braking System Active –The
number of Antilock Brake System
activations.
.Tailgating Alerts (if equipped)– the
number of times the driver was alerted
for following a vehicle ahead too closely.
Report Card Data
Cumulative Data is saved for all trips until
the Report Card is reset or until the
maximum count is exceeded. If the
maximum count is exceeded for a Report
Card line item, that item will no longer be
updated in the Report Card until it is reset.
Each item will report a maximum of
1,000 counts. The distance driven will report
a maximum of 64 374 km (40,000 mi).
To delete Report Card data, do one of the
following:
.From the Report Card display, touch
Reset.
Page 189 of 463
Chevrolet Silverado 1500 Owner Manual (GMNA-Localizing-U.S./Canada/
Mexico/Paraguay-16515119) - 2023 - CRC - 6/2/22
188 Climate Controls
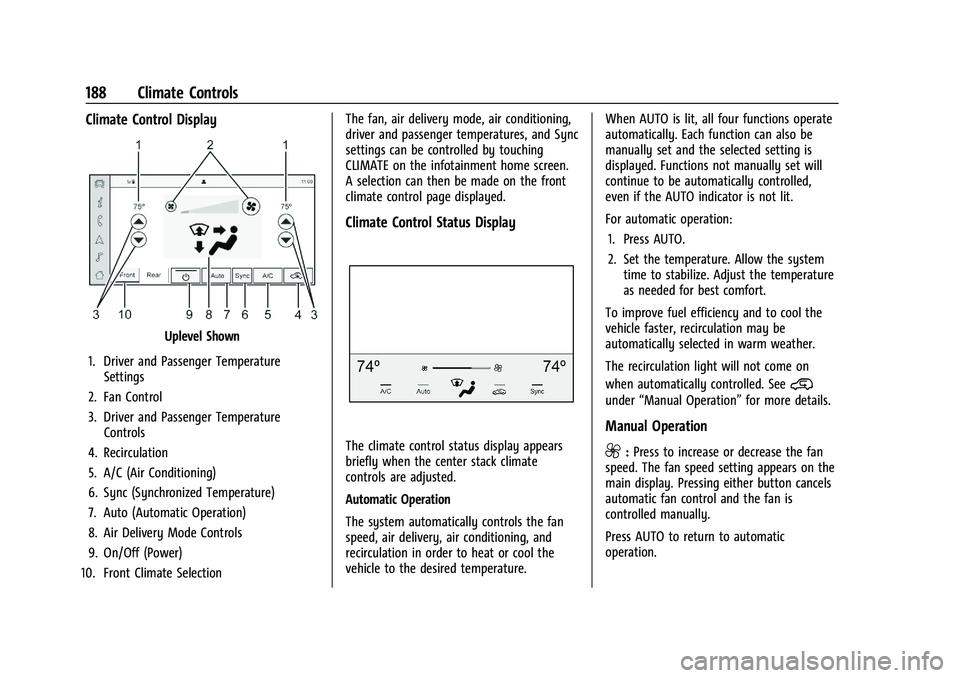
Climate Control Display
Uplevel Shown
1. Driver and Passenger Temperature Settings
2. Fan Control
3. Driver and Passenger Temperature Controls
4. Recirculation
5. A/C (Air Conditioning)
6. Sync (Synchronized Temperature)
7. Auto (Automatic Operation)
8. Air Delivery Mode Controls
9. On/Off (Power)
10. Front Climate Selection The fan, air delivery mode, air conditioning,
driver and passenger temperatures, and Sync
settings can be controlled by touching
CLIMATE on the infotainment home screen.
A selection can then be made on the front
climate control page displayed.
Climate Control Status Display
The climate control status display appears
briefly when the center stack climate
controls are adjusted.
Automatic Operation
The system automatically controls the fan
speed, air delivery, air conditioning, and
recirculation in order to heat or cool the
vehicle to the desired temperature.
When AUTO is lit, all four functions operate
automatically. Each function can also be
manually set and the selected setting is
displayed. Functions not manually set will
continue to be automatically controlled,
even if the AUTO indicator is not lit.
For automatic operation:
1. Press AUTO.
2. Set the temperature. Allow the system time to stabilize. Adjust the temperature
as needed for best comfort.
To improve fuel efficiency and to cool the
vehicle faster, recirculation may be
automatically selected in warm weather.
The recirculation light will not come on
when automatically controlled. See
@
under “Manual Operation” for more details.
Manual Operation
9:Press to increase or decrease the fan
speed. The fan speed setting appears on the
main display. Pressing either button cancels
automatic fan control and the fan is
controlled manually.
Press AUTO to return to automatic
operation.
Page 190 of 463
Chevrolet Silverado 1500 Owner Manual (GMNA-Localizing-U.S./Canada/
Mexico/Paraguay-16515119) - 2023 - CRC - 6/2/22
Climate Controls 189
Driver and Passenger Temperature Control :
The temperature can be adjusted separately
for the driver and passenger.
Turn the knob clockwise or counterclockwise
to increase or decrease the driver or
passenger temperature setting. The driver
side or passenger side temperature display
shows the temperature setting increasing or
decreasing.
SYNC :Press to link the passenger
temperature setting to the driver setting.
The SYNC indicator light will turn on. When
the passenger setting is adjusted, the SYNC
indicator light will turn off.
Air Delivery Mode Control : Press
z,Y,
or
[to change the direction of the
airflow. Any combination of the three
controls can be selected. An indicator light
comes on in the selected mode button.
Changing the mode cancels the automatic
operation and the system goes into manual
mode. Press AUTO to return to automatic
operation.
To change the current mode, select one or
more of the following:
z: Air is directed to the windshield,
outboard A/C outlets, and side window
outlets.
Y: Air is directed to the A/C outlets.
[:Air is directed to the floor outlets,
with some air directed to the windshield,
outboard A/C outlets, and side window
outlets.
0MAX : Air is directed to the windshield
and the fan runs at a higher speed if not
already above a medium fan speed. This
mode overrides the previous mode selected
and clears fog or frost from the windshield
more quickly. When the control is pressed
again, the system returns to the previous
mode setting and fan speed.
For best results, clear all snow and ice from
the windshield before defrosting.
@: Press to turn on recirculation. An
indicator light comes on. Air is recirculated
to quickly cool the inside of the vehicle.
It can also be used to help reduce outside
air and odors that enter the vehicle.
Avoid using recirculation for long periods of
time in cold or damp conditions. Using
recirculation in cold or damp conditions can
result in window fogging. A/C :
Press to turn the air conditioning on
or off. An indicator light comes on to show
that the air conditioning is enabled. If the
fan is turned off, the air conditioner will not
run. The A/C light will stay on even if the
outside temperatures are below freezing.
Rear Window Defogger
1REAR : If equipped, press to turn the
rear window defogger on or off. An indicator
light on the button comes on to show that
the rear window defogger is on.
The rear window defogger only works when
the engine is running. The defogger can be
turned off by turning the vehicle off or to
accessory mode.
If equipped with heated outside mirrors,
press
fto turn them on or off. See Heated
Mirrors 034.
Caution
Using a razor blade or sharp object to
clear the inside rear window can damage
the rear window defogger. Repairs would
not be covered by the vehicle warranty.
Do not clear the inside rear window with
sharp objects.
Page 200 of 463
Chevrolet Silverado 1500 Owner Manual (GMNA-Localizing-U.S./Canada/
Mexico/Paraguay-16515119) - 2023 - CRC - 6/2/22
Driving and Operating 199
Before driving on a hill, assess the
steepness, traction, and obstructions. If the
terrain ahead cannot be seen, get out of the
vehicle and walk the hill before driving
further.
When driving on hills:
.Use a low gear and keep a firm grip on
the steering wheel.
.Maintain a slow speed.
.When possible, drive straight up or down
the hill.
.Slow down when approaching the top of
the hill.
{Warning
Driving to the top of a hill at high speed
can cause a crash. There could be a
drop-off, embankment, cliff, or even
another vehicle. You could be seriously
injured or killed. As you near the top of a
hill, slow down and stay alert.
.Use headlamps even during the day to
make the vehicle more visible.
.Avoid turns that take the vehicle across
the incline of the hill. Driving across an
incline puts more weight on the downhill
wheels, which could cause a downhill
slide or a rollover.
.Loose gravel, muddy spots, or even wet
grass can cause the tires to slip sideways,
downhill. If the vehicle slips sideways, it
can hit something and potentially
roll over.
.Hidden obstacles can make the steepness
of the incline more severe. If a rock is
driven across with the uphill wheels, or if
the downhill wheels drop into a rut or
depression, the vehicle can tilt even more.
.If an incline must be driven across, and
the vehicle starts to slide, turn downhill.
This should help straighten out the
vehicle and prevent the side slipping.
.Never go downhill forward or backward
with either the transmission or transfer
case in N (Neutral). The brakes could
overheat and you could lose control.
.When driving down a hill, keep the
vehicle headed straight down. Use a low
gear because the engine will work with
the brakes to slow the vehicle and help
keep the vehicle under control.
{Warning
If the vehicle has the two-speed
automatic transfer case, shifting the
transfer case to N (Neutral) can cause
your vehicle to roll even if the
transmission is in P (Park). This is because
the N (Neutral) position on the transfer
case overrides the transmission. You or
someone else could be injured. If leaving
the vehicle, set the parking brake and
shift the transmission to P (Park). Shift
the transfer case to any position but
N (Neutral).
{Warning
Heavy braking when going down a hill
can cause your brakes to overheat and
fade. This could cause loss of control and
you or others could be injured or killed.
Apply the brakes lightly when descending
a hill and use a low gear to keep vehicle
speed under control.
If a brake fade condition is detected, a DIC
warning message is displayed. Adjust brake
pedal use and shift to a lower transmission
gear to reduce braking.