2023 CHEVROLET MALIBU set clock
[x] Cancel search: set clockPage 11 of 332
Chevrolet Malibu Owner Manual (GMNA-Localizing-U.S./Canada-
16273584) - 2023 - CRC - 9/28/22
10 Keys, Doors, and Windows
heard. Passive locking will then remain
disabled until
Qon the interior door is
pressed, or until the vehicle is turned on.
Remote Left In Vehicle Alert
When the vehicle is turned off and an
remote key is left in the vehicle, the horn
will chirp three times after all doors are
closed. To view available settings from the
infotainment screen, touch Settings >
Vehicle > Remote Lock, Unlock, Start.
Remote No Longer In Vehicle Alert
If the vehicle is on with a door open, and
then all doors are closed, the vehicle will
check for an remote key inside. If an remote
key is not detected, the Driver Information
Center (DIC) will display NO REMOTE
DETECTED and the horn will chirp three
times.
This occurs only once each time the vehicle
is driven. To view available settings from the
infotainment screen, touch Settings >
Vehicle > Remote Lock, Unlock, Start.
Keyless Trunk Opening
Press the touch pad on the rear of the trunk
to open it if the remote key is within 1 m
(3 ft) of the trunk.
Key Access
To access a vehicle with a weak remote key
battery, see Door Locks014.
Programming Remote Keys to the
Vehicle
Only remote keys programmed to the
vehicle will work. If a remote key is lost or
stolen, a replacement can be purchased and
programmed through your dealer. The
vehicle can be reprogrammed so that lost or
stolen remote keys no longer work. Any
remaining remote keys will need to be
reprogrammed. Each vehicle can have up to
eight remote keys matched to it.
Programming with Recognized Remote Keys
A new remote key can be programmed to
the vehicle when there are two recognized
remote keys. To program, the vehicle must
be off and all of the remote keys, both
currently recognized and new, must be
with you.
1. Place the two recognized remote keys in the cupholder.
2. Remove the key lock cylinder cap on the driver door handle. See Door Locks014.
Insert the vehicle key of the new remote
key into the key lock cylinder on the outside of the driver door and turn the
key counterclockwise five times within
10 seconds.
The DIC displays READY FOR REMOTE #2,
3, 4, or 5.
3. Place the first new remote key into the
remote key pocket with the buttons
facing the rear of the vehicle. The
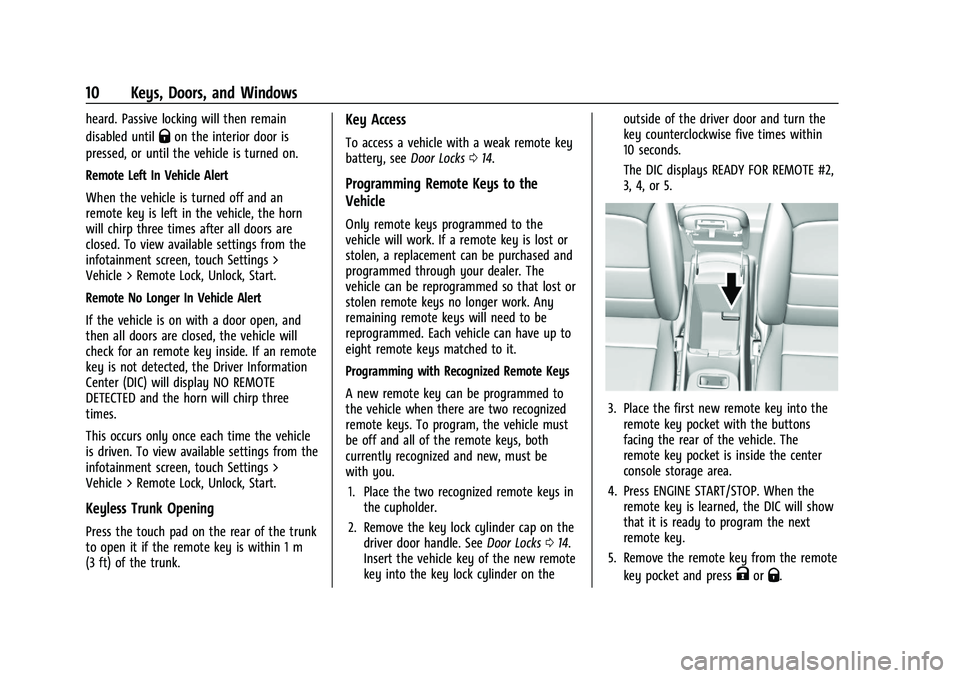
remote key pocket is inside the center
console storage area.
4. Press ENGINE START/STOP. When the remote key is learned, the DIC will show
that it is ready to program the next
remote key.
5. Remove the remote key from the remote key pocket and press
KorQ.
Page 77 of 332

Chevrolet Malibu Owner Manual (GMNA-Localizing-U.S./Canada-
16273584) - 2023 - CRC - 9/28/22
76 Instruments and Controls
LO :Use for slow wipes.
INT : Move the lever up to INT for
intermittent wipes, then turn the band up
for more frequent wipes or down for less
frequent wipes.
OFF : Use to turn the wipers off.
1X : For a single wipe, briefly move the
lever down. For several wipes, hold the
lever down.
Clear snow and ice from the wiper blades
and windshield before using them. If frozen
to the windshield, carefully loosen or thaw
them. Damaged blades should be replaced.
See Wiper Blade Replacement 0237.
Heavy snow or ice can overload the wiper
motor. If the wiper motor overheats, the
windshield wipers will stop until the motor
cools and the wiper control is turned off.
See Electrical System Overload 0243.
{Warning
In freezing weather, do not use the
washer until the windshield is warmed.
Otherwise the washer fluid can form ice
on the windshield, blocking your vision.
{Warning
Before driving the vehicle, always clear
snow and ice from the hood, windshield,
washer nozzles, roof, and rear of the
vehicle, including all lamps and windows.
Reduced visibility from snow and ice
buildup could lead to a crash.
Wiper Parking
If the ignition is turned off while the wipers
are on LO, HI, or INT, they will
immediately stop.
If the windshield wiper lever is then moved
to OFF before the driver door is opened or
within 10 minutes, the wipers will restart
and move to the base of the windshield.
If the ignition is turned off while the wipers
are performing wipes due to windshield
washing, the wipers continue to run until
they reach the base of the windshield.
f: Pull the windshield wiper lever
toward you to spray windshield washer fluid
and activate the wipers. The wipers will
continue until the lever is released or the
maximum wash time is reached. When the
lever is released, additional wipes may occur
depending on how long the windshield
washer had been activated. See Washer
Fluid 0233 for information on filling the
windshield washer fluid reservoir.
Clock
Set the time and date using the
infotainment system. See "Time/Date" under
Settings 0144.
Power Outlets
Power Outlet 12-Volt Direct Current
The accessory power outlets can be used to
plug in electrical equipment, such as a cell
phone or MP3 player.
There are two accessory power outlets:
.One on the center stack below the
climate control system
.One on the rear of the center console
Page 145 of 332
Chevrolet Malibu Owner Manual (GMNA-Localizing-U.S./Canada-
16273584) - 2023 - CRC - 9/28/22
144 Infotainment System
Google may change or suspend availability
at any time. Android Auto, Android, Google,
Google Play, and other marks are
trademarks of Google Inc.; Apple CarPlay is a
trademark of Apple Inc.
Press
{on the center stack to exit Android
Auto or Apple CarPlay. To enter back into
Android Auto or Apple CarPlay, press and
hold
{on the center stack.
Apple CarPlay and Android Auto can be
disabled from the infotainment system. To
do this, touch Home, Settings, and then
touch the Apps tab along the top of the
display. Use the On/Off toggled to turn off
Apple CarPlay or Android Auto.
Settings
Certain settings can be managed in the
Owner Center sites when an account is
established, and may be modified if other
users have accessed the vehicle or created
accounts. This may result in changes to the
security or functionality of the infotainment
system. Some settings may also be
transferred to a new vehicle, if equipped. For
instructions, in the U.S. see
my.chevrolet.com or in Canada see
mychevrolet.ca or monchevrolet.ca. Refer to the User Terms and Privacy
Statement for important details. To view,
touch the Settings icon on the Home Page
of the infotainment display.
The settings menu may be organized into
four categories. Select the desired category
by touching System, Apps, Vehicle,
or Personal.
To access the personalization menus:
1. Touch Settings on the Home Page on the infotainment display.
2. Touch the desired category to display a list of available options.
3. Touch to select the desired feature setting.
4. Touch the options on the infotainment display to disable or enable a feature.
5. Touchzto go to the top level of the
Settings menu.
System
The menu may contain the following:
Time / Date
Allows setting of the clock. Language
Sets the display language used on the
infotainment display. It may also use the
selected language for voice recognition and
audio feedback.
Phones
Allows connecting to a different cell phone
or mobile device source, disconnect a cell
phone or media device, or delete a cell
phone or media device.
Wi-Fi Networks
Shows connected and available Wi-Fi
networks.
If a 4G LTE data package is not active on the
vehicle, the infotainment system can be
connected to an external protected Wi-Fi
network, such as a mobile device or home
hotspot, to utilize connected services.
Wi-Fi Hotspot
Allows adjustment of different Wi-Fi
features.
Privacy
Allows adjustment of the infotainment
privacy settings.
Page 158 of 332
Chevrolet Malibu Owner Manual (GMNA-Localizing-U.S./Canada-
16273584) - 2023 - CRC - 9/28/22
Climate Controls 157
Climate Controls
Climate Control Systems
Climate Control Systems . . . . . . . . . . . . . . . 157
Dual Automatic Climate ControlSystem . . . . . . . . . . . . . . . . . . . . . . . . . . . . . . 159
Air Vents
Air Vents . . . . . . . . . . . . . . . . . . . . . . . . . . . . . . 162
Maintenance
Passenger Compartment Air Filter . . . . . 163
Service . . . . . . . . . . . . . . . . . . . . . . . . . . . . . . . . 164
Climate Control Systems
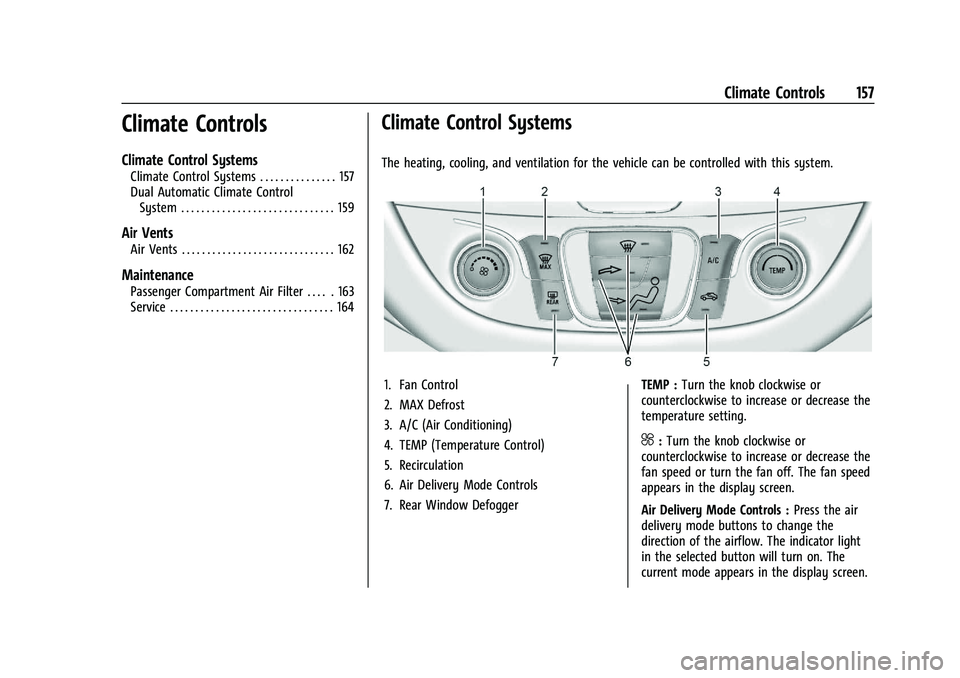
The heating, cooling, and ventilation for the vehicle can be controlled with this system.
1. Fan Control
2. MAX Defrost
3. A/C (Air Conditioning)
4. TEMP (Temperature Control)
5. Recirculation
6. Air Delivery Mode Controls
7. Rear Window Defogger TEMP :
Turn the knob clockwise or
counterclockwise to increase or decrease the
temperature setting.
^: Turn the knob clockwise or
counterclockwise to increase or decrease the
fan speed or turn the fan off. The fan speed
appears in the display screen.
Air Delivery Mode Controls : Press the air
delivery mode buttons to change the
direction of the airflow. The indicator light
in the selected button will turn on. The
current mode appears in the display screen.
Page 161 of 332
Chevrolet Malibu Owner Manual (GMNA-Localizing-U.S./Canada-
16273584) - 2023 - CRC - 9/28/22
160 Climate Controls
The fan, air delivery mode, air conditioning,
driver and passenger temperatures, and Sync
settings can be controlled by touching
CLIMATE on the infotainment Home Page or
the climate button in the climate control
display application tray. A selection can then
be made on the front climate control page
displayed. See the infotainment manual.
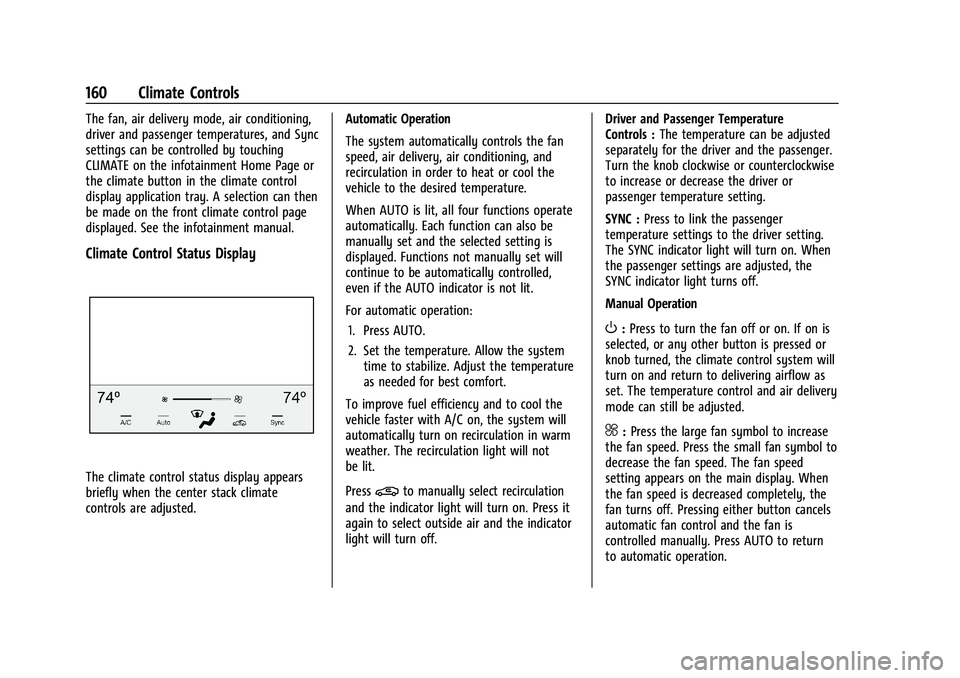
Climate Control Status Display
The climate control status display appears
briefly when the center stack climate
controls are adjusted.Automatic Operation
The system automatically controls the fan
speed, air delivery, air conditioning, and
recirculation in order to heat or cool the
vehicle to the desired temperature.
When AUTO is lit, all four functions operate
automatically. Each function can also be
manually set and the selected setting is
displayed. Functions not manually set will
continue to be automatically controlled,
even if the AUTO indicator is not lit.
For automatic operation:
1. Press AUTO.
2. Set the temperature. Allow the system time to stabilize. Adjust the temperature
as needed for best comfort.
To improve fuel efficiency and to cool the
vehicle faster with A/C on, the system will
automatically turn on recirculation in warm
weather. The recirculation light will not
be lit.
Press@to manually select recirculation
and the indicator light will turn on. Press it
again to select outside air and the indicator
light will turn off. Driver and Passenger Temperature
Controls :
The temperature can be adjusted
separately for the driver and the passenger.
Turn the knob clockwise or counterclockwise
to increase or decrease the driver or
passenger temperature setting.
SYNC : Press to link the passenger
temperature settings to the driver setting.
The SYNC indicator light will turn on. When
the passenger settings are adjusted, the
SYNC indicator light turns off.
Manual Operation
O: Press to turn the fan off or on. If on is
selected, or any other button is pressed or
knob turned, the climate control system will
turn on and return to delivering airflow as
set. The temperature control and air delivery
mode can still be adjusted.
^: Press the large fan symbol to increase
the fan speed. Press the small fan symbol to
decrease the fan speed. The fan speed
setting appears on the main display. When
the fan speed is decreased completely, the
fan turns off. Pressing either button cancels
automatic fan control and the fan is
controlled manually. Press AUTO to return
to automatic operation.
Page 271 of 332
Chevrolet Malibu Owner Manual (GMNA-Localizing-U.S./Canada-
16273584) - 2023 - CRC - 9/28/22
270 Vehicle Care
If a tire goes flat, avoid further tire and
wheel damage by driving slowly to a level
place, well off the road, if possible. Turn on
the hazard warning flashers. SeeHazard
Warning Flashers 0104.
If your vehicle is loaded at or near
maximum cargo capacity, it may be difficult
to fit the jack under the vehicle due to the
environment (shoulder slope, road debris,
etc.). Removal of some weight may improve
the ability to fit the jack under the vehicle
at the correct jacking location.
{Warning
Changing a tire can be dangerous. The
vehicle can slip off the jack and roll over
or fall causing injury or death. Find a
level place to change the tire. To help
prevent the vehicle from moving:
1. Set the parking brake firmly.
2. Put the vehicle in P (Park).
3. Turn the vehicle off and do not restart the vehicle while it is raised.
4. Do not allow passengers to remain in the vehicle.
(Continued)
Warning (Continued)
5. Place wheel blocks, if equipped, onboth sides of the tire at the opposite
corner of the tire being changed.
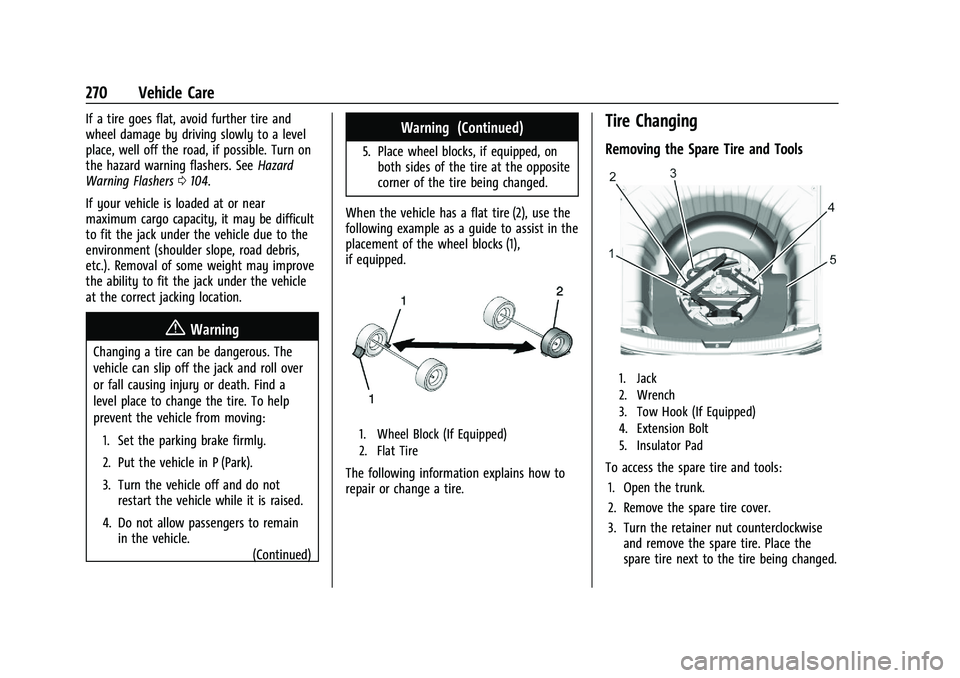
When the vehicle has a flat tire (2), use the
following example as a guide to assist in the
placement of the wheel blocks (1),
if equipped.
1. Wheel Block (If Equipped)
2. Flat Tire
The following information explains how to
repair or change a tire.
Tire Changing
Removing the Spare Tire and Tools
1. Jack
2. Wrench
3. Tow Hook (If Equipped)
4. Extension Bolt
5. Insulator Pad
To access the spare tire and tools: 1. Open the trunk.
2. Remove the spare tire cover.
3. Turn the retainer nut counterclockwise and remove the spare tire. Place the
spare tire next to the tire being changed.
Page 272 of 332
Chevrolet Malibu Owner Manual (GMNA-Localizing-U.S./Canada-
16273584) - 2023 - CRC - 9/28/22
Vehicle Care 271
4. The jack and tools are stored below thespare tire. Remove them from their
container and place them near the tire
being changed.
Removing the Flat Tire and Installing the
Spare Tire
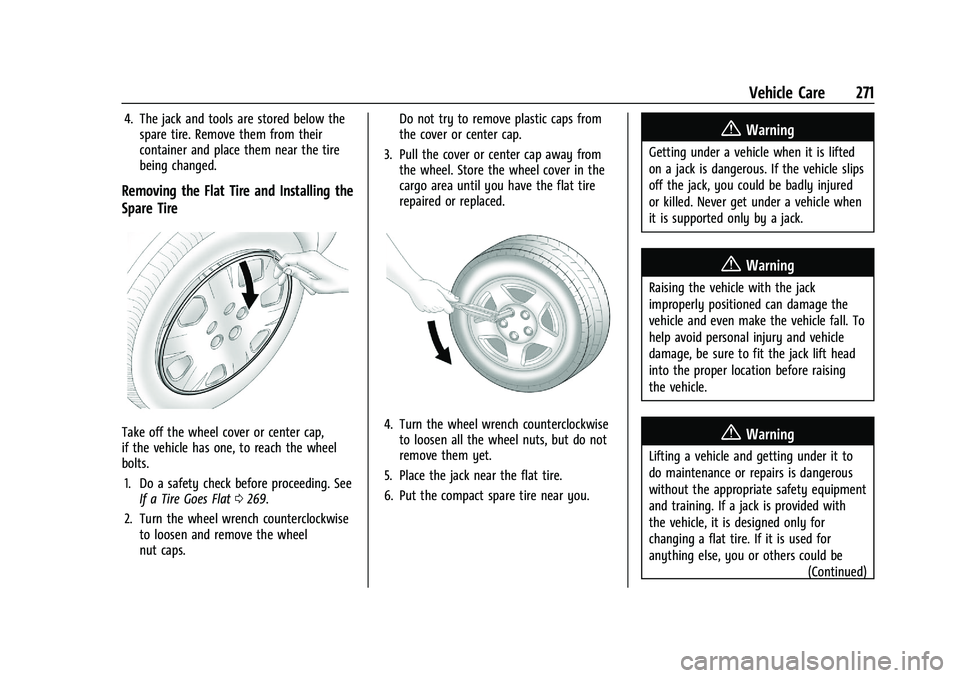
Take off the wheel cover or center cap,
if the vehicle has one, to reach the wheel
bolts.
1. Do a safety check before proceeding. See If a Tire Goes Flat 0269.
2. Turn the wheel wrench counterclockwise to loosen and remove the wheel
nut caps. Do not try to remove plastic caps from
the cover or center cap.
3. Pull the cover or center cap away from the wheel. Store the wheel cover in the
cargo area until you have the flat tire
repaired or replaced.4. Turn the wheel wrench counterclockwiseto loosen all the wheel nuts, but do not
remove them yet.
5. Place the jack near the flat tire.
6. Put the compact spare tire near you.
{Warning
Getting under a vehicle when it is lifted
on a jack is dangerous. If the vehicle slips
off the jack, you could be badly injured
or killed. Never get under a vehicle when
it is supported only by a jack.
{Warning
Raising the vehicle with the jack
improperly positioned can damage the
vehicle and even make the vehicle fall. To
help avoid personal injury and vehicle
damage, be sure to fit the jack lift head
into the proper location before raising
the vehicle.
{Warning
Lifting a vehicle and getting under it to
do maintenance or repairs is dangerous
without the appropriate safety equipment
and training. If a jack is provided with
the vehicle, it is designed only for
changing a flat tire. If it is used for
anything else, you or others could be (Continued)