2023 CHEVROLET MALIBU check engine
[x] Cancel search: check enginePage 6 of 332
Chevrolet Malibu Owner Manual (GMNA-Localizing-U.S./Canada-
16273584) - 2023 - CRC - 9/28/22
Introduction 5
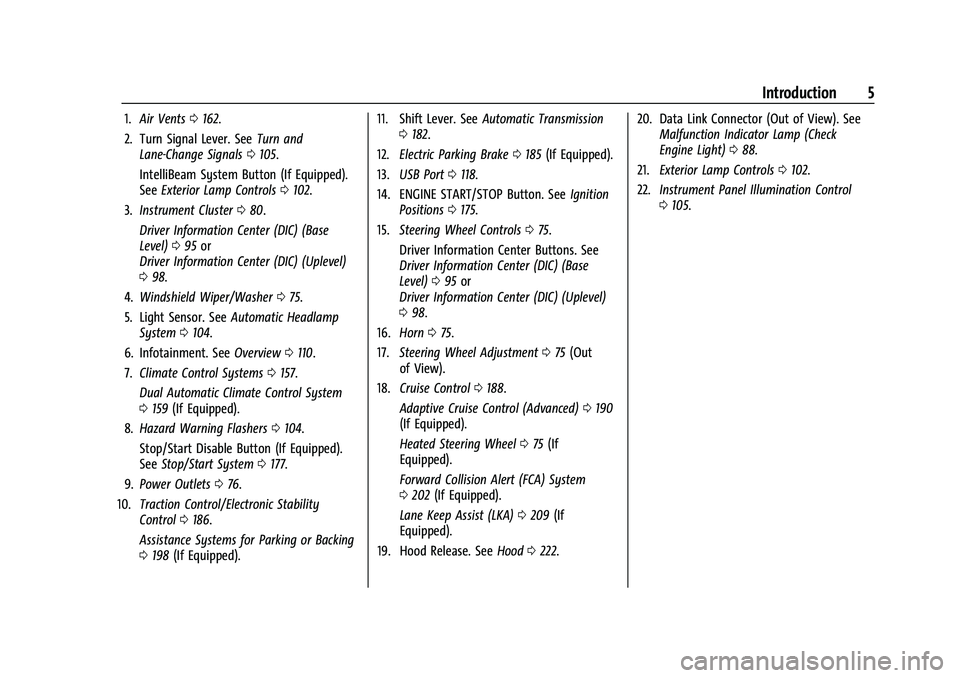
1.Air Vents 0162.
2. Turn Signal Lever. See Turn and
Lane-Change Signals 0105.
IntelliBeam System Button (If Equipped).
See Exterior Lamp Controls 0102.
3. Instrument Cluster 080.
Driver Information Center (DIC) (Base
Level) 095 or
Driver Information Center (DIC) (Uplevel)
0 98.
4. Windshield Wiper/Washer 075.
5. Light Sensor. See Automatic Headlamp
System 0104.
6. Infotainment. See Overview0110.
7. Climate Control Systems 0157.
Dual Automatic Climate Control System
0 159 (If Equipped).
8. Hazard Warning Flashers 0104.
Stop/Start Disable Button (If Equipped).
See Stop/Start System 0177.
9. Power Outlets 076.
10. Traction Control/Electronic Stability
Control 0186.
Assistance Systems for Parking or Backing
0 198 (If Equipped). 11. Shift Lever. See
Automatic Transmission
0 182.
12. Electric Parking Brake 0185 (If Equipped).
13. USB Port 0118.
14. ENGINE START/STOP Button. See Ignition
Positions 0175.
15. Steering Wheel Controls 075.
Driver Information Center Buttons. See
Driver Information Center (DIC) (Base
Level) 095 or
Driver Information Center (DIC) (Uplevel)
0 98.
16. Horn 075.
17. Steering Wheel Adjustment 075 (Out
of View).
18. Cruise Control 0188.
Adaptive Cruise Control (Advanced) 0190
(If Equipped).
Heated Steering Wheel 075 (If
Equipped).
Forward Collision Alert (FCA) System
0 202 (If Equipped).
Lane Keep Assist (LKA) 0209 (If
Equipped).
19. Hood Release. See Hood0222. 20. Data Link Connector (Out of View). See
Malfunction Indicator Lamp (Check
Engine Light) 088.
21. Exterior Lamp Controls 0102.
22. Instrument Panel Illumination Control
0105.
Page 11 of 332
Chevrolet Malibu Owner Manual (GMNA-Localizing-U.S./Canada-
16273584) - 2023 - CRC - 9/28/22
10 Keys, Doors, and Windows
heard. Passive locking will then remain
disabled until
Qon the interior door is
pressed, or until the vehicle is turned on.
Remote Left In Vehicle Alert
When the vehicle is turned off and an
remote key is left in the vehicle, the horn
will chirp three times after all doors are
closed. To view available settings from the
infotainment screen, touch Settings >
Vehicle > Remote Lock, Unlock, Start.
Remote No Longer In Vehicle Alert
If the vehicle is on with a door open, and
then all doors are closed, the vehicle will
check for an remote key inside. If an remote
key is not detected, the Driver Information
Center (DIC) will display NO REMOTE
DETECTED and the horn will chirp three
times.
This occurs only once each time the vehicle
is driven. To view available settings from the
infotainment screen, touch Settings >
Vehicle > Remote Lock, Unlock, Start.
Keyless Trunk Opening
Press the touch pad on the rear of the trunk
to open it if the remote key is within 1 m
(3 ft) of the trunk.
Key Access
To access a vehicle with a weak remote key
battery, see Door Locks014.
Programming Remote Keys to the
Vehicle
Only remote keys programmed to the
vehicle will work. If a remote key is lost or
stolen, a replacement can be purchased and
programmed through your dealer. The
vehicle can be reprogrammed so that lost or
stolen remote keys no longer work. Any
remaining remote keys will need to be
reprogrammed. Each vehicle can have up to
eight remote keys matched to it.
Programming with Recognized Remote Keys
A new remote key can be programmed to
the vehicle when there are two recognized
remote keys. To program, the vehicle must
be off and all of the remote keys, both
currently recognized and new, must be
with you.
1. Place the two recognized remote keys in the cupholder.
2. Remove the key lock cylinder cap on the driver door handle. See Door Locks014.
Insert the vehicle key of the new remote
key into the key lock cylinder on the outside of the driver door and turn the
key counterclockwise five times within
10 seconds.
The DIC displays READY FOR REMOTE #2,
3, 4, or 5.
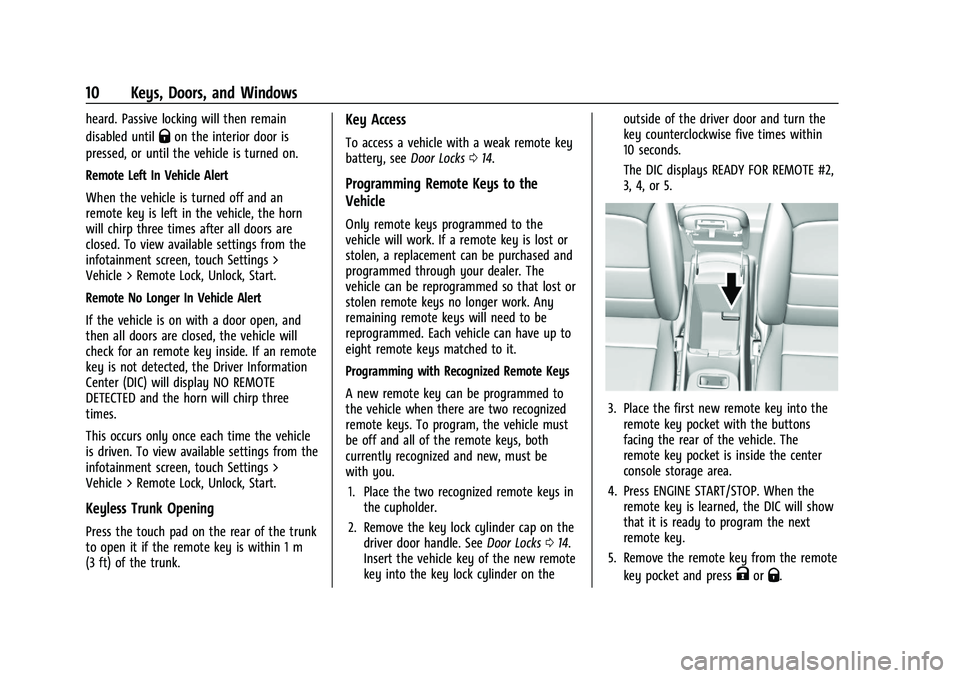
3. Place the first new remote key into the
remote key pocket with the buttons
facing the rear of the vehicle. The
remote key pocket is inside the center
console storage area.
4. Press ENGINE START/STOP. When the remote key is learned, the DIC will show
that it is ready to program the next
remote key.
5. Remove the remote key from the remote key pocket and press
KorQ.
Page 14 of 332
Chevrolet Malibu Owner Manual (GMNA-Localizing-U.S./Canada-
16273584) - 2023 - CRC - 9/28/22
Keys, Doors, and Windows 13
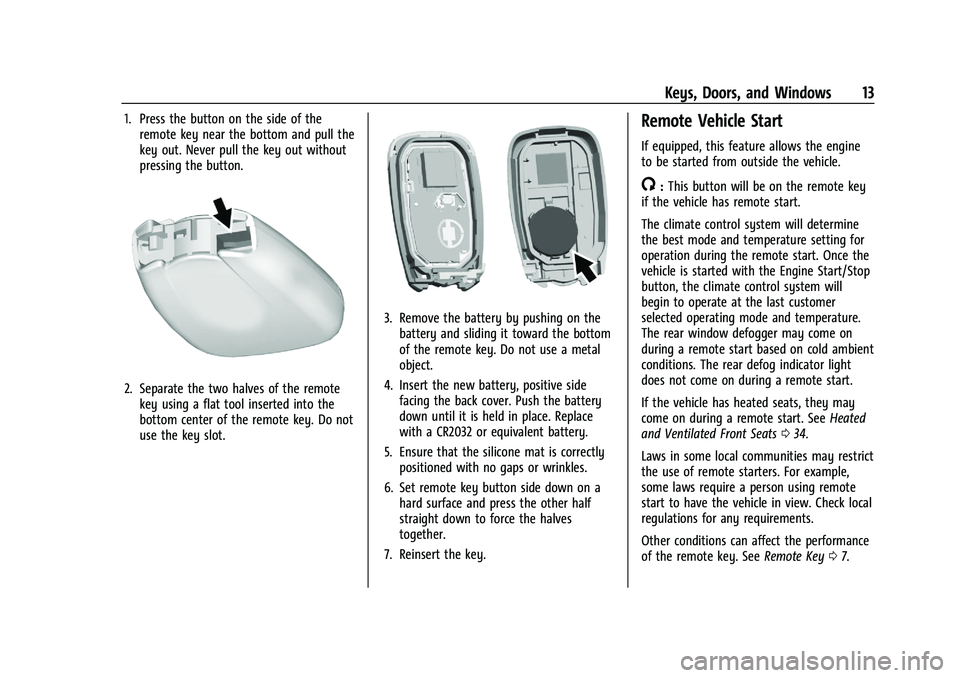
1. Press the button on the side of theremote key near the bottom and pull the
key out. Never pull the key out without
pressing the button.
2. Separate the two halves of the remotekey using a flat tool inserted into the
bottom center of the remote key. Do not
use the key slot.
3. Remove the battery by pushing on thebattery and sliding it toward the bottom
of the remote key. Do not use a metal
object.
4. Insert the new battery, positive side facing the back cover. Push the battery
down until it is held in place. Replace
with a CR2032 or equivalent battery.
5. Ensure that the silicone mat is correctly positioned with no gaps or wrinkles.
6. Set remote key button side down on a hard surface and press the other half
straight down to force the halves
together.
7. Reinsert the key.
Remote Vehicle Start
If equipped, this feature allows the engine
to be started from outside the vehicle.
/: This button will be on the remote key
if the vehicle has remote start.
The climate control system will determine
the best mode and temperature setting for
operation during the remote start. Once the
vehicle is started with the Engine Start/Stop
button, the climate control system will
begin to operate at the last customer
selected operating mode and temperature.
The rear window defogger may come on
during a remote start based on cold ambient
conditions. The rear defog indicator light
does not come on during a remote start.
If the vehicle has heated seats, they may
come on during a remote start. See Heated
and Ventilated Front Seats 034.
Laws in some local communities may restrict
the use of remote starters. For example,
some laws require a person using remote
start to have the vehicle in view. Check local
regulations for any requirements.
Other conditions can affect the performance
of the remote key. See Remote Key07.
Page 36 of 332
Chevrolet Malibu Owner Manual (GMNA-Localizing-U.S./Canada-
16273584) - 2023 - CRC - 9/28/22
Seats and Restraints 35
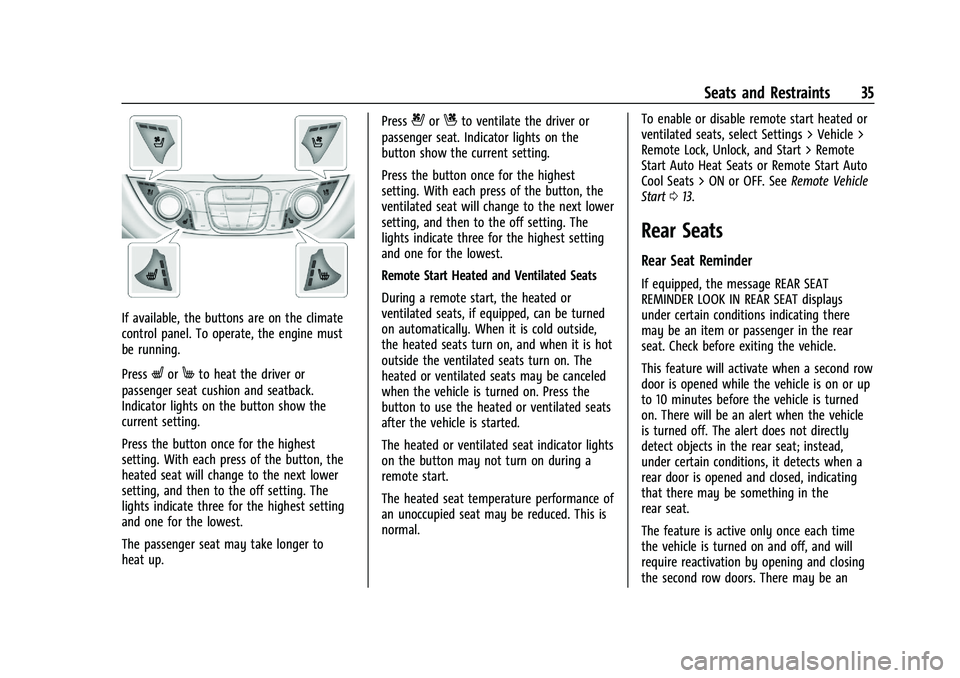
If available, the buttons are on the climate
control panel. To operate, the engine must
be running.
Press
LorMto heat the driver or
passenger seat cushion and seatback.
Indicator lights on the button show the
current setting.
Press the button once for the highest
setting. With each press of the button, the
heated seat will change to the next lower
setting, and then to the off setting. The
lights indicate three for the highest setting
and one for the lowest.
The passenger seat may take longer to
heat up. Press
{orCto ventilate the driver or
passenger seat. Indicator lights on the
button show the current setting.
Press the button once for the highest
setting. With each press of the button, the
ventilated seat will change to the next lower
setting, and then to the off setting. The
lights indicate three for the highest setting
and one for the lowest.
Remote Start Heated and Ventilated Seats
During a remote start, the heated or
ventilated seats, if equipped, can be turned
on automatically. When it is cold outside,
the heated seats turn on, and when it is hot
outside the ventilated seats turn on. The
heated or ventilated seats may be canceled
when the vehicle is turned on. Press the
button to use the heated or ventilated seats
after the vehicle is started.
The heated or ventilated seat indicator lights
on the button may not turn on during a
remote start.
The heated seat temperature performance of
an unoccupied seat may be reduced. This is
normal. To enable or disable remote start heated or
ventilated seats, select Settings > Vehicle >
Remote Lock, Unlock, and Start > Remote
Start Auto Heat Seats or Remote Start Auto
Cool Seats > ON or OFF. See
Remote Vehicle
Start 013.
Rear Seats
Rear Seat Reminder
If equipped, the message REAR SEAT
REMINDER LOOK IN REAR SEAT displays
under certain conditions indicating there
may be an item or passenger in the rear
seat. Check before exiting the vehicle.
This feature will activate when a second row
door is opened while the vehicle is on or up
to 10 minutes before the vehicle is turned
on. There will be an alert when the vehicle
is turned off. The alert does not directly
detect objects in the rear seat; instead,
under certain conditions, it detects when a
rear door is opened and closed, indicating
that there may be something in the
rear seat.
The feature is active only once each time
the vehicle is turned on and off, and will
require reactivation by opening and closing
the second row doors. There may be an
Page 75 of 332
Chevrolet Malibu Owner Manual (GMNA-Localizing-U.S./Canada-
16273584) - 2023 - CRC - 9/28/22
74 Instruments and Controls
Instruments and Controls
Controls
Steering Wheel Adjustment . . . . . . . . . . . . . 75
Steering Wheel Controls . . . . . . . . . . . . . . . . 75
Heated Steering Wheel . . . . . . . . . . . . . . . . . 75
Horn . . . . . . . . . . . . . . . . . . . . . . . . . . . . . . . . . . . . 75
Windshield Wiper/Washer . . . . . . . . . . . . . . 75
Clock . . . . . . . . . . . . . . . . . . . . . . . . . . . . . . . . . . . 76
Power Outlets . . . . . . . . . . . . . . . . . . . . . . . . . . 76
Wireless Charging . . . . . . . . . . . . . . . . . . . . . . 78
Warning Lights, Gauges, and Indicators
Warning Lights, Gauges, andIndicators . . . . . . . . . . . . . . . . . . . . . . . . . . . . 80
Instrument Cluster . . . . . . . . . . . . . . . . . . . . . 80
Speedometer . . . . . . . . . . . . . . . . . . . . . . . . . . . 82
Odometer . . . . . . . . . . . . . . . . . . . . . . . . . . . . . . 83
Trip Odometer . . . . . . . . . . . . . . . . . . . . . . . . . . 83
Tachometer . . . . . . . . . . . . . . . . . . . . . . . . . . . . 83
Fuel Gauge . . . . . . . . . . . . . . . . . . . . . . . . . . . . . 83
Engine Coolant Temperature Gauge . . . . 84
Voltmeter Gauge (Uplevel Cluster Only) . . . . . . . . . . . . . . . . . . . . . . . . . 85
Seat Belt Reminders . . . . . . . . . . . . . . . . . . . . 85
Airbag Readiness Light . . . . . . . . . . . . . . . . . 86
Passenger Airbag Status Indicator . . . . . . 87
Charging System Light . . . . . . . . . . . . . . . . . 87 Malfunction Indicator Lamp (Check
Engine Light) . . . . . . . . . . . . . . . . . . . . . . . . . 88
Brake System Warning Light . . . . . . . . . . . 89
Electric Parking Brake Light . . . . . . . . . . . . 90
Service Electric Parking Brake Light . . . . . 90
Antilock Brake System (ABS) Warning Light . . . . . . . . . . . . . . . . . . . . . . . . . . . . . . . . . 90
Lane Keep Assist (LKA) Light . . . . . . . . . . . . 91
Vehicle Ahead Indicator . . . . . . . . . . . . . . . . . 91
Pedestrian Ahead Indicator . . . . . . . . . . . . . 91
Traction Off Light . . . . . . . . . . . . . . . . . . . . . . . 91
StabiliTrak OFF Light . . . . . . . . . . . . . . . . . . . 92
Traction Control System (TCS)/StabiliTrak Light . . . . . . . . . . . . . . . . . . . . . . . . . . . . . . . . . . 92
Engine Coolant Temperature Warning Light (Uplevel Cluster Only) . . . . . . . . . . 92
Tire Pressure Light . . . . . . . . . . . . . . . . . . . . . . 93
Engine Oil Pressure Light . . . . . . . . . . . . . . . 93
Low Fuel Warning Light . . . . . . . . . . . . . . . . 94
Security Light . . . . . . . . . . . . . . . . . . . . . . . . . . 94
High-Beam On Light . . . . . . . . . . . . . . . . . . . . 94
Lamps On Reminder . . . . . . . . . . . . . . . . . . . . 95
Cruise Control Light . . . . . . . . . . . . . . . . . . . . 95
Door Ajar Light (Uplevel) . . . . . . . . . . . . . . . 95
Information Displays
Driver Information Center (DIC) (Base Level) . . . . . . . . . . . . . . . . . . . . . . . . . . . . . . . . . 95
Driver Information Center (DIC) (Uplevel) . . . . . . . . . . . . . . . . . . . . . . . . . . . . . 98
Vehicle Messages
Vehicle Messages . . . . . . . . . . . . . . . . . . . . . 100
Engine Power Messages . . . . . . . . . . . . . . . 101
Vehicle Speed Messages . . . . . . . . . . . . . . . 101
Page 81 of 332
Chevrolet Malibu Owner Manual (GMNA-Localizing-U.S./Canada-
16273584) - 2023 - CRC - 9/28/22
80 Instruments and Controls
Warning Lights, Gauges, and
Indicators
Warning lights and gauges can signal that
something is wrong before it becomes
serious enough to cause an expensive repair
or replacement. Paying attention to the
warning lights and gauges could prevent
injury.
Some warning lights come on briefly when
the engine is started to indicate they are
working. When one of the warning lights
comes on and stays on while driving,
or when one of the gauges shows there
may be a problem, check the section that
explains what to do. Waiting to do repairs
can be costly and even dangerous.
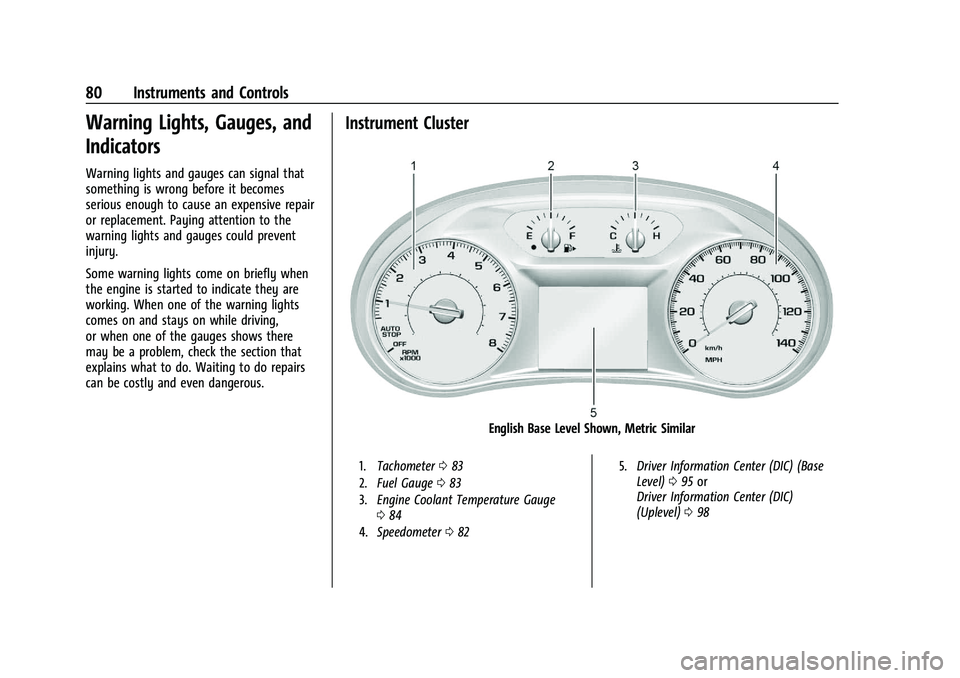
Instrument Cluster
English Base Level Shown, Metric Similar
1.Tachometer 083
2. Fuel Gauge 083
3. Engine Coolant Temperature Gauge
084
4. Speedometer 082 5.
Driver Information Center (DIC) (Base
Level) 095 or
Driver Information Center (DIC)
(Uplevel) 098
Page 88 of 332
Chevrolet Malibu Owner Manual (GMNA-Localizing-U.S./Canada-
16273584) - 2023 - CRC - 9/28/22
Instruments and Controls 87
Passenger Airbag Status Indicator
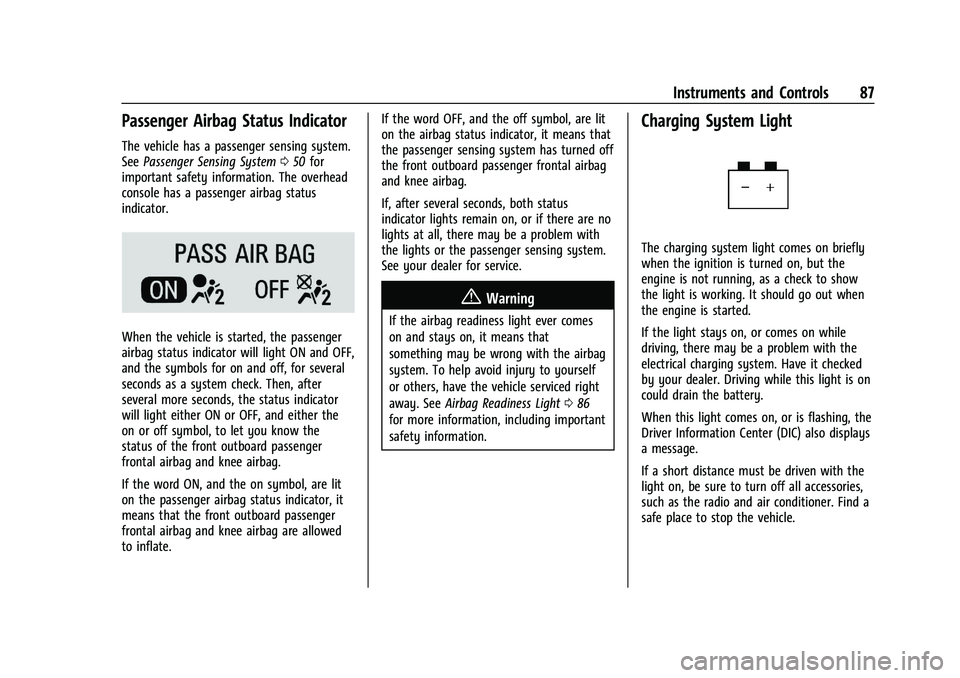
The vehicle has a passenger sensing system.
SeePassenger Sensing System 050 for
important safety information. The overhead
console has a passenger airbag status
indicator.
When the vehicle is started, the passenger
airbag status indicator will light ON and OFF,
and the symbols for on and off, for several
seconds as a system check. Then, after
several more seconds, the status indicator
will light either ON or OFF, and either the
on or off symbol, to let you know the
status of the front outboard passenger
frontal airbag and knee airbag.
If the word ON, and the on symbol, are lit
on the passenger airbag status indicator, it
means that the front outboard passenger
frontal airbag and knee airbag are allowed
to inflate. If the word OFF, and the off symbol, are lit
on the airbag status indicator, it means that
the passenger sensing system has turned off
the front outboard passenger frontal airbag
and knee airbag.
If, after several seconds, both status
indicator lights remain on, or if there are no
lights at all, there may be a problem with
the lights or the passenger sensing system.
See your dealer for service.
{Warning
If the airbag readiness light ever comes
on and stays on, it means that
something may be wrong with the airbag
system. To help avoid injury to yourself
or others, have the vehicle serviced right
away. See
Airbag Readiness Light 086
for more information, including important
safety information.
Charging System Light
The charging system light comes on briefly
when the ignition is turned on, but the
engine is not running, as a check to show
the light is working. It should go out when
the engine is started.
If the light stays on, or comes on while
driving, there may be a problem with the
electrical charging system. Have it checked
by your dealer. Driving while this light is on
could drain the battery.
When this light comes on, or is flashing, the
Driver Information Center (DIC) also displays
a message.
If a short distance must be driven with the
light on, be sure to turn off all accessories,
such as the radio and air conditioner. Find a
safe place to stop the vehicle.
Page 89 of 332
Chevrolet Malibu Owner Manual (GMNA-Localizing-U.S./Canada-
16273584) - 2023 - CRC - 9/28/22
88 Instruments and Controls
Malfunction Indicator Lamp
(Check Engine Light)
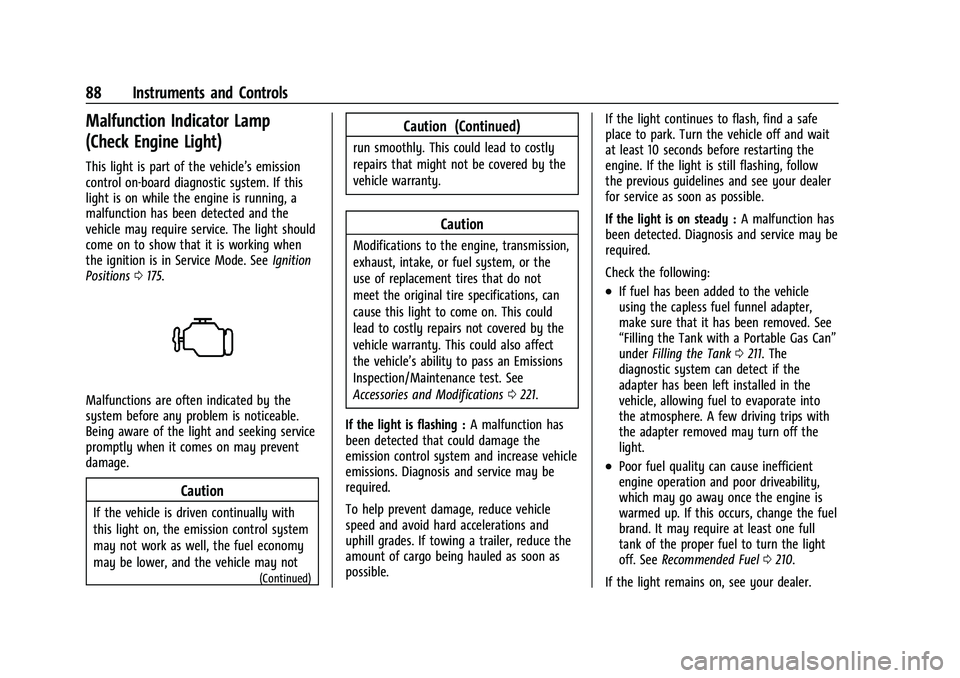
This light is part of the vehicle’s emission
control on-board diagnostic system. If this
light is on while the engine is running, a
malfunction has been detected and the
vehicle may require service. The light should
come on to show that it is working when
the ignition is in Service Mode. SeeIgnition
Positions 0175.
Malfunctions are often indicated by the
system before any problem is noticeable.
Being aware of the light and seeking service
promptly when it comes on may prevent
damage.
Caution
If the vehicle is driven continually with
this light on, the emission control system
may not work as well, the fuel economy
may be lower, and the vehicle may not
(Continued)
Caution (Continued)
run smoothly. This could lead to costly
repairs that might not be covered by the
vehicle warranty.
Caution
Modifications to the engine, transmission,
exhaust, intake, or fuel system, or the
use of replacement tires that do not
meet the original tire specifications, can
cause this light to come on. This could
lead to costly repairs not covered by the
vehicle warranty. This could also affect
the vehicle’s ability to pass an Emissions
Inspection/Maintenance test. See
Accessories and Modifications 0221.
If the light is flashing : A malfunction has
been detected that could damage the
emission control system and increase vehicle
emissions. Diagnosis and service may be
required.
To help prevent damage, reduce vehicle
speed and avoid hard accelerations and
uphill grades. If towing a trailer, reduce the
amount of cargo being hauled as soon as
possible. If the light continues to flash, find a safe
place to park. Turn the vehicle off and wait
at least 10 seconds before restarting the
engine. If the light is still flashing, follow
the previous guidelines and see your dealer
for service as soon as possible.
If the light is on steady :
A malfunction has
been detected. Diagnosis and service may be
required.
Check the following:
.If fuel has been added to the vehicle
using the capless fuel funnel adapter,
make sure that it has been removed. See
“Filling the Tank with a Portable Gas Can”
under Filling the Tank 0211. The
diagnostic system can detect if the
adapter has been left installed in the
vehicle, allowing fuel to evaporate into
the atmosphere. A few driving trips with
the adapter removed may turn off the
light.
.Poor fuel quality can cause inefficient
engine operation and poor driveability,
which may go away once the engine is
warmed up. If this occurs, change the fuel
brand. It may require at least one full
tank of the proper fuel to turn the light
off. See Recommended Fuel 0210.
If the light remains on, see your dealer.